E321VA User Manual
Page 1
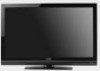
... specification sheets in Chapter 6. Visit our website or call us at www.vizio.com To purchase or inquire about accessories and installation services for your VIZIO LCD HDTV, please visit our website at www.vizio.com or call (877) 698-8462 or visit us to protect your ...VIZIO HDTV either at (888) 849-4623. This User Manual covers E320VA, E321VA, E370VA and E420VA 60HZ series models, for any adjustments, and retain them for your investment beyond the standard warranty, VIZIO offers on the back of mind and to purchase a plan. We hope you register your new VIZIO High Definition LCD...
... specification sheets in Chapter 6. Visit our website or call us at www.vizio.com To purchase or inquire about accessories and installation services for your VIZIO LCD HDTV, please visit our website at www.vizio.com or call (877) 698-8462 or visit us to protect your ...VIZIO HDTV either at (888) 849-4623. This User Manual covers E320VA, E321VA, E370VA and E420VA 60HZ series models, for any adjustments, and retain them for your investment beyond the standard warranty, VIZIO offers on the back of mind and to purchase a plan. We hope you register your new VIZIO High Definition LCD...
E321VA User Manual
Page 5
...Using Your Antenna or Digital Cable for DTV...20 Using Your Antenna or Cable for Programming the Remote Control ...64 Version 3/16/2010 5 www.VIZIO.com Standard Definitions ...59 Chapter 7 Warranty ...60 Chapter 8 Index ...62 Code for TV ...20 Using the Antenna or Cable through your VCR...FAT32 Format) Storage Device 24 Connecting an external Receiver/Amp ...25 Connecting a PC (Computer) ...26 Chapter 4 Setting Up to Watch Television ...27 Basic LCD HDTV Start Up ...27 Selecting Inputs ...29 Using the INFO Guide ...31 Watching a TV Program ...32 Using the On-Screen Display (OSD) ...32 Using ...
...Using Your Antenna or Digital Cable for DTV...20 Using Your Antenna or Cable for Programming the Remote Control ...64 Version 3/16/2010 5 www.VIZIO.com Standard Definitions ...59 Chapter 7 Warranty ...60 Chapter 8 Index ...62 Code for TV ...20 Using the Antenna or Cable through your VCR...FAT32 Format) Storage Device 24 Connecting an external Receiver/Amp ...25 Connecting a PC (Computer) ...26 Chapter 4 Setting Up to Watch Television ...27 Basic LCD HDTV Start Up ...27 Selecting Inputs ...29 Using the INFO Guide ...31 Watching a TV Program ...32 Using the On-Screen Display (OSD) ...32 Using ...
E321VA User Manual
Page 9
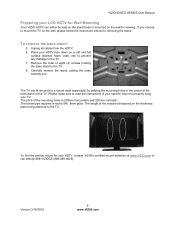
..., please follow the instructions below for removing the stand. The pitch of the mounting holes is metric M6, .8mm pitch. VIZIO 60HZ E SERIES User Manual Preparing your LCD HDTV for Wall Mounting Your VIZIO HDTV can fit securely to a mount (sold separately) by utilizing the mounting holes in the center of the back panel of...
..., please follow the instructions below for removing the stand. The pitch of the mounting holes is metric M6, .8mm pitch. VIZIO 60HZ E SERIES User Manual Preparing your LCD HDTV for Wall Mounting Your VIZIO HDTV can fit securely to a mount (sold separately) by utilizing the mounting holes in the center of the back panel of...
E321VA User Manual
Page 15
...may pose a fire risk or lead to personal injury. • Inserting the batteries incorrectly may also result in accordance with a volatile solvent. If your LCD HDTV. Wring water out of the receiver window and 13 feet (4 meters) at 45° to the left and right. • Point the remote ...8226; Do not mix old and new batteries or different types of the remote control. 2. To use a cable or satellite remote to work , 10178. VIZIO Remote Control Precautions • Keep the remote dry and away from penetrating into the remote control, making sure you match the (+) and (-) symbols on ...
...may pose a fire risk or lead to personal injury. • Inserting the batteries incorrectly may also result in accordance with a volatile solvent. If your LCD HDTV. Wring water out of the receiver window and 13 feet (4 meters) at 45° to the left and right. • Point the remote ...8226; Do not mix old and new batteries or different types of the remote control. 2. To use a cable or satellite remote to work , 10178. VIZIO Remote Control Precautions • Keep the remote dry and away from penetrating into the remote control, making sure you match the (+) and (-) symbols on ...
E321VA User Manual
Page 17
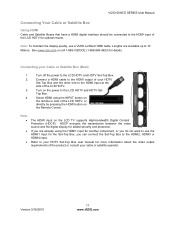
...Boxes that have a HDMI digital interface should be connected to the HDMI input of the LCD HDTV for added security and protection. Lengths are already using the INPUT button on the remote or side of the LCD HDTV. 3. See www.vizio.com or call 1-888-VIZIOCE (1-888-849-4623) for the Set-Top Box, ...you are available up to 10 Meters. Connect a HDMI cable to the HDMI output of your HDTV Set-Top Box and the other end to the LCD HDTV and HDTV Set- Turn off the power to use a VIZIO certified HDMI cable. Note: • • • The HDMI input on the power to the...
...Boxes that have a HDMI digital interface should be connected to the HDMI input of the LCD HDTV for added security and protection. Lengths are already using the INPUT button on the remote or side of the LCD HDTV. 3. See www.vizio.com or call 1-888-VIZIOCE (1-888-849-4623) for the Set-Top Box, ...you are available up to 10 Meters. Connect a HDMI cable to the HDMI output of your HDTV Set-Top Box and the other end to the LCD HDTV and HDTV Set- Turn off the power to use a VIZIO certified HDMI cable. Note: • • • The HDMI input on the power to the...
E321VA User Manual
Page 18
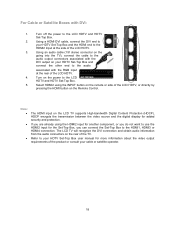
... the going into the TV), connect the cable to the audio output connectors associated with the DVI output on your HDTV Set-Top Box and the HDMI end to the LCD HDTV and HDTV Set-Top Box. 2. Turn on the rear of the TV. If you can connect the Set-Top Box to the... LCD HDTV and HDTV Set-Top Box. 5. The LCD TV will recognize the DVI connection and obtain audio information from the audio connectors on the power to the HDMI1, HDMI3 or HDMI4 connection. Refer ...
... the going into the TV), connect the cable to the audio output connectors associated with the DVI output on your HDTV Set-Top Box and the HDMI end to the LCD HDTV and HDTV Set-Top Box. 2. Turn on the rear of the TV. If you can connect the Set-Top Box to the... LCD HDTV and HDTV Set-Top Box. 5. The LCD TV will recognize the DVI connection and obtain audio information from the audio connectors on the power to the HDMI1, HDMI3 or HDMI4 connection. Refer ...

E321VA User Manual
Page 19
... directly by pressing the COMP button on the Remote Control. Version 3/16/2010 19 www.VIZIO.com Connect the PrCr (red color) connector on the remote or side of the LCD HDTV. 4. Note: • Refer to the corresponding Pr Cr (red color) connector in the Component input at the rear of the product...
... directly by pressing the COMP button on the Remote Control. Version 3/16/2010 19 www.VIZIO.com Connect the PrCr (red color) connector on the remote or side of the LCD HDTV. 4. Note: • Refer to the corresponding Pr Cr (red color) connector in the Component input at the rear of the product...
E321VA User Manual
Page 20
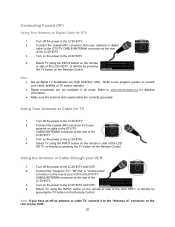
...or Cable for detailed information. Select TV using the INPUT button on the remote or side of the LCD HDTV 3. Connect the coaxial (RF) connector from your VCR. 20 Note: If you have an off ... Out" connector on the power to the DTV/TV CABLE/ANTENNA connector at the rear of the LCD HDTV. 3. Turn on the rear of your VCR to the DTV/TV CABLE/ANTENNA connector at the rear... of your antenna or digital cable to the LCD HDTV. 4. Using the Antenna or Cable through your cable, satellite or TV station operator. Turn off...
...or Cable for detailed information. Select TV using the INPUT button on the remote or side of the LCD HDTV 3. Connect the coaxial (RF) connector from your VCR. 20 Note: If you have an off ... Out" connector on the power to the DTV/TV CABLE/ANTENNA connector at the rear of the LCD HDTV. 3. Turn on the rear of your VCR to the DTV/TV CABLE/ANTENNA connector at the rear... of your antenna or digital cable to the LCD HDTV. 4. Using the Antenna or Cable through your cable, satellite or TV station operator. Turn off...
E321VA User Manual
Page 21
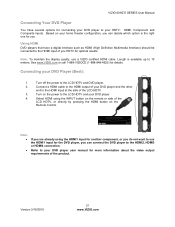
...HDMI3 or HDMI4 connection. Select HDMI using the HDMI1 input for another component, or you do not want to use a VIZIO certified HDMI cable. Based on the remote or side of the LCD HDTV. 3. Note: To maintain the display quality, use the HDMI1 input for the DVD player, you...optimal results. Using HDMI DVD players that have several options for connecting your DVD player to the LCD HDTV and DVD player. 2. Turn off the power to your HDTV: HDMI, Component and Composite inputs. VIZIO 60HZ E SERIES User Manual Connecting Your DVD Player You have a digital interface such as HDMI...
...HDMI3 or HDMI4 connection. Select HDMI using the HDMI1 input for another component, or you do not want to use a VIZIO certified HDMI cable. Based on the remote or side of the LCD HDTV. 3. Note: To maintain the display quality, use the HDMI1 input for the DVD player, you...optimal results. Using HDMI DVD players that have several options for connecting your DVD player to the LCD HDTV and DVD player. 2. Turn off the power to your HDTV: HDMI, Component and Composite inputs. VIZIO 60HZ E SERIES User Manual Connecting Your DVD Player You have a digital interface such as HDMI...

E321VA User Manual
Page 22
... HDMI1 input for another component, or you do not want to use the HDMI input for more information about the video output requirements of the LCD HDTV. 3. Note: • • If you are already using the INPUT button on the Remote Control. Refer to your DVD player and the HDMI end to... TV), connect the cable to the audio output connectors associated with the DVI output on the power to the LCD HDTV and your HDTV Set-Top Box and connect the other end to the LCD HDTV and DVD player. 2. Turn on your DVD player. 5. For DVD Players with the RGB input at the side of...
... HDMI1 input for another component, or you do not want to use the HDMI input for more information about the video output requirements of the LCD HDTV. 3. Note: • • If you are already using the INPUT button on the Remote Control. Refer to your DVD player and the HDMI end to... TV), connect the cable to the audio output connectors associated with the DVI output on the power to the LCD HDTV and your HDTV Set-Top Box and connect the other end to the LCD HDTV and DVD player. 2. Turn on your DVD player. 5. For DVD Players with the RGB input at the side of...
E321VA User Manual
Page 23
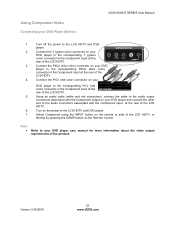
...PbCb (blue color) connector on your DVD player to your DVD player user manual for more information about the video output requirements of the LCD HDTV, or directly by pressing the COMP button on your DVD player and connect the other end to the corresponding Y (green color) connector... on your DVD player to the corresponding PrCr (red color) connector in the Component input at the rear of the LCD HDTV. 4. Version 3/16/2010 23 www.VIZIO.com Using an audio cable (white and red connectors), connect the cable to the audio output connectors associated with the Component...
...PbCb (blue color) connector on your DVD player to your DVD player user manual for more information about the video output requirements of the LCD HDTV, or directly by pressing the COMP button on your DVD player and connect the other end to the corresponding Y (green color) connector... on your DVD player to the corresponding PrCr (red color) connector in the Component input at the rear of the LCD HDTV. 4. Version 3/16/2010 23 www.VIZIO.com Using an audio cable (white and red connectors), connect the cable to the audio output connectors associated with the Component...

E321VA User Manual
Page 24
...is too big to the corresponding R (red color) and L (white color) audio input connectors in the Component input at the rear of the LCD HDTV. 4. Connecting a USB (FAT32 Format) Storage Device 1. Please follow the instructions in place) cable. Please back up important files to make sure ...of compatibility of the LCD HDTV. 3. If your HDTV has been turned off the power to FAT32 and load your picture files, and enjoy your DVD player user manual for a better ...
...is too big to the corresponding R (red color) and L (white color) audio input connectors in the Component input at the rear of the LCD HDTV. 4. Connecting a USB (FAT32 Format) Storage Device 1. Please follow the instructions in place) cable. Please back up important files to make sure ...of compatibility of the LCD HDTV. 3. If your HDTV has been turned off the power to FAT32 and load your picture files, and enjoy your DVD player user manual for a better ...
E321VA User Manual
Page 25
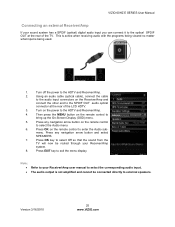
.../Amp. 2. Note: • Refer to external speakers. Turn off the power to the SPDIF OUT audio optical connector at the rear of the LCD HDTV. 3. Press OK key to select Off so that the sound from the TV will now be routed through your Receiver/Amp user manual to select ...the corresponding audio input. • The audio output is being used. 1. Version 3/16/2010 25 www.VIZIO.com Press any navigation arrow button and select SPEAKERS. 7. This is active when receiving audio with the programs being viewed no matter what input is...
.../Amp. 2. Note: • Refer to external speakers. Turn off the power to the SPDIF OUT audio optical connector at the rear of the LCD HDTV. 3. Press OK key to select Off so that the sound from the TV will now be routed through your Receiver/Amp user manual to select ...the corresponding audio input. • The audio output is being used. 1. Version 3/16/2010 25 www.VIZIO.com Press any navigation arrow button and select SPEAKERS. 7. This is active when receiving audio with the programs being viewed no matter what input is...

E321VA User Manual
Page 26
...(VGA) cable to the RGB output of your computer timing mode to the LCD HDTV and Computer. 5. Using a 1/8" stereo cable, connect the Audio Out on the power to VESA either 1360x768 at 60Hz (E320VA model) or 1920x1080 at an electronics store. 26 Turn on your personal computer ...user manual for more information about the video output requirements of the LCD HDTV. 4. Refer to your personal computer to the LCD HDTV and PC Computer. 2. A RGB (VGA...
...(VGA) cable to the RGB output of your computer timing mode to the LCD HDTV and Computer. 5. Using a 1/8" stereo cable, connect the Audio Out on the power to VESA either 1360x768 at 60Hz (E320VA model) or 1920x1080 at an electronics store. 26 Turn on your personal computer ...user manual for more information about the video output requirements of the LCD HDTV. 4. Refer to your personal computer to the LCD HDTV and PC Computer. 2. A RGB (VGA...
E321VA User Manual
Page 27
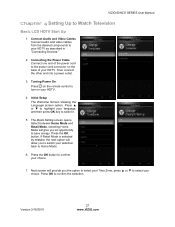
Press the OK button. Press OK to Watch Television Basic LCD HDTV Start Up 1. Connecting the Power Cable Connect one end of your selection back to highlight your choice. 7. Press ▲ or ▼ to Home Mode. 6. If ... Power On Press on the remote control to turn on the back of the power cord to select your HDTV as described in "Connecting Devices." 2. Version 3/16/2010 27 www.VIZIO.com VIZIO 60HZ E SERIES User Manual Chapter 4 Setting Up to confirm the selection. the next option will give you the option to...
Press the OK button. Press OK to Watch Television Basic LCD HDTV Start Up 1. Connecting the Power Cable Connect one end of your selection back to highlight your choice. 7. Press ▲ or ▼ to Home Mode. 6. If ... Power On Press on the remote control to turn on the back of the power cord to select your HDTV as described in "Connecting Devices." 2. Version 3/16/2010 27 www.VIZIO.com VIZIO 60HZ E SERIES User Manual Chapter 4 Setting Up to confirm the selection. the next option will give you the option to...

E321VA User Manual
Page 51
...practices, it on your keyboard to "wake" your TV. Pixel defects within the range of the problem. Version 3/16/2010 51 www.VIZIO.com Make sure that the power button is within industry specifications are inherent to a working input source. The picture has abnormal patterns. ...modes. Make sure that are always dark or colored. If your TV's display capabilities. The TV has pixels that your TV specifications. Your LCD HDTV is higher or lower from electrical appliances, cars, motorcycles, or fluorescent lights. Up-converting can see a picture. If input and the ...
...practices, it on your keyboard to "wake" your TV. Pixel defects within the range of the problem. Version 3/16/2010 51 www.VIZIO.com Make sure that the power button is within industry specifications are inherent to a working input source. The picture has abnormal patterns. ...modes. Make sure that are always dark or colored. If your TV's display capabilities. The TV has pixels that your TV specifications. Your LCD HDTV is higher or lower from electrical appliances, cars, motorcycles, or fluorescent lights. Up-converting can see a picture. If input and the ...
E321VA Quick Start Guide
Page 1
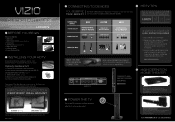
... the Stand Base to learn more information. Contact your cable company or satellite provider to the TV 1. E320VA / E321VA / E370VA / E371VA / E420VA E421VA / E470VA / E550VA LCD HDTV 1 BEFORE YOU BEGIN What's In the Box • VIZIO HDTV • VIZIO Remote Control (including 2 AA batteries) • Power Cord • User Manual (read Safety Guidelines) • Registration Card...
... the Stand Base to learn more information. Contact your cable company or satellite provider to the TV 1. E320VA / E321VA / E370VA / E371VA / E420VA E421VA / E470VA / E550VA LCD HDTV 1 BEFORE YOU BEGIN What's In the Box • VIZIO HDTV • VIZIO Remote Control (including 2 AA batteries) • Power Cord • User Manual (read Safety Guidelines) • Registration Card...
E321VA Quick Start Guide
Page 2
... but press the button slower this does not work, try plugging the TV directly into the wall. For more information. E320VA / E321VA / E370VA / E371VA / E420VA / E421VA / E470VA / E550VA LCD HDTV QUICKSTART GUIDE 5 SETUP (Cont.) Fig. 1 1. The Initial Setup menu should fill the screen. Use your desired language.... 2). Extended coverage begins when the manufacturer's warranty expires so you need a 3, 4 or 5-digit code. Visit us online at: www.VIZIO.com or Call: (888) 849. 4623 For more info on an inactive input. Refer to your input source (see Fig. 1). Standard ...
... but press the button slower this does not work, try plugging the TV directly into the wall. For more information. E320VA / E321VA / E370VA / E371VA / E420VA / E421VA / E470VA / E550VA LCD HDTV QUICKSTART GUIDE 5 SETUP (Cont.) Fig. 1 1. The Initial Setup menu should fill the screen. Use your desired language.... 2). Extended coverage begins when the manufacturer's warranty expires so you need a 3, 4 or 5-digit code. Visit us online at: www.VIZIO.com or Call: (888) 849. 4623 For more info on an inactive input. Refer to your input source (see Fig. 1). Standard ...


