
Download
Page 3
...heat sources such as radiators, heat registers, stoves, or other components to protect your investment beyond the standard warranty, VIZIO offers on your TV. These plans provide additional coverage during the standard warranty period. WHEN READING THIS MANUAL When you to the presence of ... future reference. Welcome THANK YOU FOR CHOOSING VIZIO And congratulations on -site extended warranty service plans. When you either: • Register your TV from being walked on or pinched, particularly at www.VIZIO.com • Complete and mail the enclosed registration card...
...heat sources such as radiators, heat registers, stoves, or other components to protect your investment beyond the standard warranty, VIZIO offers on your TV. These plans provide additional coverage during the standard warranty period. WHEN READING THIS MANUAL When you to the presence of ... future reference. Welcome THANK YOU FOR CHOOSING VIZIO And congratulations on -site extended warranty service plans. When you either: • Register your TV from being walked on or pinched, particularly at www.VIZIO.com • Complete and mail the enclosed registration card...

Download
Page 4
... from overheating, be of sufficient magnitude to constitute a risk of electric shock to qualified service personnel. • WARNING: Keep your TV and easily accessible. • Only power of the marked voltage can result in a bookcase or cabinet unless proper ventilation is used,... with the cart, stand, tripod, bracket, or table specified by the manufacturer, or sold with arrowhead symbol within the inside of your TV. To totally disconnect power, unplug the power cord. • The lightning flash with the apparatus. Overloading can be used for ventilation. When...
... from overheating, be of sufficient magnitude to constitute a risk of electric shock to qualified service personnel. • WARNING: Keep your TV and easily accessible. • Only power of the marked voltage can result in a bookcase or cabinet unless proper ventilation is used,... with the cart, stand, tripod, bracket, or table specified by the manufacturer, or sold with arrowhead symbol within the inside of your TV. To totally disconnect power, unplug the power cord. • The lightning flash with the apparatus. Overloading can be used for ventilation. When...

Download
Page 5
...by qualified service personnel only. Liquid sprays or any smoke or odor becomes apparent, unplug the power cord and contact your TV. If your TV in an area with arrowhead symbol within an equilateral triangle is damaged, the internal components may be placed on the power ...- These servicing instructions are unplugged before moving your dealer immediately. Continuous use in fire or electric shock. • Do not use your TV if any other moisture. - Unplug the power cord immediately and contact your dealer for use of uninsulated DANGEROUS VOLTAGE within the product's enclosure ...
...by qualified service personnel only. Liquid sprays or any smoke or odor becomes apparent, unplug the power cord and contact your TV. If your TV in an area with arrowhead symbol within an equilateral triangle is damaged, the internal components may be placed on the power ...- These servicing instructions are unplugged before moving your dealer immediately. Continuous use in fire or electric shock. • Do not use your TV if any other moisture. - Unplug the power cord immediately and contact your dealer for use of uninsulated DANGEROUS VOLTAGE within the product's enclosure ...

Download
Page 6
... Lines Do not locate the antenna near overhead light or power circuits, or where it is left unattended or unused for long periods of the TV during a lightning storm or when it could fall into such power lines or circuits. Remember, the screen of the grounding electrode. TELEVISION ANTENNA ...the grounding conductors, location of antenna discharge unit, connection to grounding electrodes, and requirements of the coaxial cable is intended to be connected to the TV, make sure that the antenna or cable system is electrically grounded to earth in the building installation.
... Lines Do not locate the antenna near overhead light or power circuits, or where it is left unattended or unused for long periods of the TV during a lightning storm or when it could fall into such power lines or circuits. Remember, the screen of the grounding electrode. TELEVISION ANTENNA ...the grounding conductors, location of antenna discharge unit, connection to grounding electrodes, and requirements of the coaxial cable is intended to be connected to the TV, make sure that the antenna or cable system is electrically grounded to earth in the building installation.

Download
Page 7
... Changing the Audio Language 29 Setting Up Closed Captioning 30 Changing the Appearance of Contents Installing the TV 3 Inspecting the Package Contents 3 Installing the TV 3 Installing the TV Stand 3 Installing the TV on a Wall 5 Controls and Connections 6 Rear Panel 6 Side Panel 7 Front Panel 8 ...Audio Cable Types.......... 15 Connecting an Audio Device - Table of Digital Closed Captions.. 30 Setting Up Devices 32 Changing the TV Settings 33 Displaying System Information 33 Using the Parental Controls 34 Accessing the Parental Controls Menu 34 Enabling or Disabling Program ...
... Changing the Audio Language 29 Setting Up Closed Captioning 30 Changing the Appearance of Contents Installing the TV 3 Inspecting the Package Contents 3 Installing the TV 3 Installing the TV Stand 3 Installing the TV on a Wall 5 Controls and Connections 6 Rear Panel 6 Side Panel 7 Front Panel 8 ...Audio Cable Types.......... 15 Connecting an Audio Device - Table of Digital Closed Captions.. 30 Setting Up Devices 32 Changing the TV Settings 33 Displaying System Information 33 Using the Parental Controls 34 Accessing the Parental Controls Menu 34 Enabling or Disabling Program ...

Download
Page 8
Using the Reset & Admin Menu 38 Restoring the TV to Factory Default Settings 38 Using the Guided Setup Menu 39 Using Guided Setup 39 Using the Info Window 40 Using the USB Media Player 41 Using the USB Media Player 41 Connecting a USB Thumb Drive to the TV 41 Playing USB Media 41 Troubleshooting & Technical Support 43 Specifications 46 Limited Warranty 48 Legal & Compliance 49 2
Using the Reset & Admin Menu 38 Restoring the TV to Factory Default Settings 38 Using the Guided Setup Menu 39 Using Guided Setup 39 Using the Info Window 40 Using the USB Media Player 41 Using the USB Media Player 41 Connecting a USB Thumb Drive to the TV 41 Playing USB Media 41 Troubleshooting & Technical Support 43 Specifications 46 Limited Warranty 48 Legal & Compliance 49 2

Download
Page 9
VIZIO LED HDTV with Batteries Quick Start Guide Power Cord 4 x T4 12mm Phillips Screw PACKAGE CONTENTS 3 TV ON STAND Remote Control with Stand INSTALLING THE TV After removing the TV from falling over if: • It is placed on an uneven, unstable, or non-level surface • It is pushed,... pulled, or otherwise improperly moved • If an earthquake occurs and the TV is missing or damaged. Your TV can still fall over . However, the TV can be installed in two ways: • On a flat surface, using the included stand • On a ...
VIZIO LED HDTV with Batteries Quick Start Guide Power Cord 4 x T4 12mm Phillips Screw PACKAGE CONTENTS 3 TV ON STAND Remote Control with Stand INSTALLING THE TV After removing the TV from falling over if: • It is placed on an uneven, unstable, or non-level surface • It is pushed,... pulled, or otherwise improperly moved • If an earthquake occurs and the TV is missing or damaged. Your TV can still fall over . However, the TV can be installed in two ways: • On a flat surface, using the included stand • On a ...
Download
Page 10
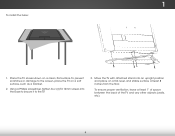
To ensure proper ventilation, leave at least 8 inches from the floor. 1 To install the base: 1. To prevent scratches or damage to the TV. 3. Place the TV screen-down on a soft surface, such as a blanket. 2. Using a Phillips screwdriver, tighten four (4) T4 12mm screws into an upright position and place on a flat, level, and stable surface at least 1" of space between the back of the TV and any other objects (walls, etc). 4 Move the TV with attached stand into the base to secure it to the screen, place the TV on a clean, flat surface.
To ensure proper ventilation, leave at least 8 inches from the floor. 1 To install the base: 1. To prevent scratches or damage to the TV. 3. Place the TV screen-down on a soft surface, such as a blanket. 2. Using a Phillips screwdriver, tighten four (4) T4 12mm screws into an upright position and place on a flat, level, and stable surface at least 1" of space between the back of the TV and any other objects (walls, etc). 4 Move the TV with attached stand into the base to secure it to the screen, place the TV on a clean, flat surface.

Download
Page 11
... weight/load of debris that came with a UL-listed wall mount bracket rated for your TV, you choose is clear of this TV. 5 1 WALL MOUNT SCREW LOCATIONS Screw Size: Screw Pitch: Screw Length: Hole Pattern: E280-A1 M4 0.70mm 10mm 100mm (V) x 100mm (H) Be sure the mount you can scratch or... damage the TV. 3. Disconnect any cables connected to your TV and wall mount to help you will need a wall mount. Installing the TV on a Wall To mount your TV on a wall, you . To...
... weight/load of debris that came with a UL-listed wall mount bracket rated for your TV, you choose is clear of this TV. 5 1 WALL MOUNT SCREW LOCATIONS Screw Size: Screw Pitch: Screw Length: Hole Pattern: E280-A1 M4 0.70mm 10mm 100mm (V) x 100mm (H) Be sure the mount you can scratch or... damage the TV. 3. Disconnect any cables connected to your TV and wall mount to help you will need a wall mount. Installing the TV on a Wall To mount your TV on a wall, you . To...

Download
Page 13
Press and hold to change input source. 7 SIDE PANEL Press to turn TV on or off. INPUT - 2 SIDE PANEL POWER -
Press and hold to change input source. 7 SIDE PANEL Press to turn TV on or off. INPUT - 2 SIDE PANEL POWER -

Download
Page 14
To keep the power indicator on as long as the TV is on, see Turning the Power Indicator On or Off on , then goes out after several seconds. The power indicator flashes on when the TV turns on page 37. 8 FRONT PANEL 2 FRONT PANEL REMOTE SENSOR & POWER INDICATOR When using the remote, aim it directly at this sensor.
To keep the power indicator on as long as the TV is on, see Turning the Power Indicator On or Off on , then goes out after several seconds. The power indicator flashes on when the TV turns on page 37. 8 FRONT PANEL 2 FRONT PANEL REMOTE SENSOR & POWER INDICATOR When using the remote, aim it directly at this sensor.

Download
Page 15
.... OK Select the highlighted menu option. GUIDE Display the info window. REMOTE CONTROL INPUT Change the currently-displayed input. EXIT Close the on . POWER Turn TV on -screen menu. V BUTTON Open the USB photo viewer. DASH Use with number pad to the channel last viewed. ARROW Navigate the on or off...
.... OK Select the highlighted menu option. GUIDE Display the info window. REMOTE CONTROL INPUT Change the currently-displayed input. EXIT Close the on . POWER Turn TV on -screen menu. V BUTTON Open the USB photo viewer. DASH Use with number pad to the channel last viewed. ARROW Navigate the on or off...

Download
Page 17
... your device has a video port that your device on the TV (HDMI, Component, etc). 2. Connecting Your Devices CONNECTING A DEVICE Your TV can be used (HDMI, Component, etc). BACK OF TV 11 3 Cable/Satellite Box DVD/Blu-ray Player Game Console HDMI CABLE BEST • DIGITAL • ... (480i)* • STEREO AUDIO * Maximum Resolution Verify that matches an available port on . Set the TV's input to match the connection you used to the TV and the device. 4. Turn the TV and your device off. 3. Connect the appropriate cable (not included) to display output from most devices. ...
... your device has a video port that your device on the TV (HDMI, Component, etc). 2. Connecting Your Devices CONNECTING A DEVICE Your TV can be used (HDMI, Component, etc). BACK OF TV 11 3 Cable/Satellite Box DVD/Blu-ray Player Game Console HDMI CABLE BEST • DIGITAL • ... (480i)* • STEREO AUDIO * Maximum Resolution Verify that matches an available port on . Set the TV's input to match the connection you used to the TV and the device. 4. Turn the TV and your device off. 3. Connect the appropriate cable (not included) to display output from most devices. ...

Download
Page 18
... • Video Resolutions up to 480i • Analog Connection • Audio and Video Signals • HD Video Resolutions up to your TV. AUDIO AND VIDEO CABLE TYPES AV CABLE AV cables (or Composite cables) are the traditional way of connecting antennas and cable television signals to...Audio and Video Signals Y L R COMPONENT VIDEO Coaxial COAXIAL CABLE GOOD 12 BETTER Video signals are the traditional way of connecting your TV. 3 CONNECTING A DEVICE - COAXIAL CABLE Coaxial cables are sent over the yellow connector while audio is sent over the red and white connectors.
... • Video Resolutions up to 480i • Analog Connection • Audio and Video Signals • HD Video Resolutions up to your TV. AUDIO AND VIDEO CABLE TYPES AV CABLE AV cables (or Composite cables) are the traditional way of connecting antennas and cable television signals to...Audio and Video Signals Y L R COMPONENT VIDEO Coaxial COAXIAL CABLE GOOD 12 BETTER Video signals are the traditional way of connecting your TV. 3 CONNECTING A DEVICE - COAXIAL CABLE Coaxial cables are sent over the yellow connector while audio is sent over the red and white connectors.

Download
Page 20
... audio device, such as a receiver or sound bar. 1. CONNECTING AN AUDIO DEVICE Your TV can output sound to the TV and the device. 4. Verify that your device has an audio port that matches an available port on . 3 Home Audio Receiver VIZIO Sound Bar HDMI CABLE BEST • ARC 2-WAY COMMUNICATION • 2.0-5.1 DIGITAL AUDIO...
... audio device, such as a receiver or sound bar. 1. CONNECTING AN AUDIO DEVICE Your TV can output sound to the TV and the device. 4. Verify that your device has an audio port that matches an available port on . 3 Home Audio Receiver VIZIO Sound Bar HDMI CABLE BEST • ARC 2-WAY COMMUNICATION • 2.0-5.1 DIGITAL AUDIO...

Download
Page 21
... - AUDIO CABLE TYPES 3.5mm CABLE AV cables (or Composite cables) are the traditional way of light through a single HDMI cable.Audio Return Channel-enabled (ARC)TVs allow audio to your audio device.
... - AUDIO CABLE TYPES 3.5mm CABLE AV cables (or Composite cables) are the traditional way of light through a single HDMI cable.Audio Return Channel-enabled (ARC)TVs allow audio to your audio device.

Download
Page 22
... Home Audio Receiver can be removed. ARC Without HDMI ARC With HDMI ARC Built-in Tuner Built-in Tuner Your TV Without an HDMI ARC setup, your TV will transmit audio signal to and from the built-in tuner to your home audio receiver through a separate audio connection. 3.5mm (Audio) ...HDMI Your Home Audio Receiver HDMI Your TV HDMI With an HDMI ARC setup, the audio connection between your TV with an all-digital audio/video connection. 3 CONNECTING AN AUDIO DEVICE -
... Home Audio Receiver can be removed. ARC Without HDMI ARC With HDMI ARC Built-in Tuner Built-in Tuner Your TV Without an HDMI ARC setup, your TV will transmit audio signal to and from the built-in tuner to your home audio receiver through a separate audio connection. 3.5mm (Audio) ...HDMI Your Home Audio Receiver HDMI Your TV HDMI With an HDMI ARC setup, the audio connection between your TV with an all-digital audio/video connection. 3 CONNECTING AN AUDIO DEVICE -

Download
Page 23
...2. To complete the first-time setup: 1. Use the Arrow buttons on the remote. When you through each of the steps necessary to get your TV ready for use. Use the OK and Arrow buttons on the remote to highlight your locale. Use the Arrow buttons on the remote to highlight... instructions to complete the channel scan. 7. When you begin the first-time setup: • Your TV should be installed and the power cord should be connected to select your preferred language and your TV is complete. 3. The First-Time Setup is receiving signal and press OK. Use the Arrow and OK...
...2. To complete the first-time setup: 1. Use the Arrow buttons on the remote. When you through each of the steps necessary to get your TV ready for use. Use the OK and Arrow buttons on the remote to highlight your locale. Use the Arrow buttons on the remote to highlight... instructions to complete the channel scan. 7. When you begin the first-time setup: • Your TV should be installed and the power cord should be connected to select your preferred language and your TV is complete. 3. The First-Time Setup is receiving signal and press OK. Use the Arrow and OK...

Download
Page 24
...; Activate the Sleep Timer • Adjust the Tuner settings • Set up Closed Captioning • Name the TV Inputs • Adjust TV Settings • Access the Guided Setup VIZIO SETTINGS Picture Audio Timers Tuner CC Closed Captions Devices System Guided Setup NAVIGATING THE ON-SCREEN MENU To open the on...menu, you can press Exit 2Dthe BA3DCK button at any time to return to select that option. Using the On-Screen Menu 5 Your TV features an easy-to-use on -scrAeBCen menu. Input Wide CC Sleep Timer Picture Audio Network Settings Help 18 Wide Zoom Normal Panoramic While...
...; Activate the Sleep Timer • Adjust the Tuner settings • Set up Closed Captioning • Name the TV Inputs • Adjust TV Settings • Access the Guided Setup VIZIO SETTINGS Picture Audio Timers Tuner CC Closed Captions Devices System Guided Setup NAVIGATING THE ON-SCREEN MENU To open the on...menu, you can press Exit 2Dthe BA3DCK button at any time to return to select that option. Using the On-Screen Menu 5 Your TV features an easy-to-use on -scrAeBCen menu. Input Wide CC Sleep Timer Picture Audio Network Settings Help 18 Wide Zoom Normal Panoramic While...

Download
Page 25
...than intended. Press the INPUT button on -screen menu. Each mode displays the picture differently. Images may vary by TV. 19 The TV can be connected to your TV, you must first change the input source in five different modes: Normal, Stretch, Panoramic, Wide, and Zoom. If...or 2.35:1) content, black bars will still appear on the top and bottom of the display image. • Zoom expands images with your TV. Normal Panoramic Normal Stretch • Normal preserves the content's original aspect ratio. 5 CHANGING THE INPUT SOURCE CHANGING THE SCREEN ASPECT RATIO External...
...than intended. Press the INPUT button on -screen menu. Each mode displays the picture differently. Images may vary by TV. 19 The TV can be connected to your TV, you must first change the input source in five different modes: Normal, Stretch, Panoramic, Wide, and Zoom. If...or 2.35:1) content, black bars will still appear on the top and bottom of the display image. • Zoom expands images with your TV. Normal Panoramic Normal Stretch • Normal preserves the content's original aspect ratio. 5 CHANGING THE INPUT SOURCE CHANGING THE SCREEN ASPECT RATIO External...


