

Download
Page 2
... Labs, Inc. Dolby and the double-D symbol are trademarks or registered trademarks of Dolby Laboratories. Changing the factory default picture settings or enabling other features will be achieved. HDMI, the HDMI logo and High-Definition Multimedia Interface are trademarks of HDMI Licensing LLC.... This product qualifies for ENERGY STAR in the "factory default" setting and this is the setting in which power savings will increase power consumption that could exceed the limits necessary to qualify for ENERGY STAR rating...
... Labs, Inc. Dolby and the double-D symbol are trademarks or registered trademarks of Dolby Laboratories. Changing the factory default picture settings or enabling other features will be achieved. HDMI, the HDMI logo and High-Definition Multimedia Interface are trademarks of HDMI Licensing LLC.... This product qualifies for ENERGY STAR in the "factory default" setting and this is the setting in which power savings will increase power consumption that could exceed the limits necessary to qualify for ENERGY STAR rating...
Download
Page 7
... Using the Network Connection Menu 28 Connecting to a Wireless Network 28 Changing the Advanced Network Settings 29 Testing Your Network Connection 29 Changing the TV Settings 30 Changing the Input Source 30 Setting the Tuner Mode 31 Scanning for Channels 31 Adding New Channels 32 Skipping Channels 33 Changing the Audio Language 33...
... Using the Network Connection Menu 28 Connecting to a Wireless Network 28 Changing the Advanced Network Settings 29 Testing Your Network Connection 29 Changing the TV Settings 30 Changing the Input Source 30 Setting the Tuner Mode 31 Scanning for Channels 31 Adding New Channels 32 Skipping Channels 33 Changing the Audio Language 33...
Download
Page 8
... Turning the Power Indicator Light On or Off 38 Using the Help Menu 39 Displaying System Information 39 Resetting the TV Settings 40 Restoring the TV to Factory Default Settings 40 Using Guided Setup 41 Using the Info Window 42 Using the USB Media Player 43 Using the USB Media Player 43... Connecting a USB Thumb Drive to the TV 43 Playing USB Media 43 Using VIZIO Internet Apps 45 Using the VIA Shortcut Buttons 45...
... Turning the Power Indicator Light On or Off 38 Using the Help Menu 39 Displaying System Information 39 Resetting the TV Settings 40 Restoring the TV to Factory Default Settings 40 Using Guided Setup 41 Using the Info Window 42 Using the USB Media Player 43 Using the USB Media Player 43... Connecting a USB Thumb Drive to the TV 43 Playing USB Media 43 Using VIZIO Internet Apps 45 Using the VIA Shortcut Buttons 45...
Download
Page 17
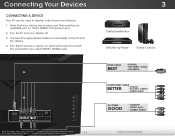
Set the TV's input to match the connection you used to display output from most devices. 1. Connect the appropriate cable (not included) to the TV and ...
Set the TV's input to match the connection you used to display output from most devices. 1. Connect the appropriate cable (not included) to the TV and ...

Download
Page 24
...Change the screen aspect ratio • Set up closed captioning • Activate the sleep timer • Adjust the picture settings • Adjust the audio settings • Adjust the network settings • Change TV settings • Access the help menu VIZIO ABC Input Wide CC Sleep Timer ...Picture Audio Network Settings Help Navigating the On-Screen Menu To open...
...Change the screen aspect ratio • Set up closed captioning • Activate the sleep timer • Adjust the picture settings • Adjust the audio settings • Adjust the network settings • Change TV settings • Access the help menu VIZIO ABC Input Wide CC Sleep Timer ...Picture Audio Network Settings Help Navigating the On-Screen Menu To open...
Download
Page 25
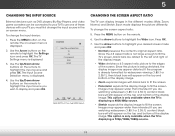
...screen mode Wiadend pZoroemss ONKor:mal Panoramic • Normal preserves the content's original aspect ratio. The TV Settings menu is being stretched, the display image may appear distorted. VIZIO Input Source Selection TV AV Component RGB HDMI 4. Each mode displays the picture differently. To change the input...screAeBnC . Since the 4:3 aspect ratio is displayed. 2. Images may appear wider than intended. The on the remote. 6. Note: E291i-A1 has two HDMI inputs Changing the Screen Aspect Ratio The TV can be connected to highlight the input source and press OK. Since the...
...screen mode Wiadend pZoroemss ONKor:mal Panoramic • Normal preserves the content's original aspect ratio. The TV Settings menu is being stretched, the display image may appear distorted. VIZIO Input Source Selection TV AV Component RGB HDMI 4. Each mode displays the picture differently. To change the input...screAeBnC . Since the 4:3 aspect ratio is displayed. 2. Images may appear wider than intended. The on the remote. 6. Note: E291i-A1 has two HDMI inputs Changing the Screen Aspect Ratio The TV can be connected to highlight the input source and press OK. Since the...
Download
Page 26
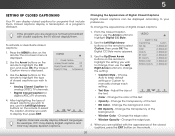
...the type of digital closed captions, press the EXIT button on the remote. Use the Up/Down Arrow WibdeuttoZnoosmon tNhoremarel mPaontoeramtoic highlight the setting you wish to change, then use the Arrow buttons to change the appearance of closed captions you wish to see : • ...broadcast with the appearance of closed captions you wish to your preference. VIZIO Digital CC Style Caption Style Custom Text Size As Broadcast Color As Broadcast Opacity As Broadcast 3. Choose Auto to keeABpC default settings or Custom to highlight the CC icon and press OK. Change ...
...the type of digital closed captions, press the EXIT button on the remote. Use the Up/Down Arrow WibdeuttoZnoosmon tNhoremarel mPaontoeramtoic highlight the setting you wish to change, then use the Arrow buttons to change the appearance of closed captions you wish to see : • ...broadcast with the appearance of closed captions you wish to your preference. VIZIO Digital CC Style Caption Style Custom Text Size As Broadcast Color As Broadcast Opacity As Broadcast 3. Choose Auto to keeABpC default settings or Custom to highlight the CC icon and press OK. Change ...

Download
Page 27
The Timers menu is VIZIO displayed. Press OK, then press EXIT. This feature can be deactivated. Use the Arrow ... press OK. Use the Up/Down Arrow buttons on -screen menu is displayed. 4. Setting the Auto Power Off Feature To help save energy, your TV is set by default to turn off after which you want the TV to turn the TV off... Activating the Sleep Timer When activated, the TV's sleep timer will turn off after a set period of time after 10 minutes if no signal is displayed. 3. To set the Auto Power Off feature: 1. Exit 2D 3D ABC Input Wide CC Sleep Timer Picture...
The Timers menu is VIZIO displayed. Press OK, then press EXIT. This feature can be deactivated. Use the Arrow ... press OK. Use the Up/Down Arrow buttons on -screen menu is displayed. 4. Setting the Auto Power Off Feature To help save energy, your TV is set by default to turn off after which you want the TV to turn the TV off... Activating the Sleep Timer When activated, the TV's sleep timer will turn off after a set period of time after 10 minutes if no signal is displayed. 3. To set the Auto Power Off feature: 1. Exit 2D 3D ABC Input Wide CC Sleep Timer Picture...

Download
Page 28
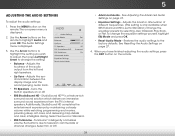
... high or too low, detail may appear faded oABrCwashed out. Use the Up/Down Arrow buttons on the remote to distinguish in the most cases. VIZIO Picture Picture Mode Backlight Brightness Contrast Color Tint Sharpness Custom - + 50 - + 50 - + 50 - + 50 - +0 - +0 More 4. Also try these... It can be used to values that will not produce detail that does not otherwise exist. This is the recommended setting. • Movie mode sets the picture settings to values perfect for watching a movie in the picture. Adjusts the LED brightness to change each of the picture...
... high or too low, detail may appear faded oABrCwashed out. Use the Up/Down Arrow buttons on the remote to distinguish in the most cases. VIZIO Picture Picture Mode Backlight Brightness Contrast Color Tint Sharpness Custom - + 50 - + 50 - + 50 - + 50 - +0 - +0 More 4. Also try these... It can be used to values that will not produce detail that does not otherwise exist. This is the recommended setting. • Movie mode sets the picture settings to values perfect for watching a movie in the picture. Adjusts the LED brightness to change each of the picture...

Download
Page 29
VIZIO Advanced Picture Noise Reduction Low MPEG NR Low Color Enhancement Normal Adaptive Luma Medium...• Backlight Control - Wide Zoom Normal Panoramic Exit 2D 3D ABC Input Wide CC Sleep Timer Picture Audio Network Settings Help 23 Use the Arrow buttons to compensate for watching film. Reduces oversaturation of brightness. When you wish to adjust... content. Select Off, Low, Medium, Strong, or Extend. • Film Mode - From the Picture Settings menu, use the Arrow buttons on the remote to highlight More, then press OK. 2. Optimizes the picture...
VIZIO Advanced Picture Noise Reduction Low MPEG NR Low Color Enhancement Normal Adaptive Luma Medium...• Backlight Control - Wide Zoom Normal Panoramic Exit 2D 3D ABC Input Wide CC Sleep Timer Picture Audio Network Settings Help 23 Use the Arrow buttons to compensate for watching film. Reduces oversaturation of brightness. When you wish to adjust... content. Select Off, Low, Medium, Strong, or Extend. • Film Mode - From the Picture Settings menu, use the Arrow buttons on the remote to highlight More, then press OK. 2. Optimizes the picture...

Download
Page 30
... OK. Green Offset - When you want to reset the color temperatures to change the "warmness" or "coolness" of the white areas of the color temperature settings: VIZIO Color Temperature Color Temperature Red Gain - Vertical Size - + 32 + 16 +0 +0 4. Normal + 128 + 128 + 128 + 128 + 128 + 128 Reset Color Temperature Red/Green/Blue Gain - The...
... OK. Green Offset - When you want to reset the color temperatures to change the "warmness" or "coolness" of the white areas of the color temperature settings: VIZIO Color Temperature Color Temperature Red Gain - Vertical Size - + 32 + 16 +0 +0 4. Normal + 128 + 128 + 128 + 128 + 128 + 128 Reset Color Temperature Red/Green/Blue Gain - The...

Download
Page 31
Highlight Yes and press OK. 4. Press the EXIT button on the remote to the factory default settings: 1. The TV displays, "Are you sure you want to RESET Picture Settings to highlight More, then press OK. 2. From the Picture Settings menu, use the Arrow buttons to the factory defaults?" 3. Use the Arrow buttons on the remote. 25 5 Resetting the Picture Settings To reset the picture settings to highlight Reset Picture Mode, then press OK.
Highlight Yes and press OK. 4. Press the EXIT button on the remote to the factory default settings: 1. The TV displays, "Are you sure you want to RESET Picture Settings to highlight More, then press OK. 2. From the Picture Settings menu, use the Arrow buttons to the factory defaults?" 3. Use the Arrow buttons on the remote. 25 5 Resetting the Picture Settings To reset the picture settings to highlight Reset Picture Mode, then press OK.
Download
Page 32
...VIZIO Audio Settings Audio Mode Balance - Use the Arrow buttons to highlight the setting you have finished adjusting the audio settings, press the EXIT buttoAnBCon the remote. Select Surround or Standard. • SRS TruVolume - See Adjusting the Advanced Audio Settings on or off. • SRS StudioSound HD - ToNocrmhaal nPgaenortahmeic equalizer settings...then press Left/Right Arrow to the factory defaults. 5 Adjusting the Audio Settings To adjust the audio settings: 1. The Audio Settings menu is a feature-rich surround sound solution which delivers an immersive surround ...
...VIZIO Audio Settings Audio Mode Balance - Use the Arrow buttons to highlight the setting you have finished adjusting the audio settings, press the EXIT buttoAnBCon the remote. Select Surround or Standard. • SRS TruVolume - See Adjusting the Advanced Audio Settings on or off. • SRS StudioSound HD - ToNocrmhaal nPgaenortahmeic equalizer settings...then press Left/Right Arrow to the factory defaults. 5 Adjusting the Audio Settings To adjust the audio settings: 1. The Audio Settings menu is a feature-rich surround sound solution which delivers an immersive surround ...
Download
Page 33
...white) connectors when connected to a home theater audio system. When you want to RESET Exit 2D 3D Audio Settings to the factory default settings: 1. WiUdese thZoeomArroNwormbaul ttPoannosraomnic the remote to control the external speakers' volume from your home theater system controls. Highlight... for the Optical output when connected to a home theater audio system. 5 Adjusting the Advanced Audio Settings To adjust the advanced audio settings: 1. VIZIO Advanced Audio Digital Audio Out Analog Audio Out PCM Fixed 3. Use the Arrow buttons to highlight Advanced...
...white) connectors when connected to a home theater audio system. When you want to RESET Exit 2D 3D Audio Settings to the factory default settings: 1. WiUdese thZoeomArroNwormbaul ttPoannosraomnic the remote to control the external speakers' volume from your home theater system controls. Highlight... for the Optical output when connected to a home theater audio system. 5 Adjusting the Advanced Audio Settings To adjust the advanced audio settings: 1. VIZIO Advanced Audio Digital Audio Out Analog Audio Out PCM Fixed 3. Use the Arrow buttons to highlight Advanced...

Download
Page 34
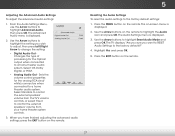
...Access Point with an Ethernet cable, you do not see the wireless network connection menu. Press the MENU button on the remote. VIZIO Network connection Wired Connection Disconnected Wireless Access Points More Access Points Manual Setup Enter Access Point Name Test Connection 6. Press the MENU ...and press OK. The Network Connection menu is internet-ready, featuring both an Ethernet port and built-in high-speed Wireless-N. To connect to set up a wireless network connection. 1. The on the remote. Highlight Enter Access Point Name and press OK. 4. Press the EXITAbBCutton on ...
...Access Point with an Ethernet cable, you do not see the wireless network connection menu. Press the MENU button on the remote. VIZIO Network connection Wired Connection Disconnected Wireless Access Points More Access Points Manual Setup Enter Access Point Name Test Connection 6. Press the MENU ...and press OK. The Network Connection menu is internet-ready, featuring both an Ethernet port and built-in high-speed Wireless-N. To connect to set up a wireless network connection. 1. The on the remote. Highlight Enter Access Point Name and press OK. 4. Press the EXITAbBCutton on ...

Download
Page 35
.... Press the EXIT button on the remote. DNS Server Alt DNS Server RJ45 MAC 0:0:0:0:0:0 Wireless MAC FF:FF:FF:FF:FF:FF • Subnet Mask - VIZIO IP Setting DHCP Off IP Address Subnet Mask Default Gateway Pref. The IP address assigned to change advanced network...
.... Press the EXIT button on the remote. DNS Server Alt DNS Server RJ45 MAC 0:0:0:0:0:0 Wireless MAC FF:FF:FF:FF:FF:FF • Subnet Mask - VIZIO IP Setting DHCP Off IP Address Subnet Mask Default Gateway Pref. The IP address assigned to change advanced network...
Download
Page 36
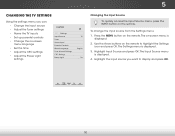
... source • Adjust the Tuner settings • Name the TV inputs • Set up parental controls • Change the on-screen menu language • Set the time • Adjust the CEC settings • Adjust the Power Light settings VIZIO Settings Input Source Tuner Name Input Parental Controls... Menu Language Time & Local Settings CEC Settings Power Light TV English On Changing the Input Source...
... source • Adjust the Tuner settings • Name the TV inputs • Set up parental controls • Change the on-screen menu language • Set the time • Adjust the CEC settings • Adjust the Power Light settings VIZIO Settings Input Source Tuner Name Input Parental Controls... Menu Language Time & Local Settings CEC Settings Power Light TV English On Changing the Input Source...

Download
Page 37
... the remote. The auto channel scan begins. 2. Highlight Antenna or Cable and press OK. 5. VIZIO Channel Scan Channels found Digital: 0 Analog: 19 18% Complete Cancel Cancel the Scan 31 The Settings menu is 100% complete. A channel scan may also be necessary when the TV has been moved...button on -screen menu is displayed. 4. The on the remote. Highlight Tuner and press OK. Wait until the channel scan is displayed. 3. 5 Setting the Tuner Mode If you are available. 1. The Tuner Mode menu is displayed. 2. Highlight Done and press OK. 3. Scanning for Channels Before the ...
... the remote. The auto channel scan begins. 2. Highlight Antenna or Cable and press OK. 5. VIZIO Channel Scan Channels found Digital: 0 Analog: 19 18% Complete Cancel Cancel the Scan 31 The Settings menu is 100% complete. A channel scan may also be necessary when the TV has been moved...button on -screen menu is displayed. 4. The on the remote. Highlight Tuner and press OK. Wait until the channel scan is displayed. 3. 5 Setting the Tuner Mode If you are available. 1. The Tuner Mode menu is displayed. 2. Highlight Done and press OK. 3. Scanning for Channels Before the ...

Download
Page 38
Wait until the partial channel search is displayed. 2. To add a single new analog channel: 1. VIZIO Add Analog Channel Enter Channel # __ Add Channel 3. The TV scans for the channel, press the EXIT button on the remote. To add a range of ... OK. From the Tuner menu, highlight Partial Channel Search. The Partial Channel Search menu is 100% complete. Highlight Done and press OK. 7. From the Tuner Settings menu, highlight Add Analog Channel and press OK. Highlight To Channel and enter the channel to which you want to end the scan. (Use the...
Wait until the partial channel search is displayed. 2. To add a single new analog channel: 1. VIZIO Add Analog Channel Enter Channel # __ Add Channel 3. The TV scans for the channel, press the EXIT button on the remote. To add a range of ... OK. From the Tuner menu, highlight Partial Channel Search. The Partial Channel Search menu is 100% complete. Highlight Done and press OK. 7. From the Tuner Settings menu, highlight Add Analog Channel and press OK. Highlight To Channel and enter the channel to which you want to end the scan. (Use the...
Download
Page 39
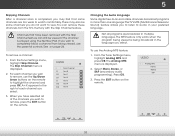
... you wish to remove, use the Up/Down Arrow buttons on the remote. ABC Input Wide CC VIZIO Analog MTS Mono Stereo SAP Sleep Timer Picture Audio Network Settings Help 33 The Skip Channel menu is displayed. 2.WiSdeelecZtooMm onoNo, rSmtael rePoan,oorarmic SAP (secondary audio programming...works when the program being viewed is being viewed, use the parental controls. From the Tuner Settings menu, highlight Skip Channel. To use the Analog MTS feature: 1. From the Tuner Settings menu, highlight Analog MTS and press OK. 5 Skipping Channels After a channel scan is completed,...
... you wish to remove, use the Up/Down Arrow buttons on the remote. ABC Input Wide CC VIZIO Analog MTS Mono Stereo SAP Sleep Timer Picture Audio Network Settings Help 33 The Skip Channel menu is displayed. 2.WiSdeelecZtooMm onoNo, rSmtael rePoan,oorarmic SAP (secondary audio programming...works when the program being viewed is being viewed, use the parental controls. From the Tuner Settings menu, highlight Skip Channel. To use the Analog MTS feature: 1. From the Tuner Settings menu, highlight Analog MTS and press OK. 5 Skipping Channels After a channel scan is completed,...


