User Manual
Page 1
Windows and the Windows logo are the property of Microsoft Corporation. All other trademarks are registered trademarks of their respective companies. All rights reserved. ViviCam X027 Digital Camera User Manual © 2009-2011 Sakar International, Inc.
Windows and the Windows logo are the property of Microsoft Corporation. All other trademarks are registered trademarks of their respective companies. All rights reserved. ViviCam X027 Digital Camera User Manual © 2009-2011 Sakar International, Inc.
User Manual
Page 3
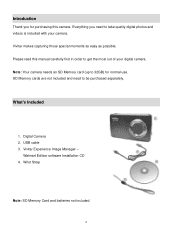
... 3. Walmart Edition software Installation CD 4. Introduction Thank you need to get the most out of your camera. Everything you for normal use. Please read this camera. Digital Camera 2. Wrist Strap Note: SD Memory Card and batteries not included. 2 Vivitar makes capturing those special moments as easy as possible. What's Included 1. SD Memory cards are not...
... 3. Walmart Edition software Installation CD 4. Introduction Thank you need to get the most out of your camera. Everything you for normal use. Please read this camera. Digital Camera 2. Wrist Strap Note: SD Memory Card and batteries not included. 2 Vivitar makes capturing those special moments as easy as possible. What's Included 1. SD Memory cards are not...
User Manual
Page 6
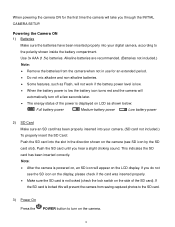
... of the power is not locked (check the lock switch on the LCD display. Push the SD card until you through the INITIAL CAMERA SETUP. When powering the camera ON for an extended period. Do not mix alkaline and non-alkaline batteries. Some features, such as Flash,...: Full battery power Medium battery power Low battery power 2) SD Card Make sure an SD card has been properly inserted into your camera. (SD card not included.) To properly insert the SD Card: Push the SD card into your digital camera, according to the polarity shown inside the battery compartment.
... of the power is not locked (check the lock switch on the LCD display. Push the SD card until you through the INITIAL CAMERA SETUP. When powering the camera ON for an extended period. Do not mix alkaline and non-alkaline batteries. Some features, such as Flash,...: Full battery power Medium battery power Low battery power 2) SD Card Make sure an SD card has been properly inserted into your camera. (SD card not included.) To properly insert the SD Card: Push the SD card into your digital camera, according to the polarity shown inside the battery compartment.
User Manual
Page 8
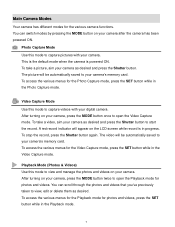
... and press the Shutter button to capture videos with your camera, press the MODE button twice to open the Video Capture mode. After turning on your digital camera. To access the various menus for the various camera functions. A red record indicator will be automatically saved to... view and manage the photos and videos on your camera‟s memory card. Main Camera Modes Your camera has different modes for the Photo...
... and press the Shutter button to capture videos with your camera, press the MODE button twice to open the Video Capture mode. After turning on your digital camera. To access the various menus for the various camera functions. A red record indicator will be automatically saved to... view and manage the photos and videos on your camera‟s memory card. Main Camera Modes Your camera has different modes for the Photo...
User Manual
Page 9
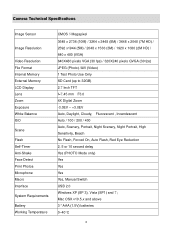
Mac OSX v10.5.x and above 3 * AAA (1.5V) batteries 0~40C 8 Camera Technical Specifications Image Sensor Image Resolution Video Resolution File Format Internal Memory External Memory LCD Display Lens Zoom Exposure White Balance ISO Scene Flash Self-... fps) / 320X240 pixels QVGA (30 fps) JPEG (Photo) /AVI (Video) 1 Test Photo Use Only SD Card (up to 32GB) 2.7 Inch TFT f=7.45 mm F3.0 4X Digital Zoom -3.0EV ~ +3.0EV Auto, Daylight, Cloudy, Fluorescent , Incandescent Auto / 100 / 200 / 400 Auto, Scenery, Portrait, Night Scenery, Night Portrait, High Sensitivity, Beach No Flash, Forced...
Mac OSX v10.5.x and above 3 * AAA (1.5V) batteries 0~40C 8 Camera Technical Specifications Image Sensor Image Resolution Video Resolution File Format Internal Memory External Memory LCD Display Lens Zoom Exposure White Balance ISO Scene Flash Self-... fps) / 320X240 pixels QVGA (30 fps) JPEG (Photo) /AVI (Video) 1 Test Photo Use Only SD Card (up to 32GB) 2.7 Inch TFT f=7.45 mm F3.0 4X Digital Zoom -3.0EV ~ +3.0EV Auto, Daylight, Cloudy, Fluorescent , Incandescent Auto / 100 / 200 / 400 Auto, Scenery, Portrait, Night Scenery, Night Portrait, High Sensitivity, Beach No Flash, Forced...
User Manual
Page 11
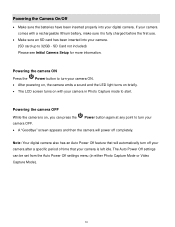
Powering the camera OFF While the camera is left idle. If your camera comes with your digital camera. Note: Your digital camera also has an Auto Power Off feature that will power off your camera after a specific period of time that your camera is on, you can be set from the Auto Power Off settings menu (in Photo Capture mode...
Powering the camera OFF While the camera is left idle. If your camera comes with your digital camera. Note: Your digital camera also has an Auto Power Off feature that will power off your camera after a specific period of time that your camera is on, you can be set from the Auto Power Off settings menu (in Photo Capture mode...
User Manual
Page 14
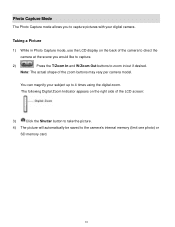
The following Digital Zoom Indicator appears on the back of the camera to direct the camera at the scene you to the camera‟s internal memory (limit one photo) or SD memory card. 13 Note: The actual shape of the LCD screen: 3) Click the Shutter button to take ... subject up to zoom in Photo Capture mode, use the LCD display on the right side of the zoom buttons may vary per camera model. You can magnify your digital camera. Taking a Picture 1) While in /out if desired. Photo Capture Mode The Photo Capture mode allows you would like to capture. 2) Press the...
The following Digital Zoom Indicator appears on the back of the camera to direct the camera at the scene you to the camera‟s internal memory (limit one photo) or SD memory card. 13 Note: The actual shape of the LCD screen: 3) Click the Shutter button to take ... subject up to zoom in Photo Capture mode, use the LCD display on the right side of the zoom buttons may vary per camera model. You can magnify your digital camera. Taking a Picture 1) While in /out if desired. Photo Capture Mode The Photo Capture mode allows you would like to capture. 2) Press the...
User Manual
Page 15
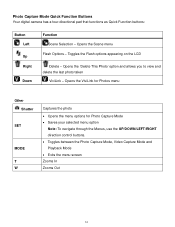
... „Delete This Photo‟ option and allows you to view and delete the last photo taken ViviLink - Photo Capture Mode Quick Function Buttons Your digital camera has a four-directional pad that functions as Quick Function buttons: Button Left Up Right Down Function Scene Selection - Opens the Scene menu Flash Options - Opens...
... „Delete This Photo‟ option and allows you to view and delete the last photo taken ViviLink - Photo Capture Mode Quick Function Buttons Your digital camera has a four-directional pad that functions as Quick Function buttons: Button Left Up Right Down Function Scene Selection - Opens the Scene menu Flash Options - Opens...
User Manual
Page 31
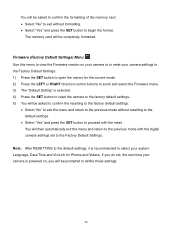
... Firmware (Factory Default Settings) Menu Use this menu to view the Firmware version on your camera or to reset your camera settings to the Factory Default Settings. 1) Press the SET button to open the menus for...: After RESETTING to the default settings, it is selected. 4) Press the SET button to reset the camera to the factory default settings. 5) You will then automatically exit the menu and return to the previous ... "Yes" and press the SET button to proceed with the digital camera settings set to define those settings. 30 You will be prompted to the Factory Default Settings.
... Firmware (Factory Default Settings) Menu Use this menu to view the Firmware version on your camera or to reset your camera settings to the Factory Default Settings. 1) Press the SET button to open the menus for...: After RESETTING to the default settings, it is selected. 4) Press the SET button to reset the camera to the factory default settings. 5) You will then automatically exit the menu and return to the previous ... "Yes" and press the SET button to proceed with the digital camera settings set to define those settings. 30 You will be prompted to the Factory Default Settings.
User Manual
Page 33
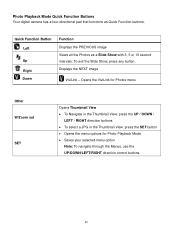
... menu option Note: To navigate through the Menus, use the UP/DOWN/LEFT/RIGHT direction control buttons. 32 Photo Playback Mode Quick Function Buttons Your digital camera has a four-directional pad that functions as a Slide Show with 3, 5 or 10 second intervals. Displays the NEXT image ViviLink -
... menu option Note: To navigate through the Menus, use the UP/DOWN/LEFT/RIGHT direction control buttons. 32 Photo Playback Mode Quick Function Buttons Your digital camera has a four-directional pad that functions as a Slide Show with 3, 5 or 10 second intervals. Displays the NEXT image ViviLink -
User Manual
Page 39
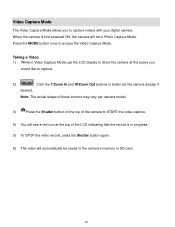
... see a red icon at the scene you to access the Video Capture Mode. Taking a Video 1) While in Photo Capture Mode. When the camera is in progress. 5) To STOP the video record, press the Shutter button again. 6) The video will automatically be in Video Capture Mode use the...4) You will be saved to better set the camera display if desired. Video Capture Mode The Video Capture Mode allows you would like to capture. 2) Click the T/Zoom In and W/Zoom Out buttons to the camera‟s memory or SD card. 38 Press the MODE button once to capture videos with your digital camera.
... see a red icon at the scene you to access the Video Capture Mode. Taking a Video 1) While in Photo Capture Mode. When the camera is in progress. 5) To STOP the video record, press the Shutter button again. 6) The video will automatically be in Video Capture Mode use the...4) You will be saved to better set the camera display if desired. Video Capture Mode The Video Capture Mode allows you would like to capture. 2) Click the T/Zoom In and W/Zoom Out buttons to the camera‟s memory or SD card. 38 Press the MODE button once to capture videos with your digital camera.
User Manual
Page 40
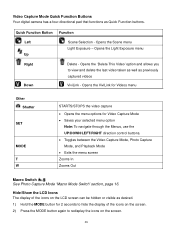
Video Capture Mode Quick Function Buttons Your digital camera has a four-directional pad that functions as desired. 1) Hold the MODE button for Video Capture Mode Saves your selected menu option Note: To navigate ...
Video Capture Mode Quick Function Buttons Your digital camera has a four-directional pad that functions as desired. 1) Hold the MODE button for Video Capture Mode Saves your selected menu option Note: To navigate ...
User Manual
Page 51
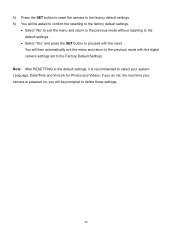
... resetting to the default settings. Select "Yes" and press the SET button to define those settings. 50 4) Press the SET button to reset the camera to the factory default settings. 5) You will be prompted to proceed with the digital camera settings set to select your camera is recommended to the Factory Default Settings.
... resetting to the default settings. Select "Yes" and press the SET button to define those settings. 50 4) Press the SET button to reset the camera to the factory default settings. 5) You will be prompted to proceed with the digital camera settings set to select your camera is recommended to the Factory Default Settings.
User Manual
Page 53
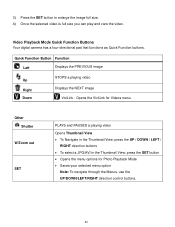
... menu option Note: To navigate through the Menus, use the UP/DOWN/LEFT/RIGHT direction control buttons. 52 Video Playback Mode Quick Function Buttons Your digital camera has a four-directional pad that functions as Quick Function buttons. 3) Press the SET button to enlarge the image full size. 4) Once the selected video is...
... menu option Note: To navigate through the Menus, use the UP/DOWN/LEFT/RIGHT direction control buttons. 52 Video Playback Mode Quick Function Buttons Your digital camera has a four-directional pad that functions as Quick Function buttons. 3) Press the SET button to enlarge the image full size. 4) Once the selected video is...
User Manual
Page 61
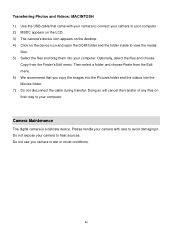
...the DCIM folder and the folder inside to heat sources. Camera Maintenance The digital camera is a delicate device. Please handle your camera with your camera to connect your camera to your computer. 2) MSDC appears on the LCD. 3) The camera‟s device icon appears on the desktop. 4) Click on... their way to your camera to view the media files. 5) Select the ...
...the DCIM folder and the folder inside to heat sources. Camera Maintenance The digital camera is a delicate device. Please handle your camera with your camera to connect your camera to your computer. 2) MSDC appears on the LCD. 3) The camera‟s device icon appears on the desktop. 4) Click on... their way to your camera to view the media files. 5) Select the ...


