User Guide
Page 1
... en este manual" Model No. VP2458 Monitor User Guide IMPORTANT: Please read this User Guide to obtain important information on installing and using your product in a safe manner, as well as registering your limited coverage from ViewSonic® Corporation, which is also found on our web site at http://www.viewsonic.com in English, or in specific languages using the Regional selection box in this User Guide will...
... en este manual" Model No. VP2458 Monitor User Guide IMPORTANT: Please read this User Guide to obtain important information on installing and using your product in a safe manner, as well as registering your limited coverage from ViewSonic® Corporation, which is also found on our web site at http://www.viewsonic.com in English, or in specific languages using the Regional selection box in this User Guide will...

User Guide
Page 4
...; Refer all servicing to qualified service personnel. If the device shuts down automatically, please turn on your monitor's resolution and refresh rate. After rebooting, change your monitor again. For details, please refer to appropriate levels, or hearing damage may result. • NOTICE: THE MONITOR MAY OVERHEAT AND SHUTDOWN! When using ear-/headphones, adjust the volume to the graphics card's user guide. 4 Ensure that the power outlet is...
...; Refer all servicing to qualified service personnel. If the device shuts down automatically, please turn on your monitor's resolution and refresh rate. After rebooting, change your monitor again. For details, please refer to appropriate levels, or hearing damage may result. • NOTICE: THE MONITOR MAY OVERHEAT AND SHUTDOWN! When using ear-/headphones, adjust the volume to the graphics card's user guide. 4 Ensure that the power outlet is...

User Guide
Page 5
...Setup 9 Installing the Stand...9 Wall Mounting...11 Using the Security Slot 13 Making Connections 14 Connecting to Power...14 Connecting External Devices 15 HDMI Connection 15 DisplayPort Connection 16 USB Connection...17 VGA Connection...18 Using the Monitor 19 Adjusting the Viewing Angle 19 Height Adjustment 19 Tilt Angle Adjustment 20 Screen Orientation Adjustment (Monitor Pivot 20 Swivel Angle Adjustment 22 Turning the Device On/Off 23 Using the Control Panel Keys 24 Quick Menu...24 Hot Keys...26 Configuring the Settings 29 General Operations 29 On-Screen Display (OSD) Menu...
...Setup 9 Installing the Stand...9 Wall Mounting...11 Using the Security Slot 13 Making Connections 14 Connecting to Power...14 Connecting External Devices 15 HDMI Connection 15 DisplayPort Connection 16 USB Connection...17 VGA Connection...18 Using the Monitor 19 Adjusting the Viewing Angle 19 Height Adjustment 19 Tilt Angle Adjustment 20 Screen Orientation Adjustment (Monitor Pivot 20 Swivel Angle Adjustment 22 Turning the Device On/Off 23 Using the Control Panel Keys 24 Quick Menu...24 Hot Keys...26 Configuring the Settings 29 General Operations 29 On-Screen Display (OSD) Menu...

User Guide
Page 9
Place the monitor on the monitor stand's base with the screen facing down. 2. Align and connect the two (2) points on a flat, stable surface with the monitor stand's neck. 3. Installing the Stand 1. Use the captured screw in the monitor stand's base and secure it to the monitor stand's neck. 9 Initial Setup This section provides detailed instructions for setting up your monitor.
Place the monitor on the monitor stand's base with the screen facing down. 2. Align and connect the two (2) points on a flat, stable surface with the monitor stand's neck. 3. Installing the Stand 1. Use the captured screw in the monitor stand's base and secure it to the monitor stand's neck. 9 Initial Setup This section provides detailed instructions for setting up your monitor.

User Guide
Page 23
To turn on the monitor. 3. Touch the Power button to the power outlet. NOTE The monitor will still consume some power as long as the power cord is not being used for a long period of time, please disconnect the power plug from the power outlet. 23 If the monitor is connected to turn the monitor off, touch the Power button again. Turning the Device On/Off 1. Plug the power cord into a power outlet. 2.
To turn on the monitor. 3. Touch the Power button to the power outlet. NOTE The monitor will still consume some power as long as the power cord is not being used for a long period of time, please disconnect the power plug from the power outlet. 23 If the monitor is connected to turn the monitor off, touch the Power button again. Turning the Device On/Off 1. Plug the power cord into a power outlet. 2.
User Guide
Page 30
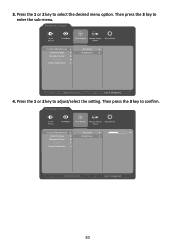
Then press the 3 key to select the desired menu option. Press the 1 or 2 key to enter the sub-menu. Then press the 3 key to adjust/select the setting. VP2458 Input Select ViewMode Color Adjust Manual Image Setup Menu Adjust Contrast/Brightness Color Format Standard Color Custom Color Calibration Contrast Brightness 1920 X 1080@60HZ 4. Press the 1 or 2 key to confirm. 3. VP2458 Input Select ViewMode Color Adjust Manual Image Setup Menu Adjust Contrast/Brightness Contrast 50 Color Format Brightness Standard Color Custom Color Calibration 1920 X 1080@60HZ 30
Then press the 3 key to select the desired menu option. Press the 1 or 2 key to enter the sub-menu. Then press the 3 key to adjust/select the setting. VP2458 Input Select ViewMode Color Adjust Manual Image Setup Menu Adjust Contrast/Brightness Color Format Standard Color Custom Color Calibration Contrast Brightness 1920 X 1080@60HZ 4. Press the 1 or 2 key to confirm. 3. VP2458 Input Select ViewMode Color Adjust Manual Image Setup Menu Adjust Contrast/Brightness Contrast 50 Color Format Brightness Standard Color Custom Color Calibration 1920 X 1080@60HZ 30

User Guide
Page 42
... the image signal and intelligently controls the backlight brightness and color, to improve on the ability to default. 42 Hue Adjust the tint of each color (red, green, blue, cyan, magenta, and yellow). Menu Option Custom Description Gamma Manually adjust the brightness level of the monitor's grayscale levels. Recall Restore custom related settings to make the black blacker in a dark scene, and make the white whiter in User Mode) or a specific color temperature and gain value (red, green, blue). Black...
... the image signal and intelligently controls the backlight brightness and color, to improve on the ability to default. 42 Hue Adjust the tint of each color (red, green, blue, cyan, magenta, and yellow). Menu Option Custom Description Gamma Manually adjust the brightness level of the monitor's grayscale levels. Recall Restore custom related settings to make the black blacker in a dark scene, and make the white whiter in User Mode) or a specific color temperature and gain value (red, green, blue). Black...
User Guide
Page 44
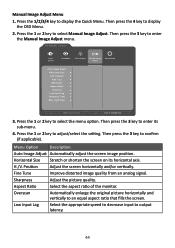
... image quality from an analog signal. Aspect Ratio Select the aspect ratio of the monitor. Position Fine Tune Sharpness Aspect Ratio Overscan Low Input Lag Response Time Blue Light Filter 1920 X 1080@60HZ 3. Then press the 4 key to enter the Manual Image Adjust menu. Position Adjust the screen horizontally and/or vertically. Then press the 3 key to display the OSD Menu. 2. Horizontal Size Stretch or shorten the screen on its sub-menu. 4. VP2458 Input Select ViewMode Color Adjust Manual Image Setup Menu Adjust Auto Image Adjust Horizontal Size...
... image quality from an analog signal. Aspect Ratio Select the aspect ratio of the monitor. Position Fine Tune Sharpness Aspect Ratio Overscan Low Input Lag Response Time Blue Light Filter 1920 X 1080@60HZ 3. Then press the 4 key to enter the Manual Image Adjust menu. Position Adjust the screen horizontally and/or vertically. Then press the 3 key to display the OSD Menu. 2. Horizontal Size Stretch or shorten the screen on its sub-menu. 4. VP2458 Input Select ViewMode Color Adjust Manual Image Setup Menu Adjust Auto Image Adjust Horizontal Size...

User Guide
Page 47
... current viewing resolution is not the correct native resolution. Choose between various modes, based on the screen. Set the OSD Menu orientation. • Auto: With built-in G sensor, the OSD Menu can auto pivot when the monitor is turned on the screen. Enable/Disable DisplayPort 1.1 support. 47 Display the monitor's information. Show/Hide the OSD background when the OSD Menu appears on . Set the power indicator On or Off. Enable this function. Resolution Notice For best picture quality, change resolution to...
... current viewing resolution is not the correct native resolution. Choose between various modes, based on the screen. Set the OSD Menu orientation. • Auto: With built-in G sensor, the OSD Menu can auto pivot when the monitor is turned on the screen. Enable/Disable DisplayPort 1.1 support. 47 Display the monitor's information. Show/Hide the OSD background when the OSD Menu appears on . Set the power indicator On or Off. Enable this function. Resolution Notice For best picture quality, change resolution to...

User Guide
Page 49
... application needs for displaying long-term color accuracy. CS-XRi1 is in the software folder of the ViewSonic® CD. Standard monitor packing does not include the color sensor, which utilizes a redesigned optical system, filter technology, calibration architecture, and intelligent form factor to deliver unrivalled color accuracy, repeatability, and device longevity. Colorbration To ensure long-term color accuracy, some specific models support hardware color calibration...
... application needs for displaying long-term color accuracy. CS-XRi1 is in the software folder of the ViewSonic® CD. Standard monitor packing does not include the color sensor, which utilizes a redesigned optical system, filter technology, calibration architecture, and intelligent form factor to deliver unrivalled color accuracy, repeatability, and device longevity. Colorbration To ensure long-term color accuracy, some specific models support hardware color calibration...
User Guide
Page 50
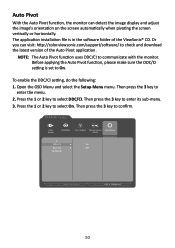
VP2458 Input Select ViewMode Color Adjust Manual Image Setup Menu Adjust DDC/CI On Save As Off All Recall 1920 X 1080@60HZ 50 Auto Pivot With the Auto Pivot function, the monitor can visit: http://color.viewsonic.com/support/software/ to check and download the latest version of the ViewSonic® CD. The application installation file is set to On. Then press the 3 key to select On. Press the 1 or 2 key to confirm...
VP2458 Input Select ViewMode Color Adjust Manual Image Setup Menu Adjust DDC/CI On Save As Off All Recall 1920 X 1080@60HZ 50 Auto Pivot With the Auto Pivot function, the monitor can visit: http://color.viewsonic.com/support/software/ to check and download the latest version of the ViewSonic® CD. The application installation file is set to On. Then press the 3 key to select On. Press the 1 or 2 key to confirm...
User Guide
Page 51
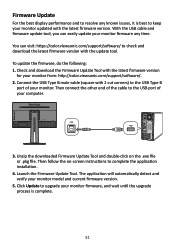
... USB Type B port of your monitor updated with the latest firmware version. Launch the Firmware Update Tool. Unzip the downloaded Firmware Update Tool and double-click on -screen instructions to upgrade your monitor firmware any known issues, it is complete. 51 With the USB cable and firmware update tool, you can visit: https://color.viewsonic.com/support/software/ to keep your computer. 3. Connect the USB Type B male cable (square with the latest firmware version for your monitor model and current firmware...
... USB Type B port of your monitor updated with the latest firmware version. Launch the Firmware Update Tool. Unzip the downloaded Firmware Update Tool and double-click on -screen instructions to upgrade your monitor firmware any known issues, it is complete. 51 With the USB cable and firmware update tool, you can visit: https://color.viewsonic.com/support/software/ to keep your computer. 3. Connect the USB Type B male cable (square with the latest firmware version for your monitor model and current firmware...

User Guide
Page 55
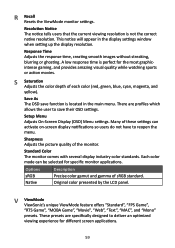
... detects the image signal and intelligently controls the backlight brightness and color, to make the black blacker in a dark scene, and make the white whiter in alphabetical order. Blue Light Filter Adjusts the filter that blocks high-energy blue light for a more comfortable viewing experience. Auto Detect If the current input source has no signal, the monitor will automatically switch to your device. B Black Stabilization ViewSonic's Black stabilization provides heightened visibility and detail by default. All...
... detects the image signal and intelligently controls the backlight brightness and color, to make the black blacker in a dark scene, and make the white whiter in alphabetical order. Blue Light Filter Adjusts the filter that blocks high-energy blue light for a more comfortable viewing experience. Auto Detect If the current input source has no signal, the monitor will automatically switch to your device. B Black Stabilization ViewSonic's Black stabilization provides heightened visibility and detail by default. All...

User Guide
Page 56
...Range) white levels are limited. Color Temperature Allows users to select specific color temperature settings to 5000K. Panel Default Panel original status sRGB Standard color space used for monitor color output (RGB, YUV). Set the color temperature to further customize their viewing experience. YUV The input signal color format is RGB and the black and (Limited Range) white levels are full. Bluish Set the color temperature to fit the user's needs. C Color Adjust Provides several color adjustment modes, to help adjust the color settings to 9300K. Cool Native...
...Range) white levels are limited. Color Temperature Allows users to select specific color temperature settings to 5000K. Panel Default Panel original status sRGB Standard color space used for monitor color output (RGB, YUV). Set the color temperature to further customize their viewing experience. YUV The input signal color format is RGB and the black and (Limited Range) white levels are full. Bluish Set the color temperature to fit the user's needs. C Color Adjust Provides several color adjustment modes, to help adjust the color settings to 9300K. Cool Native...

User Guide
Page 57
... cards's user guide for example, means that are available for your USER COLOR, which decreases signal latency. NOTE VESA 1024 x 768 @ 60Hz, for instructions on changing the resolution and refresh rate (vertical frequency). H Hue Adjusts the tint of color and technology. G Gain Adjusts the white temperature to manually adjust the brightness level of the monitor's grayscale levels. Game Mode Integrating a gaming-oriented OSD design including pre-calibrated FPS, RTS, and MOBA gaming settings. I Information Displays the timing mode (video signal input...
... cards's user guide for example, means that are available for your USER COLOR, which decreases signal latency. NOTE VESA 1024 x 768 @ 60Hz, for instructions on changing the resolution and refresh rate (vertical frequency). H Hue Adjusts the tint of color and technology. G Gain Adjusts the white temperature to manually adjust the brightness level of the monitor's grayscale levels. Game Mode Integrating a gaming-oriented OSD design including pre-calibrated FPS, RTS, and MOBA gaming settings. I Information Displays the timing mode (video signal input...

User Guide
Page 58
... the adjustments back to a cropped image on your monitor's screen. Overscan Refers to factory settings if the display is operating in a factory preset timing mode listed in the "Language Select" or "Power Lock Setting". The gain and offset functions allow users to control the white balance for red, green, and blue. M Manual Image Adjust Displays the "Manual Image Adjust" menu. NOTE (Exception) This control does not affect changes made in the "Specifications" of image quality adjustments. OSD Pivot Sets the monitor OSD Menu display direction. You can manually set a variety...
... the adjustments back to a cropped image on your monitor's screen. Overscan Refers to factory settings if the display is operating in a factory preset timing mode listed in the "Language Select" or "Power Lock Setting". The gain and offset functions allow users to control the white balance for red, green, and blue. M Manual Image Adjust Displays the "Manual Image Adjust" menu. NOTE (Exception) This control does not affect changes made in the "Specifications" of image quality adjustments. OSD Pivot Sets the monitor OSD Menu display direction. You can manually set a variety...
User Guide
Page 59
... for specific monitor applications. These presets are profiles which allows the user to save function is located in the display settings window when setting up the display resolution. A low response time is not the correct native resolution. Sharpness Adjusts the picture quality of these settings can be selected for different screen applications. 59 Setup Menu Adjusts On-Screen Display (OSD) Menu settings. Many of the monitor. Options sRGB Native Description Precise color gamut and gamma of each color (red, green, blue...
... for specific monitor applications. These presets are profiles which allows the user to save function is located in the display settings window when setting up the display resolution. A low response time is not the correct native resolution. Sharpness Adjusts the picture quality of these settings can be selected for different screen applications. 59 Setup Menu Adjusts On-Screen Display (OSD) Menu settings. Many of the monitor. Options sRGB Native Description Precise color gamut and gamma of each color (red, green, blue...

User Guide
Page 60
... colors (red, green, or blue) are missing, check the video cable to factory settings. 60 Troubleshooting This section describes some common problems that the outlet is supplying power. • Make sure the video cable connecting the monitor to the computer is properly and securely connected. • Check for bent or broken pins in the video cable connector. • Adjust the brightness and contrast settings. • Make sure the correct input source is properly and securely connected. Otherwise, touch the Power button to turn on the screen...
... colors (red, green, or blue) are missing, check the video cable to factory settings. 60 Troubleshooting This section describes some common problems that the outlet is supplying power. • Make sure the video cable connecting the monitor to the computer is properly and securely connected. • Check for bent or broken pins in the video cable connector. • Adjust the brightness and contrast settings. • Make sure the correct input source is properly and securely connected. Otherwise, touch the Power button to turn on the screen...

User Guide
Page 61
...; Turn off the monitor, unplug the power cord, plug it is properly and securely connected. not work • Make sure the USB cable is connected properly. • Try changing to another USB port (if applicable). • Some USB devices require a higher electric current; Some menus aren't • Adjust the ViewMode or the input source. Problem or Issue Possible Solutions The screen isn't centered correctly • Adjust the horizontal and vertical controls via the OSD Menu. • Check...
...; Turn off the monitor, unplug the power cord, plug it is properly and securely connected. not work • Make sure the USB cable is connected properly. • Try changing to another USB port (if applicable). • Some USB devices require a higher electric current; Some menus aren't • Adjust the ViewMode or the input source. Problem or Issue Possible Solutions The screen isn't centered correctly • Adjust the horizontal and vertical controls via the OSD Menu. • Check...

User Guide
Page 69
... receiving service under warranty, contact ViewSonic® Customer Support (Please refer to the "Customer Service" page). Installation of any unauthorized hardware, accessories, consumable parts or components (e.g. • Causes external to the product, such as electric power fluctuations or failure. • Use of supplies or parts not meeting ViewSonic's specifications. • Failure of owner to perform periodic product maintenance as stated in the User Guide. •...
... receiving service under warranty, contact ViewSonic® Customer Support (Please refer to the "Customer Service" page). Installation of any unauthorized hardware, accessories, consumable parts or components (e.g. • Causes external to the product, such as electric power fluctuations or failure. • Use of supplies or parts not meeting ViewSonic's specifications. • Failure of owner to perform periodic product maintenance as stated in the User Guide. •...


