User Guide
Page 2
Content Compliance Information 1 Important Safety Instructions 2 Product Registration 3 For Your Records 3 Getting Started Package Contents 4 Precautions 4 Quick Installation 5 Landscape/Portrait Modes 6 To Raise and Lower the display 6 Installation of Wall Mount (Optional 7 Using the LCD Display Setting the Timing Mode 8 OSD and Power Lock Settings 8 Adjusting the Screen Image 9 Main Menu Controls 10 Other Information Specifications 15 Troubleshooting 16 Customer Support 17 Cleaning the LCD Display 18 Limited Warranty 19 ViewSonic VP191b/VP191s
Content Compliance Information 1 Important Safety Instructions 2 Product Registration 3 For Your Records 3 Getting Started Package Contents 4 Precautions 4 Quick Installation 5 Landscape/Portrait Modes 6 To Raise and Lower the display 6 Installation of Wall Mount (Optional 7 Using the LCD Display Setting the Timing Mode 8 OSD and Power Lock Settings 8 Adjusting the Screen Image 9 Main Menu Controls 10 Other Information Specifications 15 Troubleshooting 16 Customer Support 17 Cleaning the LCD Display 18 Limited Warranty 19 ViewSonic VP191b/VP191s
User Guide
Page 6
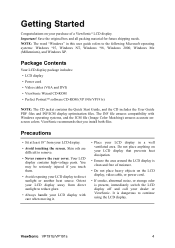
... the ICM file (Image Color Matching) ensures accurate onscreen colors. Orient your LCD display away from your LCD display. • Avoid touching the screen. ViewSonic VP191b/VP191s 4 Package Contents Your LCD display package includes: • LCD display • Power cord • Video cables (VGA and DVI) • ViewSonic Wizard CD-ROM • Perfect PortraitTM software CD-ROM...
... the ICM file (Image Color Matching) ensures accurate onscreen colors. Orient your LCD display away from your LCD display. • Avoid touching the screen. ViewSonic VP191b/VP191s 4 Package Contents Your LCD display package includes: • LCD display • Power cord • Video cables (VGA and DVI) • ViewSonic Wizard CD-ROM • Perfect PortraitTM software CD-ROM...
User Guide
Page 7
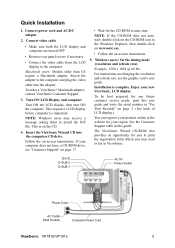
...) Computer Power Cord ViewSonic VP191b/VP191s 5 Quick Installation 1. For instructions on changing the resolution and refresh rate, see "Customer Support" on -screen instructions. 5. This sequence (LCD display before computer) is complete. Turn ON LCD Display and computer Turn ON the LCD display, then turn... ON the computer. To be best prepared for your new ViewSonic, LCD display. Attach the adapter to the computer Macintosh...
...) Computer Power Cord ViewSonic VP191b/VP191s 5 Quick Installation 1. For instructions on changing the resolution and refresh rate, see "Customer Support" on -screen instructions. 5. This sequence (LCD display before computer) is complete. Turn ON LCD Display and computer Turn ON the LCD display, then turn... ON the computer. To be best prepared for your new ViewSonic, LCD display. Attach the adapter to the computer Macintosh...
User Guide
Page 8
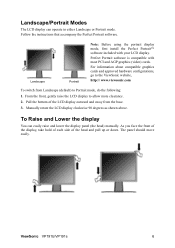
...and pull up or down. Manually rotate the LCD display clockwise 90 degrees as shown above. Perfect Portrait software is compatible with your LCD display. From the front, gently raise the LCD display to Portrait mode, do the following: 1. ViewSonic VP191b/VP191s 6 As you face the front of the... display, take hold of each side of the LCD display outward and away from Landscape (default...
...and pull up or down. Manually rotate the LCD display clockwise 90 degrees as shown above. Perfect Portrait software is compatible with your LCD display. From the front, gently raise the LCD display to Portrait mode, do the following: 1. ViewSonic VP191b/VP191s 6 As you face the front of the... display, take hold of each side of the LCD display outward and away from Landscape (default...

User Guide
Page 9
... compatible wall mounting kit (100 mm x 100 mm distance). 6. ViewSonic VP191b/VP191s 7 Disconnect Power. 2. Attach the mounting bracket from the back plate. 5. Let the plate hang on a towel or blanket. 3. Notice the four screws. 4. Lay the LCD display face down on the neck of Wall Mount (Optional) To... obtain a wall-mounting kit, contact ViewSonic or your LCD display from the head of the LCD display. Attach the LCD display to the wall, following : Remove four screws 1. To convert your local dealer. Pull the back plate away ...
... compatible wall mounting kit (100 mm x 100 mm distance). 6. ViewSonic VP191b/VP191s 7 Disconnect Power. 2. Attach the mounting bracket from the back plate. 5. Let the plate hang on a towel or blanket. 3. Notice the four screws. 4. Lay the LCD display face down on the neck of Wall Mount (Optional) To... obtain a wall-mounting kit, contact ViewSonic or your LCD display from the head of the LCD display. Attach the LCD display to the wall, following : Remove four screws 1. To convert your local dealer. Pull the back plate away ...
User Guide
Page 10
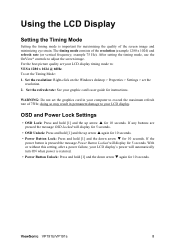
... the resolution: Right-click on the Windows desktop > Properties > Settings > set the Timing Mode: 1. Set the refresh rate: See your LCD display's power will automatically turn ON when power is restored. • Power Button Unlock: Press and hold [1] and the down arrow T ...or without this setting, after a power failure, your graphic card's user guide for 10 seconds. Using the LCD Display Setting the Timing Mode Setting the timing mode is important for 10 seconds. ViewSonic VP191b/VP191s 8 OSD and Power Lock Settings • OSD Lock: Press and hold [1] and the up arrow...
... the resolution: Right-click on the Windows desktop > Properties > Settings > set the Timing Mode: 1. Set the refresh rate: See your LCD display's power will automatically turn ON when power is restored. • Power Button Unlock: Press and hold [1] and the down arrow T ...or without this setting, after a power failure, your graphic card's user guide for 10 seconds. Using the LCD Display Setting the Timing Mode Setting the timing mode is important for 10 seconds. ViewSonic VP191b/VP191s 8 OSD and Power Lock Settings • OSD Lock: Press and hold [1] and the up arrow...
User Guide
Page 12
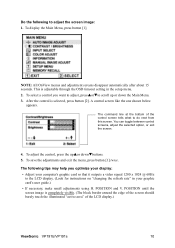
...control you optimize your display: • Adjust your computer's graphic card so that it outputs a video signal 1280 x 1024 @ 60Hz to the LCD display. (Look for instructions on "changing the refresh rate" in the setup menu. 2. After the control is adjustable through the OSD timeout setting... from this screen. To save the adjustments and exit the menu, press button [1] twice. The command line at the bottom of the LCD display.) ViewSonic VP191b/VP191s 10 To adjust the control, press the upSor downTbuttons. 5. This is selected, press button [2]. A control screen like the one ...
...control you optimize your display: • Adjust your computer's graphic card so that it outputs a video signal 1280 x 1024 @ 60Hz to the LCD display. (Look for instructions on "changing the refresh rate" in the setup menu. 2. After the control is adjustable through the OSD timeout setting... from this screen. To save the adjustments and exit the menu, press button [1] twice. The command line at the bottom of the LCD display.) ViewSonic VP191b/VP191s 10 To adjust the control, press the upSor downTbuttons. 5. This is selected, press button [2]. A control screen like the one ...
User Guide
Page 14
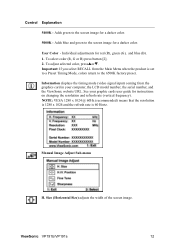
Adds blue and green to the screen image for a darker color. 5000K - To adjust selected color, pressSorT. Manual Image Adjust Sub-menu H. ViewSonic VP191b/VP191s 12 Adds green to the 6500K factory preset. Individual adjustments for instructions on changing the resolution and refresh rate (vertical frequency). User Color - ... Important: If you select RECALL from the graphics card in your graphic cards user guide for red (R), green (G), and blue (B). 1. See your computer, the LCD model number, the serial number, and the ViewSonic website URL. Control Explanation 5400K -
Adds blue and green to the screen image for a darker color. 5000K - To adjust selected color, pressSorT. Manual Image Adjust Sub-menu H. ViewSonic VP191b/VP191s 12 Adds green to the 6500K factory preset. Individual adjustments for instructions on changing the resolution and refresh rate (vertical frequency). User Color - ... Important: If you select RECALL from the graphics card in your graphic cards user guide for red (R), green (G), and blue (B). 1. See your computer, the LCD model number, the serial number, and the ViewSonic website URL. Control Explanation 5400K -
User Guide
Page 17
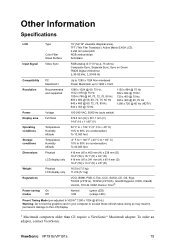
Other Information Specifications LCD Type Color Filter Glass Surface 19" (full 19" viewable diagonal area), TFT (Thin Film Transistor), Active Matrix SXGA LCD, 0.294 mm pixel pitch RGB vertical stripe Anti-Glare Input Signal Video Sync RGB analog (0.7/1.0 Vp... x 9.4" (D) 416 mm (W) x 341 mm (H) x 65.4 mm (D) 16.4" (W) x 13.4" (H) x 2.6" (D) Weight Physical LCD display only 16.5 lb (7.5 kg) 11.2 lb (5.1 kg) Regulations VCCI, BSMI, PSB, C-Tick, CCC, SASO, CE, GS, Ergo, TCO03 (VP191s), TCO'99 (VP191b), Gost-R/Hygienic, ICES, ClassB, UL/cUL, FCC-B, NOM, ENERGY STAR® Power saving On...
Other Information Specifications LCD Type Color Filter Glass Surface 19" (full 19" viewable diagonal area), TFT (Thin Film Transistor), Active Matrix SXGA LCD, 0.294 mm pixel pitch RGB vertical stripe Anti-Glare Input Signal Video Sync RGB analog (0.7/1.0 Vp... x 9.4" (D) 416 mm (W) x 341 mm (H) x 65.4 mm (D) 16.4" (W) x 13.4" (H) x 2.6" (D) Weight Physical LCD display only 16.5 lb (7.5 kg) 11.2 lb (5.1 kg) Regulations VCCI, BSMI, PSB, C-Tick, CCC, SASO, CE, GS, Ergo, TCO03 (VP191s), TCO'99 (VP191b), Gost-R/Hygienic, ICES, ClassB, UL/cUL, FCC-B, NOM, ENERGY STAR® Power saving On...

User Guide
Page 18
... is tightly secured to the video output port on the back of the video cable is not attached permanently to the LCD display, tightly secure it to the LCD display. • Adjust brightness and contrast. • If you are missing, check the video cable to make sure it is securely ... blue) are using an Macintosh older than G3, you need a Macintosh adapter. Control buttons do not work • Press only one button at a time. ViewSonic VP191b/VP191s 16 Troubleshooting No power • Make sure power button (or switch) is ON. • Make sure A/C power cord is securely connected to the...
... is tightly secured to the video output port on the back of the video cable is not attached permanently to the LCD display, tightly secure it to the LCD display. • Adjust brightness and contrast. • If you are missing, check the video cable to make sure it is securely ... blue) are using an Macintosh older than G3, you need a Macintosh adapter. Control buttons do not work • Press only one button at a time. ViewSonic VP191b/VP191s 16 Troubleshooting No power • Make sure power button (or switch) is ON. • Make sure A/C power cord is securely connected to the...
User Guide
Page 20
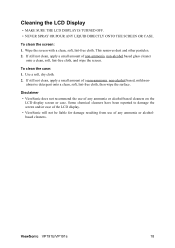
...2. To clean the case: 1. If still not clean, apply a small amount of any ammonia or alcohol-based cleaners on the LCD display screen or case. ViewSonic VP191b/VP191s 18 To clean the screen: 1. Use a soft, dry cloth. 2. Some chemical cleaners have been reported to damage the screen... and/or case of the LCD display. • ViewSonic will not be liable for damage resulting from use of non-ammonia, non-alcohol...
...2. To clean the case: 1. If still not clean, apply a small amount of any ammonia or alcohol-based cleaners on the LCD display screen or case. ViewSonic VP191b/VP191s 18 To clean the screen: 1. Use a soft, dry cloth. 2. Some chemical cleaners have been reported to damage the screen... and/or case of the LCD display. • ViewSonic will not be liable for damage resulting from use of non-ammonia, non-alcohol...
User Guide
Page 21
... a product defect. 3. Take or ship the product freight prepaid in material or workmanship during the warranty period. Effect of the U.S.A. ViewSonic LCD Warranty (V3.0) ViewSonic VP191b/VP191s 19 Limited Warranty VIEWSONIC LCD DISPLAY What the warranty covers: ViewSonic® warrants its sole option, repair or replace the product with the product. If a product proves to be required to...
... a product defect. 3. Take or ship the product freight prepaid in material or workmanship during the warranty period. Effect of the U.S.A. ViewSonic LCD Warranty (V3.0) ViewSonic VP191b/VP191s 19 Limited Warranty VIEWSONIC LCD DISPLAY What the warranty covers: ViewSonic® warrants its sole option, repair or replace the product with the product. If a product proves to be required to...


