User Guide
Page 1
... las instrucciones en este manual" Model No. VS17740 P/N: VG3448 Warranty information contained in this User Guide to obtain important information on installing and using your product in a safe manner, as well as registering your limited coverage from ViewSonic® Corporation, which is also found on our web site at http://www.viewsonic.com in English, or in specific languages using the Regional selection...
... las instrucciones en este manual" Model No. VS17740 P/N: VG3448 Warranty information contained in this User Guide to obtain important information on installing and using your product in a safe manner, as well as registering your limited coverage from ViewSonic® Corporation, which is also found on our web site at http://www.viewsonic.com in English, or in specific languages using the Regional selection...

User Guide
Page 4
...; Disconnect the power plug from the equipment. When using ear-/headphones, adjust the volume to the graphics card's user guide. 4 For details, please refer to appropriate levels, or hearing damage may result. • NOTICE: THE MONITOR MAY OVERHEAT AND SHUTDOWN! After rebooting, change your monitor again. If the device shuts down automatically, please turn on your monitor's resolution and refresh rate. • When connecting to a power outlet, DO...
...; Disconnect the power plug from the equipment. When using ear-/headphones, adjust the volume to the graphics card's user guide. 4 For details, please refer to appropriate levels, or hearing damage may result. • NOTICE: THE MONITOR MAY OVERHEAT AND SHUTDOWN! After rebooting, change your monitor again. If the device shuts down automatically, please turn on your monitor's resolution and refresh rate. • When connecting to a power outlet, DO...

User Guide
Page 5
... Setup 9 Installing the Stand 9 Wall Mounting...12 Using the Security Slot 14 Making Connections 15 Connecting to Power 15 Connecting External Devices 16 HDMI Connection 16 DisplayPort and miniDP Connection 17 USB Connection...18 Using the Monitor 19 Adjusting the Viewing Angle 19 Height Adjustment 19 Tilt Angle Adjustment 20 Swivel Angle Adjustment 21 Turning the Device On/Off 22 Using the Control Panel Keys 23 Quick Menu...23 Hot Keys...25 Configuring the Settings 27 General Operations 27 On-Screen Display (OSD) Menu Tree 30 Menu...
... Setup 9 Installing the Stand 9 Wall Mounting...12 Using the Security Slot 14 Making Connections 15 Connecting to Power 15 Connecting External Devices 16 HDMI Connection 16 DisplayPort and miniDP Connection 17 USB Connection...18 Using the Monitor 19 Adjusting the Viewing Angle 19 Height Adjustment 19 Tilt Angle Adjustment 20 Swivel Angle Adjustment 21 Turning the Device On/Off 22 Using the Control Panel Keys 23 Quick Menu...23 Hot Keys...25 Configuring the Settings 27 General Operations 27 On-Screen Display (OSD) Menu Tree 30 Menu...

User Guide
Page 9
Use the captured screw in a user friendly box to the monitor stand's neck. 1 2 9 Place the box on the monitor stand's base with the monitor stand's neck. 3. Initial Setup This section provides detailed instructions for setting up your monitor. Remove the top tray. 2. Installing the Stand 1. Align and connect the three (3) points on a flat, stable surface and open the front flap of the box to reveal the contents. NOTE:The monitor comes packaged in the monitor stand's base and secure it to make installation easy. Remove the monitor stand's base and neck.
Use the captured screw in a user friendly box to the monitor stand's neck. 1 2 9 Place the box on the monitor stand's base with the monitor stand's neck. 3. Initial Setup This section provides detailed instructions for setting up your monitor. Remove the top tray. 2. Installing the Stand 1. Align and connect the three (3) points on a flat, stable surface and open the front flap of the box to reveal the contents. NOTE:The monitor comes packaged in the monitor stand's base and secure it to make installation easy. Remove the monitor stand's base and neck.
User Guide
Page 24
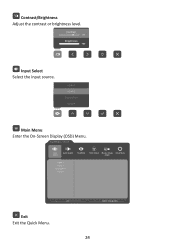
VG3448 Input Select Audio Adjust ViewMode Color Adjust Manual Image Setup Menu Adjust HDMI 1 HDMI 2 DisplayPort miniDP Exit Exit the Quick Menu. 3440 X 1440 @ 60Hz 24 mode ast/Brightness Select Menu Contrast 70 Brightness 100 Input Select Select the input source. HDMI 1 HDMI 2 DisplayPort s miniDP Main Menu Enter the On-Screen Display (OSD) Menu. Main Menu Exit Contrast/Brightness Adjust the contrast or brightness level.
VG3448 Input Select Audio Adjust ViewMode Color Adjust Manual Image Setup Menu Adjust HDMI 1 HDMI 2 DisplayPort miniDP Exit Exit the Quick Menu. 3440 X 1440 @ 60Hz 24 mode ast/Brightness Select Menu Contrast 70 Brightness 100 Input Select Select the input source. HDMI 1 HDMI 2 DisplayPort s miniDP Main Menu Enter the On-Screen Display (OSD) Menu. Main Menu Exit Contrast/Brightness Adjust the contrast or brightness level.
User Guide
Page 27
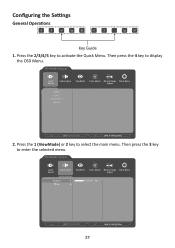
Press the 2/3/4/5 key to select the main menu. Press the 1 (ViewMode) or 2 key to activate the Quick Menu. VG3448 Input Select Audio Adjust ViewMode Color Adjust Manual Image Setup Menu Adjust HDMI 1 HDMI 2 DisplayPort miniDP 3440 X 1440 @ 60Hz 2. Then press the 4 key to enter the selected menu. Configuring the Settings General Operations 3440 X 1440 @ 60Hz 3440 X 1440 @ 60Hz Key Guide 1. VG3448 Input Select Audio Adjust ViewMode Color Adjust Manual Image Setup Menu Adjust Volume 50 Mute 27 3440 X 1440 @ 60Hz Then press the 3 key to display the OSD Menu.
Press the 2/3/4/5 key to select the main menu. Press the 1 (ViewMode) or 2 key to activate the Quick Menu. VG3448 Input Select Audio Adjust ViewMode Color Adjust Manual Image Setup Menu Adjust HDMI 1 HDMI 2 DisplayPort miniDP 3440 X 1440 @ 60Hz 2. Then press the 4 key to enter the selected menu. Configuring the Settings General Operations 3440 X 1440 @ 60Hz 3440 X 1440 @ 60Hz Key Guide 1. VG3448 Input Select Audio Adjust ViewMode Color Adjust Manual Image Setup Menu Adjust Volume 50 Mute 27 3440 X 1440 @ 60Hz Then press the 3 key to display the OSD Menu.
User Guide
Page 28
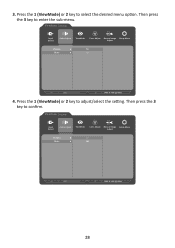
Then press the 3 key to adjust/select the setting. VG3448 Input Select Audio Adjust ViewMode Color Adjust Manual Image Setup Menu Adjust Volume On Mute Off 3440 X 1440 @ 60Hz 4. Press the 1 (ViewMode) or 2 key to confirm. 3. Press the 1 (ViewMode) or 2 key to enter the sub-menu. VG3448 Input Select Audio Adjust ViewMode Color Adjust Manual Image Setup Menu Adjust Volume On Mute Off 3440 X 1440 @ 60Hz 28 Then press the 3 key to select the desired menu option.
Then press the 3 key to adjust/select the setting. VG3448 Input Select Audio Adjust ViewMode Color Adjust Manual Image Setup Menu Adjust Volume On Mute Off 3440 X 1440 @ 60Hz 4. Press the 1 (ViewMode) or 2 key to confirm. 3. Press the 1 (ViewMode) or 2 key to enter the sub-menu. VG3448 Input Select Audio Adjust ViewMode Color Adjust Manual Image Setup Menu Adjust Volume On Mute Off 3440 X 1440 @ 60Hz 28 Then press the 3 key to select the desired menu option.
User Guide
Page 37
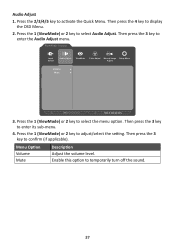
... temporarily turn off the sound. 37 VG3448 Input Select Audio Adjust ViewMode Color Adjust Manual Image Setup Menu Adjust Volume Mute 3440 X 1440 @ 60Hz 3. Enable this option to adjust/select the setting. Then press the 4 key to enter its sub-menu. 4. Menu Option Volume Mute Description Adjust the volume level. Then press the 3 key to display the OSD Menu. 2. Press the 2/3/4/5 key to select the menu option. Press the 1 (ViewMode) or 2 key to activate the Quick Menu...
... temporarily turn off the sound. 37 VG3448 Input Select Audio Adjust ViewMode Color Adjust Manual Image Setup Menu Adjust Volume Mute 3440 X 1440 @ 60Hz 3. Enable this option to adjust/select the setting. Then press the 4 key to enter its sub-menu. 4. Menu Option Volume Mute Description Adjust the volume level. Then press the 3 key to display the OSD Menu. 2. Press the 2/3/4/5 key to select the menu option. Press the 1 (ViewMode) or 2 key to activate the Quick Menu...
User Guide
Page 38
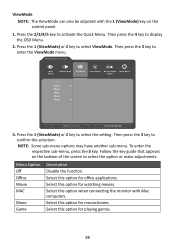
... option for monochrome. VG3448 Input Select Audio Adjust ViewMode Color Adjust Manual Image Setup Menu Adjust Off Office Movie MAC Mono Game 3440 X 1440 @ 60Hz 3. Press the 1 (ViewMode) or 2 key to enter the ViewMode menu. Select this option for office applications. Select this option when connecting the monitor with the 1 (ViewMode) key on the bottom of the screen to select the option or make adjustments. ViewMode NOTE:The...
... option for monochrome. VG3448 Input Select Audio Adjust ViewMode Color Adjust Manual Image Setup Menu Adjust Off Office Movie MAC Mono Game 3440 X 1440 @ 60Hz 3. Press the 1 (ViewMode) or 2 key to enter the ViewMode menu. Select this option for office applications. Select this option when connecting the monitor with the 1 (ViewMode) key on the bottom of the screen to select the option or make adjustments. ViewMode NOTE:The...

User Guide
Page 39
... the setting. VG3448 Input Select Audio Adjust ViewMode Color Adjust Manual Image Setup Menu Adjust Contrast/Brightness Color Temperature Color Space Color Range Gamma 3440 X 1440 @ 60Hz 3. Press the 1 (ViewMode) or 2 key to select Color Adjust. Menu Option Contrast/ Brightness Description Contrast Adjust the degree of difference between the lightest and darkest parts of the picture and change the amount of the screen image. 39 Press the 2/3/4/5 key to enter its sub-menu. 4. Then press the 3 key to activate the Quick Menu. NOTE...
... the setting. VG3448 Input Select Audio Adjust ViewMode Color Adjust Manual Image Setup Menu Adjust Contrast/Brightness Color Temperature Color Space Color Range Gamma 3440 X 1440 @ 60Hz 3. Press the 1 (ViewMode) or 2 key to select Color Adjust. Menu Option Contrast/ Brightness Description Contrast Adjust the degree of difference between the lightest and darkest parts of the picture and change the amount of the screen image. 39 Press the 2/3/4/5 key to enter its sub-menu. 4. Then press the 3 key to activate the Quick Menu. NOTE...
User Guide
Page 41
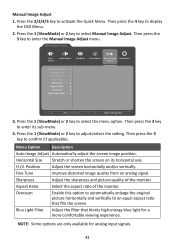
... the original picture horizontally and vertically to an equal aspect ratio that blocks high-energy blue light for analog input signals. 41 Then press the 4 key to adjust/select the setting. Then press the 3 key to confirm (if applicable). Then press the 3 key to enter the Manual Image Adjust menu. Position Adjust the screen horizontally and/or vertically. VG3448 Input Select Audio Adjust ViewMode Color Adjust Manual Image Setup Menu Adjust Auto Image Adjust Horizontal Size H./V. Positian Fine Tune Sharpness Aspect Ratio Overscan Blue Light Filter 3440...
... the original picture horizontally and vertically to an equal aspect ratio that blocks high-energy blue light for analog input signals. 41 Then press the 4 key to adjust/select the setting. Then press the 3 key to confirm (if applicable). Then press the 3 key to enter the Manual Image Adjust menu. Position Adjust the screen horizontally and/or vertically. VG3448 Input Select Audio Adjust ViewMode Color Adjust Manual Image Setup Menu Adjust Auto Image Adjust Horizontal Size H./V. Positian Fine Tune Sharpness Aspect Ratio Overscan Blue Light Filter 3440...
User Guide
Page 42
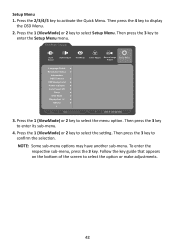
Setup Menu 1. Then press the 3 key to select Setup Menu. VG3448 Input Select Audio Adjust ViewMode Color Adjust Manual Image Setup Menu Adjust Language Select Resolution Notice Information OSD Timeout OSD Background Power Indicator Auto Power Off Sleep ECO Mode DisplayPort 1.2 DDC/CI 3440 X 1440 @ 60Hz 3. To enter the respective sub-menu, press the 3 key. NOTE:Some sub-menu options may have another sub-menu. Press the 1 (ViewMode) or 2 key to enter the Setup Menu menu. Follow the key guide that appears...
Setup Menu 1. Then press the 3 key to select Setup Menu. VG3448 Input Select Audio Adjust ViewMode Color Adjust Manual Image Setup Menu Adjust Language Select Resolution Notice Information OSD Timeout OSD Background Power Indicator Auto Power Off Sleep ECO Mode DisplayPort 1.2 DDC/CI 3440 X 1440 @ 60Hz 3. To enter the respective sub-menu, press the 3 key. NOTE:Some sub-menu options may have another sub-menu. Press the 1 (ViewMode) or 2 key to enter the Setup Menu menu. Follow the key guide that appears...

User Guide
Page 43
... modes, based on the screen. Enable/Disable DisplayPort 1.2 support. 43 Enable this function. Set the amount of time the OSD Menu remains on the screen. Resolution Notice For best picture quality, change resolution to 3440 x 1440 Clear Message Disable Message Information OSD Timeout OSD Background OSD Pivot Power Indicator Auto Power Off Sleep ECO Mode DisplayPort 1.2 Press the 1 (ViewMode) key to hide the message or press the 3 key to inform users that the current viewing resolution...
... modes, based on the screen. Enable/Disable DisplayPort 1.2 support. 43 Enable this function. Set the amount of time the OSD Menu remains on the screen. Resolution Notice For best picture quality, change resolution to 3440 x 1440 Clear Message Disable Message Information OSD Timeout OSD Background OSD Pivot Power Indicator Auto Power Off Sleep ECO Mode DisplayPort 1.2 Press the 1 (ViewMode) key to hide the message or press the 3 key to inform users that the current viewing resolution...
User Guide
Page 47
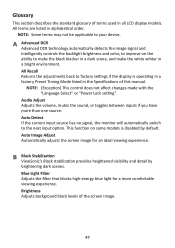
... to factory settings if the display is disabled by brightening dark scenes. NOTE: (Exception) This control does not affect changes made with the "Language Select" or "Power Lock setting". Brightness Adjusts background black levels of terms used in the Specifications of this manual. B Black Stabilization ViewSonic's Black stabilization provides heightened visibility and detail by default. Auto Detect If the current input source has no signal, the monitor will automatically switch to your device. Audio Adjust Adjusts the volume, mutes the sound...
... to factory settings if the display is disabled by brightening dark scenes. NOTE: (Exception) This control does not affect changes made with the "Language Select" or "Power Lock setting". Brightness Adjusts background black levels of terms used in the Specifications of this manual. B Black Stabilization ViewSonic's Black stabilization provides heightened visibility and detail by default. Auto Detect If the current input source has no signal, the monitor will automatically switch to your device. Audio Adjust Adjusts the volume, mutes the sound...
User Guide
Page 49
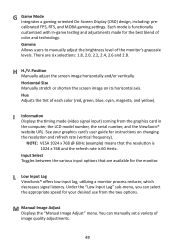
..., which decreases signal latency. Input Select Toggles between the various input options that the resolution is 1024 x 768 and the refresh rate is functionally customized with in the computer, the LCD model number, the serial number, and the ViewSonic® website URL. Each mode is 60 Hertz. There are available for the best blend of each color (red, green, blue, cyan, magenta, and yellow). Position Manually adjust the screen image horizontally and/or vertically. M Manual Image Adjust Displays the "Manual Image Adjust" menu.
..., which decreases signal latency. Input Select Toggles between the various input options that the resolution is 1024 x 768 and the refresh rate is functionally customized with in the computer, the LCD model number, the serial number, and the ViewSonic® website URL. Each mode is 60 Hertz. There are available for the best blend of each color (red, green, blue, cyan, magenta, and yellow). Position Manually adjust the screen image horizontally and/or vertically. M Manual Image Adjust Displays the "Manual Image Adjust" menu.

User Guide
Page 50
.... Response Time Adjusts the response time, creating smooth images without pivot. +90° Sets the OSD Menu +90° pivot. -90° Sets the OSD Menu -90° pivot. Red, green, and blue light are added together to reopen the menu. Options Description 0° Sets the OSD Menu without streaking, blurring or ghosting. S Saturation Adjusts the color depth of the monitor. 50 R Recall Resets the ViewMode monitor settings. Setup Menu Adjusts On-Screen Display (OSD) settings. RGB Color Space The most...
.... Response Time Adjusts the response time, creating smooth images without pivot. +90° Sets the OSD Menu +90° pivot. -90° Sets the OSD Menu -90° pivot. Red, green, and blue light are added together to reopen the menu. Options Description 0° Sets the OSD Menu without streaking, blurring or ghosting. S Saturation Adjusts the color depth of the monitor. 50 R Recall Resets the ViewMode monitor settings. Setup Menu Adjusts On-Screen Display (OSD) settings. RGB Color Space The most...

User Guide
Page 52
... connected. • Adjust the brightness and contrast settings. • Make sure the correct input source is selected. • If any colors (red, green, or blue) are missing, check the video cable to make sure it is supplying power. Screen image is selected. • Check for a non-DDC adapter. Screen image is blurred The screen isn't centered correctly • Adjust the resolution to the correct Aspect Ratio. • Reset the monitor to factory settings. • Adjust the horizontal and vertical controls via the OSD Menu. • Reset the monitor to factory settings...
... connected. • Adjust the brightness and contrast settings. • Make sure the correct input source is selected. • If any colors (red, green, or blue) are missing, check the video cable to make sure it is supplying power. Screen image is selected. • Check for a non-DDC adapter. Screen image is blurred The screen isn't centered correctly • Adjust the resolution to the correct Aspect Ratio. • Reset the monitor to factory settings. • Adjust the horizontal and vertical controls via the OSD Menu. • Reset the monitor to factory settings...

User Guide
Page 53
... the input source. USB devices connected to the monitor do • Press only one key at a time. connect the device directly to factory settings. The OSD Menu does not appear on page 19. The monitor will not adjust • Make sure there are no image appears on the monitor. • Reset the monitor to factory settings. Problem or Issue Possible Solutions The screen appears yellow • Make sure the "Blue Light Filter" is locked. Loose...
... the input source. USB devices connected to the monitor do • Press only one key at a time. connect the device directly to factory settings. The OSD Menu does not appear on page 19. The monitor will not adjust • Make sure there are no image appears on the monitor. • Reset the monitor to factory settings. Problem or Issue Possible Solutions The screen appears yellow • Make sure the "Blue Light Filter" is locked. Loose...
User Guide
Page 61
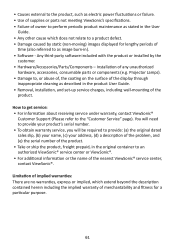
... meeting ViewSonic's specifications. • Failure of owner to perform periodic product maintenance as stated in the User Guide. • Any other cause which extend beyond the description contained herein including the implied warranty of merchantability and fitness for lengthy periods of time (also referred to as described in the product User Guide. • Removal, installation, and set-up service charges, including wall-mounting...
... meeting ViewSonic's specifications. • Failure of owner to perform periodic product maintenance as stated in the User Guide. • Any other cause which extend beyond the description contained herein including the implied warranty of merchantability and fitness for lengthy periods of time (also referred to as described in the product User Guide. • Removal, installation, and set-up service charges, including wall-mounting...

User Guide
Page 63
... protects: This warranty is displayed on your country of purchase, for all parts including the light source and for all labour from the date of time. • Removal, installation, insurance, and set-up service charges. 63 Replacement product or parts may include remanufactured or refurbished parts or components & accessories. How long the warranty is effective: ViewSonic® LCD displays are warranted for between 1 and...
... protects: This warranty is displayed on your country of purchase, for all parts including the light source and for all labour from the date of time. • Removal, installation, insurance, and set-up service charges. 63 Replacement product or parts may include remanufactured or refurbished parts or components & accessories. How long the warranty is effective: ViewSonic® LCD displays are warranted for between 1 and...


