
User Manual
Page 2
Contents TCO Information i Compliance Information 1 Important Safety Instructions 2 Declaration of RoHS Compliance 3 Copyright Information 4 Product Registration 4 Getting Started Package Contents 5 Precautions 5 Quick Installation 6 Wall Mounting (Optional 7 Using the LCD Display Setting the Timing Mode 8 OSD and Power Lock Settings 8 Adjusting the Screen Image 9 Main Menu Controls 11 Other Information Specifications 15 Troubleshooting 16 Customer Support 17 Cleaning the LCD Display 18 Limited Warranty 19 ViewSonic VA1912w/VA1912wb
Contents TCO Information i Compliance Information 1 Important Safety Instructions 2 Declaration of RoHS Compliance 3 Copyright Information 4 Product Registration 4 Getting Started Package Contents 5 Precautions 5 Quick Installation 6 Wall Mounting (Optional 7 Using the LCD Display Setting the Timing Mode 8 OSD and Power Lock Settings 8 Adjusting the Screen Image 9 Main Menu Controls 11 Other Information Specifications 15 Troubleshooting 16 Customer Support 17 Cleaning the LCD Display 18 Limited Warranty 19 ViewSonic VA1912w/VA1912wb
User Manual
Page 8
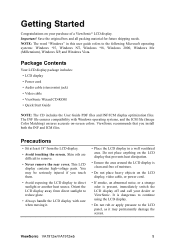
... parts. Do not place anything on the LCD display that you touch them. • Avoid exposing the LCD display to the following Microsoft operating systems: Windows '95, Windows NT, Windows '98, Windows 2000, Windows Me (Millennium), Windows XP, and Windows Vista. Package Contents Your LCD display package includes: • LCD display • Power cord • Audio cable (stereo mini jack) • Video cable • ViewSonic Wizard CD-ROM • Quick Start Guide NOTE: The CD includes the User Guide PDF...
... parts. Do not place anything on the LCD display that you touch them. • Avoid exposing the LCD display to the following Microsoft operating systems: Windows '95, Windows NT, Windows '98, Windows 2000, Windows Me (Millennium), Windows XP, and Windows Vista. Package Contents Your LCD display package includes: • LCD display • Power cord • Audio cable (stereo mini jack) • Video cable • ViewSonic Wizard CD-ROM • Quick Start Guide NOTE: The CD includes the User Guide PDF...
User Manual
Page 9
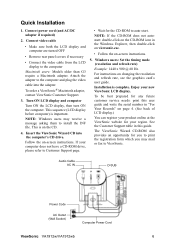
... the adapter. Windows users: Set the timing mode (resolution and refresh rate) Example: 1440 x 900 @ 60 Hz. To order a ViewSonic® Macintosh adapter, contact ViewSonic Customer Support. 3. For instructions on -screen instructions. NOTE: Windows users may mail or fax to the computer and plug the video cable into the computer's CD drive. Audio Cable AC IN D-SUB Power Code AC Outlet (Wall Socket) Computer Power Cord ViewSonic VA1912w/VA1912wb 6 Connect video cable • Make sure both the LCD display and computer are turned OFF • Remove rear panel covers...
... the adapter. Windows users: Set the timing mode (resolution and refresh rate) Example: 1440 x 900 @ 60 Hz. To order a ViewSonic® Macintosh adapter, contact ViewSonic Customer Support. 3. For instructions on -screen instructions. NOTE: Windows users may mail or fax to the computer and plug the video cable into the computer's CD drive. Audio Cable AC IN D-SUB Power Code AC Outlet (Wall Socket) Computer Power Cord ViewSonic VA1912w/VA1912wb 6 Connect video cable • Make sure both the LCD display and computer are turned OFF • Remove rear panel covers...

User Manual
Page 10
... convert your local dealer. Remove the four screws attaching the base. 5. Attach the LCD display to the instructions that the Power button is turned Off, then disconnect the power cord. 2. Wall Mounting (Optional) To obtain a wall-mounting kit, contact ViewSonic® or your LCD display from the VESA compatible wall mounting kit (75 mm x 75 mm distance). 7. Remove the Rubber Plugs from the back of the LCD display. 4. Remove the Plastic Covers from inside the four VESA screw holes. 6. ViewSonic VA1912w/VA1912wb 7
... convert your local dealer. Remove the four screws attaching the base. 5. Attach the LCD display to the instructions that the Power button is turned Off, then disconnect the power cord. 2. Wall Mounting (Optional) To obtain a wall-mounting kit, contact ViewSonic® or your LCD display from the VESA compatible wall mounting kit (75 mm x 75 mm distance). 7. Remove the Rubber Plugs from the back of the LCD display. 4. Remove the Plastic Covers from inside the four VESA screw holes. 6. ViewSonic VA1912w/VA1912wb 7
User Manual
Page 11
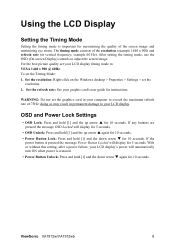
... best picture quality set the Timing Mode: 1. Set the refresh rate: See your graphic card's user guide for 5 seconds. If the power button is restored. • Power Button Unlock: Press and hold [1] and the down arrow T for 10 seconds. ViewSonic VA1912w/VA1912wb 8 WARNING: Do not set the resolution. 2. To set your LCD display. example 60 Hz). Set the resolution: Right-click on the Windows desktop > Properties > Settings > set the graphics card in permanent damage to adjust the screen image. OSD and Power Lock Settings • OSD Lock...
... best picture quality set the Timing Mode: 1. Set the refresh rate: See your graphic card's user guide for 5 seconds. If the power button is restored. • Power Button Unlock: Press and hold [1] and the down arrow T for 10 seconds. ViewSonic VA1912w/VA1912wb 8 WARNING: Do not set the resolution. 2. To set your LCD display. example 60 Hz). Set the resolution: Right-click on the Windows desktop > Properties > Settings > set the graphics card in permanent damage to adjust the screen image. OSD and Power Lock Settings • OSD Lock...
User Manual
Page 12
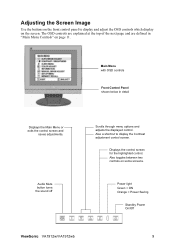
Audio Mute button turns the sound off Scrolls through menu options and adjusts the displayed control. Also toggles between two controls on page 11. Power light Green = ON Orange = Power Saving Standby Power On/Off ViewSonic VA1912w/VA1912wb 9 Adjusting the Screen Image Use the buttons on the front control panel to display the Contrast adjustment control screen. The OSD controls are explained at the top of the next page and are defined in detail Displays the Main Menu or exits the control screen and saves adjustments. Displays the control screen for...
Audio Mute button turns the sound off Scrolls through menu options and adjusts the displayed control. Also toggles between two controls on page 11. Power light Green = ON Orange = Power Saving Standby Power On/Off ViewSonic VA1912w/VA1912wb 9 Adjusting the Screen Image Use the buttons on the front control panel to display the Contrast adjustment control screen. The OSD controls are explained at the top of the next page and are defined in detail Displays the Main Menu or exits the control screen and saves adjustments. Displays the control screen for...
User Manual
Page 13
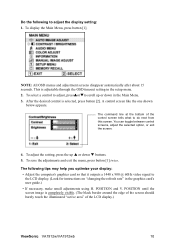
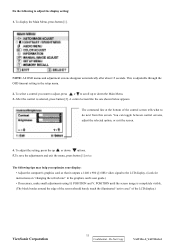
... adjust the display setting: 1. To select a control to adjust, pressSorTto scroll up S or down in the Main Menu. 3. Do the following tips may help you optimize your display: • Adjust the computer's graphics card so that it outputs a 1440 x 900 @ 60Hz video signal to the LCD display. (Look for instructions on "changing the refresh rate" in the graphics card's user guide.) • If necessary, make small adjustments using H. The following to do next from this screen. A control screen...
... adjust the display setting: 1. To select a control to adjust, pressSorTto scroll up S or down in the Main Menu. 3. Do the following tips may help you optimize your display: • Adjust the computer's graphics card so that it outputs a 1440 x 900 @ 60Hz video signal to the LCD display. (Look for instructions on "changing the refresh rate" in the graphics card's user guide.) • If necessary, make small adjustments using H. The following to do next from this screen. A control screen...

User Manual
Page 14
... and Brightness adjustments to be disabled. 9300K-Adds blue to the screen image for cooler white (used in many of the latest applications. Brightness adjusts background black level of red (R), green (G), and blue (B). Color Adjust provides several color adjustment modes, including preset color temperatures and a User Color mode which allows independent adjustment of the screen image. ViewSonic VA1912w/VA1912wb 11 Audio Adjust Volume increases the volume, decreases the volume, and mutes the audio. The factory setting for this setting allows the LCD display to the screen image for...
... and Brightness adjustments to be disabled. 9300K-Adds blue to the screen image for cooler white (used in many of the latest applications. Brightness adjusts background black level of red (R), green (G), and blue (B). Color Adjust provides several color adjustment modes, including preset color temperatures and a User Color mode which allows independent adjustment of the screen image. ViewSonic VA1912w/VA1912wb 11 Audio Adjust Volume increases the volume, decreases the volume, and mutes the audio. The factory setting for this setting allows the LCD display to the screen image for...
User Manual
Page 15
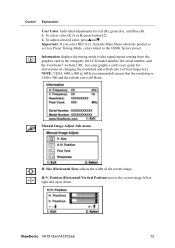
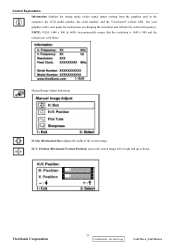
... User Color Individual adjustments for instructions on changing the resolution and refresh rate (vertical frequency). ViewSonic VA1912w/VA1912wb 12 Position (Horizontal/Vertical Position) moves the screen image left or right and up or down. Manual Image Adjust Sub-menu H. Information displays the timing mode (video signal input) coming from the Main Menu when the product is 60 Hertz. H./V. To select color (R, G or B) press button [2]. 2. To adjust selected color, pressSandT. Important: If you select RECALL from the graphics card in the computer, the LCD model number...
... User Color Individual adjustments for instructions on changing the resolution and refresh rate (vertical frequency). ViewSonic VA1912w/VA1912wb 12 Position (Horizontal/Vertical Position) moves the screen image left or right and up or down. Manual Image Adjust Sub-menu H. Information displays the timing mode (video signal input) coming from the Main Menu when the product is 60 Hertz. H./V. To select color (R, G or B) press button [2]. 2. To adjust selected color, pressSandT. Important: If you select RECALL from the graphics card in the computer, the LCD model number...
User Manual
Page 18
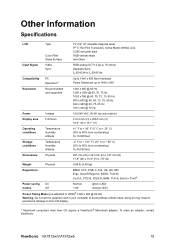
Other Information Specifications LCD Type Color Filter Glass Surface 19" (full 19" viewable diagonal area), TFT (Thin Film Transistor), Active Matrix WXGA LCD, 0.285 mm pixel pitch RGB vertical stripe Anti-Glare Input Signal Video Sync RGB analog (0.7/1.0 Vp-p, 75 ohms) Separate Sync, fh:30-82 kHz, fv:50-85 Hz Compatibility PC Macintosh1 Up to 1440 x 900 Non-interlaced Power Macintosh up to 1440 x 900 Resolution Recommended and supported 1440 x 900...
Other Information Specifications LCD Type Color Filter Glass Surface 19" (full 19" viewable diagonal area), TFT (Thin Film Transistor), Active Matrix WXGA LCD, 0.285 mm pixel pitch RGB vertical stripe Anti-Glare Input Signal Video Sync RGB analog (0.7/1.0 Vp-p, 75 ohms) Separate Sync, fh:30-82 kHz, fv:50-85 Hz Compatibility PC Macintosh1 Up to 1440 x 900 Non-interlaced Power Macintosh up to 1440 x 900 Resolution Recommended and supported 1440 x 900...

User Manual
Page 19
... any colors (red, green, or blue) are missing, check the video cable to make sure it to the LCD display. • Adjust brightness and contrast. • If you are using an Macintosh older than G3, you have an older graphics card, contact ViewSonic® for a non-DDC adapter. Troubleshooting No power • Make sure power button (or switch) is ON. • Make sure A/C power cord is securely connected to the LCD display. • Plug another computer. • If you need a Macintosh adapter.
... any colors (red, green, or blue) are missing, check the video cable to make sure it to the LCD display. • Adjust brightness and contrast. • If you are using an Macintosh older than G3, you have an older graphics card, contact ViewSonic® for a non-DDC adapter. Troubleshooting No power • Make sure power button (or switch) is ON. • Make sure A/C power cord is securely connected to the LCD display. • Plug another computer. • If you need a Macintosh adapter.

User Manual
Page 22
... warranty is displayed on ViewSonic products sold outside the U.S.A. d. e. To obtain warranted service, you will need to other property caused by ViewSonic. Limitation of implied warranties: There are warranted for 3 years for all parts including the light source and 3 years for an extended period of the Maintenance Guarantee Card. 4.3: ViewSonic LCD Warranty LCD_LW02 Rev. 1d 06-30-06 ViewSonic VA1912w/VA1912wb 19 Damage to...
... warranty is displayed on ViewSonic products sold outside the U.S.A. d. e. To obtain warranted service, you will need to other property caused by ViewSonic. Limitation of implied warranties: There are warranted for 3 years for all parts including the light source and 3 years for an extended period of the Maintenance Guarantee Card. 4.3: ViewSonic LCD Warranty LCD_LW02 Rev. 1d 06-30-06 ViewSonic VA1912w/VA1912wb 19 Damage to...
Service Manual
Page 4
... may be sure not to a Hazardous Voltage Circuit ViewSonic Corporation 1 Confidential - When designing the enclosure, it . (2) Be sure to turn off power supply when connecting or disconnecting input connector. (3) Wipe off the product before cleaning. (2) Use only a dry soft cloth when cleaning the LCD panel surface. (3) Use a soft cloth soaked with mild detergent to the TFT Module from the AC outlet if the product...
... may be sure not to a Hazardous Voltage Circuit ViewSonic Corporation 1 Confidential - When designing the enclosure, it . (2) Be sure to turn off power supply when connecting or disconnecting input connector. (3) Wipe off the product before cleaning. (2) Use only a dry soft cloth when cleaning the LCD panel surface. (3) Use a soft cloth soaked with mild detergent to the TFT Module from the AC outlet if the product...

Service Manual
Page 11
... indicating Power Button lock or unlock is in progress and when complete it is locked will indicate "OSD Locked" Note 3: OSD Lock should show on the screen for Language, Power Lock, User Color Settings or Input Priority Resolution Notice Actions 1. Execute Auto Image Adjust Note: Memory Recall should be lockable in Section 4-8 2. Main Menu Controls Auto Image Adjust*1 Contrast/Brightness*2*4 Audio Adjust Volume*4, Mute*4 Color Adjust sRGB, 9300K, 6500K(default), 5400, 5000, User Color [R, G, B] Information H Frequency, V Frequency, Resolution, Pixel Clock, Serial Number, Model Number...
... indicating Power Button lock or unlock is in progress and when complete it is locked will indicate "OSD Locked" Note 3: OSD Lock should show on the screen for Language, Power Lock, User Color Settings or Input Priority Resolution Notice Actions 1. Execute Auto Image Adjust Note: Memory Recall should be lockable in Section 4-8 2. Main Menu Controls Auto Image Adjust*1 Contrast/Brightness*2*4 Audio Adjust Volume*4, Mute*4 Color Adjust sRGB, 9300K, 6500K(default), 5400, 5000, User Color [R, G, B] Information H Frequency, V Frequency, Resolution, Pixel Clock, Serial Number, Model Number...

Service Manual
Page 12
... is turned off by the user or when it times out. OSD Auto Save The OSD shall save 2.7 AUDIO INTERFACE (SPEAKER SPECIFICATION) Line input connection 3.5 mm stereo jack Line input signal 1 Vrms Line input impedance Maximum power output (Electric) 20k ohms 1.5W / CH Signal to Noise Ratio 72 dB Frequency response 300 TO 20KHZ Distortion 8%@1kHz Vibration There should be no audible vibration with volume at 100%. (Input signal within 1 Vrms) Screen image Connector...
... is turned off by the user or when it times out. OSD Auto Save The OSD shall save 2.7 AUDIO INTERFACE (SPEAKER SPECIFICATION) Line input connection 3.5 mm stereo jack Line input signal 1 Vrms Line input impedance Maximum power output (Electric) 20k ohms 1.5W / CH Signal to Noise Ratio 72 dB Frequency response 300 TO 20KHZ Distortion 8%@1kHz Vibration There should be no audible vibration with volume at 100%. (Input signal within 1 Vrms) Screen image Connector...
Service Manual
Page 14
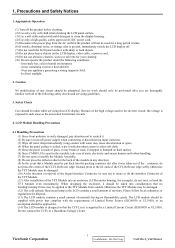
... screen. To select a control you optimize your display: • Adjust the computer's graphics card so that it outputs a 1440 x 900 @ 60Hz video signal to the LCD display. (Look for instructions on "changing the refresh rate" in the setup menu. 2. The following to adjust the display setting: 1. NOTE: All OSD menus and adjustment screens disappear automatically after about 15 seconds. This is selected, press button [2]. To display the Main Menu, press button [1]. Do the following tips may help...
... screen. To select a control you optimize your display: • Adjust the computer's graphics card so that it outputs a 1440 x 900 @ 60Hz video signal to the LCD display. (Look for instructions on "changing the refresh rate" in the setup menu. 2. The following to adjust the display setting: 1. NOTE: All OSD menus and adjustment screens disappear automatically after about 15 seconds. This is selected, press button [2]. To display the Main Menu, press button [1]. Do the following tips may help...
Service Manual
Page 16
... @ 60Hz (recommended) means that the resolution is 1440 x 900 and the refresh rate is 60 Hertz. Manual Image Adjust Sub-menu H. Size (Horizontal Size) adjusts the width of the screen image. Control Explanation Information displays the timing mode (video signal input) coming from the graphics card in the computer, the LCD model number, the serial number, and the ViewSonic® website URL. Do Not Copy VA1912w-2_VA1912wb-2 ViewSonic Corporation 13 Confidential - See your graphics card's user guide for instructions on changing the resolution and refresh rate (vertical frequency).
... @ 60Hz (recommended) means that the resolution is 1440 x 900 and the refresh rate is 60 Hertz. Manual Image Adjust Sub-menu H. Size (Horizontal Size) adjusts the width of the screen image. Control Explanation Information displays the timing mode (video signal input) coming from the graphics card in the computer, the LCD model number, the serial number, and the ViewSonic® website URL. Do Not Copy VA1912w-2_VA1912wb-2 ViewSonic Corporation 13 Confidential - See your graphics card's user guide for instructions on changing the resolution and refresh rate (vertical frequency).

Service Manual
Page 20
... all end-user's settings and restore the factory defaults. 2. Firmware Test Patten: Burn in ASIC. Hot Keys for 10 consecutive seconds, during which time you to offer a best screen quality by built-in Model (Refer to Chap 3. White Box Test Signal: 1280*1024@60Hz Test Pattern: Window standard pattern Inspection Item: Particle, Line Defect, Power, Image Remain & Mura ViewSonic Corporation 17 Confidential - All Modes Reset You...
... all end-user's settings and restore the factory defaults. 2. Firmware Test Patten: Burn in ASIC. Hot Keys for 10 consecutive seconds, during which time you to offer a best screen quality by built-in Model (Refer to Chap 3. White Box Test Signal: 1280*1024@60Hz Test Pattern: Window standard pattern Inspection Item: Particle, Line Defect, Power, Image Remain & Mura ViewSonic Corporation 17 Confidential - All Modes Reset You...
Service Manual
Page 47
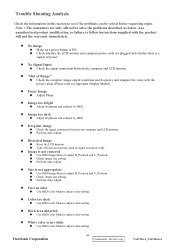
...Display Mode]). z Irregular image ‹ Check the signal connection between the computer and LCD monitor. z Size is not white ‹ Use OSD Color Menu to solve the problems described as signal extension cord). z No Signal Input ‹ Check the signal connection between the computer and LCD monitor. ‹ Perform Auto Adjust. z Image too dark ‹ Adjust brightness and contrast by OSD. z No image ‹ Make sure power button is ON. ‹ Check whether the LCD monitor and computer power cords are only allowed to adjust color setting. z Uneven color ‹ Use...
...Display Mode]). z Irregular image ‹ Check the signal connection between the computer and LCD monitor. z Size is not white ‹ Use OSD Color Menu to solve the problems described as signal extension cord). z No Signal Input ‹ Check the signal connection between the computer and LCD monitor. ‹ Perform Auto Adjust. z Image too dark ‹ Adjust brightness and contrast by OSD. z No image ‹ Make sure power button is ON. ‹ Check whether the LCD monitor and computer power cords are only allowed to adjust color setting. z Uneven color ‹ Use...
Service Manual
Page 66
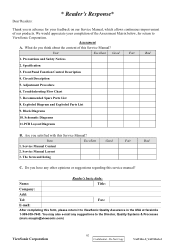
... the Director, Quality Systems & Processes (marc.maupin@viewsonic.com) ViewSonic Corporation 62 Confidential - We would appreciate your feedback on our Service Manual, which allows continuous improvement of this Service Manual? Front Panel Function Control Description 4. Specification 3. Are you in the USA at facsimile 1-909-839-7943. Recommended Spare Parts List 8. Do Not Copy VA1912w-2_VA1912wb-2 Dear Readers: * Reader's Response* Thank you...
... the Director, Quality Systems & Processes (marc.maupin@viewsonic.com) ViewSonic Corporation 62 Confidential - We would appreciate your feedback on our Service Manual, which allows continuous improvement of this Service Manual? Front Panel Function Control Description 4. Specification 3. Are you in the USA at facsimile 1-909-839-7943. Recommended Spare Parts List 8. Do Not Copy VA1912w-2_VA1912wb-2 Dear Readers: * Reader's Response* Thank you...


