

User Guide
Page 1
... este manual" Model No. Warranty information contained in this User Guide to obtain important information on our web site at http://www.viewsonic.com in English, or in specific languages using your product in the upper right corner of our website. TD2455 Display User Guide IMPORTANT: Please read this User Guide will describe your limited coverage from ViewSonic® Corporation, which is also found on installing and using...
... este manual" Model No. Warranty information contained in this User Guide to obtain important information on our web site at http://www.viewsonic.com in English, or in specific languages using your product in the upper right corner of our website. TD2455 Display User Guide IMPORTANT: Please read this User Guide will describe your limited coverage from ViewSonic® Corporation, which is also found on installing and using...

User Guide
Page 5
... 7 Package Contents...7 Product Overview...8 Initial Setup 9 Installing the Stand 9 Wall Mounting...11 Using the Security Slot 13 Making Connections 14 Connecting to Power 14 Connecting External Devices 15 HDMI Connection 15 DisplayPort Connection 16 DisplayPort MST Daisy Chain Connection 17 USB Connection...18 Touch Function Control 19 Audio Connection 20 Using the Monitor 21 Adjusting the Viewing Angle 21 Height Adjustment 21 Tilt Angle Adjustment 22 Turning the Device On/Off 23 Using the Control Panel Keys 24 Quick Menu...24 Hot Keys...26 Configuring...
... 7 Package Contents...7 Product Overview...8 Initial Setup 9 Installing the Stand 9 Wall Mounting...11 Using the Security Slot 13 Making Connections 14 Connecting to Power 14 Connecting External Devices 15 HDMI Connection 15 DisplayPort Connection 16 DisplayPort MST Daisy Chain Connection 17 USB Connection...18 Touch Function Control 19 Audio Connection 20 Using the Monitor 21 Adjusting the Viewing Angle 21 Height Adjustment 21 Tilt Angle Adjustment 22 Turning the Device On/Off 23 Using the Control Panel Keys 24 Quick Menu...24 Hot Keys...26 Configuring...

User Guide
Page 17
... four (4) monitors. Connect one end of a DisplayPort cable to the DisplayPort In port of the first monitor. Then connect the other end of the cable to the DisplayPort In port of your graphics card is 1920 x 1080. • DisplayPort 1.2 MST must be turned on in the Setup Menu in the OSD Menu to do daisy chaining. • If the input source changes to the DisplayPort Out port of...
... four (4) monitors. Connect one end of a DisplayPort cable to the DisplayPort In port of the first monitor. Then connect the other end of the cable to the DisplayPort In port of your graphics card is 1920 x 1080. • DisplayPort 1.2 MST must be turned on in the Setup Menu in the OSD Menu to do daisy chaining. • If the input source changes to the DisplayPort Out port of...

User Guide
Page 18
... C output device and cable support video signal transmission. ͫ NOTE: Power delivery capable, up stream. Then connect the other end of the cable to the USB down stream port of your computer. • One (1) USB Type C ports: One (1) up to 60W. NOTE:The monitor supports three (3) types of the monitor. Make sure your Type A peripheral device(s). (i.e. Users can power their notebooks when connected. USB Connection Connect one end of a USB cable to a USB port of USB ports.
... C output device and cable support video signal transmission. ͫ NOTE: Power delivery capable, up stream. Then connect the other end of the cable to the USB down stream port of your computer. • One (1) USB Type C ports: One (1) up to 60W. NOTE:The monitor supports three (3) types of the monitor. Make sure your Type A peripheral device(s). (i.e. Users can power their notebooks when connected. USB Connection Connect one end of a USB cable to a USB port of USB ports.
User Guide
Page 25
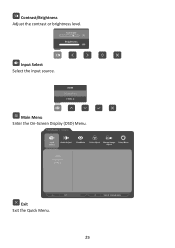
mode ast/Brightness Select Menu Contrast 70 Brightness 100 Input Select Select the input source. s HDMI DisplayPort TYPE C Main Menu Enter the On-Screen Display (OSD) Menu. TD2455 Input Select Audio Adjust ViewMode Color Adjust Manual Image Setup Menu Adjust HDMI DisplayPort TYPE C Exit Exit the Quick Menu. 1920 X 1080 @ 60Hz 25 Main Menu Exit Contrast/Brightness Adjust the contrast or brightness level.
mode ast/Brightness Select Menu Contrast 70 Brightness 100 Input Select Select the input source. s HDMI DisplayPort TYPE C Main Menu Enter the On-Screen Display (OSD) Menu. TD2455 Input Select Audio Adjust ViewMode Color Adjust Manual Image Setup Menu Adjust HDMI DisplayPort TYPE C Exit Exit the Quick Menu. 1920 X 1080 @ 60Hz 25 Main Menu Exit Contrast/Brightness Adjust the contrast or brightness level.

User Guide
Page 28
Then press the 4 key to select the main menu. TD2455 Input Select Audio Adjust ViewMode Color Adjust Manual Image Setup Menu Adjust HDMI DisplayPort TYPE C 1920 X 1080 @ 60Hz 2. Press the 1(ViewMode) or 2 key to display the OSD Menu. Press the 2/3/4/5 key to enter the selected menu. Then press the 3 key to display the Quick Menu. Mute Off Mute Configuring the Settings General Operations 1920 X 1080@60Hz 1920 X 1080@60Hz Key Guide 1. TD2455 Input Select Audio Adjust ViewMode Color Adjust Manual Image Setup Menu Adjust Volume 50 Mute 28 1920 x 1080 @ 60Hz
Then press the 4 key to select the main menu. TD2455 Input Select Audio Adjust ViewMode Color Adjust Manual Image Setup Menu Adjust HDMI DisplayPort TYPE C 1920 X 1080 @ 60Hz 2. Press the 1(ViewMode) or 2 key to display the OSD Menu. Press the 2/3/4/5 key to enter the selected menu. Then press the 3 key to display the Quick Menu. Mute Off Mute Configuring the Settings General Operations 1920 X 1080@60Hz 1920 X 1080@60Hz Key Guide 1. TD2455 Input Select Audio Adjust ViewMode Color Adjust Manual Image Setup Menu Adjust Volume 50 Mute 28 1920 x 1080 @ 60Hz
User Guide
Page 29
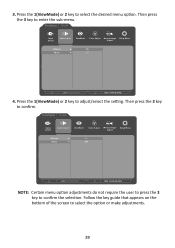
... Color Adjust Manual Image Setup Menu Adjust Volume On Mute Off 1920 x 1080 @ 60Hz 4. Then press the 3 key to select the desired menu option. TD2455 Input Select Audio Adjust ViewMode Color Adjust Manual Image Setup Menu Adjust Volume On Mute Off 1920 x 1080 @ 60Hz NOTE:Certain menu option adjustments do not require the user to press the 3 key to select the option or make adjustments. 29 Follow the key guide that appears on the bottom of the screen...
... Color Adjust Manual Image Setup Menu Adjust Volume On Mute Off 1920 x 1080 @ 60Hz 4. Then press the 3 key to select the desired menu option. TD2455 Input Select Audio Adjust ViewMode Color Adjust Manual Image Setup Menu Adjust Volume On Mute Off 1920 x 1080 @ 60Hz NOTE:Certain menu option adjustments do not require the user to press the 3 key to select the option or make adjustments. 29 Follow the key guide that appears on the bottom of the screen...

User Guide
Page 30
Press the 4 key to return to the previous menu. TD2455 Input Select Audio Adjust ViewMode Color Adjust Manual Image Setup Menu Adjust Volume On Mute Off TD2455 Input Select Audio Adjust ViewMode Color Adjust Manual Image Setup Menu Adjust Volume 50 Mute 1920 x 1080 @ 60Hz Key Guide 5. NOTE:To exit the OSD Menu, press the 5 key. 1920 x 1080 @ 60Hz Key Guide 30
Press the 4 key to return to the previous menu. TD2455 Input Select Audio Adjust ViewMode Color Adjust Manual Image Setup Menu Adjust Volume On Mute Off TD2455 Input Select Audio Adjust ViewMode Color Adjust Manual Image Setup Menu Adjust Volume 50 Mute 1920 x 1080 @ 60Hz Key Guide 5. NOTE:To exit the OSD Menu, press the 5 key. 1920 x 1080 @ 60Hz Key Guide 30
User Guide
Page 35
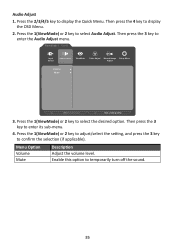
TD2455 Input Select Audio Adjust ViewMode Color Adjust Manual Image Setup Menu Adjust Volume Mute 1920 x 1080 @ 60Hz 3. Menu Option Volume Mute Description Adjust the volume level. Enable this option to select Audio Adjust. Press the 1(ViewMode) or 2 key to temporarily turn off the sound. 35 Press the 1(ViewMode) or 2 key to display the OSD Menu. 2. Then press the 4 key to select the desired option. Then press the 3 key to display the Quick Menu. Press the 2/3/4/5 key...
TD2455 Input Select Audio Adjust ViewMode Color Adjust Manual Image Setup Menu Adjust Volume Mute 1920 x 1080 @ 60Hz 3. Menu Option Volume Mute Description Adjust the volume level. Enable this option to select Audio Adjust. Press the 1(ViewMode) or 2 key to temporarily turn off the sound. 35 Press the 1(ViewMode) or 2 key to display the OSD Menu. 2. Then press the 4 key to select the desired option. Then press the 3 key to display the Quick Menu. Press the 2/3/4/5 key...

User Guide
Page 36
... display the Quick Menu. Then press the 3 key to select the option or make adjustments. Follow the key guide that appears on the bottom of the screen to confirm the selection. Select this option for monochrome. Press the 1(ViewMode) or 2 key to display the OSD Menu. 2. TD2455 Input Select Audio Adjust ViewMode Color Adjust Manual Image Setup Menu Adjust Off Office Movie MAC Mono Game 1920 X 1080 @ 60Hz 3. Menu Option Off Office Movie MAC...
... display the Quick Menu. Then press the 3 key to select the option or make adjustments. Follow the key guide that appears on the bottom of the screen to confirm the selection. Select this option for monochrome. Press the 1(ViewMode) or 2 key to display the OSD Menu. 2. TD2455 Input Select Audio Adjust ViewMode Color Adjust Manual Image Setup Menu Adjust Off Office Movie MAC Mono Game 1920 X 1080 @ 60Hz 3. Menu Option Off Office Movie MAC...

User Guide
Page 37
... display the Quick Menu. NOTE:Some sub-menu options may not be adjustable depending on the bottom of the screen to select the option or make adjustments. 37 Press the 2/3/4/5 key to select the menu option. TD2455 Input Select Audio Adjust ViewMode Color Adjust Manual Image Setup Menu Adjust Contrast/Brightness Color Temperature Color Space Color Range 1920 X 1080 @ 60Hz 3. Follow the key guide that appears on the user's custom settings. 1. To enter the respective sub-menu, press the 3 key. Color Adjust Menu...
... display the Quick Menu. NOTE:Some sub-menu options may not be adjustable depending on the bottom of the screen to select the option or make adjustments. 37 Press the 2/3/4/5 key to select the menu option. TD2455 Input Select Audio Adjust ViewMode Color Adjust Manual Image Setup Menu Adjust Contrast/Brightness Color Temperature Color Space Color Range 1920 X 1080 @ 60Hz 3. Follow the key guide that appears on the user's custom settings. 1. To enter the respective sub-menu, press the 3 key. Color Adjust Menu...

User Guide
Page 39
... latency. TD2455 Input Select Audio Adjust ViewMode Color Adjust Manual Image Setup Menu Adjust Sharpness Dynamic Contrast Response Time Aspect Ratio Overscan Low Input Lag Blue Light Filter 1920 X 1080 @ 60Hz 3. Dynamic Contrast Toggle the Dynamic Contrast function on/off. Blue Light Filter Adjusts the filter that fills the screen. Low Input Lag Select the appropriate speed to decrease input to select the menu option. Overscan Automatically enlarge the original picture horizontally and vertically to display the Quick Menu. Press...
... latency. TD2455 Input Select Audio Adjust ViewMode Color Adjust Manual Image Setup Menu Adjust Sharpness Dynamic Contrast Response Time Aspect Ratio Overscan Low Input Lag Blue Light Filter 1920 X 1080 @ 60Hz 3. Dynamic Contrast Toggle the Dynamic Contrast function on/off. Blue Light Filter Adjusts the filter that fills the screen. Low Input Lag Select the appropriate speed to decrease input to select the menu option. Overscan Automatically enlarge the original picture horizontally and vertically to display the Quick Menu. Press...
User Guide
Page 40
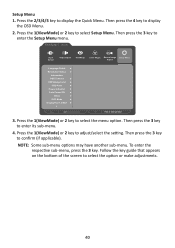
... key guide that appears on the bottom of the screen to enter its sub-menu. 4. Press the 1(ViewMode) or 2 key to display the Quick Menu. Press the 2/3/4/5 key to adjust/select the setting. NOTE:Some sub-menu options may have another sub-menu. Then press the 4 key to display the OSD Menu. 2. TD2455 Input Select Audio Adjust ViewMode Color Adjust Manual Image Setup Menu Adjust Language Select Resolution Notice Information OSD Timeout OSD Background OSD Pivot Power Indicator Auto Power Off Sleep ECO Mode...
... key guide that appears on the bottom of the screen to enter its sub-menu. 4. Press the 1(ViewMode) or 2 key to display the Quick Menu. Press the 2/3/4/5 key to adjust/select the setting. NOTE:Some sub-menu options may have another sub-menu. Then press the 4 key to display the OSD Menu. 2. TD2455 Input Select Audio Adjust ViewMode Color Adjust Manual Image Setup Menu Adjust Language Select Resolution Notice Information OSD Timeout OSD Background OSD Pivot Power Indicator Auto Power Off Sleep ECO Mode...

User Guide
Page 44
... by default. All Recall Returns the adjustments back to improve on some models, is operating in a factory Preset Timing Mode listed in a bright environment. All terms are listed in all LCD display models. NOTE: (Exception) This control does not affect changes made with the "Language Select" or "Power Lock setting". Auto Detect If the current input source has no signal, the monitor will automatically switch to your monitor. Brightness Adjusts background black levels of the screen image...
... by default. All Recall Returns the adjustments back to improve on some models, is operating in a factory Preset Timing Mode listed in a bright environment. All terms are listed in all LCD display models. NOTE: (Exception) This control does not affect changes made with the "Language Select" or "Power Lock setting". Auto Detect If the current input source has no signal, the monitor will automatically switch to your monitor. Brightness Adjusts background black levels of the screen image...

User Guide
Page 45
... testing and adjustments made for monitor color output (RGB, YUV). User Custom user settings. G Game Mode Integrating a gaming-oriented OSD design including pre-calibrated FPS, RTS, and MOBA gaming settings. Native Default color temperature. You can detect the input signal color range automatically. Panel Default Panel Original Status Panel Default Panel's default mode. Warm Set the color temperature to fit the correct color range if the colors are not displayed correctly. Gamma Allows users to use . Contrast Adjusts the difference between the image background (black level...
... testing and adjustments made for monitor color output (RGB, YUV). User Custom user settings. G Game Mode Integrating a gaming-oriented OSD design including pre-calibrated FPS, RTS, and MOBA gaming settings. Native Default color temperature. You can detect the input signal color range automatically. Panel Default Panel Original Status Panel Default Panel's default mode. Warm Set the color temperature to fit the correct color range if the colors are not displayed correctly. Gamma Allows users to use . Contrast Adjusts the difference between the image background (black level...

User Guide
Page 46
... input options that the resolution is 1024 x 768 and the refresh rate is 60Hz. L Low Input Lag ViewSonic® offers low input lag, utilizing a monitor process reducer, which decreases signal latency. H HDR10 (High-Dynamic-Range) Reduces the overall contrast of each color (red, green, blue, cyan, magenta, and yellow). NOTE:VESA 1024 x 768 @ 60Hz, for example, means that are available for your graphics cards's user guide for instructions on HDR10 video...
... input options that the resolution is 1024 x 768 and the refresh rate is 60Hz. L Low Input Lag ViewSonic® offers low input lag, utilizing a monitor process reducer, which decreases signal latency. H HDR10 (High-Dynamic-Range) Reduces the overall contrast of each color (red, green, blue, cyan, magenta, and yellow). NOTE:VESA 1024 x 768 @ 60Hz, for example, means that are available for your graphics cards's user guide for instructions on HDR10 video...

User Guide
Page 48
... correct native resolution. Response Time Creates smooth images without perceptual distortion. 48 These presets are specifically designed to reopen the menu. Setup Menu Adjusts On-Screen Display (OSD) Menu settings. Y YUV Color Space YUV color space is perfect for color image and video processing; Many of chroma components without streaking, blurring, or ghosting. This notice will appear in the display settings window when setting up the display resolution. Sharpness Adjusts the picture quality of each color (red, green, blue, cyan...
... correct native resolution. Response Time Creates smooth images without perceptual distortion. 48 These presets are specifically designed to reopen the menu. Setup Menu Adjusts On-Screen Display (OSD) Menu settings. Y YUV Color Space YUV color space is perfect for color image and video processing; Many of chroma components without streaking, blurring, or ghosting. This notice will appear in the display settings window when setting up the display resolution. Sharpness Adjusts the picture quality of each color (red, green, blue, cyan...

User Guide
Page 49
... Power button. • Make sure the power cord is properly and securely connected to the monitor and power outlet. • Plug another computer. • If you may experience when using the monitor. Wrong or abnormal colors • If any colors (red, green, or blue) are missing, check the video cable to factory settings. Screen image is too light or dark • Adjust brightness and contrast settings via the OSD Menu. • Check the Aspect Ratio. • Reset the monitor to factory settings. Screen image is blurred • Adjust...
... Power button. • Make sure the power cord is properly and securely connected to the monitor and power outlet. • Plug another computer. • If you may experience when using the monitor. Wrong or abnormal colors • If any colors (red, green, or blue) are missing, check the video cable to factory settings. Screen image is too light or dark • Adjust brightness and contrast settings via the OSD Menu. • Check the Aspect Ratio. • Reset the monitor to factory settings. Screen image is blurred • Adjust...

User Guide
Page 50
not work • Make sure the USB cable is locked. Loose or broken pins in , and then turn on the screen • Make sure the Power is On • Adjust brightness and contrast via the OSD Menu. • Check the connecting cable and make sure it is Off. selectable in the OSD • Reset the monitor to 0. • Check the Audio Input setting. Problem or Issue Possible Solutions The screen appears yellow • Make sure the "Blue Light Filter" is properly...
not work • Make sure the USB cable is locked. Loose or broken pins in , and then turn on the screen • Make sure the Power is On • Adjust brightness and contrast via the OSD Menu. • Check the connecting cable and make sure it is Off. selectable in the OSD • Reset the monitor to 0. • Check the Audio Input setting. Problem or Issue Possible Solutions The screen appears yellow • Make sure the "Blue Light Filter" is properly...

User Guide
Page 58
... the display through inappropriate cleaning as described in the product User Guide. • Removal, installation, and set-up service charges, including wall-mounting of merchantability and fitness for lengthy periods of time (also referred to the "Customer Service" page). Any third-party software included with the product or installed by static (non-moving) images displayed for a particular purpose. 58 Installation of the nearest ViewSonic® service center, contact ViewSonic...
... the display through inappropriate cleaning as described in the product User Guide. • Removal, installation, and set-up service charges, including wall-mounting of merchantability and fitness for lengthy periods of time (also referred to the "Customer Service" page). Any third-party software included with the product or installed by static (non-moving) images displayed for a particular purpose. 58 Installation of the nearest ViewSonic® service center, contact ViewSonic...


