

PJD5123 User Guide (English)
Page 1
... a safe manner, as well as registering your limited coverage from ViewSonic Corporation, which is also found on installing and using the Regional selection box in this User Guide to obtain important information on our web site at http://www. PJD5123 DLP Projector User Guide IMPORTANT: Please read this User Guide will describe your...
... a safe manner, as well as registering your limited coverage from ViewSonic Corporation, which is also found on installing and using the Regional selection box in this User Guide to obtain important information on our web site at http://www. PJD5123 DLP Projector User Guide IMPORTANT: Please read this User Guide will describe your...

PJD5123 User Guide (English)
Page 5
... local, state or federal laws. For Your Records Product Name: Model Number: Document Number: Serial Number: Purchase Date: PJD5123 ViewSonic DLP Projector VS13868 PJD5123_UG_ENG Rev. 1A 01-19-11 Product disposal at : www.viewsonic.com. ViewSonic, the three birds logo, OnView, ViewMatch, and ViewMeter are registered trademarks of product life The lamp in the United...
... local, state or federal laws. For Your Records Product Name: Model Number: Document Number: Serial Number: Purchase Date: PJD5123 ViewSonic DLP Projector VS13868 PJD5123_UG_ENG Rev. 1A 01-19-11 Product disposal at : www.viewsonic.com. ViewSonic, the three birds logo, OnView, ViewMatch, and ViewMeter are registered trademarks of product life The lamp in the United...
PJD5123 User Guide (English)
Page 7
... to . 3. Use a damp cloth for future reference. 1. Replacement parts When replacement parts are specified by suffocation. When the projector is an extreme or sudden change in temperature. 2 Read instructions All the safety and operating instructions should be sure that the operating... voltage of your unit is identical with ventilation holes (intake) and ventilation holes (exhaust). Ventilation The projector is operated. 2. The product may result in death by the manufacture. Power sources Check that the replacement parts are required...
... to . 3. Use a damp cloth for future reference. 1. Replacement parts When replacement parts are specified by suffocation. When the projector is an extreme or sudden change in temperature. 2 Read instructions All the safety and operating instructions should be sure that the operating... voltage of your unit is identical with ventilation holes (intake) and ventilation holes (exhaust). Ventilation The projector is operated. 2. The product may result in death by the manufacture. Power sources Check that the replacement parts are required...
PJD5123 User Guide (English)
Page 8
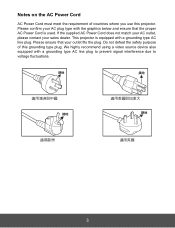
... ensure that the proper AC Power Cord is equipped with a grounding type AC line plug. This projector is used. Notes on the AC Power Cord AC Power Cord must meet the requirement of this projector. If the supplied AC Power Cord does not match your AC outlet, please contact your outlet fits...
... ensure that the proper AC Power Cord is equipped with a grounding type AC line plug. This projector is used. Notes on the AC Power Cord AC Power Cord must meet the requirement of this projector. If the supplied AC Power Cord does not match your AC outlet, please contact your outlet fits...
PJD5123 User Guide (English)
Page 9
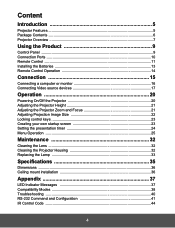
...15 Connecting a computer or monitor 16 Connecting Video source devices 17 Operation 20 Powering On/Off the Projector 20 Adjusting the Projector Height 21 Adjusting the Projector Zoom and Focus 21 Adjusting Projection Image Size 22 Locking control keys 23 Creating your own startup screen... 23 Setting the presentation timer 24 Menu Operation ...25 Maintenance 32 Cleaning the Lens ...32 Cleaning the Projector Housing 32 Replacing the Lamp 33 Specifications 35 Dimensions ...36 Ceiling mount installation 36 Appendix 37 LED Indicator Messages 37 Compatibility ...
...15 Connecting a computer or monitor 16 Connecting Video source devices 17 Operation 20 Powering On/Off the Projector 20 Adjusting the Projector Height 21 Adjusting the Projector Zoom and Focus 21 Adjusting Projection Image Size 22 Locking control keys 23 Creating your own startup screen... 23 Setting the presentation timer 24 Menu Operation ...25 Maintenance 32 Cleaning the Lens ...32 Cleaning the Projector Housing 32 Replacing the Lamp 33 Specifications 35 Dimensions ...36 Ceiling mount installation 36 Appendix 37 LED Indicator Messages 37 Compatibility ...
PJD5123 User Guide (English)
Page 10
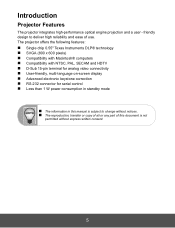
The projector offers the following features: Single chip 0.55" Texas Instruments DLP® technology SVGA (800 x 600 pixels) Compatibility with Macintosh® computers ... and ease of this document is not permitted without notices. The reproduction, transfer or copy of all or any part of use. EN-5 5 Introduction Projector Features The projector integrates high-performance optical engine projection and a user - friendly design to change without express written consent.
The projector offers the following features: Single chip 0.55" Texas Instruments DLP® technology SVGA (800 x 600 pixels) Compatibility with Macintosh® computers ... and ease of this document is not permitted without notices. The reproduction, transfer or copy of all or any part of use. EN-5 5 Introduction Projector Features The projector integrates high-performance optical engine projection and a user - friendly design to change without express written consent.

PJD5123 User Guide (English)
Page 11
for maximum protection, repack your unit. EN-6 6 they will come-in handy if you dealer immediately if any items are missing, appear damaged, or if the unit does not work. Save the original shipping carton and Packing material; Package Contents When you unpack the projector, make sure you have all these components: Projector AC Power Cord Remote Control (IR) & batteries (AAA *2 PCS) VGA Cable (D-SUB to DSUB) ViewSonic CD Wizard Quick Start Guide Contact you ever to ship your unit as it was originally packed at the factory.
for maximum protection, repack your unit. EN-6 6 they will come-in handy if you dealer immediately if any items are missing, appear damaged, or if the unit does not work. Save the original shipping carton and Packing material; Package Contents When you unpack the projector, make sure you have all these components: Projector AC Power Cord Remote Control (IR) & batteries (AAA *2 PCS) VGA Cable (D-SUB to DSUB) ViewSonic CD Wizard Quick Start Guide Contact you ever to ship your unit as it was originally packed at the factory.
PJD5123 User Guide (English)
Page 12
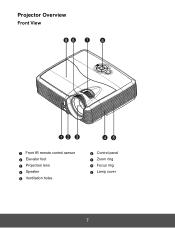
Projector Overview Front View 98 7 6 12 3 1 Front IR remote control sensor 2 Elevator foot 3 Projection lens 4 Speaker 5 Ventilation holes 45 6 Control panel 7 Zoom ring 8 Focus ring 9 Lamp cover EN-7 7
Projector Overview Front View 98 7 6 12 3 1 Front IR remote control sensor 2 Elevator foot 3 Projection lens 4 Speaker 5 Ventilation holes 45 6 Control panel 7 Zoom ring 8 Focus ring 9 Lamp cover EN-7 7
PJD5123 User Guide (English)
Page 13
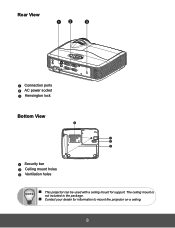
EN-8 8 Rear View 1 2 3 1 Connection ports 2 AC power socket 23 Kensington lock Bottom View 3 1 3 2 1 Security bar 2 Ceiling mount holes 3 Ventilation holes This projector can be used with a ceiling mount for information to mount the projector on a ceiling. The ceiling mount is not included in the package. Contact your dealer for support.
EN-8 8 Rear View 1 2 3 1 Connection ports 2 AC power socket 23 Kensington lock Bottom View 3 1 3 2 1 Security bar 2 Ceiling mount holes 3 Ventilation holes This projector can be used with a ceiling mount for information to mount the projector on a ceiling. The ceiling mount is not included in the package. Contact your dealer for support.

PJD5123 User Guide (English)
Page 14
EN-9 9 Using the Product Control Panel 1 2 345 6 MENU/ EXIT MODE 7 POWER 8 TEMP/LAMP SOURCE 4 1 Power Turn the projector on or off. 2 SOURCE Display the source selection bar. 3 MENU/EXIT Display or exit the on-screen display menus. 4 Keystone/Arrow keys ( /Up, /Down) Manually ...
EN-9 9 Using the Product Control Panel 1 2 345 6 MENU/ EXIT MODE 7 POWER 8 TEMP/LAMP SOURCE 4 1 Power Turn the projector on or off. 2 SOURCE Display the source selection bar. 3 MENU/EXIT Display or exit the on-screen display menus. 4 Keystone/Arrow keys ( /Up, /Down) Manually ...
PJD5123 User Guide (English)
Page 15
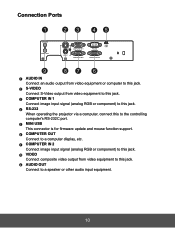
... output from video equipment to this jack. 3 COMPUTER IN 1 Connect image input signal (analog RGB or component) to this jack. 4 RS-232 When operating the projector via a computer, connect this to the controlling computer's RS-232C port. 5 MINI USB This connector is for firmware update and mouse function support. 6 COMPUTER OUT...
... output from video equipment to this jack. 3 COMPUTER IN 1 Connect image input signal (analog RGB or component) to this jack. 4 RS-232 When operating the projector via a computer, connect this to the controlling computer's RS-232C port. 5 MINI USB This connector is for firmware update and mouse function support. 6 COMPUTER OUT...
PJD5123 User Guide (English)
Page 16
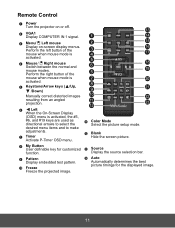
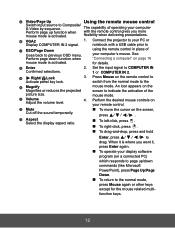
... setup mode. 12 Blank Hide the screen picture. 8 My Button User definable key for the displayed image. EN-11 11 Remote Control 1 Power Turn the projector on or off. 13 2 VGA1 Display COMPUTER IN 1 signal. 14 3 Menu/ Left mouse Display on-screen display menus. Perform the left button of the 5 18...
... setup mode. 12 Blank Hide the screen picture. 8 My Button User definable key for the displayed image. EN-11 11 Remote Control 1 Power Turn the projector on or off. 13 2 VGA1 Display COMPUTER IN 1 signal. 14 3 Menu/ Left mouse Display on-screen display menus. Perform the left button of the 5 18...
PJD5123 User Guide (English)
Page 17
... reduces the projected picture size. 21 Volume Adjust the volume level. 4. An icon appears on page 16 for the mouse related multifunction keys. Connect the projector to your remote control. 22 Mute Cut off the sound temporarily. To move the cursor on the remote control to switch from the normal...
... reduces the projected picture size. 21 Volume Adjust the volume level. 4. An icon appears on page 16 for the mouse related multifunction keys. Connect the projector to your remote control. 22 Mute Cut off the sound temporarily. To move the cursor on the remote control to switch from the normal...
PJD5123 User Guide (English)
Page 19
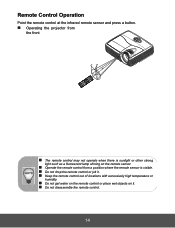
EN-14 14 Remote Control Operation Point the remote control at the infrared remote sensor and press a button. Operating the projector from the front 15 15 5m 8m 7m The remote control may not operate when there is sunlight or other strong light such as a ...
EN-14 14 Remote Control Operation Point the remote control at the infrared remote sensor and press a button. Operating the projector from the front 15 15 5m 8m 7m The remote control may not operate when there is sunlight or other strong light such as a ...
PJD5123 User Guide (English)
Page 20
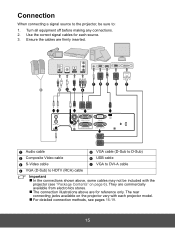
...-15 15 Connection When connecting a signal source to : 1. The rear connecting jacks available on page 6). They are for each projector model. For detailed connection methods, see "Package Contents" on the projector vary with each source. 3. Ensure the cables are firmly inserted. 156 5 7 1 1 23 4 1 Audio cable 5 ... are commercially available from electronics stores. The connection illustrations above , some cables may not be sure to the projector, be included with the projector (see pages 16-19. Turn all equipment off before making any connections. 2.
...-15 15 Connection When connecting a signal source to : 1. The rear connecting jacks available on page 6). They are for each projector model. For detailed connection methods, see "Package Contents" on the projector vary with each source. 3. Ensure the cables are firmly inserted. 156 5 7 1 1 23 4 1 Audio cable 5 ... are commercially available from electronics stores. The connection illustrations above , some cables may not be sure to the projector, be included with the projector (see pages 16-19. Turn all equipment off before making any connections. 2.
PJD5123 User Guide (English)
Page 21
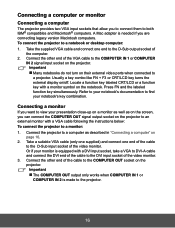
... COMPUTER OUT output only works when COMPUTER IN 1 or COMPUTER IN 2 is needed if you are connecting legacy version Macintosh computers. Connect the projector to the projector. Or if your presentation close-up on a monitor as well as described in "Connecting a computer" on page 16. 2. Connecting a computer... or monitor Connecting a computer The projector provides two VGA input sockets that allow you to connect them to the DVI input socket of the video monitor. 3. A Mac adapter is made ...
... COMPUTER OUT output only works when COMPUTER IN 1 or COMPUTER IN 2 is needed if you are connecting legacy version Macintosh computers. Connect the projector to the projector. Or if your presentation close-up on a monitor as well as described in "Connecting a computer" on page 16. 2. Connecting a computer... or monitor Connecting a computer The projector provides two VGA input sockets that allow you to connect them to the DVI input socket of the video monitor. 3. A Mac adapter is made ...
PJD5123 User Guide (English)
Page 22
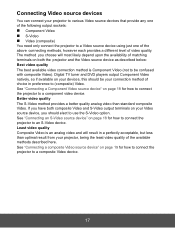
..."Connecting a Component Video source device" on your devices, this should elect to (composite) Video. Connecting Video source devices You can connect your projector to various Video source devices that provide any one of the following output sockets: Component Video S-Video Video (composite...) You need only connect the projector to a component video device. Digital TV tuner and DVD players output Component Video natively, so if available on page 18 for how to...
..."Connecting a Component Video source device" on your devices, this should elect to (composite) Video. Connecting Video source devices You can connect your projector to various Video source devices that provide any one of the following output sockets: Component Video S-Video Video (composite...) You need only connect the projector to a component video device. Digital TV tuner and DVD players output Component Video natively, so if available on page 18 for how to...
PJD5123 User Guide (English)
Page 23
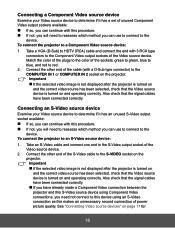
...connectors to the Component Video output sockets of the sockets; Connect the other end of the S-Video cable to the S-VIDEO socket on the projector. Also check that the Video source device is turned on and the correct video source has been selected, check that the signal cables have... already made a Component Video connection between the projector and this S-Video source device using Component Video connections, you need not connect to this device using an S-Video connection as this makes an...
...connectors to the Component Video output sockets of the sockets; Connect the other end of the S-Video cable to the S-VIDEO socket on the projector. Also check that the Video source device is turned on and the correct video source has been selected, check that the signal cables have... already made a Component Video connection between the projector and this S-Video source device using Component Video connections, you need not connect to this device using an S-Video connection as this makes an...
PJD5123 User Guide (English)
Page 24
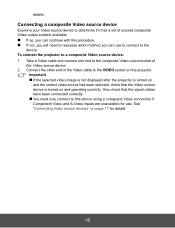
... Video cable to this procedure. If not, you will need only connect to the VIDEO socket on the projector. Important If the selected video image is not displayed after the projector is turned on page 17 for use to connect to a composite Video source device: 1. Also check that the Video... Video source device to determine if it has a set of unused composite Video output sockets available: If so, you can use . To connect the projector to the device. details.
... Video cable to this procedure. If not, you will need only connect to the VIDEO socket on the projector. Important If the selected video image is not displayed after the projector is turned on page 17 for use to connect to a composite Video source device: 1. Also check that the Video... Video source device to determine if it has a set of unused composite Video output sockets available: If so, you can use . To connect the projector to the device. details.

PJD5123 User Guide (English)
Page 25
... The cooling fans continue to operate for cooling cycle. When green mode is turned off, the Power LED begins flashing and the projector has entered stand-by mode. If you want to select your desired signal or press your desired signal key on your eyes. .... Do not turn on , you are connecting multiple sources to the projector simultaneously, press SOURCE on the projector or Source on the remote control to turn on the projector. Operation Powering On/Off the Projector Powering On the Projector: 1. Turn on the remote control. You will see a message "...
... The cooling fans continue to operate for cooling cycle. When green mode is turned off, the Power LED begins flashing and the projector has entered stand-by mode. If you want to select your desired signal or press your desired signal key on your eyes. .... Do not turn on , you are connecting multiple sources to the projector simultaneously, press SOURCE on the projector or Source on the remote control to turn on the projector. Operation Powering On/Off the Projector Powering On the Projector: 1. Turn on the remote control. You will see a message "...


