
User Guide
Page 1
PJ452 LCD Projector
PJ452 LCD Projector

User Guide
Page 4
.../2, VGA and XGA are registered trademarks of Apple Computer, Inc. Disclaimer: ViewSonic Corporation shall not be copied, reproduced, or transmitted by any additional product information as it becomes available, please register your product on the Internet at: www.viewsonic.com. For ...: Serial Number: Purchase Date: PJ452 ViewSonic LCD Projector VS10948 PJ452-1_UG_ENG Rev.1A 09-19-05 The lamp in accordance with local, state or federal laws. ViewSonic PJ452 iii Copyright Information Copyright © 2005 ViewSonic® Corporation. All rights reserved. Apple, Mac...
.../2, VGA and XGA are registered trademarks of Apple Computer, Inc. Disclaimer: ViewSonic Corporation shall not be copied, reproduced, or transmitted by any additional product information as it becomes available, please register your product on the Internet at: www.viewsonic.com. For ...: Serial Number: Purchase Date: PJ452 ViewSonic LCD Projector VS10948 PJ452-1_UG_ENG Rev.1A 09-19-05 The lamp in accordance with local, state or federal laws. ViewSonic PJ452 iii Copyright Information Copyright © 2005 ViewSonic® Corporation. All rights reserved. Apple, Mac...
User Guide
Page 5
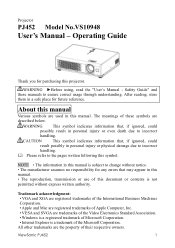
All other trademarks are described below. ViewSonic PJ452 1 WARNING This symbol indicates information that, if ignored, could result possibly in personal injury or even death due to incorrect handling. About...Inc. • VESA and SVGA are used in a safe place for purchasing this manual. Projector PJ452 Model No.VS10948 User's Manual - Please refer to change without express written authority. Trademark acknowledgment: • VGA and XGA are registered trademarks of the International Business Machines Corporation. • Apple and Mac are registered ...
All other trademarks are described below. ViewSonic PJ452 1 WARNING This symbol indicates information that, if ignored, could result possibly in personal injury or even death due to incorrect handling. About...Inc. • VESA and SVGA are used in a safe place for purchasing this manual. Projector PJ452 Model No.VS10948 User's Manual - Please refer to change without express written authority. Trademark acknowledgment: • VGA and XGA are registered trademarks of the International Business Machines Corporation. • Apple and Mac are registered ...
User Guide
Page 6
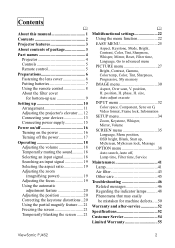
...48 Phenomena that may easily be mistaken for bottom-up use 9 Setting up 10 Arrangement 11 Adjusting the projector's elevator..... 12 Connecting your devices 13 Connecting power supply 15 Power on/off 16 Turning on G, Video ...Projector features 3 About contents of package 3 Part names 4 Projector 4 Controls 5 Remote control 5 Preparations 6 Fastening the lens cover 6 Putting batteries 7 Using the remote control 8 About the filter cover for machine defects.....50 Warranty and after-service 52 Specifications 52 Customer Service 54 Limited Warranty 55 ViewSonic PJ452...
...48 Phenomena that may easily be mistaken for bottom-up use 9 Setting up 10 Arrangement 11 Adjusting the projector's elevator..... 12 Connecting your devices 13 Connecting power supply 15 Power on/off 16 Turning on G, Video ...Projector features 3 About contents of package 3 Part names 4 Projector 4 Controls 5 Remote control 5 Preparations 6 Fastening the lens cover 6 Putting batteries 7 Using the remote control 8 About the filter cover for machine defects.....50 Warranty and after-service 52 Specifications 52 Customer Service 54 Limited Warranty 55 ViewSonic PJ452...
User Guide
Page 7
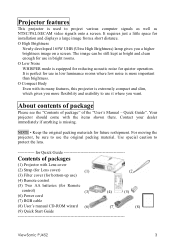
...of package" of packages (1) Projector with the items shown there. Contact your dealer immediately if anything is missing. for Remote control) (6) Power cord (3) (4) (5) (7) RGB cable (8) User's manual CD-ROM wizard (6) (7) (8) (9) Quick Start Guide ViewSonic PJ452 3 Use special caution to ...short distance. The image can be sure to use the original packing material. It requires just a little space for future reshipment. Your projector should come with Lens cover (2) Strap (for Lens cover) (1) (2) (3) Filter cover (for bottom-up use) (4) Remote control...
...of package" of packages (1) Projector with the items shown there. Contact your dealer immediately if anything is missing. for Remote control) (6) Power cord (3) (4) (5) (7) RGB cable (8) User's manual CD-ROM wizard (6) (7) (8) (9) Quick Start Guide ViewSonic PJ452 3 Use special caution to ...short distance. The image can be sure to use the original packing material. It requires just a little space for future reshipment. Your projector should come with Lens cover (2) Strap (for Lens cover) (1) (2) (3) Filter cover (for bottom-up use) (4) Remote control...

User Guide
Page 8
Part names Projector Vent ( 10) Lens ( 16, 45) Lens cover ( 6, 16) Lamp cover ( 42) (Lamp unit is inside.) Control buttons ( 5) Ports (See below.) RGB port ( 14) Restart switch ( 17) CONTROL port ( 14) Kensington lock slot Front-Right side Bottom side Rear-Left side Ports Focus ring ( 19) Remote sensor ( 8) Speaker Elevator button ( 12) Elevator foot ( 12) Filter cover ( 9, 10, 43) (Air filter and intake vent are inside.) Power switch ( 16,17) AC inlet ( 15) Elevator button ( 12) Elevator foot ( 12) Vent ( 10) S-VIDEO ( 14) VIDEO port ( 14) AUDIO port ( 14) ViewSonic PJ452 4
Part names Projector Vent ( 10) Lens ( 16, 45) Lens cover ( 6, 16) Lamp cover ( 42) (Lamp unit is inside.) Control buttons ( 5) Ports (See below.) RGB port ( 14) Restart switch ( 17) CONTROL port ( 14) Kensington lock slot Front-Right side Bottom side Rear-Left side Ports Focus ring ( 19) Remote sensor ( 8) Speaker Elevator button ( 12) Elevator foot ( 12) Filter cover ( 9, 10, 43) (Air filter and intake vent are inside.) Power switch ( 16,17) AC inlet ( 15) Elevator button ( 12) Elevator foot ( 12) Vent ( 10) S-VIDEO ( 14) VIDEO port ( 14) AUDIO port ( 14) ViewSonic PJ452 4

User Guide
Page 10
... that the power cord is not plugged in, and that the bottom is adequately cooled. ViewSonic PJ452 6 To avoid losing, please fasten the lens cover to the strap ring of projector. Slowly turn over the projector, so that the top is at a high temperature could cause a burn and/or malfunction...the lens cover WARNING ►Do not fasten the lens cover during use or immediately after use. Handling while the projector is facing up . 2. Fix the strap to the projector. Attach the lens cover to the lens of lens cover. Lens cover Strap Strap ring Strap (1) (2) Strap ...
... that the power cord is not plugged in, and that the bottom is adequately cooled. ViewSonic PJ452 6 To avoid losing, please fasten the lens cover to the strap ring of projector. Slowly turn over the projector, so that the top is at a high temperature could cause a burn and/or malfunction...the lens cover WARNING ►Do not fasten the lens cover during use or immediately after use. Handling while the projector is facing up . 2. Fix the strap to the projector. Attach the lens cover to the lens of lens cover. Lens cover Strap Strap ring Strap (1) (2) Strap ...
User Guide
Page 12
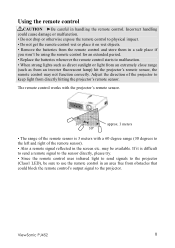
...inverter fluorescent lamp) hit the projector's remote sensor, the remote control may be sure to use the remote control in the screen etc. If it on wet objects. • Remove the batteries from the remote control and store them in handling the remote control. ViewSonic PJ452 8 Adjust the direction of... to send a remote signal to the sensor directly, please try. • Since the remote control uses infrared light to send signals to the projector (Class1 LED), be available. Using the remote control CAUTION ►Be careful in a safe place if you won't be using the remote control...
...inverter fluorescent lamp) hit the projector's remote sensor, the remote control may be sure to use the remote control in the screen etc. If it on wet objects. • Remove the batteries from the remote control and store them in handling the remote control. ViewSonic PJ452 8 Adjust the direction of... to send a remote signal to the sensor directly, please try. • Since the remote control uses infrared light to send signals to the projector (Class1 LED), be available. Using the remote control CAUTION ►Be careful in a safe place if you won't be using the remote control...
User Guide
Page 13
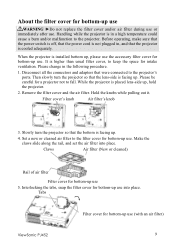
... change in , and that the projector is facing up. Slowly turn the projector so that the bottom is placed lens-side up, hold the projector. 2. Tabs ViewSonic PJ452 Filter cover for a projector not to the projector. While the projector is facing up. 4. Then slowly turn the projector so that the lens-side is...operating, make sure that the power switch is off, that were connected to the filter cover for intake ventilation. When the projector is installed bottom up, please use the accessory filter cover for bottom-up use WARNING ►Do not replace the filter ...
... change in , and that the projector is facing up. Slowly turn the projector so that the bottom is placed lens-side up, hold the projector. 2. Tabs ViewSonic PJ452 Filter cover for a projector not to the projector. While the projector is facing up. 4. Then slowly turn the projector so that the lens-side is...operating, make sure that the power switch is off, that were connected to the filter cover for intake ventilation. When the projector is installed bottom up, please use the accessory filter cover for bottom-up use WARNING ►Do not replace the filter ...
User Guide
Page 14
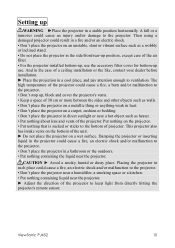
... and/or damage to the bottom of the unit. ► Do not place the projector on the projector. • Put nothing containing the liquid near the projector. This projector also has intake vents on the bottom of projector. ViewSonic PJ452 10 Placing the projector in a bathroom or the outdoors. • Put nothing that is sucked or sticks to...
... and/or damage to the bottom of the unit. ► Do not place the projector on the projector. • Put nothing containing the liquid near the projector. This projector also has intake vents on the bottom of projector. ViewSonic PJ452 10 Placing the projector in a bathroom or the outdoors. • Put nothing that is sucked or sticks to...

User Guide
Page 16
... feet. ►Except for inclining by hand. Before operating, make adjustments if the surface on the both sides. 2. ViewSonic PJ452 12 Handling while the projector is not plugged in malfunction. To prevent damaging the projector and injuring yourself, always hold in a high temperature could cause a burn and/or malfunction to the desired height and...
... feet. ►Except for inclining by hand. Before operating, make adjustments if the surface on the both sides. 2. ViewSonic PJ452 12 Handling while the projector is not plugged in malfunction. To prevent damaging the projector and injuring yourself, always hold in a high temperature could cause a burn and/or malfunction to the desired height and...

User Guide
Page 17
... For cables that have a core only at one end, connect the core to simultaneous LCD and CRT display). display devices). ViewSonic PJ452 13 Please consult with core set the laptop to CRT display or to the projector. ►Make sure that are VESA DDC (display data channel) compatible. • ...for details. Then the resolution will not be able to see a check box to activate the laptop's RGB external image output (set . This projector is changed on a computer, depending on the connectors and tighten. • Some computers may not work properly if any other type of some ...
... For cables that have a core only at one end, connect the core to simultaneous LCD and CRT display). display devices). ViewSonic PJ452 13 Please consult with core set the laptop to CRT display or to the projector. ►Make sure that are VESA DDC (display data channel) compatible. • ...for details. Then the resolution will not be able to see a check box to activate the laptop's RGB external image output (set . This projector is changed on a computer, depending on the connectors and tighten. • Some computers may not work properly if any other type of some ...
User Guide
Page 19
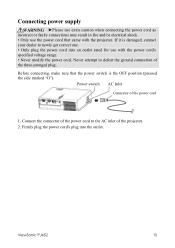
Power switch AC Inlet Connector of the projector. 2. ViewSonic PJ452 15 Connecting power supply WARNING ►Please use extra caution when connecting the power cord as incorrect or faulty connections may result in fire and/or electrical shock. • Only use with the projector. Connect the connector of the power cord to defeat the ground...
Power switch AC Inlet Connector of the projector. 2. ViewSonic PJ452 15 Connecting power supply WARNING ►Please use extra caution when connecting the power cord as incorrect or faulty connections may result in fire and/or electrical shock. • Only use with the projector. Connect the connector of the power cord to defeat the ground...

User Guide
Page 20
... lens or vents of the projector. Please power on the projector or remote control. Then wait several seconds because buttons may not function for these several seconds. 3. To display the picture, select an input signal according to the ON position. ViewSonic PJ452 16 Press the STANDBY/ON ...button on the projector before the connected devices. The power indicator will begin blinking green. NOTE • Turn the power on , ...
... lens or vents of the projector. Please power on the projector or remote control. Then wait several seconds because buttons may not function for these several seconds. 3. To display the picture, select an input signal according to the ON position. ViewSonic PJ452 16 Press the STANDBY/ON ...button on the projector before the connected devices. The power indicator will begin blinking green. NOTE • Turn the power on , ...

User Guide
Page 21
..., disconnect the power cord if the projector is not to the OFF position. After making sure that the power indicator lights to solid orange, set the power switch to solid orange when the lamp cooling is visible. ViewSonic PJ452 17 The POWER indicator will begin blinking... orange. Under certain exceptional circumstances, the projector may not operate correctly even for an emergency, whenever you turn the projector off, obey the procedure of the following "Turning...
..., disconnect the power cord if the projector is not to the OFF position. After making sure that the power indicator lights to solid orange, set the power switch to solid orange when the lamp cooling is visible. ViewSonic PJ452 17 The POWER indicator will begin blinking... orange. Under certain exceptional circumstances, the projector may not operate correctly even for an emergency, whenever you turn the projector off, obey the procedure of the following "Turning...
User Guide
Page 22
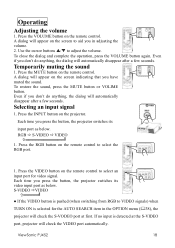
...volume. 2. S-VIDEO ÖVIDEO ● If the VIDEO button is pushed (when switching from RGB to aid you press the button, the projector switches its video input port as below . Operating Adjusting the volume 1. A dialog will appear on the screen to VIDEO signals) when TURN ON.... Press the MUTE button on the remote control to adjust the volume. Press the RGB button on the remote control. ViewSonic PJ452 18 Even if you press the button, the projector switches its input port as below . RGB Ö S-VIDEO Ö VIDEO 1. Selecting an input signal 1. Each time...
...volume. 2. S-VIDEO ÖVIDEO ● If the VIDEO button is pushed (when switching from RGB to aid you press the button, the projector switches its video input port as below . Operating Adjusting the volume 1. A dialog will appear on the screen to VIDEO signals) when TURN ON.... Press the MUTE button on the remote control to adjust the volume. Press the RGB button on the remote control. ViewSonic PJ452 18 Even if you press the button, the projector switches its input port as below . RGB Ö S-VIDEO Ö VIDEO 1. Selecting an input signal 1. Each time...
User Guide
Page 23
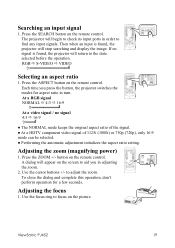
... the dialog and complete this operation, don't perform operation for aspect ratio in adjusting the zoom. 2. The projector will return to the state selected before the operation. ViewSonic PJ452 19 If no signal 4:3 Ö 16:9 ● The NORMAL mode keeps the original aspect ratio of the...1. to focus on the picture. A dialog will stop searching and display the image. Adjusting the focus 1. Then when an input is found , the projector will appear on the remote control. RGB Ö S-VIDEO Ö VIDEO Selecting an aspect ratio 1. At a RGB signal NORMAL Ö 4:3 Ö...
... the dialog and complete this operation, don't perform operation for aspect ratio in adjusting the zoom. 2. The projector will return to the state selected before the operation. ViewSonic PJ452 19 If no signal 4:3 Ö 16:9 ● The NORMAL mode keeps the original aspect ratio of the...1. to focus on the picture. A dialog will stop searching and display the image. Adjusting the focus 1. Then when an input is found , the projector will appear on the remote control. RGB Ö S-VIDEO Ö VIDEO Selecting an aspect ratio 1. At a RGB signal NORMAL Ö 4:3 Ö...
User Guide
Page 25
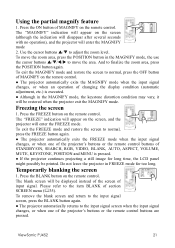
... the MAGNIFY mode, the keystone distortion condition may vary, it will be restored when the projector exit the MAGNIFY mode. ViewSonic PJ452 21 Using the partial magnify feature 1. Please refer to normal, press the OFF button of MAGNIFY on the remote control. Press ... RGB, VIDEO, BLANK, AUTO, ASPECT, VOLUME, MUTE, KEYSTONE, POSITION and MENU is executed. ● Although in FREEZE mode for long time, the LCD panel might possibly be printed. Freezing the screen 1. The "FREEZE" indication will appear on the screen (although the indication will disappear after several seconds with...
... the MAGNIFY mode, the keystone distortion condition may vary, it will be restored when the projector exit the MAGNIFY mode. ViewSonic PJ452 21 Using the partial magnify feature 1. Please refer to normal, press the OFF button of MAGNIFY on the remote control. Press ... RGB, VIDEO, BLANK, AUTO, ASPECT, VOLUME, MUTE, KEYSTONE, POSITION and MENU is executed. ● Although in FREEZE mode for long time, the LCD panel might possibly be printed. Freezing the screen 1. The "FREEZE" indication will appear on the screen (although the indication will disappear after several seconds with...
User Guide
Page 26
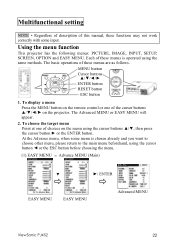
.... (1) EASY MENU → Advance MENU (Main) ▼ ►/ ENTER EASY MENU EASY MENU Advanced MENU ViewSonic PJ452 22 Each of this manual, these menus are as follows. The basic operations of the cursor buttons on the projector. To display a menu Press the MENU button on the menu using the same methods. Using the... menu function This projector has the following menus: PICTURE, IMAGE, INPUT, SETUP, SCREEN, OPTION and EASY MENU. To choose the target menu Point at one of choices on the ...
.... (1) EASY MENU → Advance MENU (Main) ▼ ►/ ENTER EASY MENU EASY MENU Advanced MENU ViewSonic PJ452 22 Each of this manual, these menus are as follows. The basic operations of the cursor buttons on the projector. To display a menu Press the MENU button on the menu using the same methods. Using the... menu function This projector has the following menus: PICTURE, IMAGE, INPUT, SETUP, SCREEN, OPTION and EASY MENU. To choose the target menu Point at one of choices on the ...
User Guide
Page 29
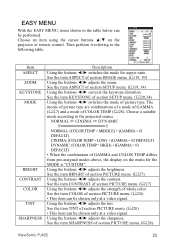
...9658; switches the mode of section PICTURE menu. ( 28). See the item ASPECT of whole color. Using the buttons ◄/► adjusts the sharpness. ViewSonic PJ452 25 See the item CONTRAST of section PICTURE menu. ( 27) Using the buttons ◄/► adjusts the strength of section SETUP menu. ( 19, ...9668;/► adjusts the brightness. See the item COLOR of GAMMA and COLOR TEMP differs from pre-assigned modes above, the display on the projector or remote control. See the item TINT of COLOR TEMP ( 28). Choose an item using the cursor buttons ▲/▼ on the ...
...9658; switches the mode of section PICTURE menu. ( 28). See the item ASPECT of whole color. Using the buttons ◄/► adjusts the sharpness. ViewSonic PJ452 25 See the item CONTRAST of section PICTURE menu. ( 27) Using the buttons ◄/► adjusts the strength of section SETUP menu. ( 19, ...9668;/► adjusts the brightness. See the item COLOR of GAMMA and COLOR TEMP differs from pre-assigned modes above, the display on the projector or remote control. See the item TINT of COLOR TEMP ( 28). Choose an item using the cursor buttons ▲/▼ on the ...


