English Owner's Manual
Page 3
Uniden expects consumer's use of these products to be in compliance with the intent to your local, state and federal law. © 2014. CONTENTS Customer Care 2 GETTING STARTED 5 USING THIS MANUAL 5 FEATURE LIST 5 WHAT'S INCLUDED 7 GETTING TO KNOW THE UDR744 SYSTEM 8 HARDWARE...8 UDR744 Monitor 8 UDR744 Camera 9 SET UP THE HARDWARE 10 Monitor...10 Camera...10 install Cameras 11...
Uniden expects consumer's use of these products to be in compliance with the intent to your local, state and federal law. © 2014. CONTENTS Customer Care 2 GETTING STARTED 5 USING THIS MANUAL 5 FEATURE LIST 5 WHAT'S INCLUDED 7 GETTING TO KNOW THE UDR744 SYSTEM 8 HARDWARE...8 UDR744 Monitor 8 UDR744 Camera 9 SET UP THE HARDWARE 10 Monitor...10 Camera...10 install Cameras 11...
English Owner's Manual
Page 6
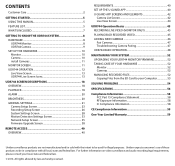
•• One LCD monitor can pair four cameras •• LCD : 5v DC 2A Power adaptor (+/-5%) •• Camera: 9v DC 600mA (+/-5%) •• RF range: 150 meter (Line of sight) •• New recording indicator/ Memory card full indicator •• Quad view •• PIR trigger and Video motion detect alert •• Night vision up to 40 feet •• Direct connection to router for remote access to live and recorded video •• No monthly fee 6
•• One LCD monitor can pair four cameras •• LCD : 5v DC 2A Power adaptor (+/-5%) •• Camera: 9v DC 600mA (+/-5%) •• RF range: 150 meter (Line of sight) •• New recording indicator/ Memory card full indicator •• Quad view •• PIR trigger and Video motion detect alert •• Night vision up to 40 feet •• Direct connection to router for remote access to live and recorded video •• No monthly fee 6
English Owner's Manual
Page 7
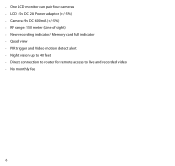
Never use damaged products! 7 WHAT'S INCLUDED You should have the following items: (1) UDR744 Monitor (2) Camera with stand Not Shown: • (1) 5V 2A Power Adapter (Monitor) • (1) Ethernet (RJ45) Cable • 8G SD Card • (1) 2000mA Battery (Monitor) • Mounting Hardware (2 sets) • Quick Start Guide (2) 9V 600mA Power Adapter (Camera) (2) Antenna (may be attached to camera) If any items are missing or damaged, contact our Customer Care Line immediately.
Never use damaged products! 7 WHAT'S INCLUDED You should have the following items: (1) UDR744 Monitor (2) Camera with stand Not Shown: • (1) 5V 2A Power Adapter (Monitor) • (1) Ethernet (RJ45) Cable • 8G SD Card • (1) 2000mA Battery (Monitor) • Mounting Hardware (2 sets) • Quick Start Guide (2) 9V 600mA Power Adapter (Camera) (2) Antenna (may be attached to camera) If any items are missing or damaged, contact our Customer Care Line immediately.
English Owner's Manual
Page 8
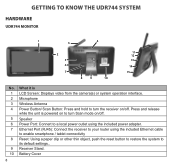
... restore the system to a local power outlet using the included power adapter. Speaker Power Port: Connert to its default settings.. GETTING TO KNOW THE UDR744 SYSTEM HARDWARE UDR744 MONITOR 1 4 3 2 5 6 7 8 9 10 11 12 13 14 15 No. 1 2 3 4 5 6 7 8 9 10 8 What it is powered on to turn Scan mode on /off . Battery Cover Microphone Wireless... Button/ Scan Button: Press and hold to turn the receiver on /off . Press and release while the unit is LCD Screen: Displays video from the camera(s) or system operation interface. Receiver Stand.
... restore the system to a local power outlet using the included power adapter. Speaker Power Port: Connert to its default settings.. GETTING TO KNOW THE UDR744 SYSTEM HARDWARE UDR744 MONITOR 1 4 3 2 5 6 7 8 9 10 11 12 13 14 15 No. 1 2 3 4 5 6 7 8 9 10 8 What it is powered on to turn Scan mode on /off . Battery Cover Microphone Wireless... Button/ Scan Button: Press and hold to turn the receiver on /off . Press and release while the unit is LCD Screen: Displays video from the camera(s) or system operation interface. Receiver Stand.
English Owner's Manual
Page 9
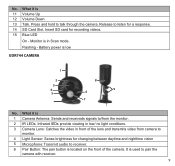
...Release to receiver. 6 Pair Button: The pair button is 1 Camera Antenna: Sends and receiveds signals to talk through the camera. Battery power is 11 Volume Up 12 Volume Down 13 Talk.... What it is located on the front of the lens and transmits video from the monitor. 2 IR LEDs. Monitor is used to pair the camera... with receiver. 9 Press and hold to /from camera to monitor. 4 Light Sensor: Sense brightness for changing between daytime and nighttime...
...Release to receiver. 6 Pair Button: The pair button is 1 Camera Antenna: Sends and receiveds signals to talk through the camera. Battery power is 11 Volume Up 12 Volume Down 13 Talk.... What it is located on the front of the lens and transmits video from the monitor. 2 IR LEDs. Monitor is used to pair the camera... with receiver. 9 Press and hold to /from camera to monitor. 4 Light Sensor: Sense brightness for changing between daytime and nighttime...
English Owner's Manual
Page 10
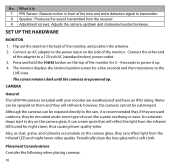
...weatherproof and have an IP65 rating. Placement Considerations Consider the following when placing cameras: 10 The monitor displays the Uniden Guardian screen for 3 - 4 seconds to dry on the back of the monitor. The screen remains dark until the cameras are powered up . 4. No. SET UP THE HARDWARE MONITOR 1. ...for night vision, thus causing lower quality video. As rainwater drops start to power it is recommended that will still work; CAMERA General The UDR744 cameras included with a soft cloth. Water can reflect light from the receiver. 9 Adjustment screws: Adjusts the...
...weatherproof and have an IP65 rating. Placement Considerations Consider the following when placing cameras: 10 The monitor displays the Uniden Guardian screen for 3 - 4 seconds to dry on the back of the monitor. The screen remains dark until the cameras are powered up . 4. No. SET UP THE HARDWARE MONITOR 1. ...for night vision, thus causing lower quality video. As rainwater drops start to power it is recommended that will still work; CAMERA General The UDR744 cameras included with a soft cloth. Water can reflect light from the receiver. 9 Adjustment screws: Adjusts the...
English Owner's Manual
Page 11
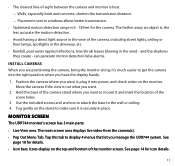
... is securely in the view of -sight between the camera and monitor is 6 - 18 feet for the camera. Tug gently on the top and bottom of the camera stand where you want to make sure it into the right position when you manage the UDR744 system. Hold the base of the monitor screen. The... main screen area displays live video from the camera(s). •• Pop Out Menu Tab. See page 18 for icon details. 11 Icons display on the stand...
... is securely in the view of -sight between the camera and monitor is 6 - 18 feet for the camera. Tug gently on the top and bottom of the camera stand where you want to make sure it into the right position when you manage the UDR744 system. Hold the base of the monitor screen. The... main screen area displays live video from the camera(s). •• Pop Out Menu Tab. See page 18 for icon details. 11 Icons display on the stand...
English Owner's Manual
Page 12
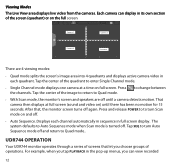
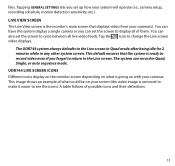
.... Press and release POWER to to turn Scan mode on full screen. Tap SEQ to turn Auto Sequence mode off again. UDR744 OPERATION Your UDR744 monitor operates through a series of operations. Each camera can view recorded 12 Viewing Modes The Live View area displays live video from the... cameras. Tap the center of the screen (quadrant) or on ) until a camera detects motion. After that let you can display in the pop...
.... Press and release POWER to to turn Scan mode on full screen. Tap SEQ to turn Auto Sequence mode off again. UDR744 OPERATION Your UDR744 monitor operates through a series of operations. Each camera can view recorded 12 Viewing Modes The Live View area displays live video from the... cameras. Tap the center of the screen (quadrant) or on ) until a camera detects motion. After that let you can display in the pop...
English Owner's Manual
Page 13
... mode. Tapping GENERAL SETTINGS lets you set up how your camera(s). LIVE VIEW SCREEN The Live View screen is going on what could be on your cameras. The UDR744 system always defaults to see the icons). UDR744 LIVE SCREEN ICONS Different icons display on the monitor screen depending...follows of them. files. This default ensures that displays video from your system will operate (i.e., camera setup, recording schedule, motion detection sensitivity, etc.). You can have the system display a single camera or you forget to return to display all live video feeds. You can record in any ...
... mode. Tapping GENERAL SETTINGS lets you set up how your camera(s). LIVE VIEW SCREEN The Live View screen is going on what could be on your cameras. The UDR744 system always defaults to see the icons). UDR744 LIVE SCREEN ICONS Different icons display on the monitor screen depending...follows of them. files. This default ensures that displays video from your system will operate (i.e., camera setup, recording schedule, motion detection sensitivity, etc.). You can have the system display a single camera or you forget to return to display all live video feeds. You can record in any ...
English Owner's Manual
Page 14
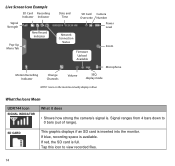
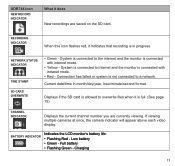
...Screen Icon Example SD Card Recording Indicator Indicator Signal Strength New Record Indicator Pop-Up Menu Tab Date and Time SD Card Camera Overwrite Number Power Level Network Connection Status Firmware Upload Available Zoom Microphone Motion Recording Indicator Change Channels Volume SEQ display mode NOTE:... SD card is . Signal ranges from 4 bars down to view recorded files. 14 What the Icons Mean UDR744 Icon SIGNAL INDICATOR What it does • Shows how strong the camera's signal is inserted into the monitor. If blue, recording space is full. If red, the SD card ...
...Screen Icon Example SD Card Recording Indicator Indicator Signal Strength New Record Indicator Pop-Up Menu Tab Date and Time SD Card Camera Overwrite Number Power Level Network Connection Status Firmware Upload Available Zoom Microphone Motion Recording Indicator Change Channels Volume SEQ display mode NOTE:... SD card is . Signal ranges from 4 bars down to view recorded files. 14 What the Icons Mean UDR744 Icon SIGNAL INDICATOR What it does • Shows how strong the camera's signal is inserted into the monitor. If blue, recording space is full. If red, the SD card ...
English Owner's Manual
Page 15
... monitor is full. (See page 15) CHANNEL INDICATOR Displays the current channel number you are saved on the SD card. If viewing multiple cameras at once, the camera indicator will appear above each video display. Connection has failed or system is not connected to overwrite files when it is connected with internet...
... monitor is full. (See page 15) CHANNEL INDICATOR Displays the current channel number you are saved on the SD card. If viewing multiple cameras at once, the camera indicator will appear above each video display. Connection has failed or system is not connected to overwrite files when it is connected with internet...
English Owner's Manual
Page 16
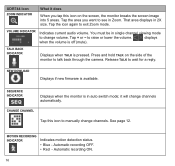
VOLUME INDICATOR Indicates current audio volume. MOTION RECORDING INDICATOR Indicates motion detection status. • Blue - UDR744 Icon ZOOM INDICATOR What it will change volume. Tap + or − to see in auto switch mode; That area displays in single channel viewing ...manually change channels. Press and hold TALK on the screen, the monitor breaks the screen image into 5 areas. Release TALK to talk back through the camera. CHANGE CHANNEL Tap this icon on the side of the monitor to wait for a reply. See page 12. displays when the volume is in Zoom...
VOLUME INDICATOR Indicates current audio volume. MOTION RECORDING INDICATOR Indicates motion detection status. • Blue - UDR744 Icon ZOOM INDICATOR What it will change volume. Tap + or − to see in auto switch mode; That area displays in single channel viewing ...manually change channels. Press and hold TALK on the screen, the monitor breaks the screen image into 5 areas. Release TALK to talk back through the camera. CHANGE CHANNEL Tap this icon on the side of the monitor to wait for a reply. See page 12. displays when the volume is in Zoom...
English Owner's Manual
Page 18
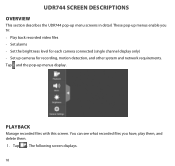
...;• Set alarms •• Set the brightness level for recording, motion detection, and other system and network requirements. Tap and the pop-up cameras for each camera connected (single channel display only) •• Set up menus display. The following screen displays. 18 These pop-up menus enable you have, play...
...;• Set alarms •• Set the brightness level for recording, motion detection, and other system and network requirements. Tap and the pop-up cameras for each camera connected (single channel display only) •• Set up menus display. The following screen displays. 18 These pop-up menus enable you have, play...
English Owner's Manual
Page 20
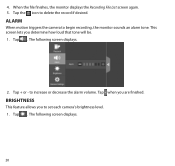
4. BRIGHTNESS This feature allows you to delete the record if desired. The following screen displays. 20 Tap the icon to set each camera's brightness level. 1. Tap when you determine how loud that tone will be. 1. When the file finishes, the monitor displays the Recording File List screen again. 5. to begin recording, the monitor sounds an alarm tone. Tap . The following screen displays. 2. ALARM When motion triggers the camera to increase or decrease the alarm volume. Tap . This screen lets you are finished. Tap + or -
4. BRIGHTNESS This feature allows you to delete the record if desired. The following screen displays. 20 Tap the icon to set each camera's brightness level. 1. Tap when you determine how loud that tone will be. 1. When the file finishes, the monitor displays the Recording File List screen again. 5. to begin recording, the monitor sounds an alarm tone. Tap . The following screen displays. 2. ALARM When motion triggers the camera to increase or decrease the alarm volume. Tap . This screen lets you are finished. Tap + or -
English Owner's Manual
Page 21
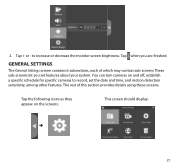
... provides details using these screens. Tap the following icons as they appear on and off, establish a specific schedule for specific cameras to increase or decrease the monitor screen brightness. You can turn cameras on the screens: This screen should display: 21 2. to record, set features about your system. Tap when you...
... provides details using these screens. Tap the following icons as they appear on and off, establish a specific schedule for specific cameras to increase or decrease the monitor screen brightness. You can turn cameras on the screens: This screen should display: 21 2. to record, set features about your system. Tap when you...
English Owner's Manual
Page 22
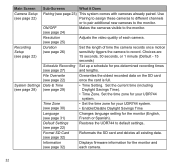
...the SD card and deletes all existing data. Default Settings (see page 22) Restores the UDR744 to record. Recording Setup (see page 22) Duration (see page 24) Makes the cameras visible to the monitor. Set the time zone for the monitor (English, French or Spanish)....Displays firmware information for your UDR744 system. Information (see page 25) Adjusts the video quality of time the camera records once motion sensitivity tiggers the camera to default settings.. Use Pairing to assign these cameras to different channels or to pair additional new cameras to the monitor. Time ...
...the SD card and deletes all existing data. Default Settings (see page 22) Restores the UDR744 to record. Recording Setup (see page 22) Duration (see page 24) Makes the cameras visible to the monitor. Set the time zone for the monitor (English, French or Spanish)....Displays firmware information for your UDR744 system. Information (see page 25) Adjusts the video quality of time the camera records once motion sensitivity tiggers the camera to default settings.. Use Pairing to assign these cameras to different channels or to pair additional new cameras to the monitor. Time ...
English Owner's Manual
Page 23
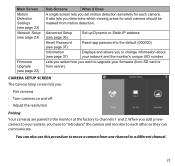
...What it Does A single screen lets you set motion detection sensitivity for each camera should be masked from motion detection. CAMERA SETUP SCREEN The Camera Setup screen lets you determine which viewing areas for each camera. Main Screen Motion Detection Settings (see page 23) Network Setup (see ... this procedure to move a camera from server). You can communicate. When you add a new camera to channels 1 and 2. It also lets you : •• Pair cameras •• Turn cameras on and off •• Adjust the resolution Pairing Your cameras are paired to the monitor ...
...What it Does A single screen lets you set motion detection sensitivity for each camera should be masked from motion detection. CAMERA SETUP SCREEN The Camera Setup screen lets you determine which viewing areas for each camera. Main Screen Motion Detection Settings (see page 23) Network Setup (see ... this procedure to move a camera from server). You can communicate. When you add a new camera to channels 1 and 2. It also lets you : •• Pair cameras •• Turn cameras on and off •• Adjust the resolution Pairing Your cameras are paired to the monitor ...
English Owner's Manual
Page 24
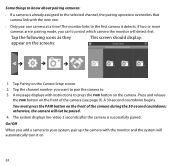
.... If two or more cameras are in pairing mode, you can't control which camera the monitor will not be paired. 4. otherwise, the camera will detect first. On/Off When you want to pair the camera to. 3. Some things to know about pairing cameras: •• If a camera is successfully paired. Tap ...icons as they This screen should display: appear on the front of the camera (see page 9). Tap the channel number you add a camera to your system, pair up the camera with instructions to the first camera it on the camera. The monitor links to press the PAIR button on . 24 You ...
.... If two or more cameras are in pairing mode, you can't control which camera the monitor will not be paired. 4. otherwise, the camera will detect first. On/Off When you want to pair the camera to. 3. Some things to know about pairing cameras: •• If a camera is successfully paired. Tap ...icons as they This screen should display: appear on the front of the camera (see page 9). Tap the channel number you add a camera to your system, pair up the camera with instructions to the first camera it on the camera. The monitor links to press the PAIR button on . 24 You ...
English Owner's Manual
Page 25
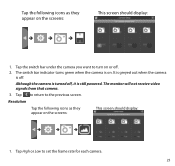
The monitor will not receive video signals from that camera. 3. Tap High or Low to the previous screen. It is greyed out when the camera is still powered. Tap to return to set the frame rate for each camera. 25 Although the camera is turned off, it is off . 2. The switch bar indicator... turns green when the camera is on or off . Resolution Tap the following icons...
The monitor will not receive video signals from that camera. 3. Tap High or Low to the previous screen. It is greyed out when the camera is still powered. Tap to return to set the frame rate for each camera. 25 Although the camera is turned off, it is off . 2. The switch bar indicator... turns green when the camera is on or off . Resolution Tap the following icons...

English Owner's Manual
Page 26
... the system will automatically record when something triggers motion sensitivity. •• Schedule a set how long the camera keeps recording after motion detection triggers it. Tap to return to automatically record from a specific camera. •• Set up file retention requirements Tap the following icons as they appear on the screens: This...
... the system will automatically record when something triggers motion sensitivity. •• Schedule a set how long the camera keeps recording after motion detection triggers it. Tap to return to automatically record from a specific camera. •• Set up file retention requirements Tap the following icons as they appear on the screens: This...


