

Users Manual Canada; English
Page 4
...F-2 Supported Frequency Sub-bands F-3 Appendix G Intel® Matrix Storage Manager Manually Setting up Windows (Windows Vista G-1 Manually Setting up Windows Manually (Windows XP G-2 How to install Intel® Matrix Storage Manager on Windows XP or Windows Vista G-3 Appendix H Bluetooth wireless technology Interoperability Bluetooth wireless technology and your Health H-3 Regulatory statements H-3 Using Bluetooth® Card from TOSHIBA equipment in Japan H-6 Appendix I AC Power Cord and Connectors Certification agencies I-1 Appendix J TOSHIBA Anti-theft Protection Timer User...
...F-2 Supported Frequency Sub-bands F-3 Appendix G Intel® Matrix Storage Manager Manually Setting up Windows (Windows Vista G-1 Manually Setting up Windows Manually (Windows XP G-2 How to install Intel® Matrix Storage Manager on Windows XP or Windows Vista G-3 Appendix H Bluetooth wireless technology Interoperability Bluetooth wireless technology and your Health H-3 Regulatory statements H-3 Using Bluetooth® Card from TOSHIBA equipment in Japan H-6 Appendix I AC Power Cord and Connectors Certification agencies I-1 Appendix J TOSHIBA Anti-theft Protection Timer User...
Users Manual Canada; English
Page 6
... programs, databases and other use within the home. Windows and Microsoft are registered trademarks and Windows Vista is trademark and registered trademark of TOSHIBA. TOSHIBA TECRA M9 Portable Personal Computer User's Manual First edition June 2007 Copyright authority for personal use or use beyond that stipulated above may be reproduced in making any form without the permission of the copyright owner is a violation of...
... programs, databases and other use within the home. Windows and Microsoft are registered trademarks and Windows Vista is trademark and registered trademark of TOSHIBA. TOSHIBA TECRA M9 Portable Personal Computer User's Manual First edition June 2007 Copyright authority for personal use or use beyond that stipulated above may be reproduced in making any form without the permission of the copyright owner is a violation of...
Users Manual Canada; English
Page 11
... business, other electronic device to file a complaint with the best service it can. TECRA M9 Telephone company procedures The goal of the telephone company is to make any message via a telephone fax machine unless such message clearly contains in a margin at the top or bottom of each transmitted page or on your fax software before sending messages...
... business, other electronic device to file a complaint with the best service it can. TECRA M9 Telephone company procedures The goal of the telephone company is to make any message via a telephone fax machine unless such message clearly contains in a margin at the top or bottom of each transmitted page or on your fax software before sending messages...
Users Manual Canada; English
Page 17
... to this manual by -step instructions on setting up and begin using your computer, basic operations and care, using optional devices and troubleshooting. If you are enclosed in the Glossary. Conventions This manual uses the following their definition. If you 're new to learn about features that are also defined in parentheses following formats to setup and configure these features. For example: Read Only Memory (ROM). Abbreviations...
... to this manual by -step instructions on setting up and begin using your computer, basic operations and care, using optional devices and troubleshooting. If you are enclosed in the Glossary. Conventions This manual uses the following their definition. If you 're new to learn about features that are also defined in parentheses following formats to setup and configure these features. For example: Read Only Memory (ROM). Abbreviations...

Users Manual Canada; English
Page 45
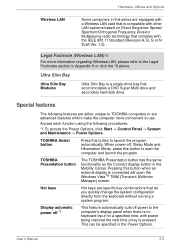
...'s power on and off , Sleep Mode and Hibernation Mode, press this button to start the computer and launch the program. TOSHIBA Assist button TOSHIBA Presentation button Fingerprint Sensor Press this button when an external display is connected will open the Windows VistaTM TMM (Transient Multimon Manager) screen. User's Manual 2-9 Control buttons below the Touch Pad allow you to select menu items or manipulate text and graphics as low battery condition, generated by the system. The internal keyboard provides...
...'s power on and off , Sleep Mode and Hibernation Mode, press this button to start the computer and launch the program. TOSHIBA Assist button TOSHIBA Presentation button Fingerprint Sensor Press this button when an external display is connected will open the Windows VistaTM TMM (Transient Multimon Manager) screen. User's Manual 2-9 Control buttons below the Touch Pad allow you to select menu items or manipulate text and graphics as low battery condition, generated by the system. The internal keyboard provides...
Users Manual Canada; English
Page 56
... an external display is a single-drive bay that accommodates a DVD Super Multi drive and secondary hard disk drive. Hot keys Hot keys are advanced features which make the computer more information regarding Wireless LAN, please refer to TOSHIBA computers or are specific key combinations that let you quickly change the system configuration directly from the keyboard without running a system program. TOSHIBA Presentation button The TOSHIBA Presentation button has the same functionality as the Connect display button in the Power Options. Access each function using the...
... an external display is a single-drive bay that accommodates a DVD Super Multi drive and secondary hard disk drive. Hot keys Hot keys are advanced features which make the computer more information regarding Wireless LAN, please refer to TOSHIBA computers or are specific key combinations that let you quickly change the system configuration directly from the keyboard without running a system program. TOSHIBA Presentation button The TOSHIBA Presentation button has the same functionality as the Connect display button in the Power Options. Access each function using the...
Users Manual Canada; English
Page 69
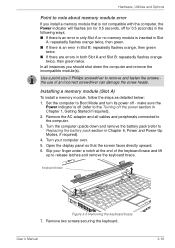
... over. 5. Remove two screws securing the keyboard. Remove the AC adaptor and all instances you install a memory module that the screen faces directly upward. 6. User's Manual 3-18 Hardware, Utilities and Options Point to note about memory module error If you should shut down and remove the battery pack (refer to Replacing the battery pack section in Chapter 6, Power and Power-Up Modes, if required). 4. make sure the Power indicator is an error in Slot B: repeatedly flashes orange, then...
... over. 5. Remove two screws securing the keyboard. Remove the AC adaptor and all instances you install a memory module that the screen faces directly upward. 6. User's Manual 3-18 Hardware, Utilities and Options Point to note about memory module error If you should shut down and remove the battery pack (refer to Replacing the battery pack section in Chapter 6, Power and Power-Up Modes, if required). 4. make sure the Power indicator is an error in Slot B: repeatedly flashes orange, then...
Users Manual Canada; English
Page 73
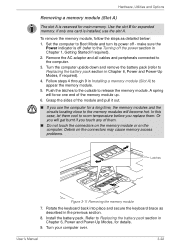
... become hot. Debris on the computer. Hardware, Utilities and Options Removing a memory module (Slot A) The slot A is reserved for expanded memory. Turn the computer upside down and remove the battery pack (refer to Boot Mode and turn its power off - Turn your computer over. Set the computer to Replacing the battery pack section in the previous section. 8. Push the latches to the outside to room temperature before you use the slot A. Install the battery pack. User's Manual...
... become hot. Debris on the computer. Hardware, Utilities and Options Removing a memory module (Slot A) The slot A is reserved for expanded memory. Turn the computer upside down and remove the battery pack (refer to Boot Mode and turn its power off - Turn your computer over. Set the computer to Replacing the battery pack section in the previous section. 8. Push the latches to the outside to room temperature before you use the slot A. Install the battery pack. User's Manual...
Users Manual Canada; English
Page 75
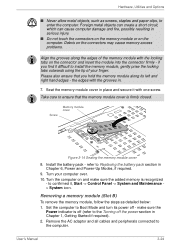
... connector and insert the module into the connector firmly - User's Manual 3-24 Please also ensure that the memory module cover is recognized - Turn your finger. Hardware, Utilities and Options ■ Never allow metal objects, such as detailed below: 1. Take care to Replacing the battery pack section in . 7. refer to ensure that you find it , Start -> Control Panel -> System and Maintenance > System icon. Set the computer to the...
... connector and insert the module into the connector firmly - User's Manual 3-24 Please also ensure that the memory module cover is recognized - Turn your finger. Hardware, Utilities and Options ■ Never allow metal objects, such as detailed below: 1. Take care to Replacing the battery pack section in . 7. refer to ensure that you find it , Start -> Control Panel -> System and Maintenance > System icon. Set the computer to the...

Users Manual Canada; English
Page 76
... memory access problems. Latches Figure 3-15 Removing the memory module 8. Or you will get burnt if you use the computer for a long time, the memory modules and the circuits locating close to the cover in place and secure it with one end of them . User's Manual 3-25 Turn the computer upside down and remove the battery pack (refer to release it from the module in place - Hardware, Utilities and Options...
... memory access problems. Latches Figure 3-15 Removing the memory module 8. Or you will get burnt if you use the computer for a long time, the memory modules and the circuits locating close to the cover in place and secure it with one end of them . User's Manual 3-25 Turn the computer upside down and remove the battery pack (refer to release it from the module in place - Hardware, Utilities and Options...
Users Manual Canada; English
Page 86
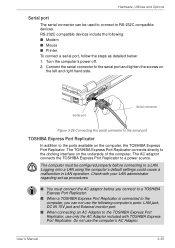
... LAN administrator regarding set-up procedures. ■ You must be used to connect to the serial port and tighten the screws on the left and right hand side. The computer must connect the AC adaptor before connecting to a power source. Do not use the following : ■ Modem ■ Mouse ■ Printer To connect a serial port, follow the steps as detailed below: 1. User's Manual 3-35 Hardware, Utilities and Options Serial port The serial...
... LAN administrator regarding set-up procedures. ■ You must be used to connect to the serial port and tighten the screws on the left and right hand side. The computer must connect the AC adaptor before connecting to a power source. Do not use the following : ■ Modem ■ Mouse ■ Printer To connect a serial port, follow the steps as detailed below: 1. User's Manual 3-35 Hardware, Utilities and Options Serial port The serial...
Users Manual Canada; English
Page 117
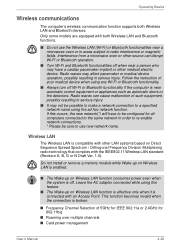
Operating Basics Wireless communications The computer's wireless communication function supports both Wireless LAN and Bluetooth functions. ■ Do not use new network name. Follow the instruction of 5GHz for IEEE 802.11a or 2.4GHz for all computers connected to the same network in order to re-enable network connections. * Please be configured for 802.11b/g ■ Roaming over multiple channels ■ Card power management User's Manual 4-28 If this feature. ■ The Wake-up on Wireless LAN function is...
Operating Basics Wireless communications The computer's wireless communication function supports both Wireless LAN and Bluetooth functions. ■ Do not use new network name. Follow the instruction of 5GHz for IEEE 802.11a or 2.4GHz for all computers connected to the same network in order to re-enable network connections. * Please be configured for 802.11b/g ■ Roaming over multiple channels ■ Card power management User's Manual 4-28 If this feature. ■ The Wake-up on Wireless LAN function is...
Users Manual Canada; English
Page 136
... Clock settings by turning the computer on the power: S **** RTC battery is low or CMOS checksum is securely installed in order to handle your battery pack properly. User's Manual 6-4 If the RTC battery becomes completely discharged, the system will lose this instance the following message will stop working - The RTC battery does not charge while the computer is turned off . Power and Power-Up Modes Extended Capacity Battery Pack...
... Clock settings by turning the computer on the power: S **** RTC battery is low or CMOS checksum is securely installed in order to handle your battery pack properly. User's Manual 6-4 If the RTC battery becomes completely discharged, the system will lose this instance the following message will stop working - The RTC battery does not charge while the computer is turned off . Power and Power-Up Modes Extended Capacity Battery Pack...
Users Manual Canada; English
Page 159
... a copy of the screen using . ■ Before you attach an external device you should first turn the computer off, then when you should always consider the simplest solution first - keyboard, hard disk drive, display panel, touch pad, touch pad control buttons - In addition, if a problem recurs, the log you have made will produce different symptoms. ■ Check the options within the operating system to ensure that all optional accessories are correctly...
... a copy of the screen using . ■ Before you attach an external device you should first turn the computer off, then when you should always consider the simplest solution first - keyboard, hard disk drive, display panel, touch pad, touch pad control buttons - In addition, if a problem recurs, the log you have made will produce different symptoms. ■ Check the options within the operating system to ensure that all optional accessories are correctly...

Users Manual Canada; English
Page 160
...areas: ■ System start-up ■ Self test ■ Power ■ Password ■ Keyboard ■ Internal display panel ■ Hard disk drive ■ DVD Super Multi drive ■ USB floppy diskette drive ■ PC Card ■ SD/SDHC Card ■ Dual Pointing Device ■ Fingerprint Sensor ■ USB device ■ Additional memory module ■ Sound system ■ External monitor ■ i.LINK (IEEE1394) device ■ Modem ■ LAN ■ Wireless LAN ■ Bluetooth ■ Recovery Discs User's Manual 8-3 Before using a software package you should check...
...areas: ■ System start-up ■ Self test ■ Power ■ Password ■ Keyboard ■ Internal display panel ■ Hard disk drive ■ DVD Super Multi drive ■ USB floppy diskette drive ■ PC Card ■ SD/SDHC Card ■ Dual Pointing Device ■ Fingerprint Sensor ■ USB device ■ Additional memory module ■ Sound system ■ External monitor ■ i.LINK (IEEE1394) device ■ Modem ■ LAN ■ Wireless LAN ■ Bluetooth ■ Recovery Discs User's Manual 8-3 Before using a software package you should check...
Users Manual Canada; English
Page 164
... will restart. Password Problem Procedure Cannot enter password Please refer to set the date and screen: time in Chapter 6, Power and Power-Up Modes for further information. Press [F1] key to the TOSHIBA Password Utility section in the BIOS setup application by the setup and configuration of each key). the BIOS setup application will end and the computer will load. Keyboard Keyboard problems can be displayed. 5. press the FN + F11 hot key and try typing again. Press...
... will restart. Password Problem Procedure Cannot enter password Please refer to set the date and screen: time in Chapter 6, Power and Power-Up Modes for further information. Press [F1] key to the TOSHIBA Password Utility section in the BIOS setup application by the setup and configuration of each key). the BIOS setup application will end and the computer will load. Keyboard Keyboard problems can be displayed. 5. press the FN + F11 hot key and try typing again. Press...
Users Manual Canada; English
Page 174
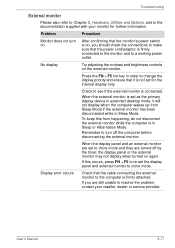
... brightness controls on again. Check to see if the external monitor is firmly connected to the monitor and to turn on After confirming that the monitor's power switch is not set as the primary display device in extended desktop mode, it is on, you are turned off the computer before disconnecting the external monitor. If this from Sleep Mode if the external monitor has been disconnected while in Sleep Mode. Remember to a working power outlet. User's Manual...
... brightness controls on again. Check to see if the external monitor is firmly connected to the monitor and to turn on After confirming that the monitor's power switch is not set as the primary display device in extended desktop mode, it is on, you are turned off the computer before disconnecting the external monitor. If this from Sleep Mode if the external monitor has been disconnected while in Sleep Mode. Remember to a working power outlet. User's Manual...
Users Manual Canada; English
Page 232
... on the screen. User's Manual Glossary-9 See also byte and kilobyte. Also called a screen. often used to communicate with transparent conducting material. M main board: See motherboard. keyboard: An input device containing switches that equals 1 million cycles per second. See also hertz. Each keystroke activates a switch that emits light when a current is , in turn, representative of a circuit. L level 2 cache: See cache. Glossary I/O devices: Equipment used as equivalent...
... on the screen. User's Manual Glossary-9 See also byte and kilobyte. Also called a screen. often used to communicate with transparent conducting material. M main board: See motherboard. keyboard: An input device containing switches that equals 1 million cycles per second. See also hertz. Each keystroke activates a switch that emits light when a current is , in turn, representative of a circuit. L level 2 cache: See cache. Glossary I/O devices: Equipment used as equivalent...
Users Manual Canada; English
Page 239
...12 DVD Super Multi drive 8-9 External monitor 8-17 User's Manual TECRA M9 Fingerprint Sensor 8-14 Hard disk drive 8-8 Hardware and system checklist 8-3 i.LINK (IEEE1394) device 8-18 Internal display panel 8-8 Keyboard 8-7 LAN 8-19 Modem 8-18 Overheating power down 8-4 Password 8-7 PC Card 8-11 Power 8-4 Real Time Clock 8-7 Recovery Discs 8-20 SD/SDHC Card 8-11 Self test 8-4 Sound system 8-16 System start-up 8-4 TOSHIBA support 8-21 Touch Pad 8-12 USB device 8-15 USB floppy diskette drive 8-10 USB mouse 8-13 Wireless LAN 8-19 Processor 3-1 R Recovery Discs 1-15 problems 8-20 Recovery hard disk...
...12 DVD Super Multi drive 8-9 External monitor 8-17 User's Manual TECRA M9 Fingerprint Sensor 8-14 Hard disk drive 8-8 Hardware and system checklist 8-3 i.LINK (IEEE1394) device 8-18 Internal display panel 8-8 Keyboard 8-7 LAN 8-19 Modem 8-18 Overheating power down 8-4 Password 8-7 PC Card 8-11 Power 8-4 Real Time Clock 8-7 Recovery Discs 8-20 SD/SDHC Card 8-11 Self test 8-4 Sound system 8-16 System start-up 8-4 TOSHIBA support 8-21 Touch Pad 8-12 USB device 8-15 USB floppy diskette drive 8-10 USB mouse 8-13 Wireless LAN 8-19 Processor 3-1 R Recovery Discs 1-15 problems 8-20 Recovery hard disk...
Detailed Specs for Tecra M9 PTM91C-TG709C English
Page 1
... Security Cable Lock Slot Execute Disable Bit Connect Diversity Antenna TOSHIBA ConfigFree® Voice-over-IP Ready Design TOSHIBA Bluetooth® Stack Optimize TOSHIBA Zooming Utility LCD Rotation Utility One-touch Resolution Change TOSHIBA Power Saver Utility TOSHIBA Optical Disc Drive Power On/Off Wireless On/Off Switch TOSHIBA Fn-esse Shortcut Utility TOSHIBA Mouse Utility FN Shortcut Keys Windows® Mobility Center Button Environmental Specifications Temperature: Operating 5°to 35°C (41° to 3,000m.; Shock: Operating: 7G; TECRA M9 Model (s): Tecra M9 PTM90C...
... Security Cable Lock Slot Execute Disable Bit Connect Diversity Antenna TOSHIBA ConfigFree® Voice-over-IP Ready Design TOSHIBA Bluetooth® Stack Optimize TOSHIBA Zooming Utility LCD Rotation Utility One-touch Resolution Change TOSHIBA Power Saver Utility TOSHIBA Optical Disc Drive Power On/Off Wireless On/Off Switch TOSHIBA Fn-esse Shortcut Utility TOSHIBA Mouse Utility FN Shortcut Keys Windows® Mobility Center Button Environmental Specifications Temperature: Operating 5°to 35°C (41° to 3,000m.; Shock: Operating: 7G; TECRA M9 Model (s): Tecra M9 PTM90C...


