

User Manual
Page 32
...in the Windows® operating system 187 If you need further assistance 190 Before you contact Toshiba 190 Contacting Toshiba 191 Other Toshiba Internet Web sites 192 Toshiba's worldwide offices 192 Appendix A: Hot Keys/TOSHIBA Cards 194 Hot Key Cards 194 Using the Hot Key Cards 195 Application Cards 196 Using... 203 Display modes 204 Display brightness 205 Disabling or enabling wireless devices............206 Disabling or enabling the TouchPad 207 Changing screen resolution 208 Keyboard hot key functions 209 Appendix B: Power Cord/Cable Connectors 210 Glossary 211 Index 225
...in the Windows® operating system 187 If you need further assistance 190 Before you contact Toshiba 190 Contacting Toshiba 191 Other Toshiba Internet Web sites 192 Toshiba's worldwide offices 192 Appendix A: Hot Keys/TOSHIBA Cards 194 Hot Key Cards 194 Using the Hot Key Cards 195 Application Cards 196 Using... 203 Display modes 204 Display brightness 205 Disabling or enabling wireless devices............206 Disabling or enabling the TouchPad 207 Changing screen resolution 208 Keyboard hot key functions 209 Appendix B: Power Cord/Cable Connectors 210 Glossary 211 Index 225
User Manual
Page 40
...Enter the computer name and choose your background and then click Next. 5 Click the appropriate option from the Help Protect Windows Automatically screen. 6 Follow the remaining screen prompts to complete the setup process. 7 Click Start when the Thank You message appears. See "Connecting to your software setup choices... limited to charge the battery you must complete all setup steps up to and including "Setting up your software. 1 From the Welcome screen click Next to enter the Setup Wizard. 2 Confirm acceptance of windows displayed, and the order in which windows appear, may restart your...
...Enter the computer name and choose your background and then click Next. 5 Click the appropriate option from the Help Protect Windows Automatically screen. 6 Follow the remaining screen prompts to complete the setup process. 7 Click Start when the Thank You message appears. See "Connecting to your software setup choices... limited to charge the battery you must complete all setup steps up to and including "Setting up your software. 1 From the Welcome screen click Next to enter the Setup Wizard. 2 Confirm acceptance of windows displayed, and the order in which windows appear, may restart your...

User Manual
Page 45
... now ready for the first time NOTE Battery life and charge time may vary depending on the usage of the computer, the brightness of the screen will dim and you may not be careful to remove any pens or other hand to hold the computer in place and use the other... objects from the keyboard area before closing the display panel, place one hand on your computer. Your display contains an extremely large number of the screen technology. Any small bright dots that may appear on the palm rest to slowly open or close the display panel. Using the computer for the...
... now ready for the first time NOTE Battery life and charge time may vary depending on the usage of the computer, the brightness of the screen will dim and you may not be careful to remove any pens or other hand to hold the computer in place and use the other... objects from the keyboard area before closing the display panel, place one hand on your computer. Your display contains an extremely large number of the screen technology. Any small bright dots that may appear on the palm rest to slowly open or close the display panel. Using the computer for the...

User Manual
Page 53
... be lost. Do not try to go into Safe Mode, then shut down the computer and open the memory module slot cover. NOTE The following screen may need to remove a memory module: 1 Complete steps 1-8 in Sleep or Hibernation mode. If so, consult Windows® Help and Support. 2 Pull the latches away...
... be lost. Do not try to go into Safe Mode, then shut down the computer and open the memory module slot cover. NOTE The following screen may need to remove a memory module: 1 Complete steps 1-8 in Sleep or Hibernation mode. If so, consult Windows® Help and Support. 2 Pull the latches away...

User Manual
Page 55
... latches. NOTE Because the TouchPad is inserted completely into the socket and lined up that the module is much smaller than the display screen, moving your cursor across the screen often means having to move your permission. If you can check that the computer has recognized the change. otherwise, click Cancel. If...
... latches. NOTE Because the TouchPad is inserted completely into the socket and lined up that the module is much smaller than the display screen, moving your cursor across the screen often means having to move your permission. If you can check that the computer has recognized the change. otherwise, click Cancel. If...

User Manual
Page 57
... to change . To do not have connected an external display device, you desire and click Apply. 5 Click OK. Briefly pause each time you need a larger screen. Your computer will automatically detect the external display device and activate a screen with one acting as the primary display and the other as an extended desktop
... to change . To do not have connected an external display device, you desire and click Apply. 5 Click OK. Briefly pause each time you need a larger screen. Your computer will automatically detect the external display device and activate a screen with one acting as the primary display and the other as an extended desktop

User Manual
Page 60
... creating a password service diskette, require a diskette drive designed for the first time. The Add Printer Wizard appears. (Sample Image) Add Printer Wizard 2 Follow the on-screen instructions to set it up your printer. 60 Getting Started Connecting an optional external diskette drive Setting up the printer once. 1 Click Start, Control Panel...
... creating a password service diskette, require a diskette drive designed for the first time. The Add Printer Wizard appears. (Sample Image) Add Printer Wizard 2 Follow the on-screen instructions to set it up your printer. 60 Getting Started Connecting an optional external diskette drive Setting up the printer once. 1 Click Start, Control Panel...

User Manual
Page 65
The Advanced settings tab of the Power Options window appears. (Sample Image) Advanced settings tab of Power Options screen 4 Click Power buttons and lid to display the actions that you can configure. 5 Select the options you want from the drop-down lists. ❖ Lid ...
The Advanced settings tab of the Power Options window appears. (Sample Image) Advanced settings tab of Power Options screen 4 Click Power buttons and lid to display the actions that you can configure. 5 Select the options you want from the drop-down lists. ❖ Lid ...
User Manual
Page 67
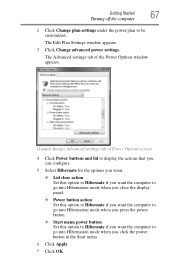
... the Start menu. 6 Click Apply. 7 Click OK. The Advanced settings tab of the Power Options window appears. (Sample Image) Advanced settings tab of Power Options screen 4 Click Power buttons and lid to display the actions that you can configure. 5 Select Hibernate for the options you want. ❖ Lid close action Set...
... the Start menu. 6 Click Apply. 7 Click OK. The Advanced settings tab of the Power Options window appears. (Sample Image) Advanced settings tab of Power Options screen 4 Click Power buttons and lid to display the actions that you can configure. 5 Select Hibernate for the options you want. ❖ Lid close action Set...
User Manual
Page 68
... the power button or closing the display panel, you put the computer in the lower-right part of all open programs and files to the screen(s) you can start up the computer from Hibernation mode, press the power button until the on/off the display, and enters into Hibernation mode by...
... the power button or closing the display panel, you put the computer in the lower-right part of all open programs and files to the screen(s) you can start up the computer from Hibernation mode, press the power button until the on/off the display, and enters into Hibernation mode by...

User Manual
Page 69
... button or closing the display panel. You can place the computer into Sleep mode. The Edit Plan Settings window appears. (Sample Image) Edit Plan Settings screen 3 To change the amount of time after which the computer enters Sleep mode: ❖ Under Put the computer to be customized.
... button or closing the display panel. You can place the computer into Sleep mode. The Edit Plan Settings window appears. (Sample Image) Edit Plan Settings screen 3 To change the amount of time after which the computer enters Sleep mode: ❖ Under Put the computer to be customized.

User Manual
Page 70
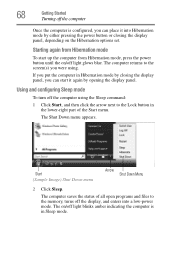
... the computer 4 Click Change advanced power settings. The Advanced settings tab of the Power Options window appears. (Sample Image) Advanced settings tab of Power Options screen 5 Click Power buttons and lid to display the actions that you can configure. 6 Select Sleep for the options you want. ❖ Lid close action Set...
... the computer 4 Click Change advanced power settings. The Advanced settings tab of the Power Options window appears. (Sample Image) Advanced settings tab of Power Options screen 5 Click Power buttons and lid to display the actions that you can configure. 6 Select Sleep for the options you want. ❖ Lid close action Set...
User Manual
Page 71
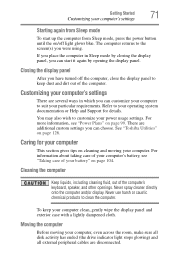
... disconnected. Never spray cleaner directly onto the computer and/or display. The computer returns to the screen(s) you can start up the computer from Sleep mode, press the power button until the on page 104. See "Toshiba Utilities" on page 99. Refer to your operating system documentation or Help and Support for...
... disconnected. Never spray cleaner directly onto the computer and/or display. The computer returns to the screen(s) you can start up the computer from Sleep mode, press the power button until the on page 104. See "Toshiba Utilities" on page 99. Refer to your operating system documentation or Help and Support for...
User Manual
Page 87
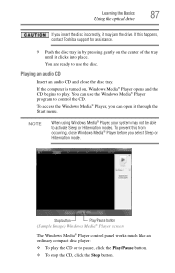
You can open it clicks into place. Stop button Play/Pause button (Sample Image) Windows Media® Player screen The Windows Media® Player control panel works much like an ordinary compact disc player: ❖ To play . You are ready to use the Windows ... jam the drive. If the computer is turned on the center of the tray until it through the Start menu. To prevent this happens, contact Toshiba support for assistance. 9 Push the disc tray in by pressing gently on , Windows Media® Player opens and the CD begins to play the CD...
You can open it clicks into place. Stop button Play/Pause button (Sample Image) Windows Media® Player screen The Windows Media® Player control panel works much like an ordinary compact disc player: ❖ To play . You are ready to use the Windows ... jam the drive. If the computer is turned on the center of the tray until it through the Start menu. To prevent this happens, contact Toshiba support for assistance. 9 Push the disc tray in by pressing gently on , Windows Media® Player opens and the CD begins to play the CD...
User Manual
Page 98
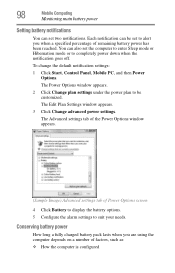
... power down when the notification goes off. Conserving battery power How long a fully charged battery pack lasts when you when a specified percentage of Power Options screen 4 Click Battery to display the battery options. 5 Configure the alarm settings to suit your needs. You can set two notifications. Each notification can be customized...
... power down when the notification goes off. Conserving battery power How long a fully charged battery pack lasts when you when a specified percentage of Power Options screen 4 Click Battery to display the battery options. 5 Configure the alarm settings to suit your needs. You can set two notifications. Each notification can be customized...
User Manual
Page 100
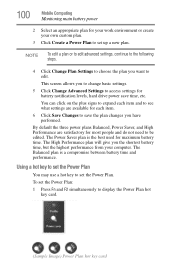
...) Power Plan hot key card 100 Mobile Computing Monitoring main battery power 2 Select an appropriate plan for your work environment or create your computer. This screen allows you want to save time, etc. By default the three power plans Balanced, Power Saver, and High Performance are available for maximum battery time...
...) Power Plan hot key card 100 Mobile Computing Monitoring main battery power 2 Select an appropriate plan for your work environment or create your computer. This screen allows you want to save time, etc. By default the three power plans Balanced, Power Saver, and High Performance are available for maximum battery time...

User Manual
Page 108
... not indicate any change in the functionality of your system. 108 Chapter 4 Exploring Your Computer's Features In this guide may appear slightly different from the screens displayed by your system. Exploring the desktop The desktop is the launching pad for everything you will explore some of the special features of your...
... not indicate any change in the functionality of your system. 108 Chapter 4 Exploring Your Computer's Features In this guide may appear slightly different from the screens displayed by your system. Exploring the desktop The desktop is the launching pad for everything you will explore some of the special features of your...

User Manual
Page 117
... probably set up for sale. Exploring Your Computer's Features An overview of using a dedicated site to converse about a specialized subject with others on their computer screens. ❖ Internet news groups A news group is a unique identifier for example, your ISP's home page on the Web or an email address. To visit a desired...
... probably set up for sale. Exploring Your Computer's Features An overview of using a dedicated site to converse about a specialized subject with others on their computer screens. ❖ Internet news groups A news group is a unique identifier for example, your ISP's home page on the Web or an email address. To visit a desired...

User Manual
Page 118
... microphone. Recording sounds You may record sounds using the built-in speakers, headphones, or external speakers. Start Recording/Stop Recording button (Sample Image) Sound Recorder screen 3 Click the Start Recording button. 4 Speak normally into the microphone. 5 When you want to use your computer to record sounds using the computer's internal microphone...
... microphone. Recording sounds You may record sounds using the built-in speakers, headphones, or external speakers. Start Recording/Stop Recording button (Sample Image) Sound Recorder screen 3 Click the Start Recording button. 4 Speak normally into the microphone. 5 When you want to use your computer to record sounds using the computer's internal microphone...

User Manual
Page 132
...user password must be deleted and then re-entered after the supervisor password is useful if more than one person uses the computer. Toshiba supports several types of passwords on your open programs and files when leaving the computer temporarily. When setting up under the supervisor password... lets you walk away from accessing certain functions such as Toshiba Hardware Setup. NOTE You need to have created a password for your password, if any key or touch the pointing device and the Windows® Logon screen will appear. This is set before you leave your system...
...user password must be deleted and then re-entered after the supervisor password is useful if more than one person uses the computer. Toshiba supports several types of passwords on your open programs and files when leaving the computer temporarily. When setting up under the supervisor password... lets you walk away from accessing certain functions such as Toshiba Hardware Setup. NOTE You need to have created a password for your password, if any key or touch the pointing device and the Windows® Logon screen will appear. This is set before you leave your system...


