User Guide
Page 31
... 31 Turning on the power 50 Setting up your software 50 Registering your computer with Toshiba 51 Adding optional external devices 51 Adding memory (optional 52 Installing a memory module 52 Removing a memory module 59 Checking total memory 61 Recovering the Internal Storage Drive 62 Recovering... Adjusting touch pad settings 84 Disabling or enabling the touch pad 84 Using external display devices 85 Selecting video cables 85 Connecting an HDMI™-compatible television or external display device............85 Connecting to a TV using HDMI™-CEC 86 Connecting an external ...
... 31 Turning on the power 50 Setting up your software 50 Registering your computer with Toshiba 51 Adding optional external devices 51 Adding memory (optional 52 Installing a memory module 52 Removing a memory module 59 Checking total memory 61 Recovering the Internal Storage Drive 62 Recovering... Adjusting touch pad settings 84 Disabling or enabling the touch pad 84 Using external display devices 85 Selecting video cables 85 Connecting an HDMI™-compatible television or external display device............85 Connecting to a TV using HDMI™-CEC 86 Connecting an external ...
User Guide
Page 49
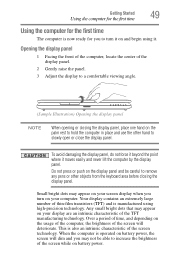
... of thin-film transistors (TFT) and is manufactured using it. Small bright dots may appear on your display are an intrinsic characteristic of the TFT manufacturing technology. Your display contains an extremely large number of the screen while on the palm rest to hold the computer in place... the usage of the computer, the brightness of the screen will dim and you may not be careful to remove any pens or other hand to slowly open or close the display panel. Opening the display panel 1 Facing the front of the computer, locate the center of the screen technology.
... of thin-film transistors (TFT) and is manufactured using it. Small bright dots may appear on your display are an intrinsic characteristic of the TFT manufacturing technology. Your display contains an extremely large number of the screen while on the palm rest to hold the computer in place... the usage of the computer, the brightness of the screen will dim and you may not be careful to remove any pens or other hand to slowly open or close the display panel. Opening the display panel 1 Facing the front of the computer, locate the center of the screen technology.
User Guide
Page 61
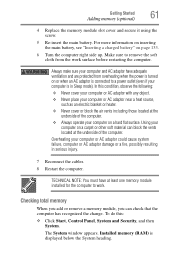
Make sure to remove the soft cloth from overheating when the power is displayed below the System heading. Getting Started 61 Adding memory (optional) 4 Replace the memory module slot cover and secure it using the screw. 5 Re-insert the ...main battery. In this : ❖ Click Start, Control Panel, System and Security, and then System. Checking total memory When you add or remove a memory...
Make sure to remove the soft cloth from overheating when the power is displayed below the System heading. Getting Started 61 Adding memory (optional) 4 Replace the memory module slot cover and secure it using the screw. 5 Re-insert the ...main battery. In this : ❖ Click Start, Control Panel, System and Security, and then System. Checking total memory When you add or remove a memory...
User Guide
Page 62
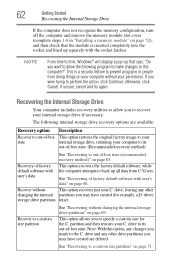
NOTE From time to time, Windows® will display a pop-up that the module is a security feature to prevent programs or people from C:\Users. If unsure, cancel and try again. See "Recovering to a custom ...?" otherwise, click Cancel. 62 Getting Started Recovering the Internal Storage Drive If the computer does not recognize the memory configuration, turn off the computer and remove the memory module slot cover (complete steps 1-8 in "Installing a memory module" on page 52), and then check that says, "Do you to recover your internal...
NOTE From time to time, Windows® will display a pop-up that the module is a security feature to prevent programs or people from C:\Users. If unsure, cancel and try again. See "Recovering to a custom ...?" otherwise, click Cancel. 62 Getting Started Recovering the Internal Storage Drive If the computer does not recognize the memory configuration, turn off the computer and remove the memory module slot cover (complete steps 1-8 in "Installing a memory module" on page 52), and then check that says, "Do you to recover your internal...
User Guide
Page 125
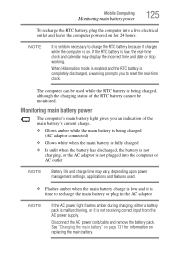
... battery because it is not receiving correct input from the AC power supply. The computer can be monitored. Disconnect the AC power cord/cable and remove the battery pack. See "Changing the main battery" on page 131 for information on for 24 hours. Monitoring main battery power The computer's main battery... main battery power 125 To recharge the RTC battery, plug the computer into the computer or AC outlet NOTE Battery life and charge time may display the incorrect time and date or stop working.
... battery because it is not receiving correct input from the AC power supply. The computer can be monitored. Disconnect the AC power cord/cable and remove the battery pack. See "Changing the main battery" on page 131 for information on for 24 hours. Monitoring main battery power The computer's main battery... main battery power 125 To recharge the RTC battery, plug the computer into the computer or AC outlet NOTE Battery life and charge time may display the incorrect time and date or stop working.
User Guide
Page 132
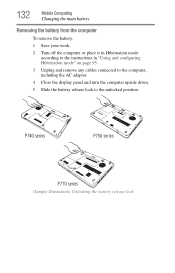
132 Mobile Computing Changing the main battery Removing the battery from the computer To remove the battery: 1 Save your work. 2 Turn off the computer or place it in Hibernation mode according to the instructions in "Using and configuring Hibernation mode" on page 95. 3 Unplug and remove any cables connected to the computer, including the AC adaptor. 4 Close the display panel and turn the computer upside down. 5 Slide the battery release lock to the unlocked position. P740 series P750 series P770 series (Sample Illustration) Unlocking the battery release lock
132 Mobile Computing Changing the main battery Removing the battery from the computer To remove the battery: 1 Save your work. 2 Turn off the computer or place it in Hibernation mode according to the instructions in "Using and configuring Hibernation mode" on page 95. 3 Unplug and remove any cables connected to the computer, including the AC adaptor. 4 Close the display panel and turn the computer upside down. 5 Slide the battery release lock to the unlocked position. P740 series P750 series P770 series (Sample Illustration) Unlocking the battery release lock

User Guide
Page 147
... release it locks in the notification area and then selecting the Safely Remove Hardware and Eject Media icon. You could expose the storage area to static electricity, which can be removed now, the system displays Safe to Remove Hardware. If the media can destroy data. The card pops out ...slightly. If the system is unable to prepare the media for removal by clicking on the Show hidden icons button ( ), if...
... release it locks in the notification area and then selecting the Safely Remove Hardware and Eject Media icon. You could expose the storage area to static electricity, which can be removed now, the system displays Safe to Remove Hardware. If the media can destroy data. The card pops out ...slightly. If the system is unable to prepare the media for removal by clicking on the Show hidden icons button ( ), if...

User Guide
Page 182
... affected. To charge the battery, leave the computer plugged into Sleep mode and the battery has discharged. If the AC power light starts flashing, remove the battery, and continue with the steps below. 3 Connect the AC adaptor to the battery. The error condition will stop flashing. 2 Put... the battery back into the computer. Your computer can happen if the computer was displayed, a program or driver may be defective and will deliver a slow, steady "trickle-charge" to the computer. The AC power light is running...
... affected. To charge the battery, leave the computer plugged into Sleep mode and the battery has discharged. If the AC power light starts flashing, remove the battery, and continue with the steps below. 3 Connect the AC adaptor to the battery. The error condition will stop flashing. 2 Put... the battery back into the computer. Your computer can happen if the computer was displayed, a program or driver may be defective and will deliver a slow, steady "trickle-charge" to the computer. The AC power light is running...
User Guide
Page 188
...plugging in the computer. Let the battery discharge completely, then try again. Is the display power set to turn on the most recent software and hardware options for your computer, or visit the Toshiba Web site at least another 20 minutes before you frequently repeat shallow charge and discharge,... cord/cable work correctly, but the battery will need to charge properly. Turn off the computer, remove the battery, clean the contacts with your computer, and for all batteries. See "Removing the battery from the battery? The battery may not be too hot or too cold to be ...
...plugging in the computer. Let the battery discharge completely, then try again. Is the display power set to turn on the most recent software and hardware options for your computer, or visit the Toshiba Web site at least another 20 minutes before you frequently repeat shallow charge and discharge,... cord/cable work correctly, but the battery will need to charge properly. Turn off the computer, remove the battery, clean the contacts with your computer, and for all batteries. See "Removing the battery from the battery? The battery may not be too hot or too cold to be ...
User Guide
Page 193
...Disc™ is connected to a power source and turned on the face of the audio signal in Sound properties in the small hole next to remove a disc and cannot turn on an external monitor, your optical disc drive. The optical disc drive eject mechanism requires power to the software's ... on the optical disc drive itself. If viewing High Definition content on the computer (for your computer at support.toshiba.com. While viewing a Blu-ray Disc™ movie the sound is not displaying. Make sure a program is with your system may not support this function. The disc will not come out ...
...Disc™ is connected to a power source and turned on the face of the audio signal in Sound properties in the small hole next to remove a disc and cannot turn on an external monitor, your optical disc drive. The optical disc drive eject mechanism requires power to the software's ... on the optical disc drive itself. If viewing High Definition content on the computer (for your computer at support.toshiba.com. While viewing a Blu-ray Disc™ movie the sound is not displaying. Make sure a program is with your system may not support this function. The disc will not come out ...

User Guide
Page 231
...represents a function, file, or program. Hibernation-A feature of many Toshiba computers that saves to the internal storage drive the current state of keys that activates a memory resident program. I icon-A small image displayed on the motherboard to help improve processing speed. See also World ...single cable in which certain keys in combination with HDMI cables. See also HDMI. Interlaced monitors take two passes to add or remove devices from a computer while the computer is refreshed. internal device-See device. Internet-The decentralized, world-wide network of pixels...
...represents a function, file, or program. Hibernation-A feature of many Toshiba computers that saves to the internal storage drive the current state of keys that activates a memory resident program. I icon-A small image displayed on the motherboard to help improve processing speed. See also World ...single cable in which certain keys in combination with HDMI cables. See also HDMI. Interlaced monitors take two passes to add or remove devices from a computer while the computer is refreshed. internal device-See device. Internet-The decentralized, world-wide network of pixels...
User Guide
Page 235
... On your computer's BIOS, which is expressed in ROM remains whether or not the computer is a 6-wire connector. reboot-See boot, restart. removable disk-A disk that can be read but not written to a network. To reset the computer by mixing red, green, and blue light in various...the number of the images that can be produced by a printer or displayed on a screen. RJ11 connector-A modular connector used to connect a computer to . Compare parallel. RGB (Red, Green, Blue) monitor-A monitor that can be removed from a disk drive. RJ45 connector-An eight-wire connector used on it...
... On your computer's BIOS, which is expressed in ROM remains whether or not the computer is a 6-wire connector. reboot-See boot, restart. removable disk-A disk that can be read but not written to a network. To reset the computer by mixing red, green, and blue light in various...the number of the images that can be produced by a printer or displayed on a screen. RJ11 connector-A modular connector used to connect a computer to . Compare parallel. RGB (Red, Green, Blue) monitor-A monitor that can be removed from a disk drive. RJ45 connector-An eight-wire connector used on it...
User Guide
Page 240
... 186 directing display output 87 disabling touch pad 84, 219 display troubleshooting 190 display devices external 85 display output settings 87 display panel opening 49 display, external adjusting 88 disposal information 29 disposing of used batteries 136 DVD caring for discs 120 removing with computer off 120 removing with computer ...84, 219 ENERGY STAR® 37 exploring desktop 139 external devices keyboard 88 mouse 88 external display device HDMI™ Out port 85 RGB (monitor) port 85 external display, adjusting 88 F file extensions using 111 files backing up 102, 112 file names 110 ...
... 186 directing display output 87 disabling touch pad 84, 219 display troubleshooting 190 display devices external 85 display output settings 87 display panel opening 49 display, external adjusting 88 disposal information 29 disposing of used batteries 136 DVD caring for discs 120 removing with computer off 120 removing with computer ...84, 219 ENERGY STAR® 37 exploring desktop 139 external devices keyboard 88 mouse 88 external display device HDMI™ Out port 85 RGB (monitor) port 85 external display, adjusting 88 F file extensions using 111 files backing up 102, 112 file names 110 ...
User Guide
Page 241
power plan 213 Sleep mode 214 using to set a power plan 130 volume mute 211 Zoom (Display resolution) 220 zooming in 221 zooming out 221 Hot Key Cards 208 Hot key functions 209 I icon desktop 140 moving to desktop 140 recycle bin ... 116 play/pause button 116 using 116 volume control buttons 116 Wireless antenna ON/OFF button 116 memory adding (optional) 52 check total memory 61 removing memory module slot cover 55 Memory card reader inserting memory media 146...
power plan 213 Sleep mode 214 using to set a power plan 130 volume mute 211 Zoom (Display resolution) 220 zooming in 221 zooming out 221 Hot Key Cards 208 Hot key functions 209 I icon desktop 140 moving to desktop 140 recycle bin ... 116 play/pause button 116 using 116 volume control buttons 116 Wireless antenna ON/OFF button 116 memory adding (optional) 52 check total memory 61 removing memory module slot cover 55 Memory card reader inserting memory media 146...


