User Manual
Page 27
... display devices 67 Directing the display output when you turn on the computer 68 Adjusting the quality of the external display......69 Using an external keyboard 69 Using a mouse 69 Connecting a printer 70 Setting up a printer 70 Connecting an optional external diskette drive........71 Turning off the computer 72 Options for...
... display devices 67 Directing the display output when you turn on the computer 68 Adjusting the quality of the external display......69 Using an external keyboard 69 Using a mouse 69 Connecting a printer 70 Setting up a printer 70 Connecting an optional external diskette drive........71 Turning off the computer 72 Options for...
User Manual
Page 28
28 Contents Using a computer lock 83 Chapter 2: Learning the Basics 84 Computing tips 84 Using the keyboard 85 Character keys 86 Ctrl, Fn, and Alt keys 86 Function keys 86 Special Windows® keys 87 Starting a program 87 Starting a program from the ... 97 Removing a disc with the computer on 98 Removing a disc with the computer off 98 Caring for CD or DVD discs 99 Toshiba's online resources 99 Chapter 3: Mobile Computing 100 Toshiba's energy-saver design 100 Running the computer on battery power 100 Battery Notice 101 Power management 102 Using additional batteries 102
28 Contents Using a computer lock 83 Chapter 2: Learning the Basics 84 Computing tips 84 Using the keyboard 85 Character keys 86 Ctrl, Fn, and Alt keys 86 Function keys 86 Special Windows® keys 87 Starting a program 87 Starting a program from the ... 97 Removing a disc with the computer on 98 Removing a disc with the computer off 98 Caring for CD or DVD discs 99 Toshiba's online resources 99 Chapter 3: Mobile Computing 100 Toshiba's energy-saver design 100 Running the computer on battery power 100 Battery Notice 101 Power management 102 Using additional batteries 102
User Manual
Page 31
... help you 175 Resolving a hardware conflict 175 A plan of action 175 Fixing a problem with Device Manager ...........176 Memory problems 177 Power and the batteries 178 Keyboard problems 179 Display problems 180 Disk drive problems 182 Optical drive problems 183 Sound system problems 184 PC Card problems 185 Printer problems 187 Modem...
... help you 175 Resolving a hardware conflict 175 A plan of action 175 Fixing a problem with Device Manager ...........176 Memory problems 177 Power and the batteries 178 Keyboard problems 179 Display problems 180 Disk drive problems 182 Optical drive problems 183 Sound system problems 184 PC Card problems 185 Printer problems 187 Modem...
User Manual
Page 32
32 Contents If you need further assistance 197 Before you contact Toshiba 197 Contacting Toshiba 198 Other Toshiba Internet Web sites 199 Toshiba's worldwide offices 199 Appendix A: Hot Keys 201 Hot Key Cards 201 Using the Hot Key Cards 202 Application Cards 203 Using the Application Cards 203 ... Display brightness 212 Disabling or enabling wireless devices............213 Disabling or enabling the TouchPad™ or Dual Mode Pad 214 Zooming applications in/out 215 Keyboard hot key functions 215 Appendix B: Power Cord/Cable Connectors 216 Glossary 217 Index 231
32 Contents If you need further assistance 197 Before you contact Toshiba 197 Contacting Toshiba 198 Other Toshiba Internet Web sites 199 Toshiba's worldwide offices 199 Appendix A: Hot Keys 201 Hot Key Cards 201 Using the Hot Key Cards 202 Application Cards 203 Using the Application Cards 203 ... Display brightness 212 Disabling or enabling wireless devices............213 Disabling or enabling the TouchPad™ or Dual Mode Pad 214 Zooming applications in/out 215 Keyboard hot key functions 215 Appendix B: Power Cord/Cable Connectors 216 Glossary 217 Index 231
User Manual
Page 40
... Setting up your computer Setting up your computer TECHNICAL NOTE: You must attach the AC adaptor. These components include, but are not limited to, a mouse, keyboard, printer, memory, and PC Cards.
... Setting up your computer Setting up your computer TECHNICAL NOTE: You must attach the AC adaptor. These components include, but are not limited to, a mouse, keyboard, printer, memory, and PC Cards.
User Manual
Page 41
... computer. Adding optional external devices NOTE Before adding external devices or memory, Toshiba recommends setting up your computer for the first time you can be connected to the Toshiba Web site at www.register.toshiba.com at a later time. See "Setting up your product. Failure to... : ❖ Add more memory (see "Adding memory (optional)" on page 47) ❖ Connect a mouse (see "Using a mouse" on page 69) ❖ Connect a full-size keyboard (see "Using an external keyboard...
... computer. Adding optional external devices NOTE Before adding external devices or memory, Toshiba recommends setting up your computer for the first time you can be connected to the Toshiba Web site at www.register.toshiba.com at a later time. See "Setting up your product. Failure to... : ❖ Add more memory (see "Adding memory (optional)" on page 47) ❖ Connect a mouse (see "Using a mouse" on page 69) ❖ Connect a full-size keyboard (see "Using an external keyboard...
User Manual
Page 45
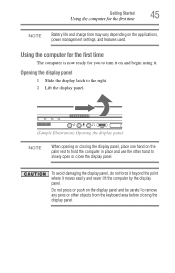
... push on the palm rest to hold the computer in place and use the other hand to remove any pens or other objects from the keyboard area before closing the display panel, place one hand on the display panel and be careful to slowly open or close the display panel. Opening...
... push on the palm rest to hold the computer in place and use the other hand to remove any pens or other objects from the keyboard area before closing the display panel, place one hand on the display panel and be careful to slowly open or close the display panel. Opening...
User Manual
Page 58
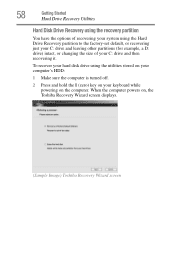
... partition to the factory-set default, or recovering just your C: drive and leaving other partitions (for example, a D: drive) intact, or changing the size of your keyboard while powering on , the Toshiba Recovery Wizard screen displays. (Sample Image) Toshiba Recovery Wizard screen When the computer powers on the computer.
... partition to the factory-set default, or recovering just your C: drive and leaving other partitions (for example, a D: drive) intact, or changing the size of your keyboard while powering on , the Toshiba Recovery Wizard screen displays. (Sample Image) Toshiba Recovery Wizard screen When the computer powers on the computer.
User Manual
Page 59
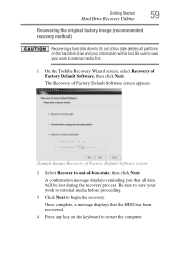
Once complete, a message displays that all partitions on the keyboard to out-of-box-state, then click Next. The Recovery of Factory Default Software screen appears. (Sample Image) Recovery of Factory Default Software screen 2 Select ... your work to begin the recovery. Be sure to save your work to external media before proceeding. 3 Click Next to external media first. 1 On the Toshiba Recovery Wizard screen, select Recovery of Factory Default Software, then click Next. Getting Started 59 Hard Drive Recovery Utilities Recovering the original factory image (recommended...
Once complete, a message displays that all partitions on the keyboard to out-of-box-state, then click Next. The Recovery of Factory Default Software screen appears. (Sample Image) Recovery of Factory Default Software screen 2 Select ... your work to begin the recovery. Be sure to save your work to external media before proceeding. 3 Click Next to external media first. 1 On the Toshiba Recovery Wizard screen, select Recovery of Factory Default Software, then click Next. Getting Started 59 Hard Drive Recovery Utilities Recovering the original factory image (recommended...
User Manual
Page 60
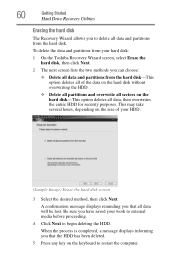
... displays informing you that all data, then overwrites the entire HDD for security purposes. Be sure you have saved your hard disk: 1 On the Toshiba Recovery Wizard screen, select Erase the hard disk, then click Next. 2 The next screen lists the two methods you that the HDD has been ... hard disk-This option deletes all data will be lost. A confirmation message displays reminding you can choose: ❖ Delete all sectors on the keyboard to begin deleting the HDD. To delete the data and partitions from your work to external media before proceeding. 4 Click Next to restart the ...
... displays informing you that all data, then overwrites the entire HDD for security purposes. Be sure you have saved your hard disk: 1 On the Toshiba Recovery Wizard screen, select Erase the hard disk, then click Next. 2 The next screen lists the two methods you that the HDD has been ... hard disk-This option deletes all data will be lost. A confirmation message displays reminding you can choose: ❖ Delete all sectors on the keyboard to begin deleting the HDD. To delete the data and partitions from your work to external media before proceeding. 4 Click Next to restart the ...
User Manual
Page 61
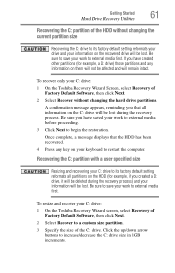
...external media before proceeding. 3 Click Next to begin the restoration. If you have saved your C: drive: 1 On the Toshiba Recovery Wizard screen, select Recovery of Factory Default Software, then click Next. 2 Select Recover to a custom size partition....To recover only your work to external media first. Be sure to save your C: drive: 1 On the Toshiba Recovery Wizard Screen, select Recovery of Factory Default Software, then click Next. 2 Select Recover without changing the ... recovered drive will be lost during the recovery process) and your keyboard to restart the computer.
...external media before proceeding. 3 Click Next to begin the restoration. If you have saved your C: drive: 1 On the Toshiba Recovery Wizard screen, select Recovery of Factory Default Software, then click Next. 2 Select Recover to a custom size partition....To recover only your work to external media first. Be sure to save your C: drive: 1 On the Toshiba Recovery Wizard Screen, select Recovery of Factory Default Software, then click Next. 2 Select Recover without changing the ... recovered drive will be lost during the recovery process) and your keyboard to restart the computer.
User Manual
Page 62
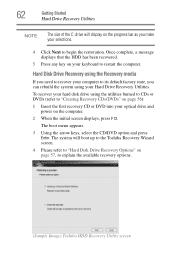
... on your Hard Drive Recovery Utilities. To recover your hard disk drive using your keyboard to restart the computer. 62 Getting Started Hard Drive Recovery Utilities NOTE The size of the C: drive will boot up to the Toshiba Recovery Wizard screen. 4 Please refer to "Hard Disk Drive Recovery Options" on page 57...
... on your Hard Drive Recovery Utilities. To recover your hard disk drive using your keyboard to restart the computer. 62 Getting Started Hard Drive Recovery Utilities NOTE The size of the C: drive will boot up to the Toshiba Recovery Wizard screen. 4 Please refer to "Hard Disk Drive Recovery Options" on page 57...
User Manual
Page 63
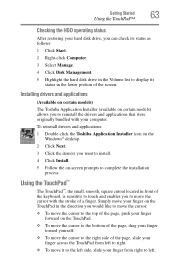
...finger. Installing drivers and applications (Available on certain models) The Toshiba Application Installer (available on certain models) allows you to reinstall the drivers and applications that were originally bundled with the stroke of the keyboard, is sensitive to touch and enables you to move it ...to the left side, slide your finger from left . To reinstall drivers and applications: 1 Double-click the Toshiba Application Installer icon on the Windows® desktop. ...
...finger. Installing drivers and applications (Available on certain models) The Toshiba Application Installer (available on certain models) allows you to reinstall the drivers and applications that were originally bundled with the stroke of the keyboard, is sensitive to touch and enables you to move it ...to the left side, slide your finger from left . To reinstall drivers and applications: 1 Double-click the Toshiba Application Installer icon on the Windows® desktop. ...
User Manual
Page 69
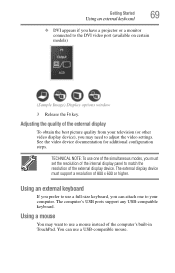
... can use a USB-compatible mouse. The computer's USB ports support any USB-compatible keyboard. See the video device documentation for additional configuration steps. Adjusting the quality of the external display To obtain the best picture quality from your computer. ... connected to the DVI video port (available on certain models) (Sample Image) Display options window 3 Release the Fn key. Getting Started 69 Using an external keyboard ❖ DVI appears if you may want to match the resolution of the external display device. The external display device must set the resolution of...
... can use a USB-compatible mouse. The computer's USB ports support any USB-compatible keyboard. See the video device documentation for additional configuration steps. Adjusting the quality of the external display To obtain the best picture quality from your computer. ... connected to the DVI video port (available on certain models) (Sample Image) Display options window 3 Release the Fn key. Getting Started 69 Using an external keyboard ❖ DVI appears if you may want to match the resolution of the external display device. The external display device must set the resolution of...
User Manual
Page 82
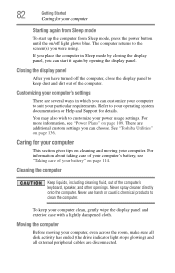
...your computer to clean the computer. For information about taking care of your computer's battery, see "Power Plans" on page 136. See "Toshiba Utilities" on page 109. Cleaning the computer Keep liquids, including cleaning fluid, out of your battery" on page 114. You may also wish... tips on /off the computer, close the display panel to keep your computer. For more information, see "Taking care of the computer's keyboard, speaker, and other openings. Moving the computer Before moving your computer clean, gently wipe the display panel and exterior case with a lightly dampened...
...your computer to clean the computer. For information about taking care of your computer's battery, see "Power Plans" on page 136. See "Toshiba Utilities" on page 109. Cleaning the computer Keep liquids, including cleaning fluid, out of your battery" on page 114. You may also wish... tips on /off the computer, close the display panel to keep your computer. For more information, see "Taking care of the computer's keyboard, speaker, and other openings. Moving the computer Before moving your computer clean, gently wipe the display panel and exterior case with a lightly dampened...
User Manual
Page 85
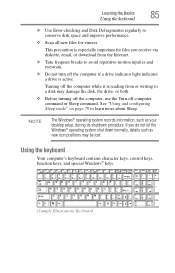
...; Before turning off the computer, use the Turn off computer command or Sleep command. Using the keyboard Your computer's keyboard contains character keys, control keys, function keys, and special Windows® keys. (Sample Illustration) Keyboard This precaution is especially important for viruses. If you receive via diskette, email, or download from ... repetitive-motion injuries and eyestrain. ❖ Do not turn off the computer while it is active. Learning the Basics 85 Using the keyboard ❖ Use Error-checking and Disk Defragmenter regularly to a disk may be lost.
...; Before turning off the computer, use the Turn off computer command or Sleep command. Using the keyboard Your computer's keyboard contains character keys, control keys, function keys, and special Windows® keys. (Sample Illustration) Keyboard This precaution is especially important for viruses. If you receive via diskette, email, or download from ... repetitive-motion injuries and eyestrain. ❖ Do not turn off the computer while it is active. Learning the Basics 85 Using the keyboard ❖ Use Error-checking and Disk Defragmenter regularly to a disk may be lost.
User Manual
Page 86
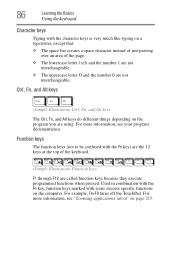
...is very much like typing on a typewriter, except that: ❖ The space bar creates a space character instead of just passing over an area of the keyboard. (Sample Illustration) Function keys F1 through F12 are using. Ctrl, Fn, and Alt keys Ctrl Fn Alt (Sample Illustration) Ctrl, Fn, and Alt ... function keys because they execute programmed functions when pressed. For example, Fn+F9 turns off the TouchPad. 86 Learning the Basics Using the keyboard Character keys Typing with icons execute specific functions on the computer. For more information, see your program documentation.
...is very much like typing on a typewriter, except that: ❖ The space bar creates a space character instead of just passing over an area of the keyboard. (Sample Illustration) Function keys F1 through F12 are using. Ctrl, Fn, and Alt keys Ctrl Fn Alt (Sample Illustration) Ctrl, Fn, and Alt ... function keys because they execute programmed functions when pressed. For example, Fn+F9 turns off the TouchPad. 86 Learning the Basics Using the keyboard Character keys Typing with icons execute specific functions on the computer. For more information, see your program documentation.

User Manual
Page 87
... complete list. Learning the Basics 87 Starting a program Special Windows® keys Windows® key Application key (Sample Illustration) Special Windows® keys Your computer's keyboard has two keys that have four options.
... complete list. Learning the Basics 87 Starting a program Special Windows® keys Windows® key Application key (Sample Illustration) Special Windows® keys Your computer's keyboard has two keys that have four options.

User Manual
Page 90
... to 260 characters and can contain up to no more than eight characters. Use this is all the letters, numbers, and other characters on the keyboard, except for these characters File names are working with a document that can include spaces. File names The Windows® operating system supports long file names...
... to 260 characters and can contain up to no more than eight characters. Use this is all the letters, numbers, and other characters on the keyboard, except for these characters File names are working with a document that can include spaces. File names The Windows® operating system supports long file names...

User Manual
Page 94
... partially out of the drive (about 1 inch). 94 Learning the Basics Using the optical drive Media control buttons The media control buttons located above the keyboard let you access the Internet when the computer is powered on The Media button activates a media playing application that is on the disc. The Stop...
... partially out of the drive (about 1 inch). 94 Learning the Basics Using the optical drive Media control buttons The media control buttons located above the keyboard let you access the Internet when the computer is powered on The Media button activates a media playing application that is on the disc. The Stop...

