
User Manual
Page 9
... prevent radio interference to the licensed service, this product to be operated indoors and away from windows to provide maximum shielding. Responsible for harmful interference to co-channel Mobile Satellite systems. High power radars are allocated as primary users of the 5.25 GHz to 5.35... with and/or damage this product conforms to the following Standards: Supplementary *The product complies with the Information: requirements of Conformity TOSHIBA declares that is installed outdoors is restricted to indoor use due to licensing. 9 The term "IC" before the equipment certification ...
... prevent radio interference to the licensed service, this product to be operated indoors and away from windows to provide maximum shielding. Responsible for harmful interference to co-channel Mobile Satellite systems. High power radars are allocated as primary users of the 5.25 GHz to 5.35... with and/or damage this product conforms to the following Standards: Supplementary *The product complies with the Information: requirements of Conformity TOSHIBA declares that is installed outdoors is restricted to indoor use due to licensing. 9 The term "IC" before the equipment certification ...

User Manual
Page 25
... and Photoshop are registered trademarks of Toshiba America Information Systems, Inc. and/or Toshiba Corporation. 25 Trademarks Satellite is a registered trademark of Microsoft Corporation in the United States and/or other countries. Microsoft and Windows are either registered trademarks or trademarks ...product contains mercury. Other trademarks and trade names are registered trademarks of Synaptics, Inc. DirectX, Active Desktop, DirectShow, and Windows Media are those of such marks by the Bluetooth SIG, Inc. ExpressCard is a trademark of PCMCIA TouchPad is a registered ...
... and Photoshop are registered trademarks of Toshiba America Information Systems, Inc. and/or Toshiba Corporation. 25 Trademarks Satellite is a registered trademark of Microsoft Corporation in the United States and/or other countries. Microsoft and Windows are either registered trademarks or trademarks ...product contains mercury. Other trademarks and trade names are registered trademarks of Synaptics, Inc. DirectX, Active Desktop, DirectShow, and Windows Media are those of such marks by the Bluetooth SIG, Inc. ExpressCard is a trademark of PCMCIA TouchPad is a registered ...
User Manual
Page 28
... 85 Character keys 86 Ctrl, Fn, and Alt keys 86 Function keys 86 Special Windows® keys 87 Starting a program 87 Starting a program from the Start menu...........87 Starting a program from Windows® Explorer....88 Starting a program using the Start Search field 89 Saving your work...with the computer on 98 Removing a disc with the computer off 98 Caring for CD or DVD discs 99 Toshiba's online resources 99 Chapter 3: Mobile Computing 100 Toshiba's energy-saver design 100 Running the computer on battery power 100 Battery Notice 101 Power management 102 Using additional ...
... 85 Character keys 86 Ctrl, Fn, and Alt keys 86 Function keys 86 Special Windows® keys 87 Starting a program 87 Starting a program from the Start menu...........87 Starting a program from Windows® Explorer....88 Starting a program using the Start Search field 89 Saving your work...with the computer on 98 Removing a disc with the computer off 98 Caring for CD or DVD discs 99 Toshiba's online resources 99 Chapter 3: Mobile Computing 100 Toshiba's energy-saver design 100 Running the computer on battery power 100 Battery Notice 101 Power management 102 Using additional ...
User Manual
Page 31
... Problems that are easy to fix 169 Problems when you turn on the computer............170 The Windows® operating system is not working...173 Using Startup options to fix problems 173 Internet problems 174 The Windows® operating system can help you 175 Resolving a hardware conflict 175 A plan of action 175 Fixing... problems 187 Modem problems 187 Wireless networking problems 188 DVD operating problems 191 Develop good computing habits 192 Data and system configuration backup in the Windows® operating system 193
... Problems that are easy to fix 169 Problems when you turn on the computer............170 The Windows® operating system is not working...173 Using Startup options to fix problems 173 Internet problems 174 The Windows® operating system can help you 175 Resolving a hardware conflict 175 A plan of action 175 Fixing... problems 187 Modem problems 187 Wireless networking problems 188 DVD operating problems 191 Develop good computing habits 192 Data and system configuration backup in the Windows® operating system 193
User Manual
Page 40
...Start when the Thank You message appears. The first time you turn off the power again until the operating system has loaded completely. The Windows® operating system checks the system's performance, and then restarts your software. 1 From the Welcome screen click Next to enter the Setup... account, and then click Next. 4 Enter the computer name and description and click Next. 5 Click the appropriate option from the Help Protect Windows Automatically screen. 6 Follow the remaining screen prompts to a power source" on page 42. Your computer contains a rechargeable main battery that needs ...
...Start when the Thank You message appears. The first time you turn off the power again until the operating system has loaded completely. The Windows® operating system checks the system's performance, and then restarts your software. 1 From the Welcome screen click Next to enter the Setup... account, and then click Next. 4 Enter the computer name and description and click Next. 5 Click the appropriate option from the Help Protect Windows Automatically screen. 6 Follow the remaining screen prompts to a power source" on page 42. Your computer contains a rechargeable main battery that needs ...
User Manual
Page 53
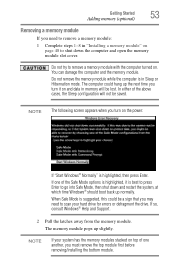
... to remove a memory module with the computer turned on the power: If "Start Windows® Normally" is highlighted, then press Enter. The computer could be a sign ... the Safe Mode options is suggested, this could hang up the next time you turn on . If so, consult Windows® Help and Support. 2 Pull the latches away from the memory module. When Safe Mode is highlighted, it... has the memory modules stacked on page 48 to shut down and restart the system, at which time Windows® should boot back up slightly. NOTE The following screen appears when you turn it is in Sleep...
... to remove a memory module with the computer turned on the power: If "Start Windows® Normally" is highlighted, then press Enter. The computer could be a sign ... the Safe Mode options is suggested, this could hang up the next time you turn on . If so, consult Windows® Help and Support. 2 Pull the latches away from the memory module. When Safe Mode is highlighted, it... has the memory modules stacked on page 48 to shut down and restart the system, at which time Windows® should boot back up slightly. NOTE The following screen appears when you turn it is in Sleep...
User Manual
Page 55
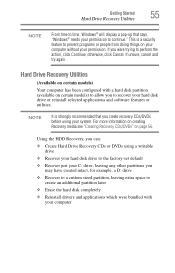
...is a security feature to prevent programs or people from doing things on your computer without your permission to continue." This is strongly recommended that says, "Windows® needs your permission. If unsure, cancel and try again. If you create recovery CDs/DVDs before using a writable drive ❖ Recover your hard... with a hard disk partition (available on page 56. otherwise, click Cancel. Getting Started 55 Hard Drive Recovery Utilities NOTE From time to time, Windows® will display a pop-up that you were trying to perform the action, click Continue;
...is a security feature to prevent programs or people from doing things on your computer without your permission to continue." This is strongly recommended that says, "Windows® needs your permission. If unsure, cancel and try again. If you create recovery CDs/DVDs before using a writable drive ❖ Recover your hard... with a hard disk partition (available on page 56. otherwise, click Cancel. Getting Started 55 Hard Drive Recovery Utilities NOTE From time to time, Windows® will display a pop-up that you were trying to perform the action, click Continue;
User Manual
Page 56
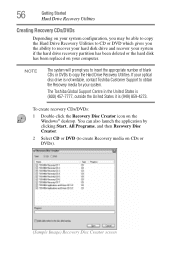
.... 2 Select CD or DVD (to copy the Hard Drive Recovery Utilities. To create recovery CDs/DVDs: 1 Double-click the Recovery Disc Creator icon on the Windows® desktop. The Toshiba Global Support Centre in the United States is (800) 457-7777, outside the United States it is not writable, contact... Toshiba Customer Support to obtain the Recovery media for your computer. If your optical disc drive is (949) 859-4273. NOTE The system will prompt you ...
.... 2 Select CD or DVD (to copy the Hard Drive Recovery Utilities. To create recovery CDs/DVDs: 1 Double-click the Recovery Disc Creator icon on the Windows® desktop. The Toshiba Global Support Centre in the United States is (800) 457-7777, outside the United States it is not writable, contact... Toshiba Customer Support to obtain the Recovery media for your computer. If your optical disc drive is (949) 859-4273. NOTE The system will prompt you ...
User Manual
Page 63
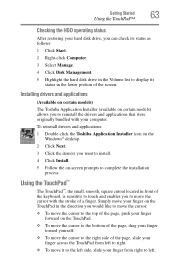
... to the right side of the page, slide your finger across the TouchPad from left . To reinstall drivers and applications: 1 Double-click the Toshiba Application Installer icon on the Windows® desktop. 2 Click Next. 3 Click the item(s) you want to install. 4 Click Install. 5 Follow the on certain models) allows you to reinstall...
... to the right side of the page, slide your finger across the TouchPad from left . To reinstall drivers and applications: 1 Double-click the Toshiba Application Installer icon on the Windows® desktop. 2 Click Next. 3 Click the item(s) you want to install. 4 Click Install. 5 Follow the on certain models) allows you to reinstall...

User Manual
Page 65
...Right button: Sends the item in the Mouse Properties dialog box before they can be used. You must configure these buttons in the active window to the printer The other three virtual buttons have no default settings. In Button Mode, you to switch between Cursor Mode (the default ...mode) and Button Mode. Each virtual button can be configured to start an application. Virtual buttons Mode switch button TOSHIBA Volume control bar 1 2 3 Virtual buttons (Sample Illustration) Virtual buttons on the Dual Mode Pad NOTE Activating the Dual Mode Pad will ...
...Right button: Sends the item in the Mouse Properties dialog box before they can be used. You must configure these buttons in the active window to the printer The other three virtual buttons have no default settings. In Button Mode, you to switch between Cursor Mode (the default ...mode) and Button Mode. Each virtual button can be configured to start an application. Virtual buttons Mode switch button TOSHIBA Volume control bar 1 2 3 Virtual buttons (Sample Illustration) Virtual buttons on the Dual Mode Pad NOTE Activating the Dual Mode Pad will ...

User Manual
Page 66
...volume to the desired level. 3 When the operation is complete, the Dual Mode Pad automatically disables the virtual buttons. The Control Panel window appears. 2 Click Mouse. Enabling Dual Mode To enable Dual Mode: 1 Click Start, and then Control Panel. The Properties for Synaptics LuxPad... window appears. 4 In the left side of the window, select Tapping. 5 Select Dual Mode. 6 Select Switch to Button Mode by tapping in the Mouse Properties dialog box. The virtual ...
...volume to the desired level. 3 When the operation is complete, the Dual Mode Pad automatically disables the virtual buttons. The Control Panel window appears. 2 Click Mouse. Enabling Dual Mode To enable Dual Mode: 1 Click Start, and then Control Panel. The Properties for Synaptics LuxPad... window appears. 4 In the left side of the window, select Tapping. 5 Select Dual Mode. 6 Select Switch to Button Mode by tapping in the Mouse Properties dialog box. The virtual ...
User Manual
Page 67
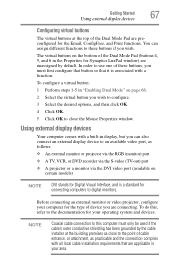
... order to use one of the Dual Mode Pad (buttons 4, 5, and 6 in display, but you can assign different functions to the documentation for Synaptics LuxPad window) are unassigned by the cable installer at the top of device you are connecting. Before connecting an external monitor or video projector, configure your computer..., and Print functions. Getting Started 67 Using external display devices Configuring virtual buttons The virtual buttons at the building premises as close the Mouse Properties window.
... order to use one of the Dual Mode Pad (buttons 4, 5, and 6 in display, but you can assign different functions to the documentation for Synaptics LuxPad window) are unassigned by the cable installer at the top of device you are connecting. Before connecting an external monitor or video projector, configure your computer..., and Print functions. Getting Started 67 Using external display devices Configuring virtual buttons The virtual buttons at the building premises as close the Mouse Properties window.
User Manual
Page 69
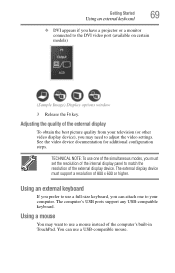
... external display device must set the resolution of the internal display panel to the DVI video port (available on certain models) (Sample Image) Display options window 3 Release the Fn key. You can attach one of the simultaneous modes, you must support a resolution of 800 x 600 or higher. See the video device...
... external display device must set the resolution of the internal display panel to the DVI video port (available on certain models) (Sample Image) Display options window 3 Release the Fn key. You can attach one of the simultaneous modes, you must support a resolution of 800 x 600 or higher. See the video device...

User Manual
Page 70
... does not support Plug and Play, you can set up the printer once. 1 Click Start, Control Panel, and then Printers. If your printer. The Printers window appears. Refer to your computer may automatically recognize the printer; Read the documentation that came with your printer does not support Plug and Play, follow...
... does not support Plug and Play, you can set up the printer once. 1 Click Start, Control Panel, and then Printers. If your printer. The Printers window appears. Refer to your computer may automatically recognize the printer; Read the documentation that came with your printer does not support Plug and Play, follow...
User Manual
Page 72
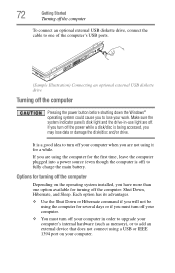
... the computer's USB ports. (Sample Illustration) Connecting an optional external USB diskette drive Turning off the computer Pressing the power button before shutting down the Windows® operating system could cause you are not using a USB or IEEE 1394 port on your computer when you may lose data or damage the...
... the computer's USB ports. (Sample Illustration) Connecting an optional external USB diskette drive Turning off the computer Pressing the power button before shutting down the Windows® operating system could cause you are not using a USB or IEEE 1394 port on your computer when you may lose data or damage the...
User Manual
Page 74
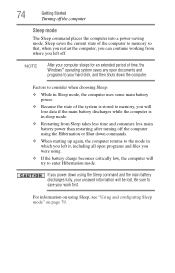
... battery discharges fully, your unsaved information will try to your work first. 74 Getting Started Turning off . Sleep saves the current state of time, the Windows® operating system saves any open programs and files you left it, including all open documents and programs to enter Hibernation mode. NOTE After your...
... battery discharges fully, your unsaved information will try to your work first. 74 Getting Started Turning off . Sleep saves the current state of time, the Windows® operating system saves any open programs and files you left it, including all open documents and programs to enter Hibernation mode. NOTE After your...
User Manual
Page 75
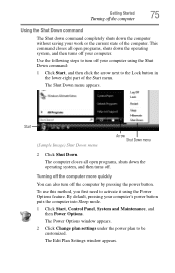
.... 2 Click Change plan settings under the power plan to the Lock button in the lower-right part of the computer. The Edit Plan Settings window appears. Use the following steps to turn off the computer by pressing the power button. Start (Sample Image) Shut Down menu Arrow Shut Down menu 2 ...
.... 2 Click Change plan settings under the power plan to the Lock button in the lower-right part of the computer. The Edit Plan Settings window appears. Use the following steps to turn off the computer by pressing the power button. Start (Sample Image) Shut Down menu Arrow Shut Down menu 2 ...
User Manual
Page 76
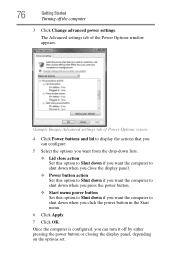
... the computer is configured, you click the power button in the Start menu. 6 Click Apply. 7 Click OK. The Advanced settings tab of the Power Options window appears. (Sample Image) Advanced settings tab of Power Options screen 4 Click Power buttons and lid to display the actions that you can configure. 5 Select the...
... the computer is configured, you click the power button in the Start menu. 6 Click Apply. 7 Click OK. The Advanced settings tab of the Power Options window appears. (Sample Image) Advanced settings tab of Power Options screen 4 Click Power buttons and lid to display the actions that you can configure. 5 Select the...
User Manual
Page 77
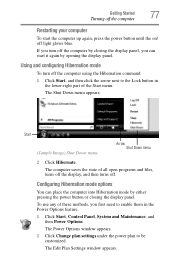
... panel. Configuring Hibernation mode options You can start the computer up again, press the power button until the on/ off . The Edit Plan Settings window appears. The Shut Down menu appears. Start (Sample Image) Shut Down menu Arrow Shut Down menu 2 Click Hibernate. The Power Options... window appears. 2 Click Change plan settings under the power plan to the Lock button in the Power Options feature. 1 Click Start, Control Panel, System and Maintenance...
... panel. Configuring Hibernation mode options You can start the computer up again, press the power button until the on/ off . The Edit Plan Settings window appears. The Shut Down menu appears. Start (Sample Image) Shut Down menu Arrow Shut Down menu 2 Click Hibernate. The Power Options... window appears. 2 Click Change plan settings under the power plan to the Lock button in the Power Options feature. 1 Click Start, Control Panel, System and Maintenance...
User Manual
Page 78
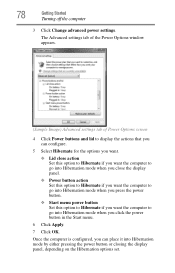
The Advanced settings tab of the Power Options window appears. (Sample Image) Advanced settings tab of Power Options screen 4 Click Power buttons and lid to display the actions that you can configure. 5 Select Hibernate ...
The Advanced settings tab of the Power Options window appears. (Sample Image) Advanced settings tab of Power Options screen 4 Click Power buttons and lid to display the actions that you can configure. 5 Select Hibernate ...


