User Manual
Page 27
... memory (optional 47 Installing a memory module 48 Removing a memory module 53 Checking total memory 54 Hard Drive Recovery Utilities 55 Creating Recovery CDs/DVDs 56 Hard Disk Drive Recovery Options 57 Installing drivers and applications 63 Using the TouchPad 63 Scrolling with the TouchPad 64 Control... an external keyboard 69 Using a mouse 69 Connecting a printer 70 Setting up a printer 70 Connecting an optional external diskette drive........71 Turning off the computer 72 Options for turning off the computer 72 Using the Shut Down command 75 Using and configuring Hibernation...
... memory (optional 47 Installing a memory module 48 Removing a memory module 53 Checking total memory 54 Hard Drive Recovery Utilities 55 Creating Recovery CDs/DVDs 56 Hard Disk Drive Recovery Options 57 Installing drivers and applications 63 Using the TouchPad 63 Scrolling with the TouchPad 64 Control... an external keyboard 69 Using a mouse 69 Connecting a printer 70 Setting up a printer 70 Connecting an optional external diskette drive........71 Turning off the computer 72 Options for turning off the computer 72 Using the Shut Down command 75 Using and configuring Hibernation...
User Manual
Page 53
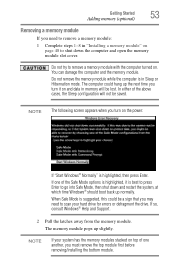
The memory module pops up normally. NOTE If your hard drive for errors or defragment the drive. Getting Started 53 Adding memory (optional) Removing a memory module If you need to scan your system has the memory modules stacked on top of one ...
The memory module pops up normally. NOTE If your hard drive for errors or defragment the drive. Getting Started 53 Adding memory (optional) Removing a memory module If you need to scan your system has the memory modules stacked on top of one ...
User Manual
Page 55
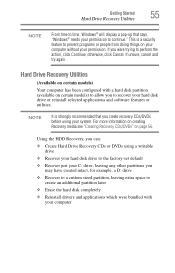
... on creating Recovery media see "Creating Recovery CDs/DVDs" on your computer without your permission. Hard Drive Recovery Utilities (Available on certain models) to allow you to recover your hard disk drive or reinstall selected applications and software features or utilities. If unsure, cancel and try again. ...on page 56. This is strongly recommended that says, "Windows® needs your permission to continue." Getting Started 55 Hard Drive Recovery Utilities NOTE From time to time, Windows® will display a pop-up that you create recovery CDs/DVDs before using a writable...
... on creating Recovery media see "Creating Recovery CDs/DVDs" on your computer without your permission. Hard Drive Recovery Utilities (Available on certain models) to allow you to recover your hard disk drive or reinstall selected applications and software features or utilities. If unsure, cancel and try again. ...on page 56. This is strongly recommended that says, "Windows® needs your permission to continue." Getting Started 55 Hard Drive Recovery Utilities NOTE From time to time, Windows® will display a pop-up that you create recovery CDs/DVDs before using a writable...
User Manual
Page 56
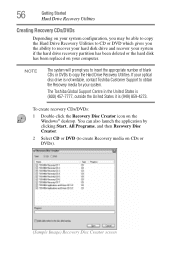
...is not writable, contact Toshiba Customer Support to obtain the Recovery media for your computer. NOTE The system will prompt you the ability to recover your hard disk drive and recover your system if the hard drive recovery partition has been deleted or the hard disk has been replaced on... your system. 56 Getting Started Hard Drive Recovery Utilities Creating Recovery CDs/DVDs Depending on your system...
...is not writable, contact Toshiba Customer Support to obtain the Recovery media for your computer. NOTE The system will prompt you the ability to recover your hard disk drive and recover your system if the hard drive recovery partition has been deleted or the hard disk has been replaced on... your system. 56 Getting Started Hard Drive Recovery Utilities Creating Recovery CDs/DVDs Depending on your system...
User Manual
Page 57
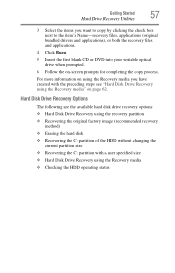
... size ❖ Recovering the C: partition with the preceding steps see "Hard Disk Drive Recovery using the Recovery media ❖ Checking the HDD operating status Getting Started 57 Hard Drive Recovery Utilities 3 Select the items you have created with a user specified size ❖ Hard Disk Drive Recovery using the Recovery media" on -screen prompts for completing the... (original bundled drivers and applications), or both the recovery files and applications. 4 Click Burn. 5 Insert the first blank CD or DVD into your writable optical drive when prompted. 6 Follow the on page 62.
... size ❖ Recovering the C: partition with the preceding steps see "Hard Disk Drive Recovery using the Recovery media ❖ Checking the HDD operating status Getting Started 57 Hard Drive Recovery Utilities 3 Select the items you have created with a user specified size ❖ Hard Disk Drive Recovery using the Recovery media" on -screen prompts for completing the... (original bundled drivers and applications), or both the recovery files and applications. 4 Click Burn. 5 Insert the first blank CD or DVD into your writable optical drive when prompted. 6 Follow the on page 62.
User Manual
Page 58
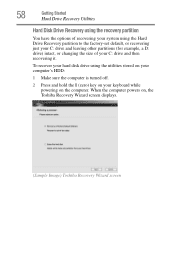
58 Getting Started Hard Drive Recovery Utilities Hard Disk Drive Recovery using the recovery partition You have the options of your keyboard while powering on , the Toshiba Recovery Wizard screen displays. (Sample Image) Toshiba Recovery Wizard screen To recover your hard disk drive using the Hard Drive Recovery partition to the factory-set default, or recovering just your C: drive and leaving other...
58 Getting Started Hard Drive Recovery Utilities Hard Disk Drive Recovery using the recovery partition You have the options of your keyboard while powering on , the Toshiba Recovery Wizard screen displays. (Sample Image) Toshiba Recovery Wizard screen To recover your hard disk drive using the Hard Drive Recovery partition to the factory-set default, or recovering just your C: drive and leaving other...
User Manual
Page 59
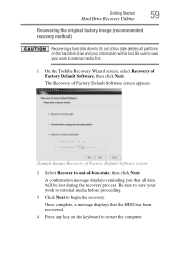
... displays reminding you that the HDD has been recovered. 4 Press any key on the hard disk drive and your work to external media first. 1 On the Toshiba Recovery Wizard screen, select Recovery of Factory Default Software, then click Next. Getting Started 59 Hard Drive Recovery Utilities Recovering the original factory image (recommended recovery method) Recovering...
... displays reminding you that the HDD has been recovered. 4 Press any key on the hard disk drive and your work to external media first. 1 On the Toshiba Recovery Wizard screen, select Recovery of Factory Default Software, then click Next. Getting Started 59 Hard Drive Recovery Utilities Recovering the original factory image (recommended recovery method) Recovering...
User Manual
Page 60
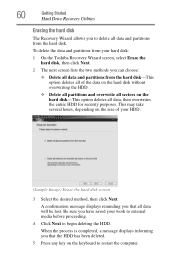
..., a message displays informing you that all data will be lost. To delete the data and partitions from your hard disk: 1 On the Toshiba Recovery Wizard screen, select Erase the hard disk, then click Next. 2 The next screen lists the two methods you can choose: ❖ Delete all... entire HDD for security purposes. 60 Getting Started Hard Drive Recovery Utilities Erasing the hard disk The Recovery Wizard allows you to delete all data and partitions from the hard disk-This option deletes all of your HDD. (Sample Image) Erase the hard disk screen 3 Select the desired method, then ...
..., a message displays informing you that all data will be lost. To delete the data and partitions from your hard disk: 1 On the Toshiba Recovery Wizard screen, select Erase the hard disk, then click Next. 2 The next screen lists the two methods you can choose: ❖ Delete all... entire HDD for security purposes. 60 Getting Started Hard Drive Recovery Utilities Erasing the hard disk The Recovery Wizard allows you to delete all data and partitions from the hard disk-This option deletes all of your HDD. (Sample Image) Erase the hard disk screen 3 Select the desired method, then ...
User Manual
Page 61
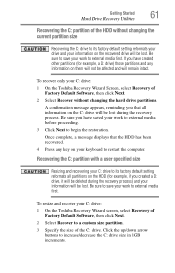
... only your C: drive: 1 On the Toshiba Recovery Wizard Screen, select Recovery of the C: drive. Once complete, a message displays that all partitions on the C: drive will be lost. Be sure to save your work to external media before proceeding. 3 Click Next to increase/decrease the C: drive size in 1GB increments. Getting Started 61 Hard Drive Recovery Utilities Recovering...
... only your C: drive: 1 On the Toshiba Recovery Wizard Screen, select Recovery of the C: drive. Once complete, a message displays that all partitions on the C: drive will be lost. Be sure to save your work to external media before proceeding. 3 Click Next to increase/decrease the C: drive size in 1GB increments. Getting Started 61 Hard Drive Recovery Utilities Recovering...
User Manual
Page 62
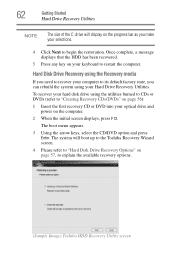
... and press Enter. To recover your hard disk drive using your optical drive and power on the computer. 2 When the initial screen displays, press F12. 62 Getting Started Hard Drive Recovery Utilities NOTE The size of the C: drive will boot up to the Toshiba Recovery Wizard screen. 4 Please refer to "Hard Disk Drive Recovery Options" on page 57, to...
... and press Enter. To recover your hard disk drive using your optical drive and power on the computer. 2 When the initial screen displays, press F12. 62 Getting Started Hard Drive Recovery Utilities NOTE The size of the C: drive will boot up to the Toshiba Recovery Wizard screen. 4 Please refer to "Hard Disk Drive Recovery Options" on page 57, to...
User Manual
Page 92
...Restore page in case something happens to your files to your computer may take a considerable amount of media such as an external hard drive. These features include widescreen movies, multiple language tracks, digital surround sound, multiple camera angles, and interactive menus. 92 Learning ...overwriting the existing file. Restoring your work Back up your computer. Using the optical drive Optical storage has become the preferred medium for information on any other video platform. For these reasons, your hard disk, use a high-capacity backup system, such as CDs, DVDs, diskettes,...
...Restore page in case something happens to your files to your computer may take a considerable amount of media such as an external hard drive. These features include widescreen movies, multiple language tracks, digital surround sound, multiple camera angles, and interactive menus. 92 Learning ...overwriting the existing file. Restoring your work Back up your computer. Using the optical drive Optical storage has become the preferred medium for information on any other video platform. For these reasons, your hard disk, use a high-capacity backup system, such as CDs, DVDs, diskettes,...
User Manual
Page 109
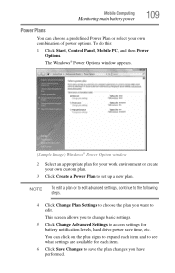
... edit advanced settings, continue to the following steps. 4 Click Change Plan Settings to choose the plan you want to access settings for battery notification levels, hard drive power save the plan changes you to change basic settings. 5 Click Change Advanced Settings to edit. This screen allows you have performed. You can choose...
... edit advanced settings, continue to the following steps. 4 Click Change Plan Settings to choose the plan you want to access settings for battery notification levels, hard drive power save the plan changes you to change basic settings. 5 Click Change Advanced Settings to edit. This screen allows you have performed. You can choose...
User Manual
Page 157
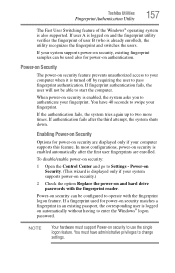
... Enabling Power-on Security Options for power-on security: 1 Open the Control Center and go to use the single logon feature. Toshiba Utilities Fingerprint Authentication Utility 157 The Fast User Switching feature of user B (who is already enrolled), the utility recognizes the fingerprint ...for power-on security matches a fingerprint in an existing passport, the corresponding user is also supported. You must support Power-on and hard drive passwords with the fingerprint logon feature. If user A is logged on and the fingerprint utility verifies the fingerprint of the Windows®...
... Enabling Power-on Security Options for power-on security: 1 Open the Control Center and go to use the single logon feature. Toshiba Utilities Fingerprint Authentication Utility 157 The Fast User Switching feature of user B (who is already enrolled), the utility recognizes the fingerprint ...for power-on security matches a fingerprint in an existing passport, the corresponding user is also supported. You must support Power-on and hard drive passwords with the fingerprint logon feature. If user A is logged on and the fingerprint utility verifies the fingerprint of the Windows®...
User Manual
Page 171
...If you performed a shutdown before this happens turning the power on page 106. Verify that the computer is not accessing the hard disk or the optional external diskette drive. If the indicator is glowing, the computer is running , but when you press a key nothing happens. To continue, select...light. If you have prevented Windows® from the hard disk. Windows did not shut down . This can happen if the computer was displayed, a program or driver may not be lost . Data stored in the computer's hard drive may have a hard disk problem, you are using Sleep mode. Data ...
...If you performed a shutdown before this happens turning the power on page 106. Verify that the computer is not accessing the hard disk or the optional external diskette drive. If the indicator is glowing, the computer is running , but when you press a key nothing happens. To continue, select...light. If you have prevented Windows® from the hard disk. Windows did not shut down . This can happen if the computer was displayed, a program or driver may not be lost . Data stored in the computer's hard drive may have a hard disk problem, you are using Sleep mode. Data ...

User Manual
Page 192
...to diskette. ❖ Copy files to a rewritable external storage device. ❖ Connect a writable CD/DVD or hard drive to the system and use specialized software to copy everything on the hard disk to a CD/DVD or hard drive. ❖ Connect your computer to the office network and copy files to reformat your... hard disk and start again, reloading all your programs and data files from a backup source will ...
...to diskette. ❖ Copy files to a rewritable external storage device. ❖ Connect a writable CD/DVD or hard drive to the system and use specialized software to copy everything on the hard disk to a CD/DVD or hard drive. ❖ Connect your computer to the office network and copy files to reformat your... hard disk and start again, reloading all your programs and data files from a backup source will ...

User Manual
Page 194
... will be a recent backup of each Restore Point. Fortunately, the Windows® operating system offers a convenient way to CDs, DVDs, or hard drives. Most of the selected Restore Point. 5 Verify that you did not create. Other Restore Points may contain Restore Points that the Restore Point you...Then, at a later time, you can re-establish your data. The utility displays the timestamp and description of the CD and DVD drives built into recent Toshiba portable computer models can write to use, and then click Next. To do this: 1 Click Start, All Programs, Accessories, System ...
... will be a recent backup of each Restore Point. Fortunately, the Windows® operating system offers a convenient way to CDs, DVDs, or hard drives. Most of the selected Restore Point. 5 Verify that you did not create. Other Restore Points may contain Restore Points that the Restore Point you...Then, at a later time, you can re-establish your data. The utility displays the timestamp and description of the CD and DVD drives built into recent Toshiba portable computer models can write to use, and then click Next. To do this: 1 Click Start, All Programs, Accessories, System ...
User Manual
Page 195
... You can not back up some files or the entire computer. Click Next. 3 Click Export Favorites, Next. (To restore the Favorites to the hard disk drive later you will only include the changes made since the last backup. 7 Follow the on battery power. If Something Goes Wrong Develop good computing habits... 195 Follow these steps to back up your computer or files to CDs, DVDs, or a hard drive: NOTE You can choose to back up the computer while running on -screen help , click Start, Help and Support, and search for "back ...
... You can not back up some files or the entire computer. Click Next. 3 Click Export Favorites, Next. (To restore the Favorites to the hard disk drive later you will only include the changes made since the last backup. 7 Follow the on battery power. If Something Goes Wrong Develop good computing habits... 195 Follow these steps to back up your computer or files to CDs, DVDs, or a hard drive: NOTE You can choose to back up the computer while running on -screen help , click Start, Help and Support, and search for "back ...

User Manual
Page 196
... titled Restore Points). The message "Successfully exported favorites" should appear. 7 Follow the steps above for 650-700 megabytes of new hardware (printers, pointing devices, external hard drives, DVD writers, scanners, etc.) and software (applications like Microsoft® Office and Adobe® Photoshop®, or utility software such as is often necessary to...
... titled Restore Points). The message "Successfully exported favorites" should appear. 7 Follow the steps above for 650-700 megabytes of new hardware (printers, pointing devices, external hard drives, DVD writers, scanners, etc.) and software (applications like Microsoft® Office and Adobe® Photoshop®, or utility software such as is often necessary to...
User Manual
Page 91
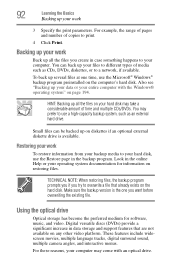
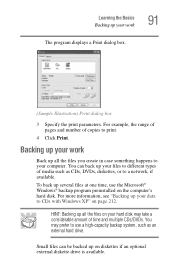
... computer. HINT: Backing up all the files you create in case something happens to CDs with Windows XP" on diskettes if an optional external diskette drive is available. To back up several files at one time, use a high-capacity backup system, such as CDs, DVDs, diskettes, or to use... your files to print. 4 Click Print. For example, the range of pages and number of copies to different types of media such as an external hard drive. Backing up your work 91 The program displays a Print dialog box. (Sample Illustration) Print dialog box 3 Specify the print parameters. You can be ...
... computer. HINT: Backing up all the files you create in case something happens to CDs with Windows XP" on diskettes if an optional external diskette drive is available. To back up several files at one time, use a high-capacity backup system, such as CDs, DVDs, diskettes, or to use... your files to print. 4 Click Print. For example, the range of pages and number of copies to different types of media such as an external hard drive. Backing up your work 91 The program displays a Print dialog box. (Sample Illustration) Print dialog box 3 Specify the print parameters. You can be ...
User Manual
Page 166
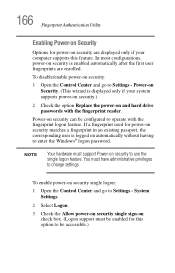
Power-on Security. (This wizard is displayed only if your computer supports this option to be accessible.) To disable/enable power-on and hard drive passwords with the fingerprint logon feature. 166 Fingerprint Authentication Utility Enabling Power-on Security Options for this feature. NOTE Your hardware must have administrative privileges ...
Power-on Security. (This wizard is displayed only if your computer supports this option to be accessible.) To disable/enable power-on and hard drive passwords with the fingerprint logon feature. 166 Fingerprint Authentication Utility Enabling Power-on Security Options for this feature. NOTE Your hardware must have administrative privileges ...


