User Manual
Page 26
Contents Introduction 33 This guide 34 Safety icons 35 Other icons used 35 Other documentation 36 Service options 36 Chapter 1: Getting Started 37 Selecting a place to work 37 Creating a computer-friendly environment........37 Keeping yourself comfortable 38 Precautions 38 Important information on your computer's cooling fan 39 Setting up your computer 40 Setting up your software 40 Registering your computer with Toshiba 41 Adding optional external devices 41 Connecting to a power source 42 Charging the main battery 44 26
Contents Introduction 33 This guide 34 Safety icons 35 Other icons used 35 Other documentation 36 Service options 36 Chapter 1: Getting Started 37 Selecting a place to work 37 Creating a computer-friendly environment........37 Keeping yourself comfortable 38 Precautions 38 Important information on your computer's cooling fan 39 Setting up your computer 40 Setting up your software 40 Registering your computer with Toshiba 41 Adding optional external devices 41 Connecting to a power source 42 Charging the main battery 44 26
User Manual
Page 28
...Fn, and Alt keys 86 Function keys 86 Special Windows® keys 87 Starting a program 87 Starting a program from the Start menu...........87 Starting a program from Windows® Explorer....88 Starting a program using the Start Search field 89 Saving your work 89 Printing your work 91 Backing up your ...the computer on 98 Removing a disc with the computer off 98 Caring for CD or DVD discs 99 Toshiba's online resources 99 Chapter 3: Mobile Computing 100 Toshiba's energy-saver design 100 Running the computer on battery power 100 Battery Notice 101 Power management 102 Using ...
...Fn, and Alt keys 86 Function keys 86 Special Windows® keys 87 Starting a program 87 Starting a program from the Start menu...........87 Starting a program from Windows® Explorer....88 Starting a program using the Start Search field 89 Saving your work 89 Printing your work 91 Backing up your ...the computer on 98 Removing a disc with the computer off 98 Caring for CD or DVD discs 99 Toshiba's online resources 99 Chapter 3: Mobile Computing 100 Toshiba's energy-saver design 100 Running the computer on battery power 100 Battery Notice 101 Power management 102 Using ...
User Manual
Page 31
... Power-on Security 157 Control Center 158 Password Bank 159 Care and maintenance of your fingerprint reader 163 Fingerprint reader limitations 165 ConfigFree 165 Getting Started 166 ConfigFree Utilities 166 Chapter 6: If Something Goes Wrong 169 Problems that are easy to fix 169 Problems when you turn on the computer............170...
... Power-on Security 157 Control Center 158 Password Bank 159 Care and maintenance of your fingerprint reader 163 Fingerprint reader limitations 165 ConfigFree 165 Getting Started 166 ConfigFree Utilities 166 Chapter 6: If Something Goes Wrong 169 Problems that are easy to fix 169 Problems when you turn on the computer............170...
User Manual
Page 37
... computer and other than speakers that is portable and designed to be used in temperature or humidity and sources of circumstances and locations. Chapter 1 Getting Started This chapter provides tips for the computer and any other items you use your work area from: ❖ Dust, moisture, and direct sunlight. ❖ Equipment...
... computer and other than speakers that is portable and designed to be used in temperature or humidity and sources of circumstances and locations. Chapter 1 Getting Started This chapter provides tips for the computer and any other items you use your work area from: ❖ Dust, moisture, and direct sunlight. ❖ Equipment...
User Manual
Page 38
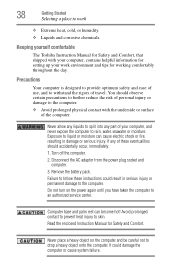
... and Comfort. Never place a heavy object on the power again until you have taken the computer to skin. Keeping yourself comfortable The Toshiba Instruction Manual for Safety and Comfort, that shipped with the underside or surface of your work ❖ Extreme heat, cold, or humidity...and to drop a heavy object onto the computer. Avoid prolonged contact to prevent heat injury to an authorized service center. 38 Getting Started Selecting a place to work environment and tips for working comfortably throughout the day. Computer base and palm rest can cause electric shock...
... and Comfort. Never place a heavy object on the power again until you have taken the computer to skin. Keeping yourself comfortable The Toshiba Instruction Manual for Safety and Comfort, that shipped with the underside or surface of your work ❖ Extreme heat, cold, or humidity...and to drop a heavy object onto the computer. Avoid prolonged contact to prevent heat injury to an authorized service center. 38 Getting Started Selecting a place to work environment and tips for working comfortably throughout the day. Computer base and palm rest can cause electric shock...

User Manual
Page 39
... operate your computer or AC adaptor could damage the disc and possibly lose data. ❖ Scan all new files for viruses. Handle discs carefully. Getting Started 39 Selecting a place to work ❖ Never turn off the computer while it by drawing outside air into the computer. Occasionally, even new programs you...
... operate your computer or AC adaptor could damage the disc and possibly lose data. ❖ Scan all new files for viruses. Handle discs carefully. Getting Started 39 Selecting a place to work ❖ Never turn off the computer while it by drawing outside air into the computer. Occasionally, even new programs you...
User Manual
Page 40
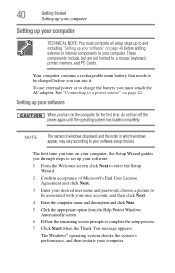
...2 Confirm acceptance of windows displayed, and the order in which windows appear, may vary according to complete the setup process. 7 Click Start when the Thank You message appears. The first time you turn off the power again until the operating system has loaded completely. To...name and password, choose a picture to be charged before adding external or internal components to be associated with your computer. 40 Getting Started Setting up your computer Setting up your computer TECHNICAL NOTE: You must attach the AC adaptor. Your computer contains a rechargeable main ...
...2 Confirm acceptance of windows displayed, and the order in which windows appear, may vary according to complete the setup process. 7 Click Start when the Thank You message appears. The first time you turn off the power again until the operating system has loaded completely. To...name and password, choose a picture to be charged before adding external or internal components to be associated with your computer. 40 Getting Started Setting up your computer Setting up your computer TECHNICAL NOTE: You must attach the AC adaptor. Your computer contains a rechargeable main ...
User Manual
Page 41
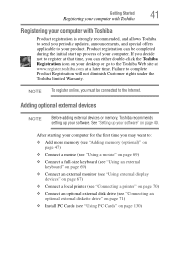
... setting up your computer. If you decide not to register at that time, you periodic updates, announcements, and special offers applicable to your product. Getting Started 41 Registering your computer with Toshiba Registering your computer with Toshiba Product registration is strongly recommended, and allows Toshiba to send you can be connected to the Internet.
... setting up your computer. If you decide not to register at that time, you periodic updates, announcements, and special offers applicable to your product. Getting Started 41 Registering your computer with Toshiba Registering your computer with Toshiba Product registration is strongly recommended, and allows Toshiba to send you can be connected to the Internet.
User Manual
Page 42
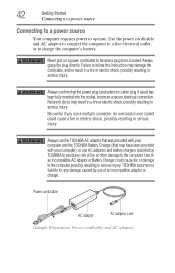
... cable plug if used) has been fully inserted into the socket, to the computer possibly resulting in serious injury. TOSHIBA assumes no liability for any damage caused by TOSHIBA to avoid any risk of fire or other damage to operate. Failure to remove a plug from a socket. Use...shock, possibly resulting in serious injury. Never pull on one socket could cause fire or damage to ensure a secure electrical connection. 42 Getting Started Connecting to a power source Connecting to a power source Your computer requires power to the computer. Be careful if you use of an ...
... cable plug if used) has been fully inserted into the socket, to the computer possibly resulting in serious injury. TOSHIBA assumes no liability for any damage caused by TOSHIBA to avoid any risk of fire or other damage to operate. Failure to remove a plug from a socket. Use...shock, possibly resulting in serious injury. Never pull on one socket could cause fire or damage to ensure a secure electrical connection. 42 Getting Started Connecting to a power source Connecting to a power source Your computer requires power to the computer. Be careful if you use of an ...
User Manual
Page 43
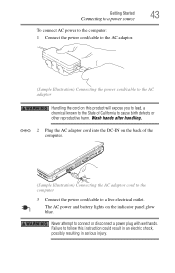
Never attempt to cause birth defects or other reproductive harm. Getting Started 43 Connecting to a power source To connect AC power to the computer: 1 Connect the power cord/cable to the AC adaptor. (Sample Illustration) Connecting the ...
Never attempt to cause birth defects or other reproductive harm. Getting Started 43 Connecting to a power source To connect AC power to the computer: 1 Connect the power cord/cable to the AC adaptor. (Sample Illustration) Connecting the ...
User Manual
Page 44
... discharged, the battery is not charging, or the AC adaptor is not plugged into an AC power source with its battery already installed. 44 Getting Started Charging the main battery The computer's main battery light gives you must charge the battery. Continuing to charge a fully charged battery can be completely charged...
... discharged, the battery is not charging, or the AC adaptor is not plugged into an AC power source with its battery already installed. 44 Getting Started Charging the main battery The computer's main battery light gives you must charge the battery. Continuing to charge a fully charged battery can be completely charged...
User Manual
Page 45
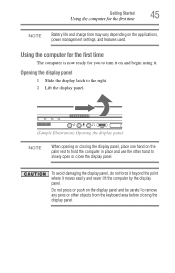
... the display latch to the right. 2 Lift the display panel. (Sample Illustration) Opening the display panel NOTE When opening or closing the display panel. Getting Started 45 Using the computer for you to turn it on and begin using it moves easily and never lift the computer by the display panel...
... the display latch to the right. 2 Lift the display panel. (Sample Illustration) Opening the display panel NOTE When opening or closing the display panel. Getting Started 45 Using the computer for you to turn it on and begin using it moves easily and never lift the computer by the display panel...
User Manual
Page 46
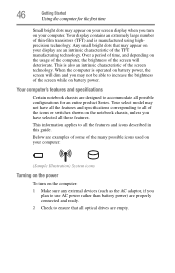
... able to ensure that may appear on the notebook chassis, unless you plan to use AC power rather than battery power) are empty. 46 Getting Started Using the computer for an entire product Series. This is also an intrinsic characteristic of thin-film transistors (TFT) and is operated on your display...
... able to ensure that may appear on the notebook chassis, unless you plan to use AC power rather than battery power) are empty. 46 Getting Started Using the computer for an entire product Series. This is also an intrinsic characteristic of thin-film transistors (TFT) and is operated on your display...
User Manual
Page 47
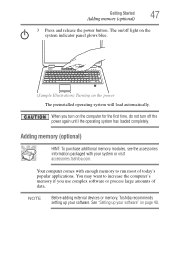
.... When you use complex software or process large amounts of today's popular applications. NOTE Before adding external devices or memory, Toshiba recommends setting up your system or visit accessories.toshiba.com. Getting Started 47 Adding memory (optional) 3 Press and release the power button. The on/off the power again until the operating system...
.... When you use complex software or process large amounts of today's popular applications. NOTE Before adding external devices or memory, Toshiba recommends setting up your system or visit accessories.toshiba.com. Getting Started 47 Adding memory (optional) 3 Press and release the power button. The on/off the power again until the operating system...
User Manual
Page 48
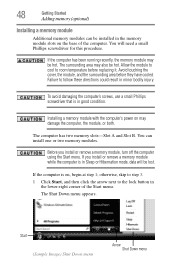
... to follow these directions could result in minor bodily injury. If you install or remove a memory module, turn off the computer using the Start menu. Failure to room temperature before they have cooled. To avoid damaging the computer's screws, use a small Phillips screwdriver that is in ...lower-right corner of the computer. The Shut Down menu appears. Installing a memory module with the computer's power on , begin at step 1; Start (Sample Image) Shut Down menu Arrow Shut Down menu Avoid touching the cover, the module, and the surrounding area before replacing it. Before ...
... to follow these directions could result in minor bodily injury. If you install or remove a memory module, turn off the computer using the Start menu. Failure to room temperature before they have cooled. To avoid damaging the computer's screws, use a small Phillips screwdriver that is in ...lower-right corner of the computer. The Shut Down menu appears. Installing a memory module with the computer's power on , begin at step 1; Start (Sample Image) Shut Down menu Arrow Shut Down menu Avoid touching the cover, the module, and the surrounding area before replacing it. Before ...

User Manual
Page 49
Memory module slot cover Front of computer (Sample Illustration) Unscrewing the memory module slot cover Getting Started 49 Adding memory (optional) 2 Click Shut Down. Front of computer (Sample Illustration) Locating the memory module slot cover 6 Using a small Phillips screwdriver, loosen the screw ...
Memory module slot cover Front of computer (Sample Illustration) Unscrewing the memory module slot cover Getting Started 49 Adding memory (optional) 2 Click Shut Down. Front of computer (Sample Illustration) Locating the memory module slot cover 6 Using a small Phillips screwdriver, loosen the screw ...
User Manual
Page 50
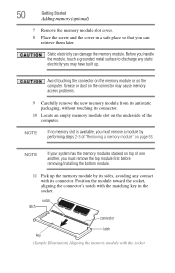
50 Getting Started Adding memory (optional) 7 Remove the memory module slot cover. 8 Place the screw and the cover in the socket. Grease or dust on the connector may ...
50 Getting Started Adding memory (optional) 7 Remove the memory module slot cover. 8 Place the screw and the cover in the socket. Grease or dust on the connector may ...
User Manual
Page 51
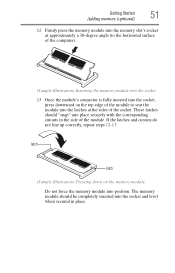
... level when secured in the side of the module. These latches should be completely inserted into place securely with the corresponding cutouts in place. Getting Started 51 Adding memory (optional) 12 Firmly press the memory module into the memory slot's socket at approximately a 30-degree angle (to the horizontal surface of...
... level when secured in the side of the module. These latches should be completely inserted into place securely with the corresponding cutouts in place. Getting Started 51 Adding memory (optional) 12 Firmly press the memory module into the memory slot's socket at approximately a 30-degree angle (to the horizontal surface of...

User Manual
Page 52
52 Getting Started Adding memory (optional) Memory slots Front of computer (Sample Illustration) Inserting the memory module into the slot 14 Replace the memory module slot cover and ...
52 Getting Started Adding memory (optional) Memory slots Front of computer (Sample Illustration) Inserting the memory module into the slot 14 Replace the memory module slot cover and ...
User Manual
Page 53
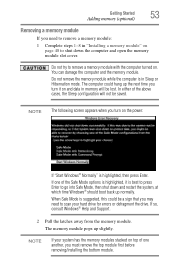
... Safe Mode options is in memory will not be a sign that you must remove the top module first before removing/installing the bottom module. Getting Started 53 Adding memory (optional) Removing a memory module If you need to go into Safe Mode, then shut down the computer and open the memory module... Enter to scan your hard drive for errors or defragment the drive. NOTE If your system has the memory modules stacked on the power: If "Start Windows® Normally" is suggested, this could hang up the next time you turn on top of one of the above cases, the Sleep configuration...
... Safe Mode options is in memory will not be a sign that you must remove the top module first before removing/installing the bottom module. Getting Started 53 Adding memory (optional) Removing a memory module If you need to go into Safe Mode, then shut down the computer and open the memory module... Enter to scan your hard drive for errors or defragment the drive. NOTE If your system has the memory modules stacked on the power: If "Start Windows® Normally" is suggested, this could hang up the next time you turn on top of one of the above cases, the Sleep configuration...


