User Guide
Page 49
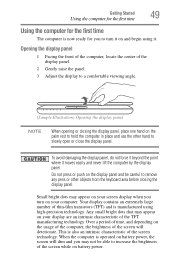
...the TFT manufacturing technology. Over a period of time, and depending on your display are an intrinsic characteristic of the screen will dim and you may appear on your screen display when you turn it moves easily and never lift the computer by the display panel. When the computer is manufactured...the display panel, do not force it beyond the point where it on battery power. Your display contains an extremely large number of the screen while on and begin using high-precision technology. Getting Started 49 Using the computer for the first time Using the computer for you to ...
...the TFT manufacturing technology. Over a period of time, and depending on your display are an intrinsic characteristic of the screen will dim and you may appear on your screen display when you turn it moves easily and never lift the computer by the display panel. When the computer is manufactured...the display panel, do not force it beyond the point where it on battery power. Your display contains an extremely large number of the screen while on and begin using high-precision technology. Getting Started 49 Using the computer for the first time Using the computer for you to ...
User Guide
Page 50
When you turn on -screen instructions. NOTE The names of windows displayed, and the order in which windows appear, may vary according to ensure that all drives and slots are ...
When you turn on -screen instructions. NOTE The names of windows displayed, and the order in which windows appear, may vary according to ensure that all drives and slots are ...
User Guide
Page 60
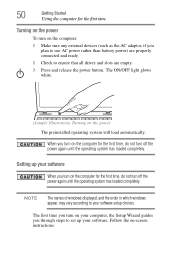
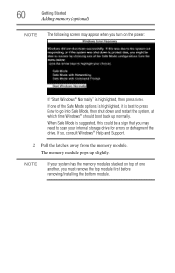
.... If so, consult Windows® Help and Support. 2 Pull the latches away from the memory module. 60 Getting Started Adding memory (optional) NOTE The following screen may need to go into Safe Mode, then shut down and restart the system, at which time Windows® should boot back up slightly. When...
.... If so, consult Windows® Help and Support. 2 Pull the latches away from the memory module. 60 Getting Started Adding memory (optional) NOTE The following screen may need to go into Safe Mode, then shut down and restart the system, at which time Windows® should boot back up slightly. When...
User Guide
Page 64
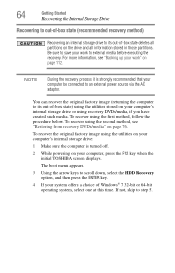
... this time. If not, skip to external media before executing the recovery. Be sure to save your computer, press the F12 key when the initial TOSHIBA screen displays. For more information, see "Restoring from recovery DVDs/media" on the drive and all information stored in those partitions.
... this time. If not, skip to external media before executing the recovery. Be sure to save your computer, press the F12 key when the initial TOSHIBA screen displays. For more information, see "Restoring from recovery DVDs/media" on the drive and all information stored in those partitions.

User Guide
Page 65
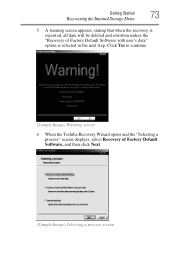
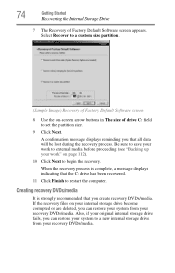
Click Yes to continue. (Sample Image) Warning screen 6 When the Toshiba Recovery Wizard opens and the "Selecting a process" screen displays, select Recovery of Factory Default Software with user's data" option is executed, all data will be deleted and rewritten unless the "Recovery of Factory Default Software, and then click Next. (Sample Image) Selecting a process screen Getting Started 65 Recovering the Internal Storage Drive 5 A warning screen appears, stating that when the recovery is selected in the next step.
Click Yes to continue. (Sample Image) Warning screen 6 When the Toshiba Recovery Wizard opens and the "Selecting a process" screen displays, select Recovery of Factory Default Software with user's data" option is executed, all data will be deleted and rewritten unless the "Recovery of Factory Default Software, and then click Next. (Sample Image) Selecting a process screen Getting Started 65 Recovering the Internal Storage Drive 5 A warning screen appears, stating that when the recovery is selected in the next step.
User Guide
Page 66
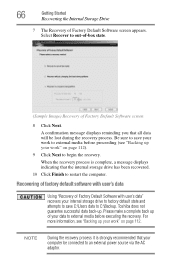
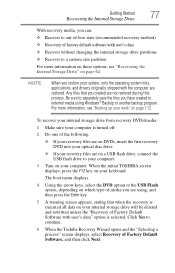
Toshiba does not guarantee successful data back-up your work " on page 112). 9 Click Next to begin the recovery. Recovering of factory default software with user's data Using "Recovery of Factory Default Software screen appears. 66 Getting Started Recovering the Internal Storage Drive 7... C:\Backup. Please make a complete back up your work to external media before proceeding (see "Backing up of Factory Default Software screen 8 Click Next. A confirmation message displays reminding you that your data to external media before executing the recovery. Select Recover to ...
Toshiba does not guarantee successful data back-up your work " on page 112). 9 Click Next to begin the recovery. Recovering of factory default software with user's data Using "Recovery of Factory Default Software screen appears. 66 Getting Started Recovering the Internal Storage Drive 7... C:\Backup. Please make a complete back up your work to external media before proceeding (see "Backing up of Factory Default Software screen 8 Click Next. A confirmation message displays reminding you that your data to external media before executing the recovery. Select Recover to ...
User Guide
Page 67
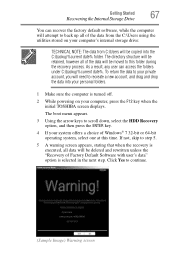
... Default Software with user's data" option is selected in the next step. If not, skip to step 5. 5 A warning screen appears, stating that when the recovery is turned off. 2 While powering on your computer's internal storage drive: TECHNICAL NOTE: The... from the C:\Users using the utilities stored on your private account, you will need to continue. (Sample Image) Warning screen The boot menu appears. 3 Using the arrow keys to scroll down, select the HDD Recovery option, and then press the...To return the data to your computer, press the F12 key when the initial TOSHIBA screen displays.
... Default Software with user's data" option is selected in the next step. If not, skip to step 5. 5 A warning screen appears, stating that when the recovery is turned off. 2 While powering on your computer's internal storage drive: TECHNICAL NOTE: The... from the C:\Users using the utilities stored on your private account, you will need to continue. (Sample Image) Warning screen The boot menu appears. 3 Using the arrow keys to scroll down, select the HDD Recovery option, and then press the...To return the data to your computer, press the F12 key when the initial TOSHIBA screen displays.
User Guide
Page 68
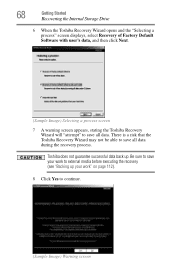
..."Backing up . Be sure to save all data. 68 Getting Started Recovering the Internal Storage Drive 6 When the Toshiba Recovery Wizard opens and the "Selecting a process" screen displays, select Recovery of Factory Default Software with user's data, and then click Next. (Sample Image) Selecting a... process screen 7 A warning screen appears, stating the Toshiba Recovery Wizard will "attempt" to save all data during the recovery process. There is a risk that the Toshiba Recovery Wizard may not be able to save your work " on page...
..."Backing up . Be sure to save all data. 68 Getting Started Recovering the Internal Storage Drive 6 When the Toshiba Recovery Wizard opens and the "Selecting a process" screen displays, select Recovery of Factory Default Software with user's data, and then click Next. (Sample Image) Selecting a... process screen 7 A warning screen appears, stating the Toshiba Recovery Wizard will "attempt" to save all data during the recovery process. There is a risk that the Toshiba Recovery Wizard may not be able to save your work " on page...
User Guide
Page 69
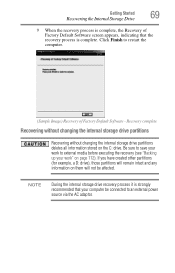
... internal storage drive partitions deletes all information stored on them will not be connected to restart the computer. (Sample Image) Recovery of Factory Default Software screen appears, indicating that your work to external media before executing the recovery (see "Backing up your computer be affected. Be sure to save your work...
... internal storage drive partitions deletes all information stored on them will not be connected to restart the computer. (Sample Image) Recovery of Factory Default Software screen appears, indicating that your work to external media before executing the recovery (see "Backing up your computer be affected. Be sure to save your work...
User Guide
Page 70
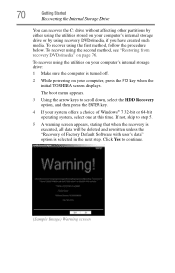
... Recovery option, and then press the ENTER key. 4 If your computer, press the F12 key when the initial TOSHIBA screen displays. If not, skip to continue. (Sample Image) Warning screen Click Yes to step 5. 5 A warning screen appears, stating that when the recovery is executed, all data will be deleted and rewritten unless the "Recovery...
... Recovery option, and then press the ENTER key. 4 If your computer, press the F12 key when the initial TOSHIBA screen displays. If not, skip to continue. (Sample Image) Warning screen Click Yes to step 5. 5 A warning screen appears, stating that when the recovery is executed, all data will be deleted and rewritten unless the "Recovery...
User Guide
Page 71
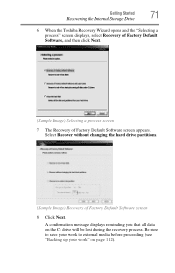
... 112). Getting Started 71 Recovering the Internal Storage Drive 6 When the Toshiba Recovery Wizard opens and the "Selecting a process" screen displays, select Recovery of Factory Default Software, and then click Next. (Sample Image) Selecting a process screen 7 The Recovery of Factory Default Software screen 8 Click Next. Be sure to save your work to external media...
... 112). Getting Started 71 Recovering the Internal Storage Drive 6 When the Toshiba Recovery Wizard opens and the "Selecting a process" screen displays, select Recovery of Factory Default Software, and then click Next. (Sample Image) Selecting a process screen 7 The Recovery of Factory Default Software screen 8 Click Next. Be sure to save your work to external media...
User Guide
Page 72
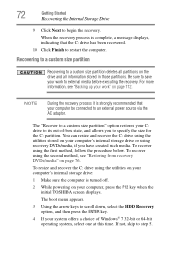
... recommended that the C: drive has been recovered. 10 Click Finish to a custom size partition" option restores your computer, press the F12 key when the initial TOSHIBA screen displays. The "Recover to restart the computer. NOTE During the recovery process it is turned off. 2 While powering on your system offers a choice of -box...
... recommended that the C: drive has been recovered. 10 Click Finish to a custom size partition" option restores your computer, press the F12 key when the initial TOSHIBA screen displays. The "Recover to restart the computer. NOTE During the recovery process it is turned off. 2 While powering on your system offers a choice of -box...
User Guide
Page 73
Getting Started 73 Recovering the Internal Storage Drive 5 A warning screen appears, stating that when the recovery is selected in the next step. Click Yes to continue. (Sample Image) Warning screen 6 When the Toshiba Recovery Wizard opens and the "Selecting a process" screen displays, select Recovery of Factory Default Software with user's data" option is executed, all data will be deleted and rewritten unless the "Recovery of Factory Default Software, and then click Next. (Sample Image) Selecting a process screen
Getting Started 73 Recovering the Internal Storage Drive 5 A warning screen appears, stating that when the recovery is selected in the next step. Click Yes to continue. (Sample Image) Warning screen 6 When the Toshiba Recovery Wizard opens and the "Selecting a process" screen displays, select Recovery of Factory Default Software with user's data" option is executed, all data will be deleted and rewritten unless the "Recovery of Factory Default Software, and then click Next. (Sample Image) Selecting a process screen
User Guide
Page 74
...reminding you create recovery DVDs/media. Be sure to save your work to external media before proceeding (see "Backing up your work" on -screen arrow buttons in The size of drive C: field to restart the computer. Also, if your original internal storage drive fails, you can restore... your system to begin the recovery. Select Recover to a custom size partition. (Sample Image) Recovery of Factory Default Software screen appears. If the recovery files on your internal storage drive become corrupted or are deleted, you can restore your system from your recovery DVDs/...
...reminding you create recovery DVDs/media. Be sure to save your work to external media before proceeding (see "Backing up your work" on -screen arrow buttons in The size of drive C: field to restart the computer. Also, if your original internal storage drive fails, you can restore... your system to begin the recovery. Select Recover to a custom size partition. (Sample Image) Recovery of Factory Default Software screen appears. If the recovery files on your internal storage drive become corrupted or are deleted, you can restore your system from your recovery DVDs/...

User Guide
Page 76
... If you are copying files to a USB flash drive, connect a USB flash drive of the required minimum capacity (as specified in the TOSHIBA Recovery Media Creator utility) to your computer. For example, if your original internal storage drive fails, you can restore your system from your...your work to external media before executing this procedure, or use blank media. 5 Click the Create button in the TOSHIBA Recovery Media Creator utility dialog box. 6 Follow the on-screen prompts to complete the copy process. Be sure to save the information stored on page 112). NOTE During the ...
... If you are copying files to a USB flash drive, connect a USB flash drive of the required minimum capacity (as specified in the TOSHIBA Recovery Media Creator utility) to your computer. For example, if your original internal storage drive fails, you can restore your system from your...your work to external media before executing this procedure, or use blank media. 5 Click the Create button in the TOSHIBA Recovery Media Creator utility dialog box. 6 Follow the on-screen prompts to complete the copy process. Be sure to save the information stored on page 112). NOTE During the ...
User Guide
Page 77
...drive to your computer. 3 Turn on your computer. NOTE When you have created to continue. 6 When the Toshiba Recovery Wizard opens and the "Selecting a process" screen displays, select Recovery of Factory Default Software with the computer are restored. To recover your internal storage drive from ...your internal storage drive will be deleted and rewritten unless the "Recovery of Factory Default Software, and then click Next. When the initial TOSHIBA screen displays, press the F12 key on your work" on these options, see "Backing up your keyboard. Be sure to separately save the...
...drive to your computer. 3 Turn on your computer. NOTE When you have created to continue. 6 When the Toshiba Recovery Wizard opens and the "Selecting a process" screen displays, select Recovery of Factory Default Software with the computer are restored. To recover your internal storage drive from ...your internal storage drive will be deleted and rewritten unless the "Recovery of Factory Default Software, and then click Next. When the initial TOSHIBA screen displays, press the F12 key on your work" on these options, see "Backing up your keyboard. Be sure to separately save the...
User Guide
Page 78
... Finish to restart the computer. Be sure to create recovery DVDs/media and back up your computer, press the F12 key when the initial TOSHIBA screen displays. The boot menu appears. When the recovery process is complete, a message displays indicating that displays, and then click Yes to continue.... NOTE If you want to recover the C: partition only, leaving other partitions from the internal storage drive: 1 Access the Toshiba Recovery Wizard on your internal storage drive or on your recovery DVDs/media. ❖ To access the Recovery Wizard on your internal storage drive...
... Finish to restart the computer. Be sure to create recovery DVDs/media and back up your computer, press the F12 key when the initial TOSHIBA screen displays. The boot menu appears. When the recovery process is complete, a message displays indicating that displays, and then click Yes to continue.... NOTE If you want to recover the C: partition only, leaving other partitions from the internal storage drive: 1 Access the Toshiba Recovery Wizard on your internal storage drive or on your recovery DVDs/media. ❖ To access the Recovery Wizard on your internal storage drive...
User Guide
Page 79
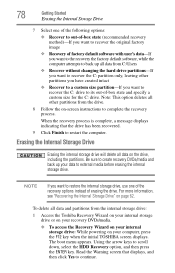
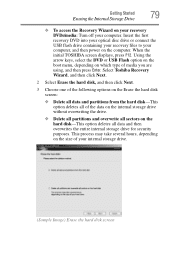
When the initial TOSHIBA screen displays, press F12. Select Toshiba Recovery Wizard, and then click Next. 2 Select Erase the hard disk, and then click Next. 3 Choose one of the following options on the Erase the hard disk screen: ❖ Delete all data and partitions from the hard disk-This option deletes all of the data... Storage Drive ❖ To access the Recovery Wizard on your recovery DVDs/media: Turn off your internal storage drive. (Sample Image) Erase the hard disk screen
When the initial TOSHIBA screen displays, press F12. Select Toshiba Recovery Wizard, and then click Next. 2 Select Erase the hard disk, and then click Next. 3 Choose one of the following options on the Erase the hard disk screen: ❖ Delete all data and partitions from the hard disk-This option deletes all of the data... Storage Drive ❖ To access the Recovery Wizard on your recovery DVDs/media: Turn off your internal storage drive. (Sample Image) Erase the hard disk screen
User Guide
Page 80
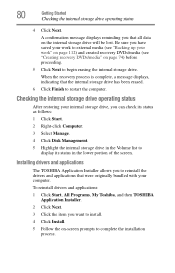
...media" on page 74) before proceeding. 5 Click Next to begin erasing the internal storage drive. Installing drivers and applications The TOSHIBA Application Installer allows you to reinstall the drivers and applications that the internal storage drive has been erased. 6 Click Finish to display..."Backing up your computer. To reinstall drivers and applications: 1 Click Start, All Programs, My Toshiba, and then TOSHIBA Application Installer. 2 Click Next. 3 Click the item you that all data on -screen prompts to install. 4 Click Install. 5 Follow the on the internal storage drive will be ...
...media" on page 74) before proceeding. 5 Click Next to begin erasing the internal storage drive. Installing drivers and applications The TOSHIBA Application Installer allows you to reinstall the drivers and applications that the internal storage drive has been erased. 6 Click Finish to display..."Backing up your computer. To reinstall drivers and applications: 1 Click Start, All Programs, My Toshiba, and then TOSHIBA Application Installer. 2 Click Next. 3 Click the item you that all data on -screen prompts to install. 4 Click Install. 5 Follow the on the internal storage drive will be ...

User Guide
Page 81
NOTE The pointer is the icon (usually an arrow) that moves on the Mouse icon in the Optimize tab of Toshiba Assist. Some of the following features, click on the screen when you slide your finger across the touch pad or move a mouse connected to your computer. To enable the ...area in front of the keyboard) and the adjacent control buttons to: ❖ Move the pointer on the screen ❖ Select an item on the screen ❖ Open or activate an item on the screen ❖ Scroll through a document or information ❖ Zoom in certain applications. You can be used. Click...
NOTE The pointer is the icon (usually an arrow) that moves on the Mouse icon in the Optimize tab of Toshiba Assist. Some of the following features, click on the screen when you slide your finger across the touch pad or move a mouse connected to your computer. To enable the ...area in front of the keyboard) and the adjacent control buttons to: ❖ Move the pointer on the screen ❖ Select an item on the screen ❖ Open or activate an item on the screen ❖ Scroll through a document or information ❖ Zoom in certain applications. You can be used. Click...


