User Manual
Page 30
30 Contents Turning on the power 49 Setting up your software 49 Registering your computer with Toshiba 50 Adding optional external devices 50 Adding memory (optional 50 Installing a memory module 51 Removing a memory module 57 Checking total memory 59 Recovering the Internal Storage Drive 59 Recovering to out-of-box state (recommended recovery method 61 Recovering...
30 Contents Turning on the power 49 Setting up your software 49 Registering your computer with Toshiba 50 Adding optional external devices 50 Adding memory (optional 50 Installing a memory module 51 Removing a memory module 57 Checking total memory 59 Recovering the Internal Storage Drive 59 Recovering to out-of-box state (recommended recovery method 61 Recovering...
User Manual
Page 33
Contents 33 Using external speakers or headphones..........136 Using the Web Camera 136 Using the Memory card reader 137 Inserting memory media 137 Removing memory media 138 Chapter 5: Utilities 139 TOSHIBA Assist 140 Secure 141 Protect & Fix 142 Optimize 143 TOSHIBA Application Installer 144 Setting passwords 145 Using an instant password 145 Using a supervisor password 146...
Contents 33 Using external speakers or headphones..........136 Using the Web Camera 136 Using the Memory card reader 137 Inserting memory media 137 Removing memory media 138 Chapter 5: Utilities 139 TOSHIBA Assist 140 Secure 141 Protect & Fix 142 Optimize 143 TOSHIBA Application Installer 144 Setting passwords 145 Using an instant password 145 Using a supervisor password 146...
User Manual
Page 44
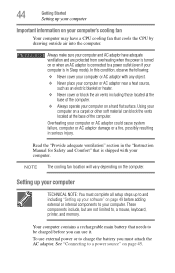
... on a hard flat surface. Read the "Provide adequate ventilation" section in the "Instruction Manual for Safety and Comfort" that needs to , a mouse, keyboard, printer, and memory. To use it. 44 Getting Started Setting up your software" on page 49 before you must complete all setup steps up to and including "Setting...
... on a hard flat surface. Read the "Provide adequate ventilation" section in the "Instruction Manual for Safety and Comfort" that needs to , a mouse, keyboard, printer, and memory. To use it. 44 Getting Started Setting up your software" on page 49 before you must complete all setup steps up to and including "Setting...
User Manual
Page 50
..., All Programs, My Toshiba, and then Toshiba Registration. 50 Getting Started Registering your computer with Toshiba Registering your computer with enough memory to run most of data. Adding optional external devices NOTE Before adding external devices or memory, Toshiba recommends setting up your software" on page 81) Adding memory (optional) HINT: To purchase additional memory modules, see "Connecting...
..., All Programs, My Toshiba, and then Toshiba Registration. 50 Getting Started Registering your computer with Toshiba Registering your computer with enough memory to run most of data. Adding optional external devices NOTE Before adding external devices or memory, Toshiba recommends setting up your software" on page 81) Adding memory (optional) HINT: To purchase additional memory modules, see "Connecting...
User Manual
Page 51
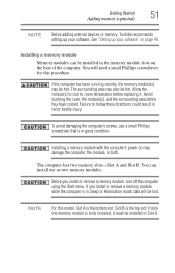
...slot. If you install or remove a memory module, turn off the computer using the Start menu. You will be installed in Slot A. Getting Started Adding memory (optional) 51 NOTE Before adding external devices or memory, Toshiba recommends setting up your software. See "...Setting up your software" on page 49. Installing a memory module Memory modules can install one memory module is to be installed in the memory module slots on...
...slot. If you install or remove a memory module, turn off the computer using the Start menu. You will be installed in Slot A. Getting Started Adding memory (optional) 51 NOTE Before adding external devices or memory, Toshiba recommends setting up your software. See "...Setting up your software" on page 49. Installing a memory module Memory modules can install one memory module is to be installed in the memory module slots on...
User Manual
Page 52
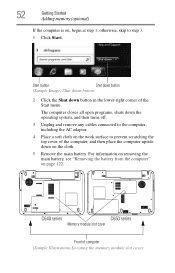
... to the computer, including the AC adaptor. 4 Place a soft cloth on the cloth. 5 Remove the main battery. C640 series C650 series Memory module slot cover Front of the computer, and then place the computer upside down on the work surface to prevent scratching the top cover of ...computer (Sample Illustration) Locating the memory module slot cover For information on removing the main battery, see "Removing the battery from the computer" on , begin at step 1; The computer...
... to the computer, including the AC adaptor. 4 Place a soft cloth on the cloth. 5 Remove the main battery. C640 series C650 series Memory module slot cover Front of the computer, and then place the computer upside down on the work surface to prevent scratching the top cover of ...computer (Sample Illustration) Locating the memory module slot cover For information on removing the main battery, see "Removing the battery from the computer" on , begin at step 1; The computer...
User Manual
Page 53
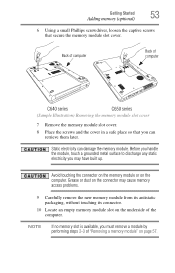
... Back of computer C640 series C650 series (Sample Illustration) Removing the memory module slot cover 7 Remove the memory module slot cover. 8 Place the screws and the cover in a safe place so that secure the memory module slot cover. Before you handle the module, touch a grounded ...metal surface to discharge any static electricity you may cause memory access problems. 9 Carefully remove the new memory module from its antistatic packaging, without touching its connector. 10 Locate an empty memory module slot on the connector may have built up. Getting Started Adding...
... Back of computer C640 series C650 series (Sample Illustration) Removing the memory module slot cover 7 Remove the memory module slot cover. 8 Place the screws and the cover in a safe place so that secure the memory module slot cover. Before you handle the module, touch a grounded ...metal surface to discharge any static electricity you may cause memory access problems. 9 Carefully remove the new memory module from its antistatic packaging, without touching its connector. 10 Locate an empty memory module slot on the connector may have built up. Getting Started Adding...
User Manual
Page 54
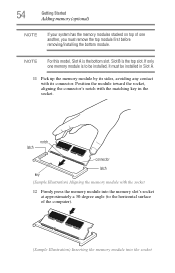
... contact with the matching key in the socket. 54 Getting Started Adding memory (optional) NOTE If your system has the memory modules stacked on top of the computer). (Sample Illustration) Inserting the memory module into the memory slot's socket at approximately a 30-degree angle (to be installed, ...the top module first before removing/installing the bottom module. notch latch connector latch key (Sample Illustration) Aligning the memory module with the socket 12 Firmly press the memory module into the socket NOTE For this model, Slot A is the top slot. Slot B is the bottom ...
... contact with the matching key in the socket. 54 Getting Started Adding memory (optional) NOTE If your system has the memory modules stacked on top of the computer). (Sample Illustration) Inserting the memory module into the memory slot's socket at approximately a 30-degree angle (to be installed, ...the top module first before removing/installing the bottom module. notch latch connector latch key (Sample Illustration) Aligning the memory module with the socket 12 Firmly press the memory module into the socket NOTE For this model, Slot A is the top slot. Slot B is the bottom ...
User Manual
Page 55
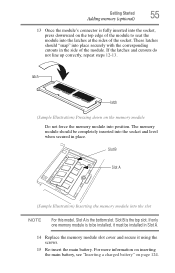
...the slot NOTE For this model, Slot A is the top slot. latch latch (Sample Illustration) Pressing down on page 124. If only one memory module is to seat the module into the latches at the sides of the socket. For more information on inserting the main battery, see "Inserting... a charged battery" on the memory module Do not force the memory module into position. Getting Started Adding memory (optional) 55 13 Once the module's connector is fully inserted into the socket, press downward on the top ...
...the slot NOTE For this model, Slot A is the top slot. latch latch (Sample Illustration) Pressing down on page 124. If only one memory module is to seat the module into the latches at the sides of the socket. For more information on inserting the main battery, see "Inserting... a charged battery" on the memory module Do not force the memory module into position. Getting Started Adding memory (optional) 55 13 Once the module's connector is fully inserted into the socket, press downward on the top ...
User Manual
Page 56
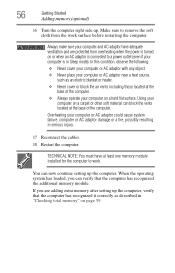
..., you are protected from the work . If you can now continue setting up . Using your computer and AC adaptor have at least one memory module installed for the computer to work surface before restarting the computer. In this condition, observe the following: ❖ Never cover your computer... AC adaptor near a heat source, such as described in serious injury. 17 Reconnect the cables. 18 Restart the computer. 56 Getting Started Adding memory (optional) 16 Turn the computer right side up the computer. Make sure to a power outlet (even if your computer or AC adaptor could...
..., you are protected from the work . If you can now continue setting up . Using your computer and AC adaptor have at least one memory module installed for the computer to work surface before restarting the computer. In this condition, observe the following: ❖ Never cover your computer... AC adaptor near a heat source, such as described in serious injury. 17 Reconnect the cables. 18 Restart the computer. 56 Getting Started Adding memory (optional) 16 Turn the computer right side up the computer. Make sure to a power outlet (even if your computer or AC adaptor could...
User Manual
Page 57
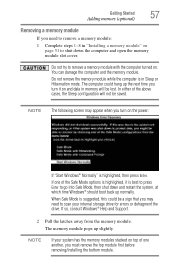
... . When Safe Mode is best to press Enter to go into Safe Mode, then shut down the computer and open the memory module slot cover. Do not try to remove a memory module with the computer turned on the power: If "Start Windows® Normally" is in Sleep or Hibernation mode. NOTE ... top module first before removing/installing the bottom module. NOTE If your internal storage drive for errors or defragment the drive. Do not remove the memory module while the computer is highlighted, then press Enter. The computer could be a sign that you may appear when you turn it is suggested, this...
... . When Safe Mode is best to press Enter to go into Safe Mode, then shut down the computer and open the memory module slot cover. Do not try to remove a memory module with the computer turned on the power: If "Start Windows® Normally" is in Sleep or Hibernation mode. NOTE ... top module first before removing/installing the bottom module. NOTE If your internal storage drive for errors or defragment the drive. Do not remove the memory module while the computer is highlighted, then press Enter. The computer could be a sign that you may appear when you turn it is suggested, this...
User Manual
Page 58
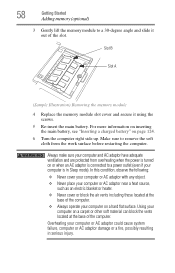
...For more information on inserting the main battery, see "Inserting a charged battery" on a hard flat surface. 58 Getting Started Adding memory (optional) 3 Gently lift the memory module to a power outlet (even if your computer is connected to a 30-degree angle and slide it using the screws. ...failure, computer or AC adaptor damage or a fire, possibly resulting in Sleep mode). Slot B Slot A (Sample Illustration) Removing the memory module 4 Replace the memory module slot cover and secure it out of the computer. ❖ Always operate your computer on page 124. 6 Turn the computer ...
...For more information on inserting the main battery, see "Inserting a charged battery" on a hard flat surface. 58 Getting Started Adding memory (optional) 3 Gently lift the memory module to a power outlet (even if your computer is connected to a 30-degree angle and slide it using the screws. ...failure, computer or AC adaptor damage or a fire, possibly resulting in Sleep mode). Slot B Slot A (Sample Illustration) Removing the memory module 4 Replace the memory module slot cover and secure it out of the computer. ❖ Always operate your computer on page 124. 6 Turn the computer ...
User Manual
Page 59
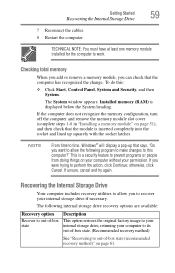
... cancel and try again. This is a security feature to prevent programs or people from doing things on page 61. The System window appears. Installed memory (RAM) is inserted completely into the socket and lined up that says, "Do you want to allow you were trying to out-of -box state... installed for the computer to this : ❖ Click Start, Control Panel, System and Security, and then System. Checking total memory When you add or remove a memory module, you can check that the module is displayed below the System heading. NOTE From time to time, Windows® will display a pop-...
... cancel and try again. This is a security feature to prevent programs or people from doing things on page 61. The System window appears. Installed memory (RAM) is inserted completely into the socket and lined up that says, "Do you want to allow you were trying to out-of -box state... installed for the computer to this : ❖ Click Start, Control Panel, System and Security, and then System. Checking total memory When you add or remove a memory module, you can check that the module is displayed below the System heading. NOTE From time to time, Windows® will display a pop-...
User Manual
Page 83
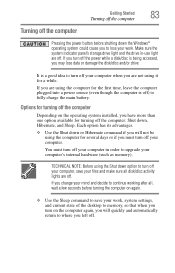
... seconds before shutting down the Windows® operating system could cause you to lose your work , system settings, and current state of the desktop to memory, so that when you turn on the computer again, you may lose data or damage the disk/disc and/or drive. Getting Started Turning off... lights are off. It is being accessed, you will not be using the Shut down option to turn off your computer's internal hardware (such as memory). You must turn off your work . If you turn off the power while a disk/disc is a good idea to turn off your computer, save your...
... seconds before shutting down the Windows® operating system could cause you to lose your work , system settings, and current state of the desktop to memory, so that when you turn on the computer again, you may lose data or damage the disk/disc and/or drive. Getting Started Turning off... lights are off. It is being accessed, you will not be using the Shut down option to turn off your computer's internal hardware (such as memory). You must turn off your work . If you turn off the power while a disk/disc is a good idea to turn off your computer, save your...
User Manual
Page 84
... ❖ While in Sleep mode, the computer uses some main battery power. ❖ Because the state of the computer to the state in memory, you were using the Shut down command. ❖ Restarting from Hibernation takes a little more time and consumes more main battery power than restarting .... ❖ Because the state of the computer to use and configure Hibernation mode see "Using and configuring Hibernation mode" on how to memory so that, when you restart the computer, you can continue working from Hibernation takes less time and consumes less main battery power than restarting...
... ❖ While in Sleep mode, the computer uses some main battery power. ❖ Because the state of the computer to the state in memory, you were using the Shut down command. ❖ Restarting from Hibernation takes a little more time and consumes more main battery power than restarting .... ❖ Because the state of the computer to use and configure Hibernation mode see "Using and configuring Hibernation mode" on how to memory so that, when you restart the computer, you can continue working from Hibernation takes less time and consumes less main battery power than restarting...
User Manual
Page 91
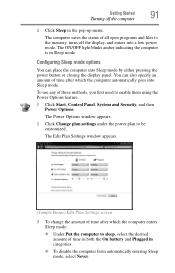
... Sleep mode options You can also specify an amount of time after which the computer enters Sleep mode: ❖ Under Put the computer to the memory, turns off the computer 91 2 Click Sleep in Sleep mode.
... Sleep mode options You can also specify an amount of time after which the computer enters Sleep mode: ❖ Under Put the computer to the memory, turns off the computer 91 2 Click Sleep in Sleep mode.
User Manual
Page 95
... save it takes time. See your battery runs out of charge while you are working, you will lose all work stays in the computer's temporary memory until you must restart your computer to reconnect, or your software documentation for further information. If the network you are using goes down and you...
... save it takes time. See your battery runs out of charge while you are working, you will lose all work stays in the computer's temporary memory until you must restart your computer to reconnect, or your software documentation for further information. If the network you are using goes down and you...
User Manual
Page 113
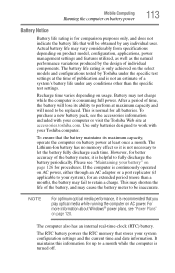
..."Power Plans" on page 120. Use only batteries designed to work with your system), for procedures. The RTC battery powers the RTC memory that you play optical media while running the computer on AC power. Actual battery life may vary considerably from specifications depending on product model...settings. It maintains this information for all batteries. The battery life rating is only achieved on the select models and configurations tested by Toshiba under any individual user. Battery may cause the battery meter to be obtained by the design of individual components. The Lithium-Ion ...
..."Power Plans" on page 120. Use only batteries designed to work with your system), for procedures. The RTC battery powers the RTC memory that you play optical media while running the computer on AC power. Actual battery life may vary considerably from specifications depending on product model...settings. It maintains this information for all batteries. The battery life rating is only achieved on the select models and configurations tested by Toshiba under any individual user. Battery may cause the battery meter to be obtained by the design of individual components. The Lithium-Ion ...
User Manual
Page 115
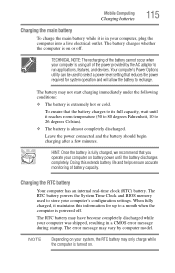
... be used to 26 degrees Celsius). ❖ The battery is using all of battery capacity. The RTC battery powers the System Time Clock and BIOS memory used to select a power level setting that the battery charges to its full capacity, wait until the battery discharges completely. To ensure that reduces the...
... be used to 26 degrees Celsius). ❖ The battery is using all of battery capacity. The RTC battery powers the System Time Clock and BIOS memory used to select a power level setting that the battery charges to its full capacity, wait until the battery discharges completely. To ensure that reduces the...
User Manual
Page 137
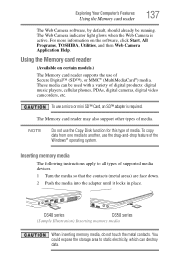
... reader (Available on the software, click Start, All Programs, TOSHIBA, Utilities, and then Web Camera Application Help. C640 series C650 series (Sample Illustration) Inserting memory media When inserting memory media, do not touch the metal contacts. These media can destroy data. You could expose ...products: digital music players, cellular phones, PDAs, digital cameras, digital video camcorders, etc. For more information on certain models.) The Memory card reader supports the use the drag-and-drop feature of the Windows® operating system. To use the Copy Disk function ...
... reader (Available on the software, click Start, All Programs, TOSHIBA, Utilities, and then Web Camera Application Help. C640 series C650 series (Sample Illustration) Inserting memory media When inserting memory media, do not touch the metal contacts. These media can destroy data. You could expose ...products: digital music players, cellular phones, PDAs, digital cameras, digital video camcorders, etc. For more information on certain models.) The Memory card reader supports the use the drag-and-drop feature of the Windows® operating system. To use the Copy Disk function ...


