
User Manual
Page 14
... yourself comfortable 40 Precautions 43 Setting up your computer 45 Setting up your software 45 Registering your computer with Toshiba ......... 46 Adding external devices 47 Connecting the AC adapter 48 Charging the battery 50 Using the computer for the first time 51 Opening the display panel 51 Turning on the power 51...
... yourself comfortable 40 Precautions 43 Setting up your computer 45 Setting up your software 45 Registering your computer with Toshiba ......... 46 Adding external devices 47 Connecting the AC adapter 48 Charging the battery 50 Using the computer for the first time 51 Opening the display panel 51 Turning on the power 51...
User Manual
Page 16
... mode more quickly 99 Toshiba's online resources 100 Chapter 4: Mobile Computing 101 Toshiba's energy-saver design 101 Running the computer on battery power 101 Battery Notice 102 Using additional batteries 102 Battery safety precautions 102 Charging batteries 103 Charging the main battery 103 Charging the RTC battery 104 Monitoring battery power 105 Determining remaining battery power 105 Conserving battery power 106 What...
... mode more quickly 99 Toshiba's online resources 100 Chapter 4: Mobile Computing 101 Toshiba's energy-saver design 101 Running the computer on battery power 101 Battery Notice 102 Using additional batteries 102 Battery safety precautions 102 Charging batteries 103 Charging the main battery 103 Charging the RTC battery 104 Monitoring battery power 105 Determining remaining battery power 105 Conserving battery power 106 What...

User Manual
Page 17
17 Contents Changing the main battery 108 Removing the battery from the computer ...... 108 Inserting a charged battery 110 Safety precautions 111 Maximizing battery life 112 Disposing of used batteries safely 113 Traveling tips 114 Chapter 5: Getting to Know the Windows® XP Operating System 115 Lesson 1: Exploring the desktop 115 Finding your way around ...
17 Contents Changing the main battery 108 Removing the battery from the computer ...... 108 Inserting a charged battery 110 Safety precautions 111 Maximizing battery life 112 Disposing of used batteries safely 113 Traveling tips 114 Chapter 5: Getting to Know the Windows® XP Operating System 115 Lesson 1: Exploring the desktop 115 Finding your way around ...
User Manual
Page 20
... 205 A plan of action 205 Resolving hardware conflicts on your own .... 206 Fixing a problem with Device Manager .......... 207 Memory card problems 209 Power and the batteries 209 Keyboard problems 211 Display problems 211 Disk drive problems 213
... 205 A plan of action 205 Resolving hardware conflicts on your own .... 206 Fixing a problem with Device Manager .......... 207 Memory card problems 209 Power and the batteries 209 Keyboard problems 211 Display problems 211 Disk drive problems 213
User Manual
Page 35
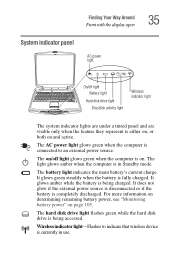
...does not glow if the external power source is disconnected or if the battery is fully charged. For more information on determining remaining battery power, see "Monitoring battery power" on page 105. It glows amber while the battery is being accessed. Wireless indicator light-Flashes to an external power source....computer is in use. The hard disk drive light flashes green while the hard disk drive is being charged. The on/off light Battery light Hard disk drive light Disc/disk activity light Wireless indicator light The system indicator lights are under a tinted panel and are ...
...does not glow if the external power source is disconnected or if the battery is fully charged. For more information on determining remaining battery power, see "Monitoring battery power" on page 105. It glows amber while the battery is being accessed. Wireless indicator light-Flashes to an external power source....computer is in use. The hard disk drive light flashes green while the hard disk drive is being charged. The on/off light Battery light Hard disk drive light Disc/disk activity light Wireless indicator light The system indicator lights are under a tinted panel and are ...
User Manual
Page 37
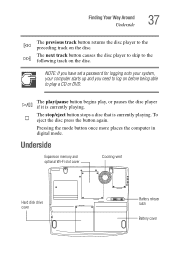
... you need to the preceding track on the disc. Underside Expansion memory and optional Wi-Fi slot cover Cooling vent Hard disk drive cover Battery release latch Battery cover Finding Your Way Around Underside 37 The previous track button returns the disc player to log on the disc. Pressing the mode button...
... you need to the preceding track on the disc. Underside Expansion memory and optional Wi-Fi slot cover Cooling vent Hard disk drive cover Battery release latch Battery cover Finding Your Way Around Underside 37 The previous track button returns the disc player to log on the disc. Pressing the mode button...
User Manual
Page 38
... a standard electrical outlet is also the slot where an optional Wi-Fi Mini-PCI card for wireless networking (*for detailed information. The battery cover provides access to the computer, preventing the cover from dislodging from the computer case. It is not available. CAUTION: To prevent ...protects the slots where you do not block the cooling vents. See "Installing additional memory (optional)" on page 108. The battery release latch secures the battery cover to the battery module, which lets you use your computer at an optimum temperature. For information about replacing the...
... a standard electrical outlet is also the slot where an optional Wi-Fi Mini-PCI card for wireless networking (*for detailed information. The battery cover provides access to the computer, preventing the cover from dislodging from the computer case. It is not available. CAUTION: To prevent ...protects the slots where you do not block the cooling vents. See "Installing additional memory (optional)" on page 108. The battery release latch secures the battery cover to the battery module, which lets you use your computer at an optimum temperature. For information about replacing the...
User Manual
Page 44
... new files for a long period. ❖ Avoid spilling liquids into the keyboard, turn off the computer immediately, disconnect the AC power adapter, and remove the battery. This precaution is especially important for viruses. Be careful when you use . 44 Getting Started Selecting a place to work ❖ Some PC Cards can become...
... new files for a long period. ❖ Avoid spilling liquids into the keyboard, turn off the computer immediately, disconnect the AC power adapter, and remove the battery. This precaution is especially important for viruses. Be careful when you use . 44 Getting Started Selecting a place to work ❖ Some PC Cards can become...
User Manual
Page 45
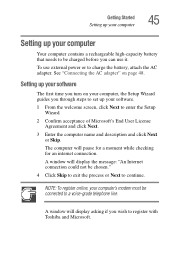
...continue. A window will display the message: "An Internet connection could not be connected to register with Toshiba and Microsoft. NOTE: To register online, your computer Your computer contains a rechargeable high-capacity battery that needs to be charged before you wish to a voice-grade telephone line. Setting up your ...you through steps to set up your computer's modem must be chosen." 4 Click Skip to exit the process or Next to charge the battery, attach the AC adapter. See "Connecting the AC adapter" on your computer, the Setup Wizard guides you turn on page 48. To ...
...continue. A window will display the message: "An Internet connection could not be connected to register with Toshiba and Microsoft. NOTE: To register online, your computer Your computer contains a rechargeable high-capacity battery that needs to be charged before you wish to a voice-grade telephone line. Setting up your ...you through steps to set up your computer's modem must be chosen." 4 Click Skip to exit the process or Next to charge the battery, attach the AC adapter. See "Connecting the AC adapter" on your computer, the Setup Wizard guides you turn on page 48. To ...
User Manual
Page 48
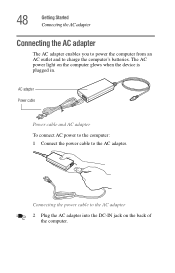
AC adapter Power cable Power cable and AC adapter To connect AC power to the computer: 1 Connect the power cable to charge the computer's batteries. The AC power light on the back of the computer. Connecting the power cable to the AC adapter 2 Plug the AC adapter into the DC-IN jack on the computer glows when the device is plugged in. 48 Getting Started Connecting the AC adapter Connecting the AC adapter The AC adapter enables you to power the computer from an AC outlet and to the AC adapter.
AC adapter Power cable Power cable and AC adapter To connect AC power to the computer: 1 Connect the power cable to charge the computer's batteries. The AC power light on the back of the computer. Connecting the power cable to the AC adapter 2 Plug the AC adapter into the DC-IN jack on the computer glows when the device is plugged in. 48 Getting Started Connecting the AC adapter Connecting the AC adapter The AC adapter enables you to power the computer from an AC outlet and to the AC adapter.

User Manual
Page 49
...the power cable to unplug it. Doing so can cause fire or electric shock. CAUTION: Using the wrong AC adapter could damage your computer. Toshiba assumes no liability for any damage in such cases. Getting Started Connecting the AC adapter 49 Connecting the adapter to the computer 3 Connect the ...power cable to the power cable. If the power cable becomes damaged or the plug overheats, discontinue use. The AC power and battery lights glow. Hold the power plug when removing the cable from the outlet with wet hands. There is a risk of , or apply heat to ...
...the power cable to unplug it. Doing so can cause fire or electric shock. CAUTION: Using the wrong AC adapter could damage your computer. Toshiba assumes no liability for any damage in such cases. Getting Started Connecting the AC adapter 49 Connecting the adapter to the computer 3 Connect the ...power cable to the power cable. If the power cable becomes damaged or the plug overheats, discontinue use. The AC power and battery lights glow. Hold the power plug when removing the cable from the outlet with wet hands. There is a risk of , or apply heat to ...

User Manual
Page 50
...computer plugged in and turned off . CAUTION: Once the battery is connected to power the computer, you can charge the battery with the computer turned off or on. Once the computer is charged for more information on battery use the battery to a power outlet, you must charge it is reduced.... the computer is on /off light glows green and the battery light glows amber to charge the battery is charging. 50 Getting Started Charging the battery Charging the battery Before you can use , see "Running the computer on battery power" on page 101. Continuing to a live power outlet using the ...
...computer plugged in and turned off . CAUTION: Once the battery is connected to power the computer, you can charge the battery with the computer turned off or on. Once the computer is charged for more information on battery use the battery to a power outlet, you must charge it is reduced.... the computer is on /off light glows green and the battery light glows amber to charge the battery is charging. 50 Getting Started Charging the battery Charging the battery Before you can use , see "Running the computer on battery power" on page 101. Continuing to a live power outlet using the ...
User Manual
Page 52
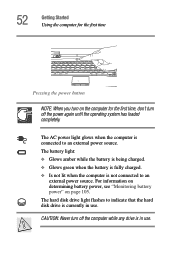
... power source. CAUTION: Never turn off the computer while any drive is in use . The battery light: ❖ Glows amber while the battery is being charged. ❖ Glows green when the battery is fully charged. ❖ Is not lit when the computer is connected to indicate that the... hard disk drive is currently in use . For information on determining battery power, see "Monitoring battery power" on the computer for the first time, don't turn off the power again until the operating system has loaded completely. The...
... power source. CAUTION: Never turn off the computer while any drive is in use . The battery light: ❖ Glows amber while the battery is being charged. ❖ Glows green when the battery is fully charged. ❖ Is not lit when the computer is connected to indicate that the... hard disk drive is currently in use . For information on determining battery power, see "Monitoring battery power" on the computer for the first time, don't turn off the power again until the operating system has loaded completely. The...

User Manual
Page 55
... (optional) Your computer comes with two memory slots, one of which is available for you use a standard Phillips no . 1 screwdriver to the computer. 4 Remove the battery. otherwise, skip to increase the computer's memory if you to add an additional memory module of today's popular applications. Your computer is on , click Start...
... (optional) Your computer comes with two memory slots, one of which is available for you use a standard Phillips no . 1 screwdriver to the computer. 4 Remove the battery. otherwise, skip to increase the computer's memory if you to add an additional memory module of today's popular applications. Your computer is on , click Start...

User Manual
Page 58
... outward until the memory module pops up other devices 11 Replace the memory slot cover. 12 Replace the screws and tighten them. 13 Replace the battery. 14 Turn the computer over and reconnect any cables you removed. 15 To verify that the computer correctly recognizes the memory: ❖ Click Start, then...
... outward until the memory module pops up other devices 11 Replace the memory slot cover. 12 Replace the screws and tighten them. 13 Replace the battery. 14 Turn the computer over and reconnect any cables you removed. 15 To verify that the computer correctly recognizes the memory: ❖ Click Start, then...
User Manual
Page 65
... on the computer again, you automatically return to where you left off. ❖ Never turn off , it may take several hours to recharge the main battery. Doing so may appear stretched. Turning off the computer It is a good idea to 640 x 480 or 800 x 600, the image on . Alternatively, use the... the hard disk. ❖ If you have work in progress and are using it . ❖ If you are not connected to fully charge the main battery. With the computer off the power while a drive-in-use the operating system Standby command to save the system settings to it for a longer period...
... on the computer again, you automatically return to where you left off. ❖ Never turn off , it may take several hours to recharge the main battery. Doing so may appear stretched. Turning off the computer It is a good idea to 640 x 480 or 800 x 600, the image on . Alternatively, use the... the hard disk. ❖ If you have work in progress and are using it . ❖ If you are not connected to fully charge the main battery. With the computer off the power while a drive-in-use the operating system Standby command to save the system settings to it for a longer period...

User Manual
Page 66
... of your computer's battery, see "Powering down the computer" on cleaning and moving your computer hard disk, diskette drive, DVD-ROM or DVD-ROM/CDRW drive. 66 Getting Started Caring for appropriate cleaning products. Never use harsh or caustic chemical products to fit an antitheft lock. Ask your Toshiba dealer for suggestions...
... of your computer's battery, see "Powering down the computer" on cleaning and moving your computer hard disk, diskette drive, DVD-ROM or DVD-ROM/CDRW drive. 66 Getting Started Caring for appropriate cleaning products. Never use harsh or caustic chemical products to fit an antitheft lock. Ask your Toshiba dealer for suggestions...
User Manual
Page 69
... tips ❖ Save your work , if, for details. 69 Your computer can turn on page 107. See "Setting battery alarms" on . Your work stays in the computer's temporary memory until you when the battery is running low. See your software documentation for example, a system error occurs and you must restart your computer...
... tips ❖ Save your work , if, for details. 69 Your computer can turn on page 107. See "Setting battery alarms" on . Your work stays in the computer's temporary memory until you when the battery is running low. See your software documentation for example, a system error occurs and you must restart your computer...
User Manual
Page 74
...by-step instructions for starting a program from the Start menu. Starting a program The easiest way to start a program is running low, see "Setting battery alarms" on . This is compatible with a standard full-size keyboard, it has fewer keys. Saving your work Before you want to work on ... a diskette. See "Lesson 6: Starting programs" on the keyboard indicator panel goes out. Your computer can be configured to warn you when the battery is to click the name of computing. 74 Learning the Basics Emulating a full-size keyboard To turn off the cursor control overlay, hold down...
...by-step instructions for starting a program from the Start menu. Starting a program The easiest way to start a program is running low, see "Setting battery alarms" on . This is compatible with a standard full-size keyboard, it has fewer keys. Saving your work Before you want to work on ... a diskette. See "Lesson 6: Starting programs" on the keyboard indicator panel goes out. Your computer can be configured to warn you when the battery is to click the name of computing. 74 Learning the Basics Emulating a full-size keyboard To turn off the cursor control overlay, hold down...

User Manual
Page 79
... DVDs while running on the right side of the computer and can play audio CDs even when the computer is on AC power rather than battery power. The CD/DVD control buttons are not available on page 81. These features include wide-screen movies, multiple language tracks, digital surround sound, multiple...
... DVDs while running on the right side of the computer and can play audio CDs even when the computer is on AC power rather than battery power. The CD/DVD control buttons are not available on page 81. These features include wide-screen movies, multiple language tracks, digital surround sound, multiple...


