
Satellite 1130/1135 Users Guide
Page 19
19 Contents Precautions 43 Setting up your computer 45 Setting up your software 45 Registering your computer with Toshiba ......... 46 Adding external devices 47 Connecting to a power source 47 Charging the main battery 49 Using the computer for the first time 50 ... the display panel 50 Turning on the power 51 Using the TouchPad 52 Control buttons 52 Disabling or enabling the TouchPad 53 Installing additional memory (optional 54 Removing a memory module 59 Connecting a mouse 60 Connecting a printer 60 Setting up a printer 61 Turning off the computer 64 Caring for your computer...
19 Contents Precautions 43 Setting up your computer 45 Setting up your software 45 Registering your computer with Toshiba ......... 46 Adding external devices 47 Connecting to a power source 47 Charging the main battery 49 Using the computer for the first time 50 ... the display panel 50 Turning on the power 51 Using the TouchPad 52 Control buttons 52 Disabling or enabling the TouchPad 53 Installing additional memory (optional 54 Removing a memory module 59 Connecting a mouse 60 Connecting a printer 60 Setting up a printer 61 Turning off the computer 64 Caring for your computer...
Satellite 1130/1135 Users Guide
Page 24
... conflict 179 A plan of action 179 Resolving hardware conflicts on your own .... 180 Fixing a problem with Device Manager .......... 182 Memory module problems 183 Power and the batteries 184 Keyboard problems 186 Display problems 186 Disk drive problems 188 DVD-ROM or multi-function ...203 Modem problems 204 Develop good computing habits 204 If you need further assistance 205 Before you call 206 Contacting Toshiba 206 Other Toshiba Internet Web sites 207 Toshiba's worldwide offices 208 Appendix A: Hot Keys 211 Volume Mute 211 Instant password security 211 Without a password 211...
... conflict 179 A plan of action 179 Resolving hardware conflicts on your own .... 180 Fixing a problem with Device Manager .......... 182 Memory module problems 183 Power and the batteries 184 Keyboard problems 186 Display problems 186 Disk drive problems 188 DVD-ROM or multi-function ...203 Modem problems 204 Develop good computing habits 204 If you need further assistance 205 Before you call 206 Contacting Toshiba 206 Other Toshiba Internet Web sites 207 Toshiba's worldwide offices 208 Appendix A: Hot Keys 211 Volume Mute 211 Instant password security 211 Without a password 211...
Satellite 1130/1135 Users Guide
Page 38
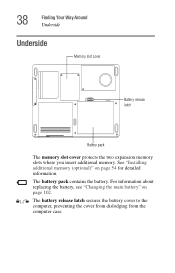
For information about replacing the battery, see "Changing the main battery" on page 54 for detailed information. The battery release latch secures the battery cover to the computer, preventing the cover from dislodging from the computer case. The battery pack contains the battery. 38 Finding Your Way Around Underside Underside Memory slot cover Battery release latch Battery pack The memory slot cover protects the two expansion memory slots where you insert additional memory. See "Installing additional memory (optional)" on page 102.
For information about replacing the battery, see "Changing the main battery" on page 54 for detailed information. The battery release latch secures the battery cover to the computer, preventing the cover from dislodging from the computer case. The battery pack contains the battery. 38 Finding Your Way Around Underside Underside Memory slot cover Battery release latch Battery pack The memory slot cover protects the two expansion memory slots where you insert additional memory. See "Installing additional memory (optional)" on page 102.
Satellite 1130/1135 Users Guide
Page 45
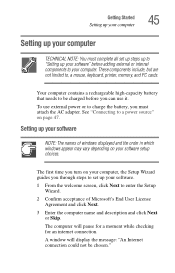
... name and description and click Next or Skip. A window will pause for a moment while checking for an internet connection. See "Connecting to , a mouse, keyboard, printer, memory, and PC cards. Getting Started Setting up your computer 45 Setting up your computer TECHNICAL NOTE: You must attach the AC adapter. To use external...
... name and description and click Next or Skip. A window will pause for a moment while checking for an internet connection. See "Connecting to , a mouse, keyboard, printer, memory, and PC cards. Getting Started Setting up your computer 45 Setting up your computer TECHNICAL NOTE: You must attach the AC adapter. To use external...

Satellite 1130/1135 Users Guide
Page 47
... power cable and AC adapter to connect the computer to a live electrical outlet, or to : ❖ Add more memory (see "Installing additional memory (optional)" on page 54) ❖ Connect a mouse (see "Connecting a mouse" on page 60) ❖ ...Connect a local printer (see "Connecting a printer" on page 60) ❖ Install PC Cards (see "Using PC Cards" on page 45. Getting Started Connecting to a power source 47 Adding external devices NOTE: Before adding external devices, Toshiba...
... power cable and AC adapter to connect the computer to a live electrical outlet, or to : ❖ Add more memory (see "Installing additional memory (optional)" on page 54) ❖ Connect a mouse (see "Connecting a mouse" on page 60) ❖ ...Connect a local printer (see "Connecting a printer" on page 60) ❖ Install PC Cards (see "Using PC Cards" on page 45. Getting Started Connecting to a power source 47 Adding external devices NOTE: Before adding external devices, Toshiba...
Satellite 1130/1135 Users Guide
Page 54
... data. In this happens, let the modules cool to increase the computer's memory if you use the computer for more information). Your computer comes with a memory module in various capacities (visit Toshiba's Web site at toshiba.com for a long time, the memory modules will be installed in slot B, there will sound when you turn on...
... data. In this happens, let the modules cool to increase the computer's memory if you use the computer for more information). Your computer comes with a memory module in various capacities (visit Toshiba's Web site at toshiba.com for a long time, the memory modules will be installed in slot B, there will sound when you turn on...
Satellite 1130/1135 Users Guide
Page 55
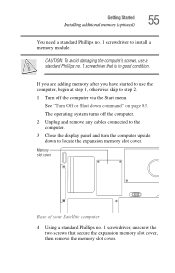
... the computer. 2 Unplug and remove any cables connected to the computer. 3 Close the display panel and turn the computer upside down command" on page 83. Memory slot cover Base of your Satellite computer 4 Using a standard Phillips no. 1 screwdriver, unscrew the two screws that is in good condition. If you are adding...
... the computer. 2 Unplug and remove any cables connected to the computer. 3 Close the display panel and turn the computer upside down command" on page 83. Memory slot cover Base of your Satellite computer 4 Using a standard Phillips no. 1 screwdriver, unscrew the two screws that is in good condition. If you are adding...
Satellite 1130/1135 Users Guide
Page 56
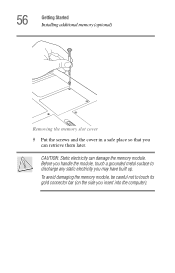
Before you handle the module, touch a grounded metal surface to touch its gold connector bar (on the side you may have built up. CAUTION: Static electricity can retrieve them later. To avoid damaging the memory module, be careful not to discharge any static electricity you insert into the computer). 56 Getting Started Installing additional memory (optional) Removing the memory slot cover 5 Put the screws and the cover in a safe place so that you can damage the memory module.
Before you handle the module, touch a grounded metal surface to touch its gold connector bar (on the side you may have built up. CAUTION: Static electricity can retrieve them later. To avoid damaging the memory module, be careful not to discharge any static electricity you insert into the computer). 56 Getting Started Installing additional memory (optional) Removing the memory slot cover 5 Put the screws and the cover in a safe place so that you can damage the memory module.
Satellite 1130/1135 Users Guide
Page 57
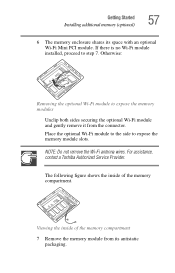
... optional Wi-Fi module to the side to step 7. For assistance, contact a Toshiba Authorized Service Provider. Getting Started Installing additional memory (optional) 57 6 The memory enclosure shares its antistatic packaging. Otherwise: Removing the optional Wi-Fi module to expose the memory modules Unclip both sides securing the optional Wi-Fi module and gently remove...
... optional Wi-Fi module to the side to step 7. For assistance, contact a Toshiba Authorized Service Provider. Getting Started Installing additional memory (optional) 57 6 The memory enclosure shares its antistatic packaging. Otherwise: Removing the optional Wi-Fi module to expose the memory modules Unclip both sides securing the optional Wi-Fi module and gently remove...
Satellite 1130/1135 Users Guide
Page 58
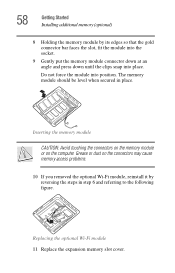
58 Getting Started Installing additional memory (optional) 8 Holding the memory module by reversing the steps in place. Inserting the memory module CAUTION: Avoid touching the connectors on the memory module or on the connectors may cause memory access problems. 10 If you removed the optional Wi-Fi module, reinstall it by its edges... so that the gold connector bar faces the slot, fit the module into the socket. 9 Gently put the memory module connector down at an angle and press down until the clips snap into position. Grease or dust on the computer. The...
58 Getting Started Installing additional memory (optional) 8 Holding the memory module by reversing the steps in place. Inserting the memory module CAUTION: Avoid touching the connectors on the memory module or on the connectors may cause memory access problems. 10 If you removed the optional Wi-Fi module, reinstall it by its edges... so that the gold connector bar faces the slot, fit the module into the socket. 9 Gently put the memory module connector down at an angle and press down until the clips snap into position. Grease or dust on the computer. The...
Satellite 1130/1135 Users Guide
Page 59
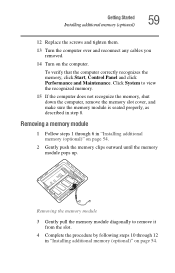
... Performance and Maintenance. Click System to remove it from the slot. 4 Complete the procedure by following steps 10 through 6 in step 8. Getting Started Installing additional memory (optional) 59 12 Replace the screws and tighten them. 13 Turn the computer over and reconnect any cables you removed. 14 Turn on page 54...
... Performance and Maintenance. Click System to remove it from the slot. 4 Complete the procedure by following steps 10 through 6 in step 8. Getting Started Installing additional memory (optional) 59 12 Replace the screws and tighten them. 13 Turn the computer over and reconnect any cables you removed. 14 Turn on page 54...

Satellite 1130/1135 Users Guide
Page 60
... come with your computer. NOTE: Follow the manufacturer's instructions for connecting a parallel printer to your computer through the USB ports. 60 Getting Started Installing additional memory (optional) Connecting a mouse You may want to the computer's parallel port. Alternatively, you can connect a parallel printer to use a mouse instead of the USB ports...
... come with your computer. NOTE: Follow the manufacturer's instructions for connecting a parallel printer to your computer through the USB ports. 60 Getting Started Installing additional memory (optional) Connecting a mouse You may want to the computer's parallel port. Alternatively, you can connect a parallel printer to use a mouse instead of the USB ports...
Satellite 1130/1135 Users Guide
Page 61
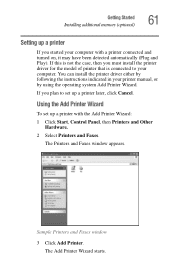
... either by using the operating system Add Printer Wizard. Using the Add Printer Wizard To set up a printer later, click Cancel. Getting Started Installing additional memory (optional) 61 Setting up a printer If you started your printer manual, or by following the instructions indicated in your computer with the Add Printer Wizard...
... either by using the operating system Add Printer Wizard. Using the Add Printer Wizard To set up a printer later, click Cancel. Getting Started Installing additional memory (optional) 61 Setting up a printer If you started your printer manual, or by following the instructions indicated in your computer with the Add Printer Wizard...
Satellite 1130/1135 Users Guide
Page 62
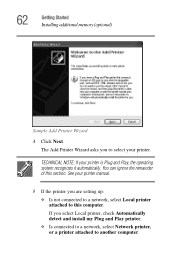
... install my Plug and Play printer. ❖ Is connected to a network, select Network printer, or a printer attached to this section. 62 Getting Started Installing additional memory (optional) Sample Add Printer Wizard 4 Click Next.
... install my Plug and Play printer. ❖ Is connected to a network, select Network printer, or a printer attached to this section. 62 Getting Started Installing additional memory (optional) Sample Add Printer Wizard 4 Click Next.
Satellite 1130/1135 Users Guide
Page 63
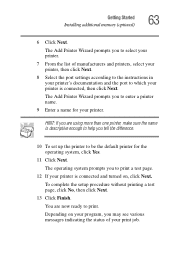
..., make sure the name is descriptive enough to help you tell the difference. 10 To set up the printer to print. Getting Started Installing additional memory (optional) 63 6 Click Next.
..., make sure the name is descriptive enough to help you tell the difference. 10 To set up the printer to print. Getting Started Installing additional memory (optional) 63 6 Click Next.
Satellite 1130/1135 Users Guide
Page 64
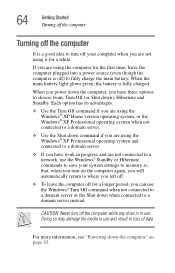
... loss of data. 64 Getting Started Turning off the computer Turning off the computer It is a good idea to turn off your system settings to memory so that, when you turn off the computer while any drive is fully charged. When you power down when connected to a domain server instead. CAUTION...
... loss of data. 64 Getting Started Turning off the computer Turning off the computer It is a good idea to turn off your system settings to memory so that, when you turn off the computer while any drive is fully charged. When you power down when connected to a domain server instead. CAUTION...
Satellite 1130/1135 Users Guide
Page 67
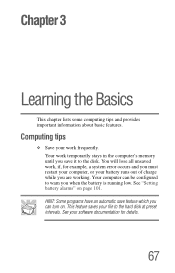
... some computing tips and provides important information about basic features. See "Setting battery alarms" on . This feature saves your work temporarily stays in the computer's memory until you are working.
... some computing tips and provides important information about basic features. See "Setting battery alarms" on . This feature saves your work temporarily stays in the computer's memory until you are working.
Satellite 1130/1135 Users Guide
Page 84
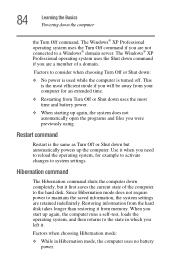
... than restoring it from Turn Off or Shut down command if you need to reload the operating system, for an extended time. ❖ Restarting from memory. Use it when you are a member of the computer to system settings. Since Hibernation mode does not require power to maintain the saved information, the...
... than restoring it from Turn Off or Shut down command if you need to reload the operating system, for an extended time. ❖ Restarting from memory. Use it when you are a member of the computer to system settings. Since Hibernation mode does not require power to maintain the saved information, the...
Satellite 1130/1135 Users Guide
Page 85
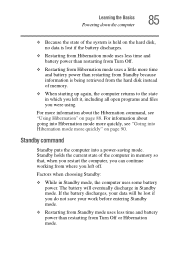
... mode more time and battery power than restarting from Turn Off. ❖ Restarting from the hard disk instead of memory. ❖ When starting up again, the computer returns to the state in memory so that, when you restart the computer, you can continue working from where you left it, including all open...
... mode more time and battery power than restarting from Turn Off. ❖ Restarting from the hard disk instead of memory. ❖ When starting up again, the computer returns to the state in memory so that, when you restart the computer, you can continue working from where you left it, including all open...
Satellite 1130/1135 Users Guide
Page 92
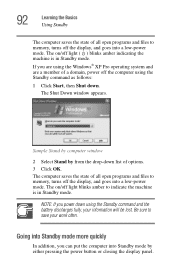
... pressing the power button or closing the display panel. The on /off light ( ) blinks amber indicating the machine is in Standby mode. Be sure to memory, turns off the computer using the Standby command and the battery discharges fully, your work often. Going into Standby mode more quickly In addition, you... /off the display, and goes into Standby mode by from the drop-down . The computer saves the state of all open programs and files to memory, turns off light blinks amber to indicate the machine is in Standby mode.
... pressing the power button or closing the display panel. The on /off light ( ) blinks amber indicating the machine is in Standby mode. Be sure to memory, turns off the computer using the Standby command and the battery discharges fully, your work often. Going into Standby mode more quickly In addition, you... /off the display, and goes into Standby mode by from the drop-down . The computer saves the state of all open programs and files to memory, turns off light blinks amber to indicate the machine is in Standby mode.


