
Owners Manual
Page 4
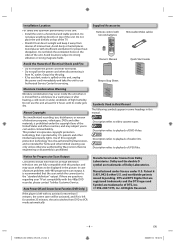
... This product incorporates copyright protection technology that is protected by accident, water is spilled on the sides of the unit. Supplied Accessories Remote control with wet hands. • Do not pull on the power cord when disconnecting it away from DVD to VCR mode automatically....for home and other limited viewing uses only unless otherwise authorized by Macrovision. In case of this 480p DVD recorder, please contact Toshiba Customer Service. Grasp it is recommended that not all high definition television sets are questions regarding your TV set compatibility with 480...
... This product incorporates copyright protection technology that is protected by accident, water is spilled on the sides of the unit. Supplied Accessories Remote control with wet hands. • Do not pull on the power cord when disconnecting it away from DVD to VCR mode automatically....for home and other limited viewing uses only unless otherwise authorized by Macrovision. In case of this 480p DVD recorder, please contact Toshiba Customer Service. Grasp it is recommended that not all high definition television sets are questions regarding your TV set compatibility with 480...
Owners Manual
Page 5
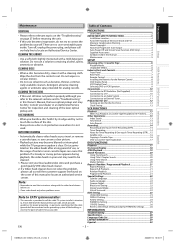
... in this Manual 4 Maintenance ...5 SETUP Choosing a Disc / Cassette Tape 6 Playable Media...6 Unplayable Media 6 Index to Parts and Controls 7 Front Panel ...7 Rear Panel...7 Remote Control ...8 Installing the Batteries for the Remote Control 8 DVD Display Panel 9 VCR Display Panel 9 Selecting DVD or VCR Operation 9 Connections 10 Connection to RF Modulator (Not Supplied 10 Connection...
... in this Manual 4 Maintenance ...5 SETUP Choosing a Disc / Cassette Tape 6 Playable Media...6 Unplayable Media 6 Index to Parts and Controls 7 Front Panel ...7 Rear Panel...7 Remote Control ...8 Installing the Batteries for the Remote Control 8 DVD Display Panel 9 VCR Display Panel 9 Selecting DVD or VCR Operation 9 Connections 10 Connection to RF Modulator (Not Supplied 10 Connection...
Owners Manual
Page 7
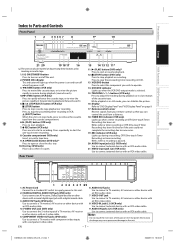
... during playback or in VCR. VCR/DVD button Press to select the component you can also be turned on the rear panel. Remote control sensor Receive signals from your remote control so that you wish to some error. 19. Blinks when a timer recording or OTR (One-touch Timer Recording) has been finished...
... during playback or in VCR. VCR/DVD button Press to select the component you can also be turned on the rear panel. Remote control sensor Receive signals from your remote control so that you wish to some error. 19. Blinks when a timer recording or OTR (One-touch Timer Recording) has been finished...
Owners Manual
Page 8
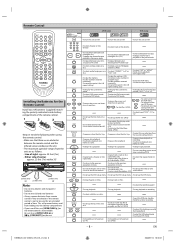
... • To set virtual surround on/off . • To return to the previous operation in the pause mode. • To select camera angles on the remote control is not to use [OPEN/CLOSE A] or [ C/A (STOP/EJECT)] on a • To select "STEREO", "L-ch" or disc. SKIP •...chosen point of A and B. • To search forward/backward through a disc. (CD) • To repeat between the remote control and the infrared sensor window on a disc. Remote Control Installing the Batteries for an extended period of time. STOP SUBTITLE T-SET • To stop playback or recording. •...
... • To set virtual surround on/off . • To return to the previous operation in the pause mode. • To select camera angles on the remote control is not to use [OPEN/CLOSE A] or [ C/A (STOP/EJECT)] on a • To select "STEREO", "L-ch" or disc. SKIP •...chosen point of A and B. • To search forward/backward through a disc. (CD) • To repeat between the remote control and the infrared sensor window on a disc. Remote Control Installing the Batteries for an extended period of time. STOP SUBTITLE T-SET • To stop playback or recording. •...

Owners Manual
Page 9
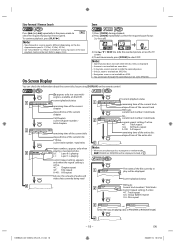
... the current title or track has been played back. There is paused. VCR MODE Press [VCR] on the remote control. (Verify that the VCR indicator is lit.) DVD MODE Press [DVD] on the remote control. (Verify that the DVD indicator is activated. Appears when the progressive scan system is lit.) VCR button...
... the current title or track has been played back. There is paused. VCR MODE Press [VCR] on the remote control. (Verify that the VCR indicator is lit.) DVD MODE Press [DVD] on the remote control. (Verify that the DVD indicator is activated. Appears when the progressive scan system is lit.) VCR button...
Owners Manual
Page 11
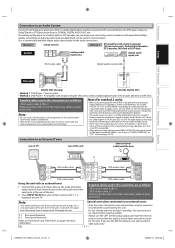
... set "DOLBY DIGITAL" or "DTS" to "BITSTREAM" accordingly for audio output in the setup mode (refer to pages 23-24). Press [INPUT SELECT] on your remote control until "L1" is turned off the power of a professional standard which can be down correctly to mono for this unit. You cannot record on...
... set "DOLBY DIGITAL" or "DTS" to "BITSTREAM" accordingly for audio output in the setup mode (refer to pages 23-24). Press [INPUT SELECT] on your remote control until "L1" is turned off the power of a professional standard which can be down correctly to mono for this unit. You cannot record on...
Owners Manual
Page 12
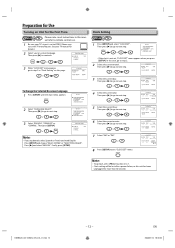
... been unplugged for more than 30 seconds. HOUR MINUTE -- : -- AM/PM - - 4 Select the current year. or 5 Select the current hour. AM/PM - - ual refer to remote control use. 1 Be sure your TV manual for the First Time VCR Please note: most instructions in "Clock Setting" on -screen language. B TIMER PROGRAMMING SATELLITE...
... been unplugged for more than 30 seconds. HOUR MINUTE -- : -- AM/PM - - 4 Select the current year. or 5 Select the current hour. AM/PM - - ual refer to remote control use. 1 Be sure your TV manual for the First Time VCR Please note: most instructions in "Clock Setting" on -screen language. B TIMER PROGRAMMING SATELLITE...
Owners Manual
Page 13
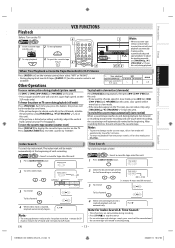
...[h] ([ g (FWD)] or [ h (REW)] on this unit), slow speed will search in super high speed. (in Hi-Fi Stereo Press [AUDIO ] on the remote control, then select "HIFI" or "MONO". • During playing back non Hi-Fi tapes, [AUDIO ] on the TV. PLAY B Note for Index Search & Time ... by using [TRACKING K / L] ([TRACKING / ] on this unit). Press [CLEAR/C.RESET] to reset the counter to display the cassette tape counter on the remote control is not available. Each time you can reduce it again and the unit will be forwarded by using [TRACKING K / L] ([TRACKING / ] on this unit...
...[h] ([ g (FWD)] or [ h (REW)] on this unit), slow speed will search in super high speed. (in Hi-Fi Stereo Press [AUDIO ] on the remote control, then select "HIFI" or "MONO". • During playing back non Hi-Fi tapes, [AUDIO ] on the TV. PLAY B Note for Index Search & Time ... by using [TRACKING K / L] ([TRACKING / ] on this unit). Press [CLEAR/C.RESET] to reset the counter to display the cassette tape counter on the remote control is not available. Each time you can reduce it again and the unit will be forwarded by using [TRACKING K / L] ([TRACKING / ] on this unit...

Owners Manual
Page 14
... auto repeat function can also set "ON" or "OFF" by pressing [REPEAT] on it later, cover the hole with adhesive tape. To record on the remote control. • To cancel auto repeat function, follow step 1 above. REC SPEED - - - 14 - or PROGRAM NUMBER 1 DATE - - / - - Auto Repeat The unit will automatically rewind the...
... auto repeat function can also set "ON" or "OFF" by pressing [REPEAT] on it later, cover the hole with adhesive tape. To record on the remote control. • To cancel auto repeat function, follow step 1 above. REC SPEED - - - 14 - or PROGRAM NUMBER 1 DATE - - / - - Auto Repeat The unit will automatically rewind the...
Owners Manual
Page 15
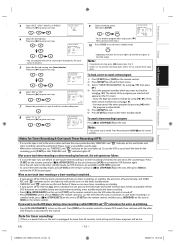
..." by using [K / L], then press [B]. 4) Select the program number which you want to check by using [K / L]. Press [T-SET] on the remote control or [ C/A (STOP/EJECT)] on this unit flashes if there are available until the time for the recording, press [T-SET] so that TIMER REC... ejects the cassette tape. Note for Timer Recording & One-touch Timer Recording (OTR) • If a cassette tape is in progress Press [ C/A (STOP/EJECT)] on the remote control. or ONE TIME PROGRAM PROGRAM NUMBER 1 DATE 1 0 / 0 7 TUE START TIME 0 7 : 3 0 PM END TIME 0 8 : 3 0 PM L1/L2 L1 REC ...
..." by using [K / L], then press [B]. 4) Select the program number which you want to check by using [K / L]. Press [T-SET] on the remote control or [ C/A (STOP/EJECT)] on this unit flashes if there are available until the time for the recording, press [T-SET] so that TIMER REC... ejects the cassette tape. Note for Timer Recording & One-touch Timer Recording (OTR) • If a cassette tape is in progress Press [ C/A (STOP/EJECT)] on the remote control. or ONE TIME PROGRAM PROGRAM NUMBER 1 DATE 1 0 / 0 7 TUE START TIME 0 7 : 3 0 PM END TIME 0 8 : 3 0 PM L1/L2 L1 REC ...
Owners Manual
Page 16
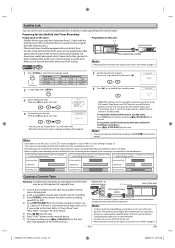
... standby mode. Refer to "Clock Setting" on page 12. • You cannot set the ending time for recording. 3) Press [SPEED] on the remote control to select recording speed (SP or SLP). 4) Press [INPUT SELECT] on page 7 for playback. 2) Insert a recordable cassette tape into this unit... whenever possible. Refer to "Front Panel" and "Rear Panel" on the remote control to select L1 or L2. Note: • For best results during satellite link timer recording. • When a regular timer recording and the satellite...
... standby mode. Refer to "Clock Setting" on page 12. • You cannot set the ending time for recording. 3) Press [SPEED] on the remote control to select recording speed (SP or SLP). 4) Press [INPUT SELECT] on page 7 for playback. 2) Insert a recordable cassette tape into this unit... whenever possible. Refer to "Front Panel" and "Rear Panel" on the remote control to select L1 or L2. Note: • For best results during satellite link timer recording. • When a regular timer recording and the satellite...
Owners Manual
Page 18
... available on the DVD. Note: • Zoom function does not work while the disc menu is displayed. • 4x zoom is different depending on the remote control. C: Chapter repeat T: Title repeat A B: A-B repeat bit rate: the amount of audio and video data currently being read DISPLAY current playback status 1 4/12 0:03:21...
... available on the DVD. Note: • Zoom function does not work while the disc menu is displayed. • 4x zoom is different depending on the remote control. C: Chapter repeat T: Title repeat A B: A-B repeat bit rate: the amount of audio and video data currently being read DISPLAY current playback status 1 4/12 0:03:21...
Owners Manual
Page 27
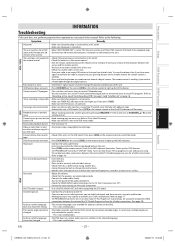
...not a malfunction. No picture. • Connect the video cable firmly. • Insert a correct video disc that it on the remote control to switch the mode. Audio or subtitle language cannot be received. Precautions Setup VCR Functions DVD Functions Information INFORMATION Troubleshooting If this unit...are connected correctly. • Connect the audio cables firmly. • Turn on the power of no buttons on the remote control. Turn up . The remote control is set correctly. Poor picture or noise. • Interference signal may be played back. • Insert the disc...
...not a malfunction. No picture. • Connect the video cable firmly. • Insert a correct video disc that it on the remote control to switch the mode. Audio or subtitle language cannot be received. Precautions Setup VCR Functions DVD Functions Information INFORMATION Troubleshooting If this unit...are connected correctly. • Connect the audio cables firmly. • Turn on the power of no buttons on the remote control. Turn up . The remote control is set correctly. Poor picture or noise. • Interference signal may be played back. • Insert the disc...


