
User Manual
Page 11
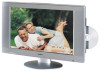
... Glows orange in the disc slot. Introduction Introduction Identification of the TV-screen by 3° forward or by 10° backward from vertical angle. 11 Remote Control Sensor Adjusting the angle of the base Approx. 10° 0° Approx. 3° You can adjust the angle of controls Front POWER Button CHANNEL...
... Glows orange in the disc slot. Introduction Introduction Identification of the TV-screen by 3° forward or by 10° backward from vertical angle. 11 Remote Control Sensor Adjusting the angle of the base Approx. 10° 0° Approx. 3° You can adjust the angle of controls Front POWER Button CHANNEL...

User Manual
Page 13
...REV PAUSE FWD SLOW REV STOP SLOW FWD ZOOM ANGLE SUB TITLE RETURN RMT CODE(1/2) [1]: For controlling SD-P7000 model and other Toshiba brand TV. [2]: For controlling SD-P7000 model only. MEMORY REPEAT REPEAT A-B CLEAR DISPLAY CAP/TEXT MONO/ STEREO/SAP PICTURE RANDOM AUDIO 123 45... 78 +10 100 0 TOP MENU 6 9 T MENU ENTER SKIP SKIP VOLUME + - Introduction Remote control The instructions in for...
...REV PAUSE FWD SLOW REV STOP SLOW FWD ZOOM ANGLE SUB TITLE RETURN RMT CODE(1/2) [1]: For controlling SD-P7000 model and other Toshiba brand TV. [2]: For controlling SD-P7000 model only. MEMORY REPEAT REPEAT A-B CLEAR DISPLAY CAP/TEXT MONO/ STEREO/SAP PICTURE RANDOM AUDIO 123 45... 78 +10 100 0 TOP MENU 6 9 T MENU ENTER SKIP SKIP VOLUME + - Introduction Remote control The instructions in for...

User Manual
Page 14
... should be followed when using batteries in the battery compartment. Operation • Aim the remote control at the remote sensor and press control buttons to operate. • Operate the remote control within 30° angle on either side of the remote sensor, up to be recharged; they can overheat and rupture (follow the correct...
... should be followed when using batteries in the battery compartment. Operation • Aim the remote control at the remote sensor and press control buttons to operate. • Operate the remote control within 30° angle on either side of the remote sensor, up to be recharged; they can overheat and rupture (follow the correct...

User Manual
Page 16
...Box, match the jack colors (Video = yellow, Audio Left = white, and Audio Right = red). 2. Select channels using the cable box remote control. Insert a video tape into the VCR and press PLAY on the TV. Select channels at the cable box or with the channel switch on...Left = white, and Audio Right = red). 2. Connection 2 1. Connect the audio/video output jacks on the VCR to the corresponding input jacks on the remote control to a local cable TV service and installing a converter, you can watch cable TV programming. - For further cable TV information, contact your local cable...
...Box, match the jack colors (Video = yellow, Audio Left = white, and Audio Right = red). 2. Select channels using the cable box remote control. Insert a video tape into the VCR and press PLAY on the TV. Select channels at the cable box or with the channel switch on...Left = white, and Audio Right = red). 2. Connection 2 1. Connect the audio/video output jacks on the VCR to the corresponding input jacks on the remote control to a local cable TV service and installing a converter, you can watch cable TV programming. - For further cable TV information, contact your local cable...

User Manual
Page 17
Connections External A/V Source Setup Connections Connect the audio/video output jacks on the external A/V equipment to the corresponding input jacks on the remote control to select Video. 3. Viewing Setup 1. TV Side Panel VIDEO R AUDIO L External Equipment Camcorder Video Game set External DVD Setup - Viewing ...the AUDIO jacks. Use the INPUT SELECT button on the TV. This TV can play a DVD without a separate DVD player. Turn on the remote control to the figure as shown below. Use the INPUT SELECT button on the DVD player, insert a DVD disc. 2. Connections Connect the ...
Connections External A/V Source Setup Connections Connect the audio/video output jacks on the external A/V equipment to the corresponding input jacks on the remote control to select Video. 3. Viewing Setup 1. TV Side Panel VIDEO R AUDIO L External Equipment Camcorder Video Game set External DVD Setup - Viewing ...the AUDIO jacks. Use the INPUT SELECT button on the TV. This TV can play a DVD without a separate DVD player. Turn on the remote control to the figure as shown below. Use the INPUT SELECT button on the DVD player, insert a DVD disc. 2. Connections Connect the ...

User Manual
Page 18
... it 's impossible to use DVD digital sound output. • Do not look into the H/P jack as shown. - Connections Connecting to select Component. Turn on the remote control to optional equipment (Continued) DTV Setup - Adjust the sound level of the second TV or monitor for the digital set -top box. To watch...
... it 's impossible to use DVD digital sound output. • Do not look into the H/P jack as shown. - Connections Connecting to select Component. Turn on the remote control to optional equipment (Continued) DTV Setup - Adjust the sound level of the second TV or monitor for the digital set -top box. To watch...

User Manual
Page 19
... input form for the computer you are using). Set the monitor output resolution on the PC before connecting to select RGB-PC source on the remote control to the operating manual for Horizontal and Vertical frequencies is separate. Turn on the screen, adjust the PC output to the PC with the...
... input form for the computer you are using). Set the monitor output resolution on the PC before connecting to select RGB-PC source on the remote control to the operating manual for Horizontal and Vertical frequencies is separate. Turn on the screen, adjust the PC output to the PC with the...

User Manual
Page 20
Press the POWER button located on the TV to turn the TV off, press the POWER button located on the remote control. TV channel Video S-video 3 After viewing, press the POWER button on the TV. The power indicator will light. • In the standby mode, press ...the POWER, CHANNEL, INPUT SELECT or number buttons on the remote control to turn on the remote control. The TV reverts to receive channels in your local broadcast area. 20 Connect the AC power cord into the TV, then plug...
Press the POWER button located on the TV to turn the TV off, press the POWER button located on the remote control. TV channel Video S-video 3 After viewing, press the POWER button on the TV. The power indicator will light. • In the standby mode, press ...the POWER, CHANNEL, INPUT SELECT or number buttons on the remote control to turn on the remote control. The TV reverts to receive channels in your local broadcast area. 20 Connect the AC power cord into the TV, then plug...

User Manual
Page 30
... and then use the D / E buttons to select caption: CC1, CC2, CC3, CC4, Text1, Text2, Text3, or Text4. This feature can only be used with the remote control. -
... and then use the D / E buttons to select caption: CC1, CC2, CC3, CC4, Text1, Text2, Text3, or Text4. This feature can only be used with the remote control. -

User Manual
Page 32
... is set with the initial password "0-0-0-0". 5 Press the D / E buttons to select type of blocking to be set the types of ratings to select on the remote control. 32 So, repeat steps 4 and 5 in '7', '7', '7', '7' on or off . Parental Lock On Set password Off MPAA Age block Content block Aux. Then, press the...
... is set with the initial password "0-0-0-0". 5 Press the D / E buttons to select type of blocking to be set the types of ratings to select on the remote control. 32 So, repeat steps 4 and 5 in '7', '7', '7', '7' on or off . Parental Lock On Set password Off MPAA Age block Content block Aux. Then, press the...
User Manual
Page 38
...: Random → Shuffle → Off • Random: Begins random playback from the beginning. • Shuffle : Begins random playback from the time location designated on the remote control. 38 Each time you pause or stop a picture of a DVD video disc and leave it , the set value is changed. Playback begins from the...
...: Random → Shuffle → Off • Random: Begins random playback from the beginning. • Shuffle : Begins random playback from the time location designated on the remote control. 38 Each time you pause or stop a picture of a DVD video disc and leave it , the set value is changed. Playback begins from the...

User Manual
Page 39
... the selected language.) - Select your preferred subtitle language. You can also select another available subtitle language during playback with the SUB TITLE button on the remote control during playback. 1 Press the SET UP button in the stop mode and then use the D / E buttons to select Subtitle Language. 2 Press the G button and...
... the selected language.) - Select your preferred subtitle language. You can also select another available subtitle language during playback with the SUB TITLE button on the remote control during playback. 1 Press the SET UP button in the stop mode and then use the D / E buttons to select Subtitle Language. 2 Press the G button and...

User Manual
Page 40
... disc menus and DVD messages. (The disc must contain the selected language) 1 Press the SET UP button in a 4-digit password. The menus and on the remote control. 40
... disc menus and DVD messages. (The disc must contain the selected language) 1 Press the SET UP button in a 4-digit password. The menus and on the remote control. 40
User Manual
Page 48
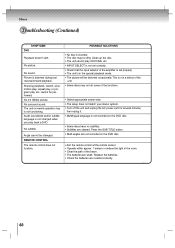
...room. • Clear the path of the amplifier is set properly. • The unit is not changed . No sound. REMOTE CONTROL The remote control does not function. Audio soundtrack and/or subtitle language is in the special playback mode. • The picture will be ...sound. Angle cannot be distorted occasionally. Others Troubleshooting (Continued) SYMPTOMS DVD Playback doesn't start. Picture is not functioning. The unit or remote operation key is distorted during fast reverse/forward playback. Press the SUB TITLE button. • Multi-angles are not recorded on the DVD...
...room. • Clear the path of the amplifier is set properly. • The unit is not changed . No sound. REMOTE CONTROL The remote control does not function. Audio soundtrack and/or subtitle language is in the special playback mode. • The picture will be ...sound. Angle cannot be distorted occasionally. Others Troubleshooting (Continued) SYMPTOMS DVD Playback doesn't start. Picture is not functioning. The unit or remote operation key is distorted during fast reverse/forward playback. Press the SUB TITLE button. • Multi-angles are not recorded on the DVD...
User Manual
Page 49
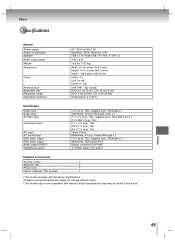
... kΩ, Stereo Mini jack x 1 1.0 V (p-p), 75Ω, negative sync., RCA jack x 1 400mVrms, RCA jack(L/R)x1 Optical connector 2.4V/10pF ø 3.5mm stereo mini jackx1 Supplied accessories Remote control 1 Batteries (AA 2 Power cord 1 Owner's Manual (This booklet 1 • This model complies with the above specifications. • Designs and specifications are subject to change...
... kΩ, Stereo Mini jack x 1 1.0 V (p-p), 75Ω, negative sync., RCA jack x 1 400mVrms, RCA jack(L/R)x1 Optical connector 2.4V/10pF ø 3.5mm stereo mini jackx1 Supplied accessories Remote control 1 Batteries (AA 2 Power cord 1 Owner's Manual (This booklet 1 • This model complies with the above specifications. • Designs and specifications are subject to change...

Brochure
Page 2
... set-top box receiver. WMA, MP3 and JPEG discs may be enjoyed. SD-P7000 TECHNOLOGY & BENEFITS VIDEO > > 17" 16x9 TFT LCD Display - 16x9 ...DVD-R discs recorded by CD-DA method can be played back. http://www.tacp.toshiba.com Customer Service: 800.631.3811 Marketing Communications © Toshiba America Consumer Products, L.L.C. 82 Totowa Road, Wayne, NJ 07470 (2004). Designed ... Sound Environments Stereo Speakers Titanium Parental Lock x Sleep Timer x Closed Caption x V-Chip x Remote Control VESA® Mounting Holes Unified TV/DVD 100 mm Inputs Component 1 S-Video 1 RCA...
... set-top box receiver. WMA, MP3 and JPEG discs may be enjoyed. SD-P7000 TECHNOLOGY & BENEFITS VIDEO > > 17" 16x9 TFT LCD Display - 16x9 ...DVD-R discs recorded by CD-DA method can be played back. http://www.tacp.toshiba.com Customer Service: 800.631.3811 Marketing Communications © Toshiba America Consumer Products, L.L.C. 82 Totowa Road, Wayne, NJ 07470 (2004). Designed ... Sound Environments Stereo Speakers Titanium Parental Lock x Sleep Timer x Closed Caption x V-Chip x Remote Control VESA® Mounting Holes Unified TV/DVD 100 mm Inputs Component 1 S-Video 1 RCA...

