
Owners Manual
Page 10
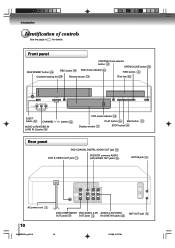
... 22 REC button 34 VCR/DVD mode selector button 22 OPEN/CLOSE button 42 DVD mode indicator 42 FWD button 30 Cassette loading slot 29 Remote sensor 13 Disc tray 42 EJECT button 29 CHANNEL / buttons 34 AUDIO (L/R)/VIDEO IN (LINE IN 2) jacks 40 VCR mode indicator 22 Display window 11...
... 22 REC button 34 VCR/DVD mode selector button 22 OPEN/CLOSE button 42 DVD mode indicator 42 FWD button 30 Cassette loading slot 29 Remote sensor 13 Disc tray 42 EJECT button 29 CHANNEL / buttons 34 AUDIO (L/R)/VIDEO IN (LINE IN 2) jacks 40 VCR mode indicator 22 Display window 11...

Owners Manual
Page 12
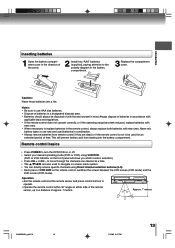
buttons 23 CH+/- buttons 34 CANCEL button 26 CLEAR button 45 STOP button 30 42 PAUSE/STEP button 31 43 INDEX- Remote control VCR DVD button 22 EJECT button (VCR) 29 CLOCK/COUNTER button 33 VCR MENU button 23 SETUP button 57 CM SKIP button 31 ZOOM ... 32 ANGLE button 49 ATR button 31 SUBTITLE button 51 DVD MENU button Use the DVD MENU button to display the menu included on the remote control.
buttons 23 CH+/- buttons 34 CANCEL button 26 CLEAR button 45 STOP button 30 42 PAUSE/STEP button 31 43 INDEX- Remote control VCR DVD button 22 EJECT button (VCR) 29 CLOCK/COUNTER button 33 VCR MENU button 23 SETUP button 57 CM SKIP button 31 ZOOM ... 32 ANGLE button 49 ATR button 31 SUBTITLE button 51 DVD MENU button Use the DVD MENU button to display the menu included on the remote control.
Owners Manual
Page 13
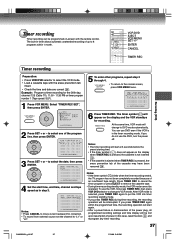
...of the arrow. 2 Install two "AAA" batteries (supplied), paying attention to the polarity diagram in combination. • Always remove batteries from leaking into a fire. Remote control basics • Press POWER to turn the DVD/VCR on or off. • Select your desired operating mode (DVD or VCR) using VCR DVD.... (DVD or VCR indicator on the front panel will prevent battery acid from remote control if they are also used for an extended period of time. Approx. 7 meters 2I30201B-En_p02-13 13 1/13/06, 2:47 PM 13
...of the arrow. 2 Install two "AAA" batteries (supplied), paying attention to the polarity diagram in combination. • Always remove batteries from leaking into a fire. Remote control basics • Press POWER to turn the DVD/VCR on or off. • Select your desired operating mode (DVD or VCR) using VCR DVD.... (DVD or VCR indicator on the front panel will prevent battery acid from remote control if they are also used for an extended period of time. Approx. 7 meters 2I30201B-En_p02-13 13 1/13/06, 2:47 PM 13

Owners Manual
Page 22
...'s manual for details. Refer to receive a sharp color picture from the video cassette recorder. The VCR mode indicator will OR start to turn on the remote for 3 seconds in the display window. 2 Press POWER to flash for about 4 seconds. 22 2I30201B-En_p18-25 22 1/13/06, 2:47 PM POWER ...Disconnect the AC power cord once, then connect it again. 3 Press VCR DVD selector to watch a program selected by the unit and/or the remote control): Static electricity, etc., may affect the player's operation. To view playback of a recorded tape or DVD disc, or to select the VCR mode.
...'s manual for details. Refer to receive a sharp color picture from the video cassette recorder. The VCR mode indicator will OR start to turn on the remote for 3 seconds in the display window. 2 Press POWER to flash for about 4 seconds. 22 2I30201B-En_p18-25 22 1/13/06, 2:47 PM POWER ...Disconnect the AC power cord once, then connect it again. 3 Press VCR DVD selector to watch a program selected by the unit and/or the remote control): Static electricity, etc., may affect the player's operation. To view playback of a recorded tape or DVD disc, or to select the VCR mode.

Owners Manual
Page 29
... unloading a cassette tape Use only video cassette tapes marked . Once the tape is automatically inserted. Unloading 1 Press EJECT on the front panel or on the remote. 2 Remove the cassette tape.
... unloading a cassette tape Use only video cassette tapes marked . Once the tape is automatically inserted. Unloading 1 Press EJECT on the front panel or on the remote. 2 Remove the cassette tape.

Owners Manual
Page 30
... but remain fully loaded and ready to picture search mode (see page 31 ). To discontinue the tape-winding, press STOP. The tape will appear on remote control. neously. " " will stop playback Press STOP once. Notes: • This VCR selects the playback tape speed SP, LP or SLP au- To switch to...
... but remain fully loaded and ready to picture search mode (see page 31 ). To discontinue the tape-winding, press STOP. The tape will appear on remote control. neously. " " will stop playback Press STOP once. Notes: • This VCR selects the playback tape speed SP, LP or SLP au- To switch to...
Owners Manual
Page 37
... may have been removed 29 . After VCR mode is selected, press TIMER REC again to select the VCR mode. • Load a cassette tape with the remote control. ENTER CANCEL TIMER REC Recording (VCR) Timer recording Preparation: • Press VCR DVD selector to put the VCR into timer recording standby mode. •...
... may have been removed 29 . After VCR mode is selected, press TIMER REC again to select the VCR mode. • Load a cassette tape with the remote control. ENTER CANCEL TIMER REC Recording (VCR) Timer recording Preparation: • Press VCR DVD selector to put the VCR into timer recording standby mode. •...

Owners Manual
Page 43
... take a minute or so to the type of information. Press STOP to close the disc tray. Please press any objects other than discs on your remote control once the movie is completed. • There may not work the resuming facility. • Resuming cannot function when you set , permanently etching that heading...
... take a minute or so to the type of information. Press STOP to close the disc tray. Please press any objects other than discs on your remote control once the movie is completed. • There may not work the resuming facility. • Resuming cannot function when you set , permanently etching that heading...

Owners Manual
Page 61
... range so as explosion or similar is toned down slightly when played back. Notes: • The QSound setting can be changed with AUDIO on the remote control # . • This function works only when the disc recorded with the unit. 1) Press C or D to select "Parental", then press ENTER. The parental level list...
... range so as explosion or similar is toned down slightly when played back. Notes: • The QSound setting can be changed with AUDIO on the remote control # . • This function works only when the disc recorded with the unit. 1) Press C or D to select "Parental", then press ENTER. The parental level list...

Owners Manual
Page 62
..., progressive scan compatible. Progressive: Select when connecting to the TV from "Interlace" or "Progressive". "No Disc" appears on the screen. 4) While holding 7 down on the remote control and then press STOP on the screen. "Password Clear" appears on the front panel. Output You can always be retained in the memory even...
..., progressive scan compatible. Progressive: Select when connecting to the TV from "Interlace" or "Progressive". "No Disc" appears on the screen. 4) While holding 7 down on the remote control and then press STOP on the screen. "Password Clear" appears on the front panel. Output You can always be retained in the memory even...
Owners Manual
Page 65
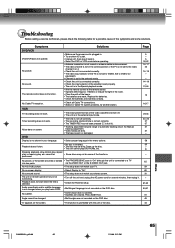
...not work . Playback doesn't start /end time is not set properly. • The unit is in the Special playback mode. • Aim the remote control at the remote sensor. • Operate within Approx. 7 Meters or reduce the light in your language. • The erase prevention tab of the video cassette is... channel is not in the external input mode. • The time is inserted. • The disc may not do some solutions. No picture. The remote control does not function. No Cable TV reception. Noise bars on the screen. • The function is not functioning. Clean up the disc. •...
...not work . Playback doesn't start /end time is not set properly. • The unit is in the Special playback mode. • Aim the remote control at the remote sensor. • Operate within Approx. 7 Meters or reduce the light in your language. • The erase prevention tab of the video cassette is... channel is not in the external input mode. • The time is inserted. • The disc may not do some solutions. No picture. The remote control does not function. No Cable TV reception. Noise bars on the screen. • The function is not functioning. Clean up the disc. •...

Owners Manual
Page 66
... Ω, negative sync., pin jack x 1 (PB)/(PR) 0.7 V (p-p), 75 Ω, pin jack x 2 0.5 V (p-p), 75 Ω, pin jack x 1 -12 dBm, 1 kΩ, pin jacks (L, R) x 1 Supplied accessories Audio/video cable 1 Remote control (SE-R0220 1 Batteries (R03/AAA 2 75 Ω coaxial cable 1 • This model complies with the above specifications. • Designs and specifications are subject to...
... Ω, negative sync., pin jack x 1 (PB)/(PR) 0.7 V (p-p), 75 Ω, pin jack x 2 0.5 V (p-p), 75 Ω, pin jack x 1 -12 dBm, 1 kΩ, pin jacks (L, R) x 1 Supplied accessories Audio/video cable 1 Remote control (SE-R0220 1 Batteries (R03/AAA 2 75 Ω coaxial cable 1 • This model complies with the above specifications. • Designs and specifications are subject to...

