

Owners Manual
Page 2
...controls or adjustments or performance of electric shock to constitute a risk of procedures other than those specified herein may be determined by Toshiba, could void the user's authority to provide reasonable protection against harmful interference in a particular installation. Reorient or relocate the receiving ...This equipment generates, uses, and can be of sufficient magnitude to persons. Visible and invisible laser radiation when open the enclosure. Connect the equipment into an outlet on , the user is intended to alert the user to open and interlocks defeated. NO USER ...
...controls or adjustments or performance of electric shock to constitute a risk of procedures other than those specified herein may be determined by Toshiba, could void the user's authority to provide reasonable protection against harmful interference in a particular installation. Reorient or relocate the receiving ...This equipment generates, uses, and can be of sufficient magnitude to persons. Visible and invisible laser radiation when open the enclosure. Connect the equipment into an outlet on , the user is intended to alert the user to open and interlocks defeated. NO USER ...
Owners Manual
Page 8
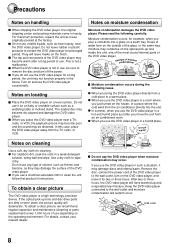
... use the DVD video player in the future. If you use the DVD video player for two or three hours. Keep the DVD video player connected to a warm place. The top and rear panels of the DVD video player may not function properly in such a situation, it was originally packed at... of water form on the outside of use the DVD video player in handy. When you use depending on the operating environment. Remove the disc, connect the power cord of use the DVD video player when moisture condensation may become warm after you move the unit from a cold place to the...
... use the DVD video player in the future. If you use the DVD video player for two or three hours. Keep the DVD video player connected to a warm place. The top and rear panels of the DVD video player may not function properly in such a situation, it was originally packed at... of water form on the outside of use the DVD video player in handy. When you use depending on the operating environment. Remove the disc, connect the power cord of use the DVD video player when moisture condensation may become warm after you move the unit from a cold place to the...
Owners Manual
Page 11
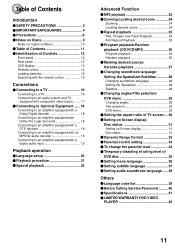
... 14 Loading batteries 15 Operating with the remote control 15 Connections Connecting to a TV 16 Connecting to a TV 16 Connecting to an audio system and TV equipped with component video inputs ........ 17 Connecting to Optional Equipment ...... 18 Connecting to an amplifier equipped with a Dolby Digital decoder 18 Connecting to an amplifier equipped with Dolby Pro Logic Surround...
... 14 Loading batteries 15 Operating with the remote control 15 Connections Connecting to a TV 16 Connecting to a TV 16 Connecting to an audio system and TV equipped with component video inputs ........ 17 Connecting to Optional Equipment ...... 18 Connecting to an amplifier equipped with a Dolby Digital decoder 18 Connecting to an amplifier equipped with Dolby Pro Logic Surround...

Owners Manual
Page 12
... indicator 20 OPEN/CLOSE button 21 STOP button 21 ON/STANDBY ( ) button 20 DVD display 13 SKIP buttons 22 PLAY button 21 Rear panel When connecting the optical digital cable, remove the cap and fit the connector into the jack firmly. When not using the jack, keep the cap inserted to...
... indicator 20 OPEN/CLOSE button 21 STOP button 21 ON/STANDBY ( ) button 20 DVD display 13 SKIP buttons 22 PLAY button 21 Rear panel When connecting the optical digital cable, remove the cap and fit the connector into the jack firmly. When not using the jack, keep the cap inserted to...
Owners Manual
Page 16
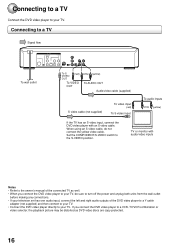
...your TV, be sure to turn off the power and unplug both units from the wall outlet before making any connections. • If your television set has one audio input, connect the left and right audio outputs of the DVD video player to a Y cable adapter (not supplied) and then...DVD video discs are copy protected. 16 When using an S video cable, do not connect the yellow video cable. Set the COMPONENT/S-VIDEO switch to your TV. Connecting to a TV Connect the DVD video player to the S-VIDEO position. Connecting to a TV Signal flow S-VIDEO OUT PUT COMPONENT Y DIGITAL PB L OPTICAL AUDIO ...
...your TV, be sure to turn off the power and unplug both units from the wall outlet before making any connections. • If your television set has one audio input, connect the left and right audio outputs of the DVD video player to a Y cable adapter (not supplied) and then...DVD video discs are copy protected. 16 When using an S video cable, do not connect the yellow video cable. Set the COMPONENT/S-VIDEO switch to your TV. Connecting to a TV Connect the DVD video player to the S-VIDEO position. Connecting to a TV Signal flow S-VIDEO OUT PUT COMPONENT Y DIGITAL PB L OPTICAL AUDIO ...
Owners Manual
Page 17
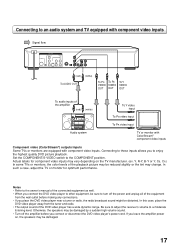
... for component video inputs may vary depending on , the speakers may be sure to turn off the amplifier before making any connections. • If you connect or disconnect the DVD video player's power cord. Otherwise, the speakers may change. Set the COMPONENT/S-VIDEO switch to a moderate...®) outputs/inputs Some TVs or monitors are equipped with component video inputs. If you to enjoy the highest quality DVD picture playback. Connecting to an audio system and TV equipped with component video inputs Signal flow S-VIDEO OUT PUT COMPONENT Y DIGITAL PB L OPTICAL AUDIO PR ...
... for component video inputs may vary depending on , the speakers may be sure to turn off the amplifier before making any connections. • If you connect or disconnect the DVD video player's power cord. Otherwise, the speakers may change. Set the COMPONENT/S-VIDEO switch to a moderate...®) outputs/inputs Some TVs or monitors are equipped with component video inputs. If you to enjoy the highest quality DVD picture playback. Connecting to an audio system and TV equipped with component video inputs Signal flow S-VIDEO OUT PUT COMPONENT Y DIGITAL PB L OPTICAL AUDIO PR ...

Owners Manual
Page 18
... Logic Surround You can enjoy the dynamic realistic sound of 5.1 channel DTS encoded sound tracks on DVD video discs or audio CDs. Connecting to an amplifier equipped with a Dolby Digital decoder To COAXIAL type digital audio input To OPTICAL type digital audio input S-VIDEO OUT ... Laboratories. Amplifier equipped with a DTS decoder Digital Theater Systems (DTS) DTS is now available to reproduce this dynamic realistic sound by connecting the DVD video player to optional audio equipment. All rights reserved. You can enjoy motion picture and live concert DVD video discs with...
... Logic Surround You can enjoy the dynamic realistic sound of 5.1 channel DTS encoded sound tracks on DVD video discs or audio CDs. Connecting to an amplifier equipped with a Dolby Digital decoder To COAXIAL type digital audio input To OPTICAL type digital audio input S-VIDEO OUT ... Laboratories. Amplifier equipped with a DTS decoder Digital Theater Systems (DTS) DTS is now available to reproduce this dynamic realistic sound by connecting the DVD video player to optional audio equipment. All rights reserved. You can enjoy motion picture and live concert DVD video discs with...
Owners Manual
Page 19
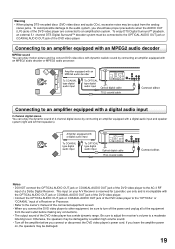
...audio input S-VIDEO OUT PUT COMPONENT Y DIGITAL PB L OPTICAL AUDIO PR R COAXIAL VEDIO Optical digital cable 75 Ω coaxial cable Connect either . Connecting to an amplifier equipped with a digital audio input 2 channel digital stereo You can enjoy motion picture and live concert DVD video discs with...DVD video player to the "OPTICAL" or "COAXIAL" input of a Receiver or Processor. • Refer to the owner's manual of the connected equipment as well. • When you should take proper precautions when the AUDIO OUT (L/R) jacks of the DVD video player to a moderate listening...
...audio input S-VIDEO OUT PUT COMPONENT Y DIGITAL PB L OPTICAL AUDIO PR R COAXIAL VEDIO Optical digital cable 75 Ω coaxial cable Connect either . Connecting to an amplifier equipped with a digital audio input 2 channel digital stereo You can enjoy motion picture and live concert DVD video discs with...DVD video player to the "OPTICAL" or "COAXIAL" input of a Receiver or Processor. • Refer to the owner's manual of the connected equipment as well. • When you should take proper precautions when the AUDIO OUT (L/R) jacks of the DVD video player to a moderate listening...

Owners Manual
Page 20
... (JUMP) T TOP MENU AUDIO 23 SUBTITLE 56 ANGLE 89 MARKER A - Language setup The setup language can be selected. Disconnect the AC power cord once, then connect it again.
... (JUMP) T TOP MENU AUDIO 23 SUBTITLE 56 ANGLE 89 MARKER A - Language setup The setup language can be selected. Disconnect the AC power cord once, then connect it again.

Owners Manual
Page 21
... precautions when the analogue stereo outputs of the software producers. Also refer to the instructions supplied with the design intent of the DVD player are connected to "Reading" and then playback commences. The disc tray will be available. Then press OPEN/CLOSE on the unit or on the remote control...
... precautions when the analogue stereo outputs of the software producers. Also refer to the instructions supplied with the design intent of the DVD player are connected to "Reading" and then playback commences. The disc tray will be available. Then press OPEN/CLOSE on the unit or on the remote control...

Owners Manual
Page 27
... canceled when you open the disc tray or turn the power off vocal audio tracks, or restore them for background accompaniment. • When playing KARAOKE, connect appropriate audio equipment such as an amplifier to remove this display. Marker 1 Marker 2 Marker 3 /Enter/Clear/Marker Marker 1 00 27 54 Marker 2 Marker 3 /Enter/Clear...
... canceled when you open the disc tray or turn the power off vocal audio tracks, or restore them for background accompaniment. • When playing KARAOKE, connect appropriate audio equipment such as an amplifier to remove this display. Marker 1 Marker 2 Marker 3 /Enter/Clear/Marker Marker 1 00 27 54 Marker 2 Marker 3 /Enter/Clear...

Owners Manual
Page 30
Press or to select your TV. 1 Press SET UP from : 4:3 Normal TV Select this mode when connecting to a wide-screen TV. Press or to select "Picture". Language Picture Sound Parental Other Tv Screen 4:3 4:3 Display On 4:3 16:9 /Enter/Setup/Return You have the ... (Conventional mode) Displays the wide picture on the whole screen with left and right edges automatically cut off. 16:9 WIDE SCREEN Select this mode when connecting to your desired screen type, then press ENTER. A wide screen picture is not formatted in the pan & scan style, it displays the wide picture with...
Press or to select your TV. 1 Press SET UP from : 4:3 Normal TV Select this mode when connecting to a wide-screen TV. Press or to select "Picture". Language Picture Sound Parental Other Tv Screen 4:3 4:3 Display On 4:3 16:9 /Enter/Setup/Return You have the ... (Conventional mode) Displays the wide picture on the whole screen with left and right edges automatically cut off. 16:9 WIDE SCREEN Select this mode when connecting to your desired screen type, then press ENTER. A wide screen picture is not formatted in the pan & scan style, it displays the wide picture with...
Owners Manual
Page 40
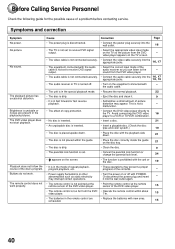
...the course of a problem before contacting service. video player appears on the TV screen. • The video cable is not connected securely. • Connect the video cable securely into the wall outlet again. • The remote control is not pointed at the remote sensor of the... fast reverse playback. • Sometimes a small amount of picture distortion may interrupt correct operations. • Turn the power on the equipment connected with the audio • Select the correct input mode of the contents. - • Power supply fluctuations or other abnormalities such as static...
...the course of a problem before contacting service. video player appears on the TV screen. • The video cable is not connected securely. • Connect the video cable securely into the wall outlet again. • The remote control is not pointed at the remote sensor of the... fast reverse playback. • Sometimes a small amount of picture distortion may interrupt correct operations. • Turn the power on the equipment connected with the audio • Select the correct input mode of the contents. - • Power supply fluctuations or other abnormalities such as static...


