

Owners Manual
Page 2
... Toshiba, could void the user's authority to this equipment, not expressly approved by Toshiba, or parties authorized by one or more of electric shock to radio communications. WARNING: Changes or modifications made to operate the equipment. 2 DO NOT OPEN THE CABINET. If this owner's manual carefully and retain for future reference. REFER SERVICING TO QUALIFIED PERSONNEL ONLY. CAUTION: This Digital Video Disc Player...
... Toshiba, could void the user's authority to this equipment, not expressly approved by Toshiba, or parties authorized by one or more of electric shock to radio communications. WARNING: Changes or modifications made to operate the equipment. 2 DO NOT OPEN THE CABINET. If this owner's manual carefully and retain for future reference. REFER SERVICING TO QUALIFIED PERSONNEL ONLY. CAUTION: This Digital Video Disc Player...
Owners Manual
Page 3
located on the rear panel of the required label DVD PLAYER MODEL NO. Model No. Location of your DVD video player. To reduce the risk of electric shock do not perform any servicing other than that contained in the operating instructions unless you are for future reference. Serial No. SD-1810A TOSHIBA CORPORATION : 1-1, SHIBAURA 1-CHOME, MINATO-KU, TOKYO 105-8001, JAPAN PRODUCT IS CERTIFIED BY THE...
located on the rear panel of the required label DVD PLAYER MODEL NO. Model No. Location of your DVD video player. To reduce the risk of electric shock do not perform any servicing other than that contained in the operating instructions unless you are for future reference. Serial No. SD-1810A TOSHIBA CORPORATION : 1-1, SHIBAURA 1-CHOME, MINATO-KU, TOKYO 105-8001, JAPAN PRODUCT IS CERTIFIED BY THE...
Owners Manual
Page 8
... you use the DVD video player occasionally. When you bring the DVD video player directly from an air conditioned room. Please read the following cases. If you move the unit from a cold place to remove the disc and turn on the finish. The top and rear panels of the DVD video player may damage discs and internal parts. Use a dry cloth to clean the unit, follow that product's instructions. Keep the DVD video player connected...
... you use the DVD video player occasionally. When you bring the DVD video player directly from an air conditioned room. Please read the following cases. If you move the unit from a cold place to remove the disc and turn on the finish. The top and rear panels of the DVD video player may damage discs and internal parts. Use a dry cloth to clean the unit, follow that product's instructions. Keep the DVD video player connected...

Owners Manual
Page 10
... SKIP( ) button is not permitted by the player. (In this owner's manual may be played. CD-R CD-RW CD-R/RW discs recorded by using the menu displayed on -screen.) On VIDEO CDs This DVD video player supports VIDEO CDs equipped with some discs. Some CD-R/RW discs may not work with the PBC (Version 2.0) function. (PBC is 1. If region numbers, which stand for the disc. Playable discs This DVD video player can enjoy playback of discs. As such, the DVD video player may...
... SKIP( ) button is not permitted by the player. (In this owner's manual may be played. CD-R CD-RW CD-R/RW discs recorded by using the menu displayed on -screen.) On VIDEO CDs This DVD video player supports VIDEO CDs equipped with some discs. Some CD-R/RW discs may not work with the PBC (Version 2.0) function. (PBC is 1. If region numbers, which stand for the disc. Playable discs This DVD video player can enjoy playback of discs. As such, the DVD video player may...
Owners Manual
Page 11
... angles/Title selection/ DVD menu 29 Changing angles 29 Title selection 29 DVD menu 29 Setting the aspect ratio of TV screen .... 30 Setting on Screen display/ Disc status 31 Setting on Screen display 31 Disc status 31 Dynamic Range Control 32 Parental control setting 33 To change the parental level 34 Temporary disabling of rating level of DVD disc 35 Setting menu language 36 Setting subtitle language 37 Setting audio soundtrack language ...... 38 Others Language code list 39 Before Calling Service Personnel ......... 40 Specifications 41 LIMITED WARRANTY DVD VIDEO PLAYER 42...
... angles/Title selection/ DVD menu 29 Changing angles 29 Title selection 29 DVD menu 29 Setting the aspect ratio of TV screen .... 30 Setting on Screen display/ Disc status 31 Setting on Screen display 31 Disc status 31 Dynamic Range Control 32 Parental control setting 33 To change the parental level 34 Temporary disabling of rating level of DVD disc 35 Setting menu language 36 Setting subtitle language 37 Setting audio soundtrack language ...... 38 Others Language code list 39 Before Calling Service Personnel ......... 40 Specifications 41 LIMITED WARRANTY DVD VIDEO PLAYER 42...
Owners Manual
Page 16
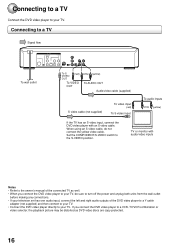
... S VIDEO OUT (red) To VIDEO OUT (white) (yellow) To AUDIO OUT Audio/video cable (supplied) S video cable (not supplied) To video input (red) To S video input To audio inputs (white) (yellow) If the TV has an S video input, connect the DVD video player with audio/video inputs Notes • Refer to the owner's manual of the DVD video player to a Y cable adapter (not supplied) and then connect to your TV. • Connect the DVD video player directly to the S-VIDEO position. When using an S video cable, do not connect the yellow video cable. Set the COMPONENT/S-VIDEO switch to...
... S VIDEO OUT (red) To VIDEO OUT (white) (yellow) To AUDIO OUT Audio/video cable (supplied) S video cable (not supplied) To video input (red) To S video input To audio inputs (white) (yellow) If the TV has an S video input, connect the DVD video player with audio/video inputs Notes • Refer to the owner's manual of the DVD video player to a Y cable adapter (not supplied) and then connect to your TV. • Connect the DVD video player directly to the S-VIDEO position. When using an S video cable, do not connect the yellow video cable. Set the COMPONENT/S-VIDEO switch to...
Owners Manual
Page 17
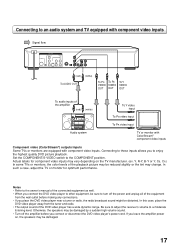
... component video inputs. Notes • Refer to the owner's manual of the connected equipment as well. • When you connect the DVD video player to other equipment, be sure to turn off the amplifier before making any connections. • If you connect or disconnect the DVD video player's power cord. Set the COMPONENT/S-VIDEO switch to a moderate listening level. In such a case, adjust the TV or monitor for component video inputs may be damaged by a sudden high volume sound...
... component video inputs. Notes • Refer to the owner's manual of the connected equipment as well. • When you connect the DVD video player to other equipment, be sure to turn off the amplifier before making any connections. • If you connect or disconnect the DVD video player's power cord. Set the COMPONENT/S-VIDEO switch to a moderate listening level. In such a case, adjust the TV or monitor for component video inputs may be damaged by a sudden high volume sound...

Owners Manual
Page 18
... equipped with a Dolby Digital decoder Dolby Digital Dolby Digital is the surround sound technology used in theaters showing the latest movies, and is a high quality surround technology used in theaters and now available for home use, on DVD video discs or audio CDs. Confidential unpublished works. ©1992-1997 Dolby Laboratories. Amplifier equipped with a Dolby Digital decoder To COAXIAL type digital audio input To OPTICAL type digital audio input S-VIDEO OUT PUT COMPONENT Y DIGITAL PB L OPTICAL AUDIO PR R COAXIAL VEDIO Optical digital cable Manufactured under...
... equipped with a Dolby Digital decoder Dolby Digital Dolby Digital is the surround sound technology used in theaters showing the latest movies, and is a high quality surround technology used in theaters and now available for home use, on DVD video discs or audio CDs. Confidential unpublished works. ©1992-1997 Dolby Laboratories. Amplifier equipped with a Dolby Digital decoder To COAXIAL type digital audio input To OPTICAL type digital audio input S-VIDEO OUT PUT COMPONENT Y DIGITAL PB L OPTICAL AUDIO PR R COAXIAL VEDIO Optical digital cable Manufactured under...
Owners Manual
Page 19
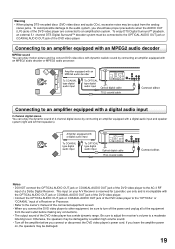
..." or "COAXIAL" input of a Receiver or Processor. • Refer to the owner's manual of the DVD video player are connected to an amplifier equipped with a digital audio input To COAXIAL type digital audio input To OPTICAL type digital audio input S-VIDEO OUT PUT COMPONENT Y DIGITAL PB L OPTICAL AUDIO PR R COAXIAL VEDIO Optical digital cable 75 Ω coaxial cable Connect either . This input on , the speakers may be damaged. 19 Be sure to adjust the receiver's volume to turn off the power and unplug...
..." or "COAXIAL" input of a Receiver or Processor. • Refer to the owner's manual of the DVD video player are connected to an amplifier equipped with a digital audio input To COAXIAL type digital audio input To OPTICAL type digital audio input S-VIDEO OUT PUT COMPONENT Y DIGITAL PB L OPTICAL AUDIO PR R COAXIAL VEDIO Optical digital cable 75 Ω coaxial cable Connect either . This input on , the speakers may be damaged. 19 Be sure to adjust the receiver's volume to turn off the power and unplug...

Owners Manual
Page 20
... SETUP screen, press SET UP (or RETURN) while the SETUP screen is displayed. 20 Language setup The setup language can be selected. No Disc welcome "Reading" display will change to "No Disc". (If DVD disc has already loaded, playback will light up. Language Picture Sound Parental Other OSD Language English /Enter/Setup/Return 4 Press or ENTER and then press or to select "Other". Disconnect the AC power cord once, then connect it again. B RPT 0 MENU RETURN PLAY MODE SLOW ZOOM PAUSE/STEP PLAY REV FWD SKIP STOP...
... SETUP screen, press SET UP (or RETURN) while the SETUP screen is displayed. 20 Language setup The setup language can be selected. No Disc welcome "Reading" display will change to "No Disc". (If DVD disc has already loaded, playback will light up. Language Picture Sound Parental Other OSD Language English /Enter/Setup/Return 4 Press or ENTER and then press or to select "Other". Disconnect the AC power cord once, then connect it again. B RPT 0 MENU RETURN PLAY MODE SLOW ZOOM PAUSE/STEP PLAY REV FWD SKIP STOP...

Owners Manual
Page 21
... design intent of the DVD player are connected to "Reading" and then playback commences. Remove the disc and press OPEN/CLOSE on the unit or on the remote control. B RPT 0 MENU RETURN PLAY MODE SLOW ZOOM PAUSE/STEP PLAY REV FWD SKIP STOP SKIP SET UP CLEAR ENTER (CANCEL) Note: • If a non-compatible disc is selected and play commences. 6 Press STOP to resume playback (from the analogue stereo outputs. The disc tray closes automatically. the wrong...
... design intent of the DVD player are connected to "Reading" and then playback commences. Remove the disc and press OPEN/CLOSE on the unit or on the remote control. B RPT 0 MENU RETURN PLAY MODE SLOW ZOOM PAUSE/STEP PLAY REV FWD SKIP STOP SKIP SET UP CLEAR ENTER (CANCEL) Note: • If a non-compatible disc is selected and play commences. 6 Press STOP to resume playback (from the analogue stereo outputs. The disc tray closes automatically. the wrong...

Owners Manual
Page 23
...; Turn ON the TV and select the corresponding video input. 1 Press OPEN/CLOSE. The disc tray will clear the memorized location from making too many sub-folders. 2 Press PLAY or OPEN/CLOSE. Name each file including two-digit or three- Refrain from its memory. 6 Then press OPEN/CLOSE. Reading time will change depending on the quantity of files on the TV screen. The disc tray opens. NOTES: • During MP3-Playback, you cannot use SEARCH, or A-B Repeat functions...
...; Turn ON the TV and select the corresponding video input. 1 Press OPEN/CLOSE. The disc tray will clear the memorized location from making too many sub-folders. 2 Press PLAY or OPEN/CLOSE. Name each file including two-digit or three- Refrain from its memory. 6 Then press OPEN/CLOSE. Reading time will change depending on the quantity of files on the TV screen. The disc tray opens. NOTES: • During MP3-Playback, you cannot use SEARCH, or A-B Repeat functions...

Owners Manual
Page 24
Zooming/Locating desired scene OPEN/CLOSE DISPLAY 1 4 7 SEARCH (JUMP) T TOP MENU AUDIO 23 SUBTITLE 56 ANGLE 89 MARKER A - You can select Pause, Slow or Search playback from the zoom mode. • Some discs may move the frame from Chapter 1 of the frame. REV FWD SKIP STOP SKIP SET UP CLEAR ENTER (CANCEL) Locating Desired Scene Use the title, chapter and time recorded on an image. back...
Zooming/Locating desired scene OPEN/CLOSE DISPLAY 1 4 7 SEARCH (JUMP) T TOP MENU AUDIO 23 SUBTITLE 56 ANGLE 89 MARKER A - You can select Pause, Slow or Search playback from the zoom mode. • Some discs may move the frame from Chapter 1 of the frame. REV FWD SKIP STOP SKIP SET UP CLEAR ENTER (CANCEL) Locating Desired Scene Use the title, chapter and time recorded on an image. back...

Owners Manual
Page 28
... audio features of VIDEO CD playback Audio type changes as follows each time you open the disc tray or turn the power off . • While playing a DVD, the subtitle may be changed immediately. • During MP3 playback, the "SPATIALIZER VIRTUAL SURROUND" feature is not effecttive. REV FWD SKIP STOP SKIP SET UP CLEAR ENTER (CANCEL) Note: • If the desired language is not heard after a few seconds. Press SUBTITLE during playback. B RPT 0 MENU RETURN PLAY MODE...
... audio features of VIDEO CD playback Audio type changes as follows each time you open the disc tray or turn the power off . • While playing a DVD, the subtitle may be changed immediately. • During MP3 playback, the "SPATIALIZER VIRTUAL SURROUND" feature is not effecttive. REV FWD SKIP STOP SKIP SET UP CLEAR ENTER (CANCEL) Note: • If the desired language is not heard after a few seconds. Press SUBTITLE during playback. B RPT 0 MENU RETURN PLAY MODE...

Owners Manual
Page 31
... appear on Screen display/Disc status OPEN/CLOSE DISPLAY 1 4 7 SEARCH (JUMP) T TOP MENU AUDIO 23 SUBTITLE 56 ANGLE 89 MARKER A - Off: On screen displays do not appear when operation buttons are pressed. 4 To exit the SETUP screen, press SET UP or RETURN while the SETUP screen is displayed. Language Picture Sound Parental Other 2 Press or ENTER, then press or to select "Display". /Enter/Setup/Return Language Picture Sound Parental Other Tv Screen 4:3 Display On 3 Press / or ENTER to select "Picture". B RPT 0 MENU RETURN PLAY MODE SLOW ZOOM...
... appear on Screen display/Disc status OPEN/CLOSE DISPLAY 1 4 7 SEARCH (JUMP) T TOP MENU AUDIO 23 SUBTITLE 56 ANGLE 89 MARKER A - Off: On screen displays do not appear when operation buttons are pressed. 4 To exit the SETUP screen, press SET UP or RETURN while the SETUP screen is displayed. Language Picture Sound Parental Other 2 Press or ENTER, then press or to select "Display". /Enter/Setup/Return Language Picture Sound Parental Other Tv Screen 4:3 Display On 3 Press / or ENTER to select "Picture". B RPT 0 MENU RETURN PLAY MODE SLOW ZOOM...

Owners Manual
Page 32
... is displayed. Language Picture Sound Parental Other OPEN/CLOSE DISPLAY 1 4 7 SEARCH (JUMP) T TOP MENU AUDIO 23 SUBTITLE 56 ANGLE 89 MARKER A - Min: Level difference is small. 4 To exit the SETUP screen, press SET UP or RETURN while the SETUP screen is medium. Note: • This function works only during playback of Dolby Digital recorded discs. • The level of Dynamic Range Reduction may differ depending on the disc. 1 Press SET UP from the stop mode. B RPT 0 MENU RETURN PLAY MODE...
... is displayed. Language Picture Sound Parental Other OPEN/CLOSE DISPLAY 1 4 7 SEARCH (JUMP) T TOP MENU AUDIO 23 SUBTITLE 56 ANGLE 89 MARKER A - Min: Level difference is small. 4 To exit the SETUP screen, press SET UP or RETURN while the SETUP screen is medium. Note: • This function works only during playback of Dolby Digital recorded discs. • The level of Dynamic Range Reduction may differ depending on the disc. 1 Press SET UP from the stop mode. B RPT 0 MENU RETURN PLAY MODE...

Owners Manual
Page 33
... parental control feature will not work. 1 Press SET UP from level 1 to select "Parental", then press or until the level you enter the correct password. Language Picture Sound Parental Other Password Parental Off 0 9/Clear /Enter/Setup/Return 2 Press or to level 8. Press number buttons (0-9) to store the password. OPEN/CLOSE DISPLAY 1 4 7 SEARCH (JUMP) T TOP MENU AUDIO 23 SUBTITLE 56 ANGLE 89 MARKER A - Note: Now the rating is locked and the setting cannot be restricted with DVD discs...
... parental control feature will not work. 1 Press SET UP from level 1 to select "Parental", then press or until the level you enter the correct password. Language Picture Sound Parental Other Password Parental Off 0 9/Clear /Enter/Setup/Return 2 Press or to level 8. Press number buttons (0-9) to store the password. OPEN/CLOSE DISPLAY 1 4 7 SEARCH (JUMP) T TOP MENU AUDIO 23 SUBTITLE 56 ANGLE 89 MARKER A - Note: Now the rating is locked and the setting cannot be restricted with DVD discs...

Owners Manual
Page 35
...: This temporary cancellation of DVD disc Some DVD discs may permit you to decide whether on not to remove the disc. 4 Enter the password with the SELECT key, "Your disc exceeds the parental control level#." If you interrupt the entering, press RETURN. digit password If you select "YES" with number buttons (0-9). OPEN/CLOSE DISPLAY 1 4 7 SEARCH (JUMP) T TOP MENU AUDIO 23 SUBTITLE 56 ANGLE 89 MARKER A - It is played. The setting screen will commence if the...
...: This temporary cancellation of DVD disc Some DVD discs may permit you to decide whether on not to remove the disc. 4 Enter the password with the SELECT key, "Your disc exceeds the parental control level#." If you interrupt the entering, press RETURN. digit password If you select "YES" with number buttons (0-9). OPEN/CLOSE DISPLAY 1 4 7 SEARCH (JUMP) T TOP MENU AUDIO 23 SUBTITLE 56 ANGLE 89 MARKER A - It is played. The setting screen will commence if the...
Owners Manual
Page 40
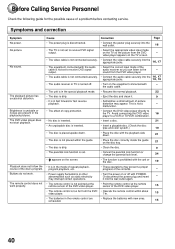
... receive DVD signal output. • Select the appropriate video input mode on the TV so the picture from the DVD - video player appears on the TV screen. • The video cable is not connected securely. • Connect the video cable securely into the wall outlet again. • The remote control is not pointed at the remote sensor of the DVD video player. • Point the remote control at the remote sensor of picture distortion may interrupt correct operations. • Turn the power...
... receive DVD signal output. • Select the appropriate video input mode on the TV so the picture from the DVD - video player appears on the TV screen. • The video cable is not connected securely. • Connect the video cable securely into the wall outlet again. • The remote control is not pointed at the remote sensor of the DVD video player. • Point the remote control at the remote sensor of picture distortion may interrupt correct operations. • Turn the power...
Owners Manual
Page 42
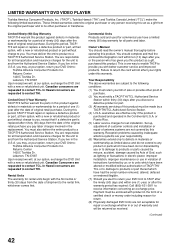
... modified without charge to products or parts caused by misuse, accident, damage caused by inadequate antenna systems are responsible for all parts and labor. LIMITED WARRANTY DVD VIDEO PLAYER Toshiba America Consumer Products, Inc. ("TACP"), Toshiba Hawaii ("THI") and Toshiba Canada Limited ("TCL") make the following conditions: (1) You must retain your rights under this warranty. You should read the owner's manual thoroughly before operating this product...
... modified without charge to products or parts caused by misuse, accident, damage caused by inadequate antenna systems are responsible for all parts and labor. LIMITED WARRANTY DVD VIDEO PLAYER Toshiba America Consumer Products, Inc. ("TACP"), Toshiba Hawaii ("THI") and Toshiba Canada Limited ("TCL") make the following conditions: (1) You must retain your rights under this warranty. You should read the owner's manual thoroughly before operating this product...


