

Owners Manual
Page 2
... product's enclosure that to persons. If this owner's manual carefully and retain for a Class B digital device, pursuant to radio communications. Connect the equipment into an outlet on , the user is connected. - CAUTION: This Digital Video Disc Player employs a Laser System. DO NOT STARE INTO BEAM. The lightning flash with the instructions, may be determined by turning the equipment off and on a circuit different...
... product's enclosure that to persons. If this owner's manual carefully and retain for a Class B digital device, pursuant to radio communications. Connect the equipment into an outlet on , the user is connected. - CAUTION: This Digital Video Disc Player employs a Laser System. DO NOT STARE INTO BEAM. The lightning flash with the instructions, may be determined by turning the equipment off and on a circuit different...
Owners Manual
Page 3
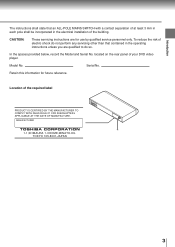
.... In the spaces provided below, record the Model and Serial No. Location of your DVD video player. MANUFACTURED 1-1,SHIBAURA 1-CHOME,MINATO-KU. Serial No. Introduction The instructions shall state that contained in the electrical installation of the building. CAUTION: These servicing instructions are qualified to do not perform any servicing other than that an ALL-POLE MAINS SWITCH with a contact separation of at...
.... In the spaces provided below, record the Model and Serial No. Location of your DVD video player. MANUFACTURED 1-1,SHIBAURA 1-CHOME,MINATO-KU. Serial No. Introduction The instructions shall state that contained in the electrical installation of the building. CAUTION: These servicing instructions are qualified to do not perform any servicing other than that an ALL-POLE MAINS SWITCH with a contact separation of at...

Owners Manual
Page 8
.... Exacmopnldeeonfsmatoioisnt!ure Optical pick-up lens and disc drive parts are dirty or worn down, the picture quality becomes poor. In summer, when you do not use the DVD video player for cleaning. If you bring the DVD video player directly from the TV, radio, or VCR. When you use volatile liquids, such as it dry. Remove the disc, connect the power cord of the glass. For details, contact...
.... Exacmopnldeeonfsmatoioisnt!ure Optical pick-up lens and disc drive parts are dirty or worn down, the picture quality becomes poor. In summer, when you do not use the DVD video player for cleaning. If you bring the DVD video player directly from the TV, radio, or VCR. When you use volatile liquids, such as it dry. Remove the disc, connect the power cord of the glass. For details, contact...
Owners Manual
Page 10
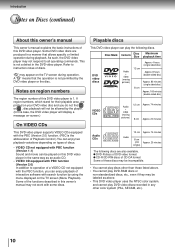
... software with search function by using the menu displayed on the TV screen (Menu Playback). Introduction Notes on Discs (continued) About this owner's manual This owner's manual explains the basic instructions of discs. Disc Mark Contents Disc Size Maximum playback time DVD video discs Audio + video (moving pictures) 12 cm Approx. 4 hours (single sided disc) Approx. 8 hours (double sided disc) 8 cm Approx. 80 minutes (single sided disc) Approx. 160 minutes (double sided disc) VIDEO CDs DIGITAL VIDEO Audio + video (moving pictures) 12 cm Approx...
... software with search function by using the menu displayed on the TV screen (Menu Playback). Introduction Notes on Discs (continued) About this owner's manual This owner's manual explains the basic instructions of discs. Disc Mark Contents Disc Size Maximum playback time DVD video discs Audio + video (moving pictures) 12 cm Approx. 4 hours (single sided disc) Approx. 8 hours (double sided disc) 8 cm Approx. 80 minutes (single sided disc) Approx. 160 minutes (double sided disc) VIDEO CDs DIGITAL VIDEO Audio + video (moving pictures) 12 cm Approx...

Owners Manual
Page 11
... SAFETY INSTRUCTIONS ... 4 Precautions 8 Notes on Discs 9 Notes on region numbers 10 Table of Contents 11 Identification of Controls 12 Front panel 12 Rear panel 12 DVD display 13 Remote control 14 Loading batteries 15 Operating with the remote control 15 Connections Connecting to a TV 18 Connecting to a TV 18 Connecting to an audio system and TV equipped with component video inputs ........ 19 Connecting to Optional Equipment ...... 20 Connecting to an amplifier equipped with a Dolby Digital decoder 21 Connecting to an...
... SAFETY INSTRUCTIONS ... 4 Precautions 8 Notes on Discs 9 Notes on region numbers 10 Table of Contents 11 Identification of Controls 12 Front panel 12 Rear panel 12 DVD display 13 Remote control 14 Loading batteries 15 Operating with the remote control 15 Connections Connecting to a TV 18 Connecting to a TV 18 Connecting to an audio system and TV equipped with component video inputs ........ 19 Connecting to Optional Equipment ...... 20 Connecting to an amplifier equipped with a Dolby Digital decoder 21 Connecting to an...
Owners Manual
Page 14
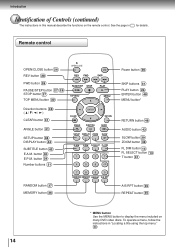
... MEMORY REPEAT A-B RPT Power button 26 SKIP buttons 31 PLAY button 26 ENTER button 48 MENU button* RETURN button 48 AUDIO button 43 SLOW button 29 ZOOM button 38 FL DIM button 13 FL SELECT button 13 T button 31 A-B RPT button 35 REPEAT button 35 14 * MENU button Use the MENU button to display the menu included on the remote control. To operate a menu, follow the instructions in for details. E.P.M. Introduction Identification of Controls (continued) The instructions in this manual describe the functions on many DVD video discs. See the...
... MEMORY REPEAT A-B RPT Power button 26 SKIP buttons 31 PLAY button 26 ENTER button 48 MENU button* RETURN button 48 AUDIO button 43 SLOW button 29 ZOOM button 38 FL DIM button 13 FL SELECT button 13 T button 31 A-B RPT button 35 REPEAT button 35 14 * MENU button Use the MENU button to display the menu included on the remote control. To operate a menu, follow the instructions in for details. E.P.M. Introduction Identification of Controls (continued) The instructions in this manual describe the functions on many DVD video discs. See the...
Owners Manual
Page 17
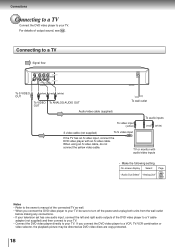
... power and unplug both units from the wall outlet before making any connections. • If your television set has one audio input, connect the left and right audio outputs of output sound, see 43 . For details of the DVD video player to a Y cable adapter (not supplied) and then connect to your TV. • Connect the DVD video player directly to your TV. Connecting to a TV Signal flow VIDEO Y PB PR VIDEO OUT S R L COAXIAL AUDIO OUT ANALOG BITSTREAM/PCM DIGITAL...
... power and unplug both units from the wall outlet before making any connections. • If your television set has one audio input, connect the left and right audio outputs of output sound, see 43 . For details of the DVD video player to a Y cable adapter (not supplied) and then connect to your TV. • Connect the DVD video player directly to your TV. Connecting to a TV Signal flow VIDEO Y PB PR VIDEO OUT S R L COAXIAL AUDIO OUT ANALOG BITSTREAM/PCM DIGITAL...
Owners Manual
Page 18
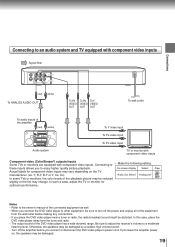
... with component video inputs Signal flow VIDEO Y PB PR VIDEO OUT S R L COAXIAL AUDIO OUT ANALOG BITSTREAM/PCM DIGITAL (red) (white) To ANALOG AUDIO OUT To PR To PB To Y VIDEO VIDEO VIDEO OUT OUT OUT To wall outlet To audio inputs of the DVD video player has a wide dynamic range. Connections Connecting to enjoy higher quality picture playback. Notes • Refer to other equipment, be damaged by a sudden high volume sound. • Turn off the power and...
... with component video inputs Signal flow VIDEO Y PB PR VIDEO OUT S R L COAXIAL AUDIO OUT ANALOG BITSTREAM/PCM DIGITAL (red) (white) To ANALOG AUDIO OUT To PR To PB To Y VIDEO VIDEO VIDEO OUT OUT OUT To wall outlet To audio inputs of the DVD video player has a wide dynamic range. Connections Connecting to enjoy higher quality picture playback. Notes • Refer to other equipment, be damaged by a sudden high volume sound. • Turn off the power and...
Owners Manual
Page 19
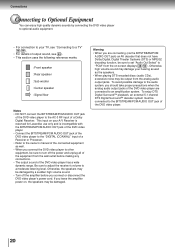
... section uses the following reference marks. : Front speaker : Rear speaker : Sub woofer : Center speaker : Signal flow Notes • DO NOT connect the BITSTREAM/PCM AUDIO OUT jack of the DVD video player to the AC-3 RF input of a Dolby Digital Receiver. Otherwise, the speakers may be damaged. Connections Connecting to Optional Equipment You can enjoy high quality dynamic sounds by a sudden high volume sound. • Turn off the power and...
... section uses the following reference marks. : Front speaker : Rear speaker : Sub woofer : Center speaker : Signal flow Notes • DO NOT connect the BITSTREAM/PCM AUDIO OUT jack of the DVD video player to the AC-3 RF input of a Dolby Digital Receiver. Otherwise, the speakers may be damaged. Connections Connecting to Optional Equipment You can enjoy high quality dynamic sounds by a sudden high volume sound. • Turn off the power and...
Owners Manual
Page 20
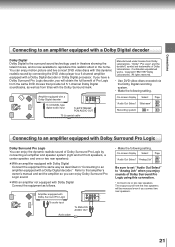
... from the same DVD movies that amplifier's owner's manual and set "Audio Out Select" to "Analog 2ch" when you connect two rear speakers. 21 Copyright 1992-1997 Dolby Laboratories. You can enjoy Dolby Surround Pro Logic sound. Amplifier equipped with a Dolby Digital decoder To COAXIAL type digital audio input VIDEO Y PB PR VIDEO OUT S R L COAXIAL AUDIO OUT ANALOG BITSTREAM/PCM DIGITAL To BITSTREAM/ PCM AUDIO OUT 75 Ω coaxial cable On-screen display "Audio Out Select" Recording system Select: "Bitstream" D Page 48...
... from the same DVD movies that amplifier's owner's manual and set "Audio Out Select" to "Analog 2ch" when you connect two rear speakers. 21 Copyright 1992-1997 Dolby Laboratories. You can enjoy Dolby Surround Pro Logic sound. Amplifier equipped with a Dolby Digital decoder To COAXIAL type digital audio input VIDEO Y PB PR VIDEO OUT S R L COAXIAL AUDIO OUT ANALOG BITSTREAM/PCM DIGITAL To BITSTREAM/ PCM AUDIO OUT 75 Ω coaxial cable On-screen display "Audio Out Select" Recording system Select: "Bitstream" D Page 48...

Owners Manual
Page 21
...-screen display Select: Page "Audio Out Select" "Bitstream" 48 50 Recording system MPEG2 43 22 On-screen display Select: Page "Audio Out Select" "Bitstream" 48 50 Recording system DTS 43 Connecting to an amplifier equipped with an MPEG2 audio decoder To COAXIAL type digital audio input VIDEO Y PB PR VIDEO OUT S R L COAXIAL AUDIO OUT ANALOG BITSTREAM/PCM DIGITAL To BITSTREAM/ PCM AUDIO OUT 75 Ω coaxial cable • Use DVD video discs encoded via the DTS recording system. • Make the following setting...
...-screen display Select: Page "Audio Out Select" "Bitstream" 48 50 Recording system MPEG2 43 22 On-screen display Select: Page "Audio Out Select" "Bitstream" 48 50 Recording system DTS 43 Connecting to an amplifier equipped with an MPEG2 audio decoder To COAXIAL type digital audio input VIDEO Y PB PR VIDEO OUT S R L COAXIAL AUDIO OUT ANALOG BITSTREAM/PCM DIGITAL To BITSTREAM/ PCM AUDIO OUT 75 Ω coaxial cable • Use DVD video discs encoded via the DTS recording system. • Make the following setting...
Owners Manual
Page 24
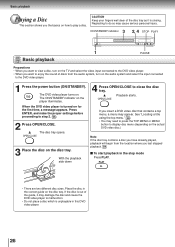
... view a disc, turn on the audio system and select the input connected to close the disc tray. The ON/STANDBY indicator on . With the playback side down 4 Press OPEN/CLOSE to the DVD video player. 1 Press the power button (ON/STANDBY). OPEN/CLOSE 3 Place the disc on the disc tray. If the disc is out of discs from the location where you last stopped playback. 29 To start playback in the stop mode Press PLAY. Place the disc in the correct guide on the disc tray. Basic playback Playing a Disc...
... view a disc, turn on the audio system and select the input connected to close the disc tray. The ON/STANDBY indicator on . With the playback side down 4 Press OPEN/CLOSE to the DVD video player. 1 Press the power button (ON/STANDBY). OPEN/CLOSE 3 Place the disc on the disc tray. If the disc is out of discs from the location where you last stopped playback. 29 To start playback in the stop mode Press PLAY. Place the disc in the correct guide on the disc tray. Basic playback Playing a Disc...

Owners Manual
Page 27
... PLAY The DVD video player resumes playback from the CD beginning of the disc. • If you want to interrupt playback. To start playback from the beginning of a DVD video disc, open the disc tray. • There may function only after the memory is stopped. 2 Press PLAY. you play a PBC-featured VIDEO CD while "PBC" 55 is muted during playback. SLOW Each time you change the parental lock setting 53 or select a disc menu language 51 . - PLAY Note The sound is set...
... PLAY The DVD video player resumes playback from the CD beginning of the disc. • If you want to interrupt playback. To start playback from the beginning of a DVD video disc, open the disc tray. • There may function only after the memory is stopped. 2 Press PLAY. you play a PBC-featured VIDEO CD while "PBC" 55 is muted during playback. SLOW Each time you change the parental lock setting 53 or select a disc menu language 51 . - PLAY Note The sound is set...

Owners Manual
Page 41
... initial default setting 52 . Notes • When you can select output sound format. 50 The abbreviation of the language appears instead of VIDEO CDs You can switch left and right channels by pressing the AUDIO button repeatedly during playback. ENTER If you press the / buttons, you turn off the audio setting display, press the CLEAR or ENTER button. Advanced playback Selecting a Language You can select a preferred language and sound recording system from those included on the DVD video disc change audio selections only...
... initial default setting 52 . Notes • When you can select output sound format. 50 The abbreviation of the language appears instead of VIDEO CDs You can switch left and right channels by pressing the AUDIO button repeatedly during playback. ENTER If you press the / buttons, you turn off the audio setting display, press the CLEAR or ENTER button. Advanced playback Selecting a Language You can select a preferred language and sound recording system from those included on the DVD video disc change audio selections only...

Owners Manual
Page 46
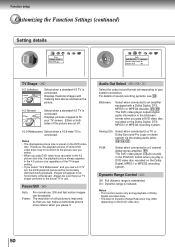
... C On-Screen Language Disc Menu Language Audio Language Subtitle Language On-Screen Displays Background Screen Saver Parental Lock Title Stop PBC On-Screen Language TV Shape Audio Out Select Details Page DVD To select a picture size according to the aspect 50 ratio of still pictures. 50 (Field/Frame) DVD To select an output sound format 50 VCD CD corresponding to your TV. DVD To select the resolution of your system connection. VCD To use the menu screen when playing a PBC- 55 controllable VIDEO CD. DVD VCD To select the background color or background...
... C On-Screen Language Disc Menu Language Audio Language Subtitle Language On-Screen Displays Background Screen Saver Parental Lock Title Stop PBC On-Screen Language TV Shape Audio Out Select Details Page DVD To select a picture size according to the aspect 50 ratio of still pictures. 50 (Field/Frame) DVD To select an output sound format 50 VCD CD corresponding to your TV. DVD To select the resolution of your system connection. VCD To use the menu screen when playing a PBC- 55 controllable VIDEO CD. DVD VCD To select the background color or background...
Owners Manual
Page 47
... TV screen. Audio Out Select DVD VCD CD Select the output sound format corresponding to the picture size you select. • When you play DVD video discs recorded in the 4:3 picture size only, the playback picture always appears in the bitstream format when you play a DVD video disc recorded on the DVD video disc. 50 On: Dynamic range is connected. Pause/Still DVD Auto: For normal use . Frame: The resolution of sound recording systems, see 43 . Displays pictures cropped to the actual TV in the PCM 2ch format...
... TV screen. Audio Out Select DVD VCD CD Select the output sound format corresponding to the picture size you select. • When you play DVD video discs recorded in the 4:3 picture size only, the playback picture always appears in the bitstream format when you play a DVD video disc recorded on the DVD video disc. 50 On: Dynamic range is connected. Pause/Still DVD Auto: For normal use . Frame: The resolution of sound recording systems, see 43 . Displays pictures cropped to the actual TV in the PCM 2ch format...
Owners Manual
Page 48
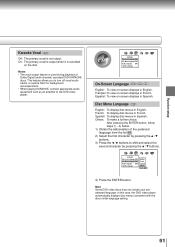
... preselected language. Español: To view on -screen displays in Spanish. English French Spanish Others Code E S 4) Press the ENTER button. Function setup Karaoke Vocal DVD Off: The primary vocal is used during playback of the preferred language from the list 56 . 2) Select the first character by pressing the / buttons. 3) Press the / buttons to the DVD video player. AB C AB C Language On-Screen Language ENG Disc Menu Language ENG Audio Language ENG Subtitle Language - - - French: To display disc menus in English. Disc Menu Language DVD English: To display disc menus...
... preselected language. Español: To view on -screen displays in Spanish. English French Spanish Others Code E S 4) Press the ENTER button. Function setup Karaoke Vocal DVD Off: The primary vocal is used during playback of the preferred language from the list 56 . 2) Select the first character by pressing the / buttons. 3) Press the / buttons to the DVD video player. AB C AB C Language On-Screen Language ENG Disc Menu Language ENG Audio Language ENG Subtitle Language - - - French: To display disc menus in English. Disc Menu Language DVD English: To display disc menus...
Owners Manual
Page 50
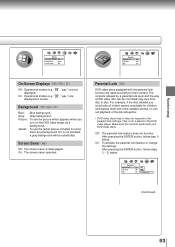
... C Operation Parental Lock Off Title Stop Off PBC On Off On Security Code - - - - (Continued) 53 " ", " displayed. On: Operational modes (e.g. Picture: To use the jacket picture included on some discs as a background. On: To activate the parental lock feature or change the settings. If it is not included, a gray background will be controlled may not respond to their content. The contents allowed by a parental lock level and the way a DVD video disc can...
... C Operation Parental Lock Off Title Stop Off PBC On Off On Security Code - - - - (Continued) 53 " ", " displayed. On: Operational modes (e.g. Picture: To use the jacket picture included on some discs as a background. On: To activate the parental lock feature or change the settings. If it is not included, a gray background will be controlled may not respond to their content. The contents allowed by a parental lock level and the way a DVD video disc can...
Owners Manual
Page 55
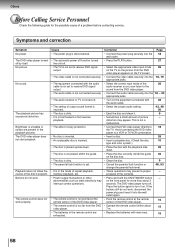
The DVD video player turned off . Buttons do not work, disconnect the power plug and insert it on the disc tray. • Clean the disc. 9 • Cancel the parental lock function or change the parental lock level. 48, 53 • These operations may appear. Page 18 27 • Select the appropriate video input mode 26 on the TV so the picture from the DVD video player appears on the TV screen. • Connect the video cable securely into the 18...
The DVD video player turned off . Buttons do not work, disconnect the power plug and insert it on the disc tray. • Clean the disc. 9 • Cancel the parental lock function or change the parental lock level. 48, 53 • These operations may appear. Page 18 27 • Select the appropriate video input mode 26 on the TV so the picture from the DVD video player appears on the TV screen. • Connect the video cable securely into the 18...
Owners Manual
Page 57
... instructions. TACP/THI IS NOT RESPONSIBLE IF YOUR DVD PLAYER IS LOST OR DAMAGED DURING SHIPMENT. *Commercial Units DVD Players sold and used in Hawaii, call . You should read this owner's manual thoroughly before operating this manual and checking the "Troubleshooting" section, you find that service is one of God (such as received. Others LIMITED WARRANTY DVD VIDEO PLAYER Toshiba America Consumer Products, Inc. ("TACP") and Toshiba Hawaii, Inc. ("THI") make...
... instructions. TACP/THI IS NOT RESPONSIBLE IF YOUR DVD PLAYER IS LOST OR DAMAGED DURING SHIPMENT. *Commercial Units DVD Players sold and used in Hawaii, call . You should read this owner's manual thoroughly before operating this manual and checking the "Troubleshooting" section, you find that service is one of God (such as received. Others LIMITED WARRANTY DVD VIDEO PLAYER Toshiba America Consumer Products, Inc. ("TACP") and Toshiba Hawaii, Inc. ("THI") make...


