

User Guide
Page 6
Contents Chapter 1: Getting to Know Your Camcorder 9 Overview 9 Check the Components 10 System Requirements 10 Front/Side views 11 Rear view 12 Underside view 12 Chapter 2: Getting Started 13 Loading the battery 13 Charging the battery 14 Inserting and removing an SD™ Card (optional).....19 Protecting data on an SD™ Card 20 Turning the camcorder on and getting started .......20 Turning off the camcorder 20 Chapter 3: Record Mode 21 Button functions 21 LCD touch screen information 22 Notification icons 22 Touch function icons 24 6
Contents Chapter 1: Getting to Know Your Camcorder 9 Overview 9 Check the Components 10 System Requirements 10 Front/Side views 11 Rear view 12 Underside view 12 Chapter 2: Getting Started 13 Loading the battery 13 Charging the battery 14 Inserting and removing an SD™ Card (optional).....19 Protecting data on an SD™ Card 20 Turning the camcorder on and getting started .......20 Turning off the camcorder 20 Chapter 3: Record Mode 21 Button functions 21 LCD touch screen information 22 Notification icons 22 Touch function icons 24 6

User Guide
Page 7
... 36 Deleting files 39 Chapter 4: Playback Mode 41 Button functions 41 LCD touch screen information 42 Notification icons 42 Touch function icons 43 Playback mode operations 44 Video Playback 45 Photo Playback 45 Delete a file in Playback mode 46 Chapter 5: Camcorder Settings 47 Settings Menu 47 Sound 48 TV 48 Language 49 Time Setting...
... 36 Deleting files 39 Chapter 4: Playback Mode 41 Button functions 41 LCD touch screen information 42 Notification icons 42 Touch function icons 43 Playback mode operations 44 Video Playback 45 Photo Playback 45 Delete a file in Playback mode 46 Chapter 5: Camcorder Settings 47 Settings Menu 47 Sound 48 TV 48 Language 49 Time Setting...

User Guide
Page 9
...; HDTV connectivity via an HDMI™ cable ❖ Easy playback of your CAMILEO™ S30 camcorder are: ❖ High quality images up to 16 mega-pixels ❖ Color LCD touch screen for extended video recording with a 8 Mega Pixel sensor that can be set to automatic or... manually adjusted ❖ 16x digital zoom ❖ Various effect options, such as Time Lapse and Slow Motion 9 Chapter 1 Getting to Know Your Camcorder Overview Your Toshiba camcorder comes equipped...
...; HDTV connectivity via an HDMI™ cable ❖ Easy playback of your CAMILEO™ S30 camcorder are: ❖ High quality images up to 16 mega-pixels ❖ Color LCD touch screen for extended video recording with a 8 Mega Pixel sensor that can be set to automatic or... manually adjusted ❖ 16x digital zoom ❖ Various effect options, such as Time Lapse and Slow Motion 9 Chapter 1 Getting to Know Your Camcorder Overview Your Toshiba camcorder comes equipped...

User Guide
Page 11
... extremely highprecision technology. However, some tiny black and/or bright dots (white, red, blue or green) may appear on the LCD touch screen. Getting to Know Your Camcorder 11 Overview NOTE The LCD touch screen is connected to the computer, press to a Web site. Battery cover (Sample Illustration) Front view Internet Upload button In Playback...
... extremely highprecision technology. However, some tiny black and/or bright dots (white, red, blue or green) may appear on the LCD touch screen. Getting to Know Your Camcorder 11 Overview NOTE The LCD touch screen is connected to the computer, press to a Web site. Battery cover (Sample Illustration) Front view Internet Upload button In Playback...

User Guide
Page 13
To properly connect the battery: 1 Flip open the LCD touch screen and slide the battery cover off. 2 Remove the battery. 3 Pull off the protective film. Protective film Li-ion battery (Sample Illustration) Removing the protective film 4 Reinsert the battery, making sure it is lined-up with the correct polarity marks. 13 Chapter 2 Getting Started Loading the battery The battery comes pre-installed in the camcorder, however you must remove the protective film on the battery before use.
To properly connect the battery: 1 Flip open the LCD touch screen and slide the battery cover off. 2 Remove the battery. 3 Pull off the protective film. Protective film Li-ion battery (Sample Illustration) Removing the protective film 4 Reinsert the battery, making sure it is lined-up with the correct polarity marks. 13 Chapter 2 Getting Started Loading the battery The battery comes pre-installed in the camcorder, however you must remove the protective film on the battery before use.

User Guide
Page 20
... a photo: Press the Mode ( ) button or touch the onscreen ( ) icon to switch to take a photo. Turning off the camcorder To turn off the camcorder: You can either : ❖ Flip the LCD touch screen outward to turn on the camcorder automatically. ❖ Or press the Power button for ...approximately one second to turn on the camcorder, either press the Power ( ) button for...
... a photo: Press the Mode ( ) button or touch the onscreen ( ) icon to switch to take a photo. Turning off the camcorder To turn off the camcorder: You can either : ❖ Flip the LCD touch screen outward to turn on the camcorder automatically. ❖ Or press the Power button for ...approximately one second to turn on the camcorder, either press the Power ( ) button for...
User Guide
Page 27
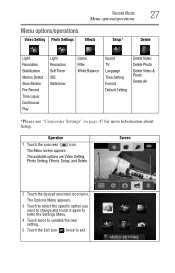
..., Setup, and Delete. The Options Menu appears. 3 Touch to select the specific option you want to change and touch it again to enter the Settings Menu. 4 Touch twice to validate the new setting. 5 Touch the Exit icon ( ) twice to exit. Operation 1 Touch the onscreen ( ) icon. The Menu screen appears. Record Mode 27 Menu options/operations Menu... ISO Slideshow Scene Filter White Balance Sound TV Language Time Setting Format Default Setting Delete Video Delete Photo Delete Video & Photo Delete All *Please see "Camcorder Settings" on page 47 for more information about Setup.
..., Setup, and Delete. The Options Menu appears. 3 Touch to select the specific option you want to change and touch it again to enter the Settings Menu. 4 Touch twice to validate the new setting. 5 Touch the Exit icon ( ) twice to exit. Operation 1 Touch the onscreen ( ) icon. The Menu screen appears. Record Mode 27 Menu options/operations Menu... ISO Slideshow Scene Filter White Balance Sound TV Language Time Setting Format Default Setting Delete Video Delete Photo Delete Video & Photo Delete All *Please see "Camcorder Settings" on page 47 for more information about Setup.

User Guide
Page 29
...Record videos at 640 x 480p 30 resolution. Screen NOTE Stabilization does not apply to exit. Operation 1 In the Video Setting menu, touch the Resolution icon twice. 2 Touch to select the desired option. 3 Touch again to validate the new setting. 4 Touch the Exit icon ( ) twice to FHD...1 In the Video Setting menu, touch the Stabilization icon twice. 2 Touch to select the desired option. 3 Touch again to validate the new setting. 4 Touch the Exit icon ( ) twice to help reduce shaking and create clearer videos. Screen Stabilization Your camcorder provides a feature that steadies the ...
...Record videos at 640 x 480p 30 resolution. Screen NOTE Stabilization does not apply to exit. Operation 1 In the Video Setting menu, touch the Resolution icon twice. 2 Touch to select the desired option. 3 Touch again to validate the new setting. 4 Touch the Exit icon ( ) twice to FHD...1 In the Video Setting menu, touch the Stabilization icon twice. 2 Touch to select the desired option. 3 Touch again to validate the new setting. 4 Touch the Exit icon ( ) twice to help reduce shaking and create clearer videos. Screen Stabilization Your camcorder provides a feature that steadies the ...

User Guide
Page 30
... automatically if movement is detected. Operation 1 In the Video Setting menu, touch the Slow Motion icon twice. 2 Touch to select the desired option. 3 Touch again to validate the new setting. 4 Touch the Exit icon ( ) twice to automatically record videos when the camcorder detects movement. Screen Screen Slow motion This setting records videos with a slow motion effect. Operation...
... automatically if movement is detected. Operation 1 In the Video Setting menu, touch the Slow Motion icon twice. 2 Touch to select the desired option. 3 Touch again to validate the new setting. 4 Touch the Exit icon ( ) twice to automatically record videos when the camcorder detects movement. Screen Screen Slow motion This setting records videos with a slow motion effect. Operation...
User Guide
Page 31
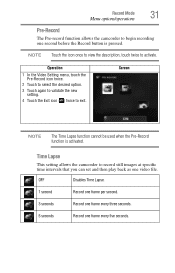
...5 seconds Record one video file. Time Lapse This setting allows the camcorder to record still images at specific time intervals that you can set and then play back as one frame every five seconds. Screen NOTE The Time Lapse function cannot be used when the Pre-Record function... is pressed. NOTE Touch the icon once to view the description, touch twice to exit. Record Mode 31 Menu options/operations Pre-Record The Pre-record function allows the camcorder to begin recording...
...5 seconds Record one video file. Time Lapse This setting allows the camcorder to record still images at specific time intervals that you can set and then play back as one frame every five seconds. Screen NOTE The Time Lapse function cannot be used when the Pre-Record function... is pressed. NOTE Touch the icon once to view the description, touch twice to exit. Record Mode 31 Menu options/operations Pre-Record The Pre-record function allows the camcorder to begin recording...
User Guide
Page 34
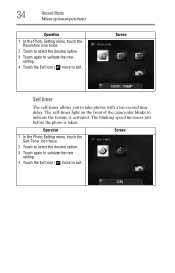
...Record Mode Menu options/operations Operation 1 In the Photo Setting menu, touch the Resolution icon twice. 2 Touch to select the desired option. 3 Touch again to validate the new setting. 4 Touch the Exit icon ( ) twice to exit. Screen Self timer The self-timer allows you to indicate the feature is... taken. The self-timer light on the front of the camcorder blinks to take ...
...Record Mode Menu options/operations Operation 1 In the Photo Setting menu, touch the Resolution icon twice. 2 Touch to select the desired option. 3 Touch again to validate the new setting. 4 Touch the Exit icon ( ) twice to exit. Screen Self timer The self-timer allows you to indicate the feature is... taken. The self-timer light on the front of the camcorder blinks to take ...
User Guide
Page 35
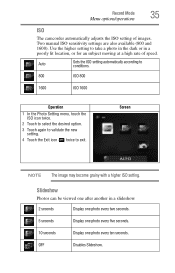
Record Mode 35 Menu options/operations ISO The camcorder automatically adjusts the ISO setting of speed. Screen NOTE The image may become grainy with a higher ISO setting. Two manual ISO sensitivity settings are also available (800 and 1600). Use the higher... ISO setting automatically according to conditions. 800 ISO 800 1600 ISO 1600 Operation 1 In the Photo Setting menu, touch the ISO icon twice. 2 Touch to select the desired option. 3 Touch again to validate the new setting. 4 Touch the Exit icon ( ) twice to take a photo in the dark or in a slideshow. 2 seconds Display...
Record Mode 35 Menu options/operations ISO The camcorder automatically adjusts the ISO setting of speed. Screen NOTE The image may become grainy with a higher ISO setting. Two manual ISO sensitivity settings are also available (800 and 1600). Use the higher... ISO setting automatically according to conditions. 800 ISO 800 1600 ISO 1600 Operation 1 In the Photo Setting menu, touch the ISO icon twice. 2 Touch to select the desired option. 3 Touch again to validate the new setting. 4 Touch the Exit icon ( ) twice to take a photo in the dark or in a slideshow. 2 seconds Display...

User Guide
Page 37
... Setting menu, touch the Scene icon twice. 2 Touch to select the desired option. 3 Touch again to validate the new setting. 4 Touch the Exit icon ( ) twice to the negative of the original. Screen 37 NOTE To avoid blurry photos when taking photos in Night mode, place the camcorder on a flat... to sepia. Auto No filter effects. Operation 1 In the Effects Setting menu, touch the Filter icon twice. 2 Touch to select the desired option. 3 Touch again to validate the new setting. 4 Touch the Exit icon ( ) twice to black and white. Screen Classic The image is converted to exit.
... Setting menu, touch the Scene icon twice. 2 Touch to select the desired option. 3 Touch again to validate the new setting. 4 Touch the Exit icon ( ) twice to the negative of the original. Screen 37 NOTE To avoid blurry photos when taking photos in Night mode, place the camcorder on a flat... to sepia. Auto No filter effects. Operation 1 In the Effects Setting menu, touch the Filter icon twice. 2 Touch to select the desired option. 3 Touch again to validate the new setting. 4 Touch the Exit icon ( ) twice to black and white. Screen Classic The image is converted to exit.

User Guide
Page 38
...: B/W / Classic / Negative effect can be previewed immediately without icons appearing on the LCD touch screen. Four White balance settings are available: Auto Automatically adjusts white balance. Fluorescent Use in tungsten lighting. Tungsten Use in Fluorescent lighting. White Balance The camcorder adjusts the white balance of images automatically. Operation 1 In the Effects Setting menu...
...: B/W / Classic / Negative effect can be previewed immediately without icons appearing on the LCD touch screen. Four White balance settings are available: Auto Automatically adjusts white balance. Fluorescent Use in tungsten lighting. Tungsten Use in Fluorescent lighting. White Balance The camcorder adjusts the white balance of images automatically. Operation 1 In the Effects Setting menu...
User Guide
Page 47
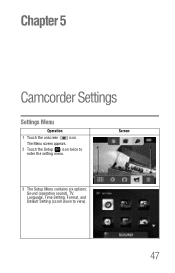
Screen 3 The Setup Menu contains six options: Sound (operation sound), TV, Language, Time Setting, Format, and Default Setting (scroll down to enter the setting menu. The Menu screen appears. 2 Touch the Setup ( ) icon twice to view). 47 Chapter 5 Camcorder Settings Settings Menu Operation 1 Touch the onscreen ( ) icon.
Screen 3 The Setup Menu contains six options: Sound (operation sound), TV, Language, Time Setting, Format, and Default Setting (scroll down to enter the setting menu. The Menu screen appears. 2 Touch the Setup ( ) icon twice to view). 47 Chapter 5 Camcorder Settings Settings Menu Operation 1 Touch the onscreen ( ) icon.

User Guide
Page 48
...The Menu screen appears. 2 Touch to select the desired option. 3 Touch again to validate the setting. 4 Touch the Exit icon ( ) twice to select the appropriate TV standard for your area, either NTSC or PAL. PAL (50Hz) UK, Europe, China, Australia, Singapore, and Hong Kong, etc. 48 Camcorder Settings Settings ...Menu Sound You can enable or disable tone and operating sounds. Operation 1 In the Setup menu, touch the Sound icon twice. Screen TV Use this function to exit...
...The Menu screen appears. 2 Touch to select the desired option. 3 Touch again to validate the setting. 4 Touch the Exit icon ( ) twice to select the appropriate TV standard for your area, either NTSC or PAL. PAL (50Hz) UK, Europe, China, Australia, Singapore, and Hong Kong, etc. 48 Camcorder Settings Settings ...Menu Sound You can enable or disable tone and operating sounds. Operation 1 In the Setup menu, touch the Sound icon twice. Screen TV Use this function to exit...
User Guide
Page 49
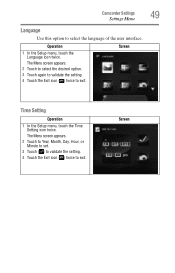
The Menu screen appears. 2 Touch to select the desired option. 3 Touch again to validate the setting. 4 Touch the Exit icon ( ) twice to exit. Screen Time Setting Operation 1 In the Setup menu, touch the Time Setting icon twice. Screen The Menu screen appears. 2 Touch to Year, Month, Day, Hour, or Minute to set. 3 Touch ( ) to validate the setting. 4 Touch the Exit icon ( ) twice to exit. Operation 1 In the Setup menu, touch the Language icon twice. Camcorder Settings 49 Settings Menu Language Use this option to select the language of the user interface.
The Menu screen appears. 2 Touch to select the desired option. 3 Touch again to validate the setting. 4 Touch the Exit icon ( ) twice to exit. Screen Time Setting Operation 1 In the Setup menu, touch the Time Setting icon twice. Screen The Menu screen appears. 2 Touch to Year, Month, Day, Hour, or Minute to set. 3 Touch ( ) to validate the setting. 4 Touch the Exit icon ( ) twice to exit. Operation 1 In the Setup menu, touch the Language icon twice. Camcorder Settings 49 Settings Menu Language Use this option to select the language of the user interface.
User Guide
Page 50
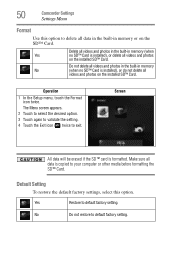
...8482; Card. Default Setting To restore the default factory settings, select this option to your computer or other media before formatting the SD™ Card. Screen All data will be erased if the SD™ card is installed), or delete all videos and photos in the built-in memory or on... the SD™ Card. 50 Camcorder Settings Settings Menu Format Use this option. Operation 1 In the Setup menu, touch the Format icon twice. No Do not restore to exit. Delete all videos and photos on the installed SD...
...8482; Card. Default Setting To restore the default factory settings, select this option to your computer or other media before formatting the SD™ Card. Screen All data will be erased if the SD™ card is installed), or delete all videos and photos in the built-in memory or on... the SD™ Card. 50 Camcorder Settings Settings Menu Format Use this option. Operation 1 In the Setup menu, touch the Format icon twice. No Do not restore to exit. Delete all videos and photos on the installed SD...
User Guide
Page 53
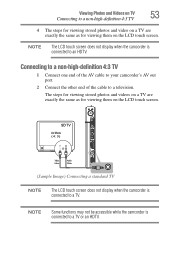
... viewing stored photos and videos on a TV are exactly the same as for viewing them on the LCD touch screen. Connecting to a non-high-definition 4:3 TV 1 Connect one end of the AV cable to your camcorder's AV out port. 2 Connect the other end of the cable to a television. NOTE The LCD... touch screen does not display when the camcorder is connected to a TV or an HDTV. Viewing Photos and Videos on TV 53 Connecting...
... viewing stored photos and videos on a TV are exactly the same as for viewing them on the LCD touch screen. Connecting to a non-high-definition 4:3 TV 1 Connect one end of the AV cable to your camcorder's AV out port. 2 Connect the other end of the cable to a television. NOTE The LCD... touch screen does not display when the camcorder is connected to a TV or an HDTV. Viewing Photos and Videos on TV 53 Connecting...
User Guide
Page 65
... photo is taken. 4 How do not display properly when the LCD touch screen shows the "!" A blinking light confirms the camcorder is too low of my indoor photos look blurry and dark? Chapter 10 Troubleshooting 1 If the LCD touch screen preview is not clear while shooting, how can the focus be turned ...OFF. symbol indicates that charging has been completed. The camcorder must use the supplied AC adaptor or the USB cable. The light ...
... photo is taken. 4 How do not display properly when the LCD touch screen shows the "!" A blinking light confirms the camcorder is too low of my indoor photos look blurry and dark? Chapter 10 Troubleshooting 1 If the LCD touch screen preview is not clear while shooting, how can the focus be turned ...OFF. symbol indicates that charging has been completed. The camcorder must use the supplied AC adaptor or the USB cable. The light ...


