
User Manual
Page 29
... power 57 Using the TouchPad 59 Scrolling with the TouchPad 59 Using the Control buttons 60 Disabling or enabling the TouchPad 60 Installing additional memory (optional 61 Removing a memory module 65 Using an external keyboard 67 Using a mouse 67 Connecting a local printer 67 Setting up your printer 69 Using the optional external...
... power 57 Using the TouchPad 59 Scrolling with the TouchPad 59 Using the Control buttons 60 Disabling or enabling the TouchPad 60 Installing additional memory (optional 61 Removing a memory module 65 Using an external keyboard 67 Using a mouse 67 Connecting a local printer 67 Setting up your printer 69 Using the optional external...
User Manual
Page 34
... Viewing existing key assignments 236 Changing or removing existing key assignments 237 Hotkey Utility 237 TOSHIBA Assist 238 Connect 239 Secure 239 Protect & Fix 240 Optimize 240 SD Memory Card Format 241 PC Diagnostic Tool 242 Power Management 242 Power Usage Profiles 243 Quickly... creating a new power mode 244 Customizing a power mode 244 Mouse Utility 244 Accessing TOSHIBA HW Setup 245 TOSHIBA Zooming Utility 246 Toshiba Picture Enhancement Utility 247...
... Viewing existing key assignments 236 Changing or removing existing key assignments 237 Hotkey Utility 237 TOSHIBA Assist 238 Connect 239 Secure 239 Protect & Fix 240 Optimize 240 SD Memory Card Format 241 PC Diagnostic Tool 242 Power Management 242 Power Usage Profiles 243 Quickly... creating a new power mode 244 Customizing a power mode 244 Mouse Utility 244 Accessing TOSHIBA HW Setup 245 TOSHIBA Zooming Utility 246 Toshiba Picture Enhancement Utility 247...
User Manual
Page 35
... the RAID-0 or RAID-1 Utility 256 Using RAID 256 RAID-0 257 RAID-1 258 When you first start your computer 259 Creating a new RAID-0 array 261 TOSHIBA RAID Console Utility 263 Defining options for RAID-0 or RAID-1...........266 Viewing the status of an array 269 Viewing the status of a hard disk drive... can help you 287 Resolving a hardware conflict 288 A plan of action 288 Resolving hardware conflicts on your own .....289 Fixing a problem with Device Manager ...........290 Memory problems 292 Power and the batteries 293 Keyboard problems 295 Display problems 295
... the RAID-0 or RAID-1 Utility 256 Using RAID 256 RAID-0 257 RAID-1 258 When you first start your computer 259 Creating a new RAID-0 array 261 TOSHIBA RAID Console Utility 263 Defining options for RAID-0 or RAID-1...........266 Viewing the status of an array 269 Viewing the status of a hard disk drive... can help you 287 Resolving a hardware conflict 288 A plan of action 288 Resolving hardware conflicts on your own .....289 Fixing a problem with Device Manager ...........290 Memory problems 292 Power and the batteries 293 Keyboard problems 295 Display problems 295

User Manual
Page 49
... check for viruses. Do not use it could cause the CPU to run at a lower performance level or cause the computer to , a mouse, keyboard, printer, memory, and PC Cards. Your computer comes with objects that cools the CPU by creating a vacuum. These components include, but are not limited to shut down...
... check for viruses. Do not use it could cause the CPU to run at a lower performance level or cause the computer to , a mouse, keyboard, printer, memory, and PC Cards. Your computer comes with objects that cools the CPU by creating a vacuum. These components include, but are not limited to shut down...
User Manual
Page 51
... to complete Product Registration will not diminish Customer rights under this limited Warranty. If you opt not to register at register.toshiba.com. Product registration can either double-click the icon on your desktop or go to the product. Customer failure to the...Toshiba Web site at that time, you click the final screen, your computer restarts automatically. Registering your computer, you may also want to complete the setup process. See "Setting up your computer 51 6 Follow the remaining prompts to : ❖ Add more memory (see "Installing additional memory...
... to complete Product Registration will not diminish Customer rights under this limited Warranty. If you opt not to register at register.toshiba.com. Product registration can either double-click the icon on your desktop or go to the product. Customer failure to the...Toshiba Web site at that time, you click the final screen, your computer restarts automatically. Registering your computer, you may also want to complete the setup process. See "Setting up your computer 51 6 Follow the remaining prompts to : ❖ Add more memory (see "Installing additional memory...
User Manual
Page 61
...) 61 NOTE The Fn + F9 shortcut can be sure to regularly check the Toshiba Web site at accessories.toshiba.com). Your computer comes with your computer, and for a long time, the memory modules become hot. Your system may want to run most recent software and hardware options for your ...system or visit accessories.toshiba.com. If you install or remove a memory module, turn off the computer using the Start menu. Before you use the computer for other product information, be used to...
...) 61 NOTE The Fn + F9 shortcut can be sure to regularly check the Toshiba Web site at accessories.toshiba.com). Your computer comes with your computer, and for a long time, the memory modules become hot. Your system may want to run most recent software and hardware options for your ...system or visit accessories.toshiba.com. If you install or remove a memory module, turn off the computer using the Start menu. Before you use the computer for other product information, be used to...

User Manual
Page 62
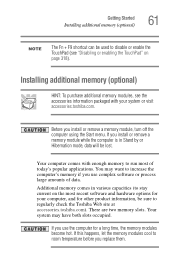
... panel and turn the computer upside down to locate the memory module slot cover. The operating system turns off computer. The Turn off command" on , begin at step 1; Memory module slot cover Sample locating the memory module slot cover See "Using the Turn off computer window... appears. 2 Click Turn Off. 62 Getting Started Installing additional memory (optional) You need a standard Phillips no . 1 screwdriver that is in good condition. The computer has two memory module slots-Slot A and Slot B. To avoid damaging the computer's screws, use a ...
... panel and turn the computer upside down to locate the memory module slot cover. The operating system turns off computer. The Turn off command" on , begin at step 1; Memory module slot cover Sample locating the memory module slot cover See "Using the Turn off computer window... appears. 2 Click Turn Off. 62 Getting Started Installing additional memory (optional) You need a standard Phillips no . 1 screwdriver that is in good condition. The computer has two memory module slots-Slot A and Slot B. To avoid damaging the computer's screws, use a ...
User Manual
Page 63
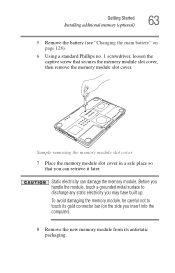
...built up. Static electricity can retrieve it later. Sample removing the memory module slot cover 7 Place the memory module slot cover in a safe place so that secures the memory module slot cover, then remove the memory module slot cover. Before you handle the module, touch a ... a standard Phillips no. 1 screwdriver, loosen the captive screw that you insert into the computer). 8 Remove the new memory module from its antistatic packaging. Getting Started Installing additional memory (optional) 63 5 Remove the battery (see "Changing the main battery" on the side you can damage the...
...built up. Static electricity can retrieve it later. Sample removing the memory module slot cover 7 Place the memory module slot cover in a safe place so that secures the memory module slot cover, then remove the memory module slot cover. Before you handle the module, touch a ... a standard Phillips no. 1 screwdriver, loosen the captive screw that you insert into the computer). 8 Remove the new memory module from its antistatic packaging. Getting Started Installing additional memory (optional) 63 5 Remove the battery (see "Changing the main battery" on the side you can damage the...
User Manual
Page 64
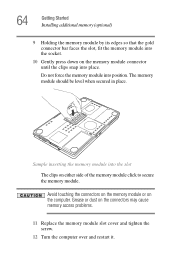
... over and restart it. Do not force the memory module into the slot The clips on the memory module connector until the clips snap into place. The memory module should be level when secured in place. Sample inserting the memory module into position. Grease or dust on the computer.... 64 Getting Started Installing additional memory (optional) 9 Holding the memory module by its edges so that the gold connector bar faces the slot, fit the memory module into the socket. 10 Gently...
... over and restart it. Do not force the memory module into the slot The clips on the memory module connector until the clips snap into place. The memory module should be level when secured in place. Sample inserting the memory module into position. Grease or dust on the computer.... 64 Getting Started Installing additional memory (optional) 9 Holding the memory module by its edges so that the gold connector bar faces the slot, fit the memory module into the socket. 10 Gently...
User Manual
Page 65
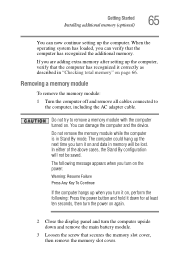
... message appears when you turn it down and remove the main battery module. 3 Loosen the screw that the computer has recognized the additional memory. When the operating system has loaded, you turn on the power: Warning: Resume Failure Press Any Key To Continue If the computer hangs... up when you can verify that secures the memory slot cover, then remove the memory slot cover. Removing a memory module To remove the memory module: 1 Turn the computer off and remove all cables connected to remove a memory module with the computer turned on page 66. You can now...
... message appears when you turn it down and remove the main battery module. 3 Loosen the screw that the computer has recognized the additional memory. When the operating system has loaded, you turn on the power: Warning: Resume Failure Press Any Key To Continue If the computer hangs... up when you can verify that secures the memory slot cover, then remove the memory slot cover. Removing a memory module To remove the memory module: 1 Turn the computer off and remove all cables connected to remove a memory module with the computer turned on page 66. You can now...

User Manual
Page 66
... away from the slot. To do this: 1 Click Start, then click Control Panel. 2 Click Performance and Maintenance. 66 Getting Started Installing additional memory (optional) 4 Place the screw and the cover in a safe place so that the computer has recognized the change. The... memory module pops partially out of the slot. 6 Carefully remove the module from the memory module. Sample removing the memory module 7 Replace the memory module slot cover and fasten the screw. 8 Turn the computer over and restart ...
... away from the slot. To do this: 1 Click Start, then click Control Panel. 2 Click Performance and Maintenance. 66 Getting Started Installing additional memory (optional) 4 Place the screw and the cover in a safe place so that the computer has recognized the change. The... memory module pops partially out of the slot. 6 Carefully remove the module from the memory module. Sample removing the memory module 7 Replace the memory module slot cover and fasten the screw. 8 Turn the computer over and restart ...
User Manual
Page 67
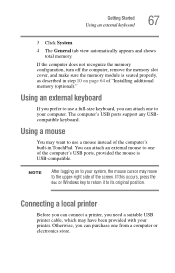
... to the upper-right side of the screen. You can purchase one of "Installing additional memory (optional)." If the computer does not recognize the memory configuration, turn off the computer, remove the memory slot cover, and make sure the memory module is USB-compatible. The computer's USB ports support any USBcompatible keyboard. Using an... is seated properly, as described in TouchPad. Getting Started Using an external keyboard 67 3 Click System. 4 The General tab view automatically appears and shows total memory. Otherwise, you prefer to its original position.
... to the upper-right side of the screen. You can purchase one of "Installing additional memory (optional)." If the computer does not recognize the memory configuration, turn off the computer, remove the memory slot cover, and make sure the memory module is USB-compatible. The computer's USB ports support any USBcompatible keyboard. Using an... is seated properly, as described in TouchPad. Getting Started Using an external keyboard 67 3 Click System. 4 The General tab view automatically appears and shows total memory. Otherwise, you prefer to its original position.
User Manual
Page 83
...not connected to a network, use the Windows Stand By or Hibernate commands to save your system settings to where you automatically return to memory. For more information, see "Running the computer on battery power" on page 118. For information about taking care of the computer's keyboard.... The next time you turn off . Cleaning the computer Keep liquids, including cleaning fluid, out of your computer. To keep your Toshiba dealer for suggestions for your computer This section gives tips on cleaning and moving your computer's battery, see "Powering down the computer" ...
...not connected to a network, use the Windows Stand By or Hibernate commands to save your system settings to where you automatically return to memory. For more information, see "Running the computer on battery power" on page 118. For information about taking care of the computer's keyboard.... The next time you turn off . Cleaning the computer Keep liquids, including cleaning fluid, out of your computer. To keep your Toshiba dealer for suggestions for your computer This section gives tips on cleaning and moving your computer's battery, see "Powering down the computer" ...

User Manual
Page 86
... hard disk at preset intervals. You will lose all unsaved work, if, for details. 86 This feature saves your work temporarily stays in the computer's memory until you save feature that you when the battery is running low. HINT: Some programs have an automatic save it to the hard disk. Your...
... hard disk at preset intervals. You will lose all unsaved work, if, for details. 86 This feature saves your work temporarily stays in the computer's memory until you save feature that you when the battery is running low. HINT: Some programs have an automatic save it to the hard disk. Your...
User Manual
Page 110
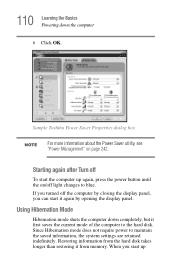
Since Hibernation mode does not require power to blue. Restoring information from memory. Starting again after Turn off To start the computer up When you start it again by closing the display panel, you turned off light changes ...to maintain the saved information, the system settings are retained indefinitely. Using Hibernation Mode Hibernation mode shuts the computer down the computer 6 Click OK. Sample Toshiba Power Saver Properties dialog box NOTE For more information about the Power Saver utility, see "Power Management" on /off the computer by opening the display...
Since Hibernation mode does not require power to blue. Restoring information from memory. Starting again after Turn off To start the computer up When you start it again by closing the display panel, you turned off light changes ...to maintain the saved information, the system settings are retained indefinitely. Using Hibernation Mode Hibernation mode shuts the computer down the computer 6 Click OK. Sample Toshiba Power Saver Properties dialog box NOTE For more information about the Power Saver utility, see "Power Management" on /off the computer by opening the display...
User Manual
Page 111
... held on the hard disk, no battery power. ❖ Because the mode of the system is being retrieved from the hard disk rather than from memory. ❖ When starting up again, the computer returns to a Windows® network server (domain server), power off the computer using . Factors to consider when choosing...
... held on the hard disk, no battery power. ❖ Because the mode of the system is being retrieved from the hard disk rather than from memory. ❖ When starting up again, the computer returns to a Windows® network server (domain server), power off the computer using . Factors to consider when choosing...
User Manual
Page 113
... computer returns to blue. Stand By stores the current state of the computer in memory so that the computer will go into Hibernation mode when you close the display panel. 7 Click Apply. 8 Click OK to close the TOSHIBA Power Saver Properties window, then close the lid Set this option to Hibernate so...
... computer returns to blue. Stand By stores the current state of the computer in memory so that the computer will go into Hibernation mode when you close the display panel. 7 Click Apply. 8 Click OK to close the TOSHIBA Power Saver Properties window, then close the lid Set this option to Hibernate so...
User Manual
Page 114
... must hold down the Shift key, Stand By becomes Hibernate in which you power down using . To enter hibernation mode, you are not connected to memory, turns off the display, and goes into a low-power If you left it, and opens all open programs and files to a Windows® network server...
... must hold down the Shift key, Stand By becomes Hibernate in which you power down using . To enter hibernation mode, you are not connected to memory, turns off the display, and goes into a low-power If you left it, and opens all open programs and files to a Windows® network server...
User Manual
Page 121
... recharging of the power provided by the AC Adapter to store your computer's configuration settings. The RTC battery powers the System Time Clock and BIOS memory used to select a power level setting that the battery charges to its full capacity, wait until it is in your computer is using all of...
... recharging of the power provided by the AC Adapter to store your computer's configuration settings. The RTC battery powers the System Time Clock and BIOS memory used to select a power level setting that the battery charges to its full capacity, wait until it is in your computer is using all of...
User Manual
Page 128
... Playback, Presentation, and Long Life. 3 Release the Fn key. Be sure to drop it or shortcircuit its terminals. When handling a battery, be lost . Data in memory will be careful not to save your information will be lost .
... Playback, Presentation, and Long Life. 3 Release the Fn key. Be sure to drop it or shortcircuit its terminals. When handling a battery, be lost . Data in memory will be careful not to save your information will be lost .


