
User Manual
Page 5
... can. Disconnection If you disconnect the equipment until the problem is to make any message unless such message clearly contains in their equipment, operations or procedures. Connection to party line service is necessary. In order to file a complaint with this , it is subject to make changes in a margin at (949) 859-4273. Fax Branding The Telephone Consumer Protection Act...
... can. Disconnection If you disconnect the equipment until the problem is to make any message unless such message clearly contains in their equipment, operations or procedures. Connection to party line service is necessary. In order to file a complaint with this , it is subject to make changes in a margin at (949) 859-4273. Fax Branding The Telephone Consumer Protection Act...

User Manual
Page 29
...time 56 Opening the display panel 56 Your computer's features and specifications ....57 Turning on the power 57 Using the TouchPad 59 Scrolling with the TouchPad 59 Using the Control buttons 60 Disabling or enabling the TouchPad 60 Installing additional memory (optional 61 Removing a memory module 65 Using an external keyboard 67 Using a mouse 67 Connecting a local printer 67 Setting up your printer 69 Using the optional external USB diskette drive........70 Connecting an optional external diskette drive..70 Connecting external display devices 71 Connecting the display device 72...
...time 56 Opening the display panel 56 Your computer's features and specifications ....57 Turning on the power 57 Using the TouchPad 59 Scrolling with the TouchPad 59 Using the Control buttons 60 Disabling or enabling the TouchPad 60 Installing additional memory (optional 61 Removing a memory module 65 Using an external keyboard 67 Using a mouse 67 Connecting a local printer 67 Setting up your printer 69 Using the optional external USB diskette drive........70 Connecting an optional external diskette drive..70 Connecting external display devices 71 Connecting the display device 72...

User Manual
Page 36
... DVD-ROM or multi-function drive problems...300 Sound system problems 301 PC Card problems 301 Printer problems 305 Modem problems 306 Develop good computing habits 306 If you need further assistance 307 Before you contact Toshiba 308 Contacting Toshiba 308 Other Toshiba Internet Web sites 309 Toshiba's worldwide offices 310 Appendix A: Hot Keys 312 Volume Mute 312 Instant password security 313 Power usage profile 313 Stand By mode 314 Hibernation mode 315 Display modes 316 Enabling a wireless device...
... DVD-ROM or multi-function drive problems...300 Sound system problems 301 PC Card problems 301 Printer problems 305 Modem problems 306 Develop good computing habits 306 If you need further assistance 307 Before you contact Toshiba 308 Contacting Toshiba 308 Other Toshiba Internet Web sites 309 Toshiba's worldwide offices 310 Appendix A: Hot Keys 312 Volume Mute 312 Instant password security 313 Power usage profile 313 Stand By mode 314 Hibernation mode 315 Display modes 316 Enabling a wireless device...
User Manual
Page 38
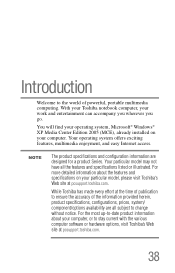
... work and entertainment can accompany you wherever you go. Introduction Welcome to the world of the information provided herein, product specifications, configurations, prices, system/ component/options availability are designed for a product Series. Your particular model may not have all subject to change without notice. Your operating system offers exciting features, multimedia enjoyment, and easy Internet access. NOTE The product specifications and configuration...
... work and entertainment can accompany you wherever you go. Introduction Welcome to the world of the information provided herein, product specifications, configurations, prices, system/ component/options availability are designed for a product Series. Your particular model may not have all subject to change without notice. Your operating system offers exciting features, multimedia enjoyment, and easy Internet access. NOTE The product specifications and configuration...
User Manual
Page 63
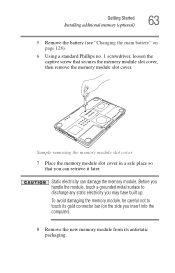
... damage the memory module. To avoid damaging the memory module, be careful not to discharge any static electricity you insert into the computer). 8 Remove the new memory module from its antistatic packaging. Static electricity can retrieve it later. Sample removing the memory module slot cover 7 Place the memory module slot cover in a safe place so that secures the memory module slot cover, then remove the memory module slot cover. Getting Started Installing additional memory (optional) 63 5 Remove the battery (see "Changing the main battery" on...
... damage the memory module. To avoid damaging the memory module, be careful not to discharge any static electricity you insert into the computer). 8 Remove the new memory module from its antistatic packaging. Static electricity can retrieve it later. Sample removing the memory module slot cover 7 Place the memory module slot cover in a safe place so that secures the memory module slot cover, then remove the memory module slot cover. Getting Started Installing additional memory (optional) 63 5 Remove the battery (see "Changing the main battery" on...

User Manual
Page 66
... removing the memory module 7 Replace the memory module slot cover and fasten the screw. 8 Turn the computer over and restart it. To do this: 1 Click Start, then click Control Panel. 2 Click Performance and Maintenance. The memory module pops partially out of the slot. 6 Carefully remove the module from the memory module. You must have at least one memory module installed for the computer to work. 66 Getting Started Installing additional memory (optional) 4 Place the screw and the cover in a safe...
... removing the memory module 7 Replace the memory module slot cover and fasten the screw. 8 Turn the computer over and restart it. To do this: 1 Click Start, then click Control Panel. 2 Click Performance and Maintenance. The memory module pops partially out of the slot. 6 Carefully remove the module from the memory module. You must have at least one memory module installed for the computer to work. 66 Getting Started Installing additional memory (optional) 4 Place the screw and the cover in a safe...
User Manual
Page 72
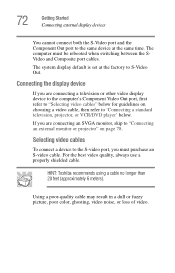
... best video quality, always use a properly shielded cable. 72 Getting Started Connecting external display devices You cannot connect both the S-Video port and the Component Out port to the same device at the factory to S-Video Out. The system display default is set at the same time. If you are connecting a television or other video display device to the computer's Component Video Out port, first refer to 'Connecting a standard television, projector, or VCR/DVD player' below...
... best video quality, always use a properly shielded cable. 72 Getting Started Connecting external display devices You cannot connect both the S-Video port and the Component Out port to the same device at the factory to S-Video Out. The system display default is set at the same time. If you are connecting a television or other video display device to the computer's Component Video Out port, first refer to 'Connecting a standard television, projector, or VCR/DVD player' below...
User Manual
Page 164
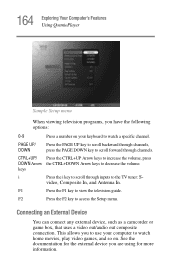
... following options: 0-9 Press a number on . This allows you are using for the external device you to use your keyboard to watch home movies, play video games, and so on your computer to watch a specific channel. keys i Press the i key to scroll through channels. CTRL+UP/ Press the CTRL+UP Arrow keys to increase the volume, press DOWN Arrow the CTRL+DOWN Arrow keys to access the Setup menu. video...
... following options: 0-9 Press a number on . This allows you are using for the external device you to use your keyboard to watch home movies, play video games, and so on your computer to watch a specific channel. keys i Press the i key to scroll through channels. CTRL+UP/ Press the CTRL+UP Arrow keys to increase the volume, press DOWN Arrow the CTRL+DOWN Arrow keys to access the Setup menu. video...
User Manual
Page 165
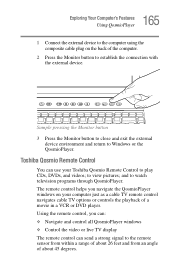
... the QosmioPlayer. Using the remote control, you navigate the QosmioPlayer windows on the back of the computer. 2 Press the Monitor button to establish the connection with the external device. The remote control helps you can: ❖ Navigate and control all QosmioPlayer windows ❖ Control the video or live TV display The remote control can use your computer just as a cable TV remote control navigates cable TV options or controls the playback...
... the QosmioPlayer. Using the remote control, you navigate the QosmioPlayer windows on the back of the computer. 2 Press the Monitor button to establish the connection with the external device. The remote control helps you can: ❖ Navigate and control all QosmioPlayer windows ❖ Control the video or live TV display The remote control can use your computer just as a cable TV remote control navigates cable TV options or controls the playback...

User Manual
Page 202
..., you to: ❖ Change settings for your television service provider ❖ Change settings for your Internet Service Provider ❖ Manually update the My TV Television Program Guide ❖ Check your remote control ❖ Change your ZIP Code to receive the correct Television Program Guide for : ❖ Recording a TV program, including manually recording ❖ The TV Guide ❖ The TV Signal ❖ Adjust display settings ❖ Audio settings To make a change, click on the...
..., you to: ❖ Change settings for your television service provider ❖ Change settings for your Internet Service Provider ❖ Manually update the My TV Television Program Guide ❖ Check your remote control ❖ Change your ZIP Code to receive the correct Television Program Guide for : ❖ Recording a TV program, including manually recording ❖ The TV Guide ❖ The TV Signal ❖ Adjust display settings ❖ Audio settings To make a change, click on the...
User Manual
Page 224
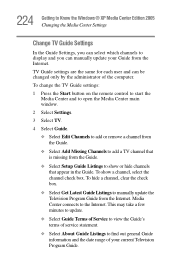
... from the Internet. To hide a channel, clear the check box. ❖ Select Get Latest Guide Listings to manually update the Television Program Guide from the Guide. ❖ Select Setup Guide Listings to show a channel, select the channel check box. To change the TV Guide settings: 1 Press the Start button on the remote control to start the Media Center and to open the Media Center main window. 2 Select Settings. 3 Select TV. 4 Select Guide. ❖ Select...
... from the Internet. To hide a channel, clear the check box. ❖ Select Get Latest Guide Listings to manually update the Television Program Guide from the Guide. ❖ Select Setup Guide Listings to show a channel, select the channel check box. To change the TV Guide settings: 1 Press the Start button on the remote control to start the Media Center and to open the Media Center main window. 2 Select Settings. 3 Select TV. 4 Select Guide. ❖ Select...
User Manual
Page 268
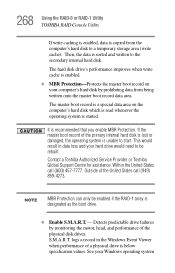
... onto the master boot record data area. Contact a Toshiba Authorized Service Provider or Toshiba Global Support Centre for assistance. See your computer's hard disk by monitoring the motor, head, and performance of the primary internal hard disk is lost or damaged, the operating system is recommended that you enable MBR Protection. Detects predictable drive failures by prohibiting data from the computer's hard disk to a temporary storage...
... onto the master boot record data area. Contact a Toshiba Authorized Service Provider or Toshiba Global Support Centre for assistance. See your computer's hard disk by monitoring the motor, head, and performance of the primary internal hard disk is lost or damaged, the operating system is recommended that you enable MBR Protection. Detects predictable drive failures by prohibiting data from the computer's hard disk to a temporary storage...
User Manual
Page 285
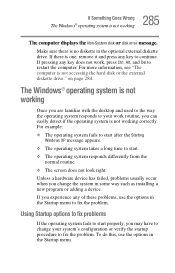
... fix the problem. For more information, see "The computer is not accessing the hard disk or the external diskette drive." The Windows® operating system is not working Once you experience any of these problems, use the options in some way such as installing a new program or adding a device. If there is one, remove it and press any key does not work routine, you may have to start after the Starting Windows...
... fix the problem. For more information, see "The computer is not accessing the hard disk or the external diskette drive." The Windows® operating system is not working Once you experience any of these problems, use the options in some way such as installing a new program or adding a device. If there is one, remove it and press any key does not work routine, you may have to start after the Starting Windows...

User Manual
Page 295
... simultaneously to turn off the cursor control light or press Fn and F11 simultaneously to turn off , make sure the display priority is blank. If you are using the built-in screen, make sure the software you are using is not remapping the keyboard. If it . The keyboard produces unexpected characters. Display problems Here are some typical display problems and their solutions: The display is not set for an external monitor.
... simultaneously to turn off the cursor control light or press Fn and F11 simultaneously to turn off , make sure the display priority is blank. If you are using the built-in screen, make sure the software you are using is not remapping the keyboard. If it . The keyboard produces unexpected characters. Display problems Here are some typical display problems and their solutions: The display is not set for an external monitor.

User Manual
Page 318
... more information, see "TOSHIBA Zooming Utility" on and off. Fn + This hot key turns the Zooming utility to zoom-in. 318 Hot Keys Disabling or enabling the TouchPad Disabling or enabling the TouchPad Fn + This hot key enables/disables the TouchPad. Sample disable and enable TouchPad windows Keyboard hot keys Fn + This hot key turns the cursor control overlay on and off . Zooming applications in/out Fn + This hot key turns the Zooming utility to zoom-out. Fn + This hot key turns the scroll lock feature on page 246...
... more information, see "TOSHIBA Zooming Utility" on and off. Fn + This hot key turns the Zooming utility to zoom-in. 318 Hot Keys Disabling or enabling the TouchPad Disabling or enabling the TouchPad Fn + This hot key enables/disables the TouchPad. Sample disable and enable TouchPad windows Keyboard hot keys Fn + This hot key turns the cursor control overlay on and off . Zooming applications in/out Fn + This hot key turns the Zooming utility to zoom-out. Fn + This hot key turns the scroll lock feature on page 246...
User Manual
Page 321
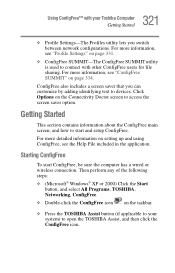
... Settings-The Profiles utility lets you switch between network configurations. Starting ConfigFree To start and setup ConfigFree. Then perform any of the following steps: ❖ (Microsoft® Windows® XP or 2000) Click the Start button, and select All Programs, TOSHIBA, Networking, ConfigFree. ❖ Double-click the ConfigFree icon on the Connectivity Doctor screen to start ConfigFree, be sure the computer has a wired or wireless connection. Click Options on...
... Settings-The Profiles utility lets you switch between network configurations. Starting ConfigFree To start and setup ConfigFree. Then perform any of the following steps: ❖ (Microsoft® Windows® XP or 2000) Click the Start button, and select All Programs, TOSHIBA, Networking, ConfigFree. ❖ Double-click the ConfigFree icon on the Connectivity Doctor screen to start ConfigFree, be sure the computer has a wired or wireless connection. Click Options on...
User Manual
Page 360
... tips 86 Connecting external AV input devices 80 Connecting external display devices 71 connecting to a power source 52 connection set up 143 conserving battery power 126 Contents CDs 106 DVDs 106 control buttons 60 critical applications 3 Ctrl keys 89 D desktop creating new icon 137 exploring 136 icons 137 major features 137 Device Manager 290 checking properties 291 disabling a device 290, 291 devices keyboard 67 mouse 67 Disk Defragmenter 299 disk drive corrupted/damaged data files 299 missing files/trouble accessing a disk 298...
... tips 86 Connecting external AV input devices 80 Connecting external display devices 71 connecting to a power source 52 connection set up 143 conserving battery power 126 Contents CDs 106 DVDs 106 control buttons 60 critical applications 3 Ctrl keys 89 D desktop creating new icon 137 exploring 136 icons 137 major features 137 Device Manager 290 checking properties 291 disabling a device 290, 291 devices keyboard 67 mouse 67 Disk Defragmenter 299 disk drive corrupted/damaged data files 299 missing files/trouble accessing a disk 298...
User Manual
Page 361
... display device connecting 72 display modes hot key 316 display panel closing 84 opening 56 disposal information 27 disposing of used batteries 134 DMA (Direct Memory Access) 289 double-click 60 DVD-ROM or multi-function drive cannot access disc 300 drive tray will not open 300 inserting discs 103 problems 300 removing 107 troubleshooting 291 E environmental considerations 44 ergonomics 45 posture 44 error messages device driver conflict 288 general hardware problem 288 non-system disk or disk error 285, 300 problem with display settings/ current settings not working...
... display device connecting 72 display modes hot key 316 display panel closing 84 opening 56 disposal information 27 disposing of used batteries 134 DMA (Direct Memory Access) 289 double-click 60 DVD-ROM or multi-function drive cannot access disc 300 drive tray will not open 300 inserting discs 103 problems 300 removing 107 troubleshooting 291 E environmental considerations 44 ergonomics 45 posture 44 error messages device driver conflict 288 general hardware problem 288 non-system disk or disk error 285, 300 problem with display settings/ current settings not working...
User Manual
Page 362
... DVDs 103 installing main battery 128 mouse 67 instant passwords, using 252 Internal/External mode 297 Internet bookmarked site not found 287 connecting to 148 features 149 slow connection 287 surfing 149 uploading and downloading files 150 URL address not found 287 Internet Explorer icon 138 Internet Service Providers 147 IRQ (Interrupt Request) 289 ISPs 147 J jack headphones 153 microphone 151 RJ-11 142 K keeping comfortable 43 key changing 237 removing...
... DVDs 103 installing main battery 128 mouse 67 instant passwords, using 252 Internal/External mode 297 Internet bookmarked site not found 287 connecting to 148 features 149 slow connection 287 surfing 149 uploading and downloading files 150 URL address not found 287 Internet Explorer icon 138 Internet Service Providers 147 IRQ (Interrupt Request) 289 ISPs 147 J jack headphones 153 microphone 151 RJ-11 142 K keeping comfortable 43 key changing 237 removing...
User Manual
Page 363
... port 140 problem solving 306 resetting port to default settings 140 upgrading 140 module memory 63 Wi-Fi Mini PC 145 monitor connecting 72, 78 not working 296 mouse installing 67 serial 67 MP3 151 playing 151 recording 151 N network accessing 143 Dial-Up Networking Wizard 143 networking wireless 143 O other documentation 40 overlay keys 90 P password deleting a supervisor 253 disabling a user 255 supervisor set up 252 types 251 passwords instant, using 252 setting 251 PC Card checklist 302 CIS (Card...
... port 140 problem solving 306 resetting port to default settings 140 upgrading 140 module memory 63 Wi-Fi Mini PC 145 monitor connecting 72, 78 not working 296 mouse installing 67 serial 67 MP3 151 playing 151 recording 151 N network accessing 143 Dial-Up Networking Wizard 143 networking wireless 143 O other documentation 40 overlay keys 90 P password deleting a supervisor 253 disabling a user 255 supervisor set up 252 types 251 passwords instant, using 252 setting 251 PC Card checklist 302 CIS (Card...


