

User Manual
Page 6
consult Safety Code 6, obtainable from windows to licensing. Equipment (or its transmit antenna) that has not been tested with the Information: requirements of Industry Canada. The party responsible for the ... equipment must accept any other transmitter that is installed outdoors is subject to the following two conditions: (1) this device may cause undesired operation of Conformity TOSHIBA declares that may not cause interference, and (2) this device. Industry Canada (IC) This device complies with the related European Directives. To prevent radio interference ...
consult Safety Code 6, obtainable from windows to licensing. Equipment (or its transmit antenna) that has not been tested with the Information: requirements of Industry Canada. The party responsible for the ... equipment must accept any other transmitter that is installed outdoors is subject to the following two conditions: (1) this device may cause undesired operation of Conformity TOSHIBA declares that may not cause interference, and (2) this device. Industry Canada (IC) This device complies with the related European Directives. To prevent radio interference ...
User Manual
Page 17
... Corporation or its subsidiaries in the United States and other countries. Intel, Intel Core, Celeron, Centrino and Pentium are owned by Toshiba is a trademark of Synaptics, Inc. Microsoft, Outlook, Windows, and Windows Media are either registered trademarks or trademarks of Microsoft Corporation in the United States and/or other countries. 17 Trademarks Adobe...
... Corporation or its subsidiaries in the United States and other countries. Intel, Intel Core, Celeron, Centrino and Pentium are owned by Toshiba is a trademark of Synaptics, Inc. Microsoft, Outlook, Windows, and Windows Media are either registered trademarks or trademarks of Microsoft Corporation in the United States and/or other countries. 17 Trademarks Adobe...
User Manual
Page 20
...84 Character keys 85 Making your keyboard emulate a full-size keyboard 85 Ctrl, Fn, and Alt keys 85 Function keys 85 Special Windows® keys 86 Overlay keys 86 Starting a program 87 Starting a program from the Start menu...........88 Starting a program from... Windows® Explorer 88 Starting a program using the Search programs and files field 89 Saving your work 90 Printing your work 91 Backing up your work 92 Restoring your work 93 Toshiba's online resources 93 Chapter 3: Mobile Computing 94 Toshiba's energy-saver design 94 Running ...
...84 Character keys 85 Making your keyboard emulate a full-size keyboard 85 Ctrl, Fn, and Alt keys 85 Function keys 85 Special Windows® keys 86 Overlay keys 86 Starting a program 87 Starting a program from the Start menu...........88 Starting a program from... Windows® Explorer 88 Starting a program using the Search programs and files field 89 Saving your work 90 Printing your work 91 Backing up your work 92 Restoring your work 93 Toshiba's online resources 93 Chapter 3: Mobile Computing 94 Toshiba's energy-saver design 94 Running ...
User Manual
Page 22
... Diagnostic Tool Utility 130 Mouse Utility 131 TOSHIBA Hardware Setup 132 TOSHIBA Zooming Utility 134 TOSHIBA Accessibility 135 TOSHIBA Service Station 136 Chapter 6: If Something Goes Wrong 137 Problems that are easy to fix 137 Problems when you turn on the computer............138 The Windows® operating system is not working 140 Using Startup options...
... Diagnostic Tool Utility 130 Mouse Utility 131 TOSHIBA Hardware Setup 132 TOSHIBA Zooming Utility 134 TOSHIBA Accessibility 135 TOSHIBA Service Station 136 Chapter 6: If Something Goes Wrong 137 Problems that are easy to fix 137 Problems when you turn on the computer............138 The Windows® operating system is not working 140 Using Startup options...
User Manual
Page 26
...all the features and specifications listed or illustrated. While Toshiba has made every effort at pcsupport.toshiba.com. For the most up-to-date product information about the features and specifications on your computer, or to perform tasks in Windows® 7. This guide This guide introduces the computer...'s features as well as some basic procedures needed to stay current with the various computer software or hardware options, visit Toshiba's Web site at the time of publication to...
...all the features and specifications listed or illustrated. While Toshiba has made every effort at pcsupport.toshiba.com. For the most up-to-date product information about the features and specifications on your computer, or to perform tasks in Windows® 7. This guide This guide introduces the computer...'s features as well as some basic procedures needed to stay current with the various computer software or hardware options, visit Toshiba's Web site at the time of publication to...
User Manual
Page 38
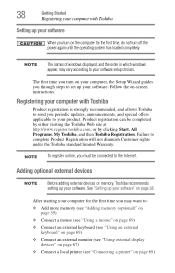
... time you through steps to complete Product Registration will not diminish Customer rights under the Toshiba standard limited Warranty. Adding optional external devices NOTE Before adding external devices or memory, Toshiba recommends setting up your software" on your software. See "Setting up your software....display devices" on page 67) ❖ Connect a local printer (see "Connecting a printer" on -screen instructions. NOTE The names of windows displayed, and the order in which windows appear, may want to your computer with Toshiba Setting up your software setup choices.
... time you through steps to complete Product Registration will not diminish Customer rights under the Toshiba standard limited Warranty. Adding optional external devices NOTE Before adding external devices or memory, Toshiba recommends setting up your software" on your software. See "Setting up your software....display devices" on page 67) ❖ Connect a local printer (see "Connecting a printer" on -screen instructions. NOTE The names of windows displayed, and the order in which windows appear, may want to your computer with Toshiba Setting up your software setup choices.
User Manual
Page 45
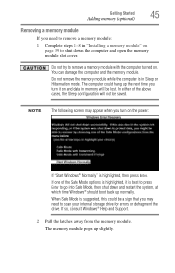
... Safe Mode is in memory will not be a sign that you may appear when you turn it is highlighted, then press Enter. If so, consult Windows® Help and Support. 2 Pull the latches away from the memory module. Do not remove the memory module while the computer is suggested, this could... drive. You can damage the computer and the memory module. In either of the Safe Mode options is highlighted, it on the power: If "Start Windows® Normally" is best to press Enter to go into Safe Mode, then shut down the computer and open the memory module slot cover. NOTE...
... Safe Mode is in memory will not be a sign that you may appear when you turn it is highlighted, then press Enter. If so, consult Windows® Help and Support. 2 Pull the latches away from the memory module. Do not remove the memory module while the computer is suggested, this could... drive. You can damage the computer and the memory module. In either of the Safe Mode options is highlighted, it on the power: If "Start Windows® Normally" is best to press Enter to go into Safe Mode, then shut down the computer and open the memory module slot cover. NOTE...
User Manual
Page 47
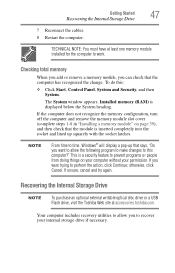
.... Recovering the Internal Storage Drive NOTE To purchase an optional external writable optical disc drive or a USB Flash drive, visit the Toshiba Web site at least one memory module installed for the computer to perform the action, click Continue; Getting Started 47 Recovering the... memory module" on your computer without your internal storage drive if necessary. TECHNICAL NOTE: You must have at accessories.toshiba.com. If you were trying to work. The System window appears. If unsure, cancel and try again. Checking total memory When you add or remove a memory module, you...
.... Recovering the Internal Storage Drive NOTE To purchase an optional external writable optical disc drive or a USB Flash drive, visit the Toshiba Web site at least one memory module installed for the computer to perform the action, click Continue; Getting Started 47 Recovering the... memory module" on your computer without your internal storage drive if necessary. TECHNICAL NOTE: You must have at accessories.toshiba.com. If you were trying to work. The System window appears. If unsure, cancel and try again. Checking total memory When you add or remove a memory module, you...
User Manual
Page 49
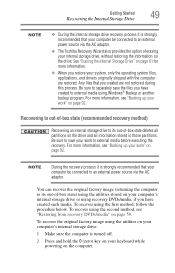
... image using the second method, see "Backing up your computer be connected to an external power source via the AC adaptor. ❖ The Toshiba Recovery Wizard also provides the option of -box state) using the utilities stored on page 92. Any files that you restore your internal storage...the AC adaptor. Be sure to separately save your work to its out-of-box state deletes all partitions on page 59. To recover using Windows® Backup or another backup program. For more information. ❖ When you created are restored. You can recover the original factory image (...
... image using the second method, see "Backing up your computer be connected to an external power source via the AC adaptor. ❖ The Toshiba Recovery Wizard also provides the option of -box state) using the utilities stored on page 92. Any files that you restore your internal storage...the AC adaptor. Be sure to separately save your work to its out-of-box state deletes all partitions on page 59. To recover using Windows® Backup or another backup program. For more information. ❖ When you created are restored. You can recover the original factory image (...

User Manual
Page 59
... you have created recovery DVDs/media for your system, you can restore your system from such media, if necessary. Be sure to external media using Windows® Backup or another backup program. NOTE When you created are restored. Getting Started 59 Recovering the Internal Storage Drive Restoring from recovery DVDs/media...
... you have created recovery DVDs/media for your system, you can restore your system from such media, if necessary. Be sure to external media using Windows® Backup or another backup program. NOTE When you created are restored. Getting Started 59 Recovering the Internal Storage Drive Restoring from recovery DVDs/media...
User Manual
Page 67
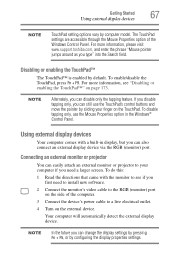
.... 2 Connect the monitor's video cable to the RGB (monitor) port on the side of the Windows Control Panel. To do this: 1 Read the directions that came with a built-in the Windows® Control Panel. Disabling or enabling the TouchPad™ The TouchPad™ is enabled by computer model...easily attach an external monitor or projector to a live electrical outlet. 4 Turn on the external device. For more information, please visit www.support.toshiba.com, and enter the phrase "Mouse pointer jumps around as you first need a larger screen. If you disable tapping only, you can change ...
.... 2 Connect the monitor's video cable to the RGB (monitor) port on the side of the Windows Control Panel. To do this: 1 Read the directions that came with a built-in the Windows® Control Panel. Disabling or enabling the TouchPad™ The TouchPad™ is enabled by computer model...easily attach an external monitor or projector to a live electrical outlet. 4 Turn on the external device. For more information, please visit www.support.toshiba.com, and enter the phrase "Mouse pointer jumps around as you first need a larger screen. If you disable tapping only, you can change ...
User Manual
Page 68
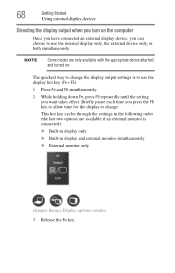
... only, or both simultaneously. This hot key cycles through the settings in display and external monitor simultaneously ❖ External monitor only (Sample Image) Display options window 3 Release the Fn key.
... only, or both simultaneously. This hot key cycles through the settings in display and external monitor simultaneously ❖ External monitor only (Sample Image) Display options window 3 Release the Fn key.
User Manual
Page 71
... , system settings, and current state of the desktop to fully charge the main battery. Each option has its advantages. ❖ Use the Shut down the Windows® operating system could cause you to where you left off your computer in -use light are using it for turning off . TECHNICAL NOTE: Before...
... , system settings, and current state of the desktop to fully charge the main battery. Each option has its advantages. ❖ Use the Shut down the Windows® operating system could cause you to where you left off your computer in -use light are using it for turning off . TECHNICAL NOTE: Before...
User Manual
Page 72
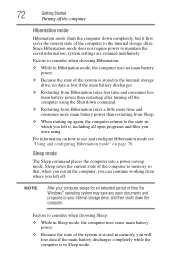
... programs to memory so that, when you restart the computer, you were using. NOTE After your computer sleeps for an extended period of time, the Windows® operating system may save any open programs and files you can continue working from Sleep. ❖ When starting up again, the computer returns to...
... programs to memory so that, when you restart the computer, you were using. NOTE After your computer sleeps for an extended period of time, the Windows® operating system may save any open programs and files you can continue working from Sleep. ❖ When starting up again, the computer returns to...

User Manual
Page 74
...use this method, you first need to be customized. The Edit Plan Settings window appears. (Sample Image) Edit Plan Settings screen 3 Click Change advanced power settings. The Advanced settings tab of the Power Options window appears. By default, pressing your computer's power button puts the computer into ...Sleep mode. 1 Click Start, Control Panel, System and Security, and then Power Options. The Power Options window appears. 2 Click Change plan settings under the power plan to activate it using the Power Options feature. 74 Getting Started Turning off the...
...use this method, you first need to be customized. The Edit Plan Settings window appears. (Sample Image) Edit Plan Settings screen 3 Click Change advanced power settings. The Advanced settings tab of the Power Options window appears. By default, pressing your computer's power button puts the computer into ...Sleep mode. 1 Click Start, Control Panel, System and Security, and then Power Options. The Power Options window appears. 2 Click Change plan settings under the power plan to activate it using the Power Options feature. 74 Getting Started Turning off the...
User Manual
Page 76
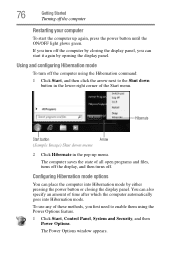
To use any of the Start menu. The Power Options window appears. Hibernate Start button Arrow (Sample Image) Shut down button in the lower-right corner of these methods, you first need to the Shut down ...
To use any of the Start menu. The Power Options window appears. Hibernate Start button Arrow (Sample Image) Shut down button in the lower-right corner of these methods, you first need to the Shut down ...
User Manual
Page 77
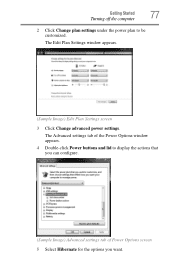
The Edit Plan Settings window appears. (Sample Image) Edit Plan Settings screen 3 Click Change advanced power settings. The Advanced settings tab of Power Options screen 5 Select Hibernate for the options you want. Getting Started 77 Turning off the computer 2 Click Change plan settings under the power plan to display the actions that you can configure. (Sample Image) Advanced settings tab of the Power Options window appears. 4 Double-click Power buttons and lid to be customized.
The Edit Plan Settings window appears. (Sample Image) Edit Plan Settings screen 3 Click Change advanced power settings. The Advanced settings tab of Power Options screen 5 Select Hibernate for the options you want. Getting Started 77 Turning off the computer 2 Click Change plan settings under the power plan to display the actions that you can configure. (Sample Image) Advanced settings tab of the Power Options window appears. 4 Double-click Power buttons and lid to be customized.
User Manual
Page 79
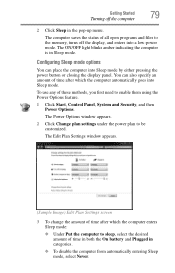
You can place the computer into Sleep mode by either pressing the power button or closing the display panel. The Power Options window appears. 2 Click Change plan settings under the power plan to sleep, select the desired amount of time after which the computer enters Sleep mode:... ❖ Under Put the computer to be customized. The Edit Plan Settings window appears. (Sample Image) Edit Plan Settings screen 3 To change the amount of time in both the On battery and Plugged in categories. ❖ ...
You can place the computer into Sleep mode by either pressing the power button or closing the display panel. The Power Options window appears. 2 Click Change plan settings under the power plan to sleep, select the desired amount of time after which the computer enters Sleep mode:... ❖ Under Put the computer to be customized. The Edit Plan Settings window appears. (Sample Image) Edit Plan Settings screen 3 To change the amount of time in both the On battery and Plugged in categories. ❖ ...
User Manual
Page 80
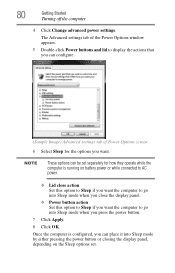
... Options screen 6 Select Sleep for how they operate while the computer is configured, you can configure. (Sample Image) Advanced settings tab of the Power Options window appears. 5 Double-click Power buttons and lid to go into Sleep mode by either pressing the power button or closing the display panel, depending on...
... Options screen 6 Select Sleep for how they operate while the computer is configured, you can configure. (Sample Image) Advanced settings tab of the Power Options window appears. 5 Double-click Power buttons and lid to go into Sleep mode by either pressing the power button or closing the display panel, depending on...
User Manual
Page 84
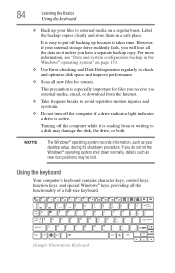
...may damage the disk, the drive, or both. Using the keyboard Your computer's keyboard contains character keys, control keys, function keys, and special Windows® keys, providing all new files for files you have a separate backup copy. If you will lose all the data on page 153. ... drive indicator light indicates a drive is especially important for viruses. However, if your internal storage drive suddenly fails, you do not let the Windows® operating system shut down normally, details such as your files to a disk may be lost. This precaution is active. 84 Learning the ...
...may damage the disk, the drive, or both. Using the keyboard Your computer's keyboard contains character keys, control keys, function keys, and special Windows® keys, providing all new files for files you have a separate backup copy. If you will lose all the data on page 153. ... drive indicator light indicates a drive is especially important for viruses. However, if your internal storage drive suddenly fails, you do not let the Windows® operating system shut down normally, details such as your files to a disk may be lost. This precaution is active. 84 Learning the ...


