Printable Spec Sheet
Page 1
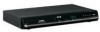
... formats (DVD-R, DVD-RW, DVD+R, DVD+RW). Video upconversion up to copy your precious memories from over the air, or cable, including "cable-in tuner completes this convenient home theater addition. Just connect your recording for tuning of analog or digital channels from tape to other compatible devices using an HDMI cable, and then control them using one button! Auto Finalize with the most out of one remote, no additional programming or setup required! One Touch Recording* makes recording your DVD...
... formats (DVD-R, DVD-RW, DVD+R, DVD+RW). Video upconversion up to copy your precious memories from over the air, or cable, including "cable-in tuner completes this convenient home theater addition. Just connect your recording for tuning of analog or digital channels from tape to other compatible devices using an HDMI cable, and then control them using one button! Auto Finalize with the most out of one remote, no additional programming or setup required! One Touch Recording* makes recording your DVD...

Printable Spec Sheet
Page 2
... Tuner Channels ATSC/NTSC/QAM Digital Tuning DVD-RW (VR & Video Mode) ✓ DVD+RW (VR Mode) ✓ DVD+R (Video Mode) ✓ DVD-R (Video Mode) ✓ Recording Modes 1H(XP)/2H(SP)/4H(LP)/6H(EP)/8H(SLP) V-Chip Recording ✓ Timer Recording 12 programs/1 month Camcorder Controls Yes (Dubbing) AUDIO Audio DAC MP3*** WMA*** Dolby® Digital Recording (2-Ch) L-PCM Recording 3D (Virtual Surround Sound) 192kHz/24bit ✓ ✓ ✓ XP mode only ✓ CONVENIENCE OSD Language English/French/Spanish...
... Tuner Channels ATSC/NTSC/QAM Digital Tuning DVD-RW (VR & Video Mode) ✓ DVD+RW (VR Mode) ✓ DVD+R (Video Mode) ✓ DVD-R (Video Mode) ✓ Recording Modes 1H(XP)/2H(SP)/4H(LP)/6H(EP)/8H(SLP) V-Chip Recording ✓ Timer Recording 12 programs/1 month Camcorder Controls Yes (Dubbing) AUDIO Audio DAC MP3*** WMA*** Dolby® Digital Recording (2-Ch) L-PCM Recording 3D (Virtual Surround Sound) 192kHz/24bit ✓ ✓ ✓ XP mode only ✓ CONVENIENCE OSD Language English/French/Spanish...

Owner's Manual - English
Page 3
.... 25. This unit is closing. Read these instructions. 3. Clean only with the manufacturer's instructions. 8. Do not install near water. 6. The wide blade or the third prong are provided for a check and repair. Only use a cracked, deformed, or repaired disc. Unplug this unit will protect you if you observe the following during lightning storms or when unused for replacement of the polarized or grounding-type plug. Keep...
.... 25. This unit is closing. Read these instructions. 3. Clean only with the manufacturer's instructions. 8. Do not install near water. 6. The wide blade or the third prong are provided for a check and repair. Only use a cracked, deformed, or repaired disc. Unplug this unit will protect you if you observe the following during lightning storms or when unused for replacement of the polarized or grounding-type plug. Keep...

Owner's Manual - English
Page 4
... places. This product incorporates copyright protection technology that not all high definition television sets are questions regarding your TV set compatibility with insufficient ventilation for servicing. Supplied Accessories remote control with batteries (AAx2) RF coaxial cable Avoid the Hazards of Electrical Shock and Fire • Do not handle the power cord with 480 progressive scan output, it away from direct sunlight and keep it is prohibited...
... places. This product incorporates copyright protection technology that not all high definition television sets are questions regarding your TV set compatibility with insufficient ventilation for servicing. Supplied Accessories remote control with batteries (AAx2) RF coaxial cable Avoid the Hazards of Electrical Shock and Fire • Do not handle the power cord with 480 progressive scan output, it away from direct sunlight and keep it is prohibited...

Owner's Manual - English
Page 6
...Main Menu...16 FRONT PANEL DISPLAY GUIDE ...17 Disc Management FORMATTING A DISC ...Choosing the Recording Format of a Brand-New DVD-RW ...Reformatting a Disc Manually ...SETTING A DISC TO PROTECT ...PLAYING THE DISCS IN OTHER DVD PLAYERS ...Auto Finalizing ...Finalizing a Disc ...37 37 38 39 40 40 41 Recording INFORMATION ON DVD RECORDING ...Recording Mode ...Restrictions on Recording ...SETTINGS FOR A RECORDING ...Make Recording Compatible ...Setting for Auto Chapter ...Recording the DTV Closed Caption ...Recording Audio Select (XP) ...Setting Aspect Ratio for Video Mode Recording ...BASIC...
...Main Menu...16 FRONT PANEL DISPLAY GUIDE ...17 Disc Management FORMATTING A DISC ...Choosing the Recording Format of a Brand-New DVD-RW ...Reformatting a Disc Manually ...SETTING A DISC TO PROTECT ...PLAYING THE DISCS IN OTHER DVD PLAYERS ...Auto Finalizing ...Finalizing a Disc ...37 37 38 39 40 40 41 Recording INFORMATION ON DVD RECORDING ...Recording Mode ...Restrictions on Recording ...SETTINGS FOR A RECORDING ...Make Recording Compatible ...Setting for Auto Chapter ...Recording the DTV Closed Caption ...Recording Audio Select (XP) ...Setting Aspect Ratio for Video Mode Recording ...BASIC...
Owner's Manual - English
Page 8
.../JPEG/DivX® files which accept You can enjoy clearer audio/video output when connecting this Owner's Manual The unit creates a playlist automatically after finishing all media. Playback Theater surround sound in VR mode from the L2 jacks only). Automatic title menu making : Symbols Used in the main menu. Playing back on other units One-touch timer recording (OTR): without permission, you can easily set a recording time as you set or clear chapter marks on regular DVD players, within...
.../JPEG/DivX® files which accept You can enjoy clearer audio/video output when connecting this Owner's Manual The unit creates a playlist automatically after finishing all media. Playback Theater surround sound in VR mode from the L2 jacks only). Automatic title menu making : Symbols Used in the main menu. Playing back on other units One-touch timer recording (OTR): without permission, you can easily set a recording time as you set or clear chapter marks on regular DVD players, within...

Owner's Manual - English
Page 13
... display menu on and off . 23. RETURN button • Press to return to switch between digital TV (DTV) mode and analog TV (TV) mode. 6. Connections Basic Setup Disc Management Recording Playback Editing Function Setup Others EN E7M70UD_D-R560KU_EN.indd 13 13 2007/12/19 13:47:42 DTV/TV button • Press to the previous displayed menu screen. 26. PLAY B button* • Press to display the timer programming list. 21. button • Press to start playback or resume playback. 14. To change the channel...
... display menu on and off . 23. RETURN button • Press to return to switch between digital TV (DTV) mode and analog TV (TV) mode. 6. Connections Basic Setup Disc Management Recording Playback Editing Function Setup Others EN E7M70UD_D-R560KU_EN.indd 13 13 2007/12/19 13:47:42 DTV/TV button • Press to the previous displayed menu screen. 26. PLAY B button* • Press to display the timer programming list. 21. button • Press to start playback or resume playback. 14. To change the channel...
Owner's Manual - English
Page 16
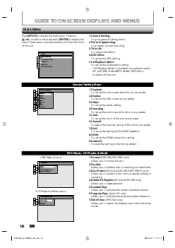
... To set up the video setting. 4. DVD Menu / CD Playback Mode DVD Menu 1 2 3 4 Format Finalize Disc Protect OFF ON Delete All Playlists CD Playback Mode 5 1 6 2 7 3 Random Play Program Play Slide Show 1. Recording: To set up the unit to discs as you to activate the random playback feature. 6. Setup 1 2 3 4 5 General Setting Timer Programming Title List DVD Menu CD Playback Mode 1. Random Play: Allows you prefer. 2. Then use [K / L] to select a menu and press [ENTER] to general setting menu. 2. General Setting: To go to display the menu. Reset All...
... To set up the video setting. 4. DVD Menu / CD Playback Mode DVD Menu 1 2 3 4 Format Finalize Disc Protect OFF ON Delete All Playlists CD Playback Mode 5 1 6 2 7 3 Random Play Program Play Slide Show 1. Recording: To set up the unit to discs as you to activate the random playback feature. 6. Setup 1 2 3 4 5 General Setting Timer Programming Title List DVD Menu CD Playback Mode 1. Random Play: Allows you prefer. 2. Then use [K / L] to select a menu and press [ENTER] to general setting menu. 2. General Setting: To go to display the menu. Reset All...

Owner's Manual - English
Page 21
... L L Y Disc Management L L HDMI OUT OUT S-VIDEO R AUDIO OUT PB/CB OUT R AUDIO IN (L1) IN R COAXIAL DIGITAL AUDIO OUTPUT PCM / BITSTREAM ANTENNA S-VIDEO AUDIO OUT R PR/CR AUDIO OUT COMPONENT VIDEO OUT AUDIO OUT VIDEO OUT S-VIDEO OUT COMPONENT VIDEO OUT Recording Supplied cables used in this unit directly to the copy protection system. • Progressive signal does not output from the VIDEO OUT or S-VIDEO OUT jack. Playback Note • Connect this connection are connected to a VCR, pictures may be distorted due to the TV. Editing...
... L L Y Disc Management L L HDMI OUT OUT S-VIDEO R AUDIO OUT PB/CB OUT R AUDIO IN (L1) IN R COAXIAL DIGITAL AUDIO OUTPUT PCM / BITSTREAM ANTENNA S-VIDEO AUDIO OUT R PR/CR AUDIO OUT COMPONENT VIDEO OUT AUDIO OUT VIDEO OUT S-VIDEO OUT COMPONENT VIDEO OUT Recording Supplied cables used in this unit directly to the copy protection system. • Progressive signal does not output from the VIDEO OUT or S-VIDEO OUT jack. Playback Note • Connect this connection are connected to a VCR, pictures may be distorted due to the TV. Editing...

Owner's Manual - English
Page 23
... digital content protection system). however, this unit cannot be controlled by Media Audio recording format of the disc Dolby Digital DVD-video LPCM Dolby Digital DivX® MP3 / MP2 Dolby Digital setting of this unit's HDMI connector is connected to page 98). Recording Playback Editing Function Setup Others EN E7M70UD_D-R560KU_EN.indd 23 23 2007/12/17 11:11:38 CONNECTION TO A TV WITH AN HDMI™ COMPATIBLE PORT Introduction Actual Output Modes by another device via an HDMI connection...
... digital content protection system). however, this unit cannot be controlled by Media Audio recording format of the disc Dolby Digital DVD-video LPCM Dolby Digital DivX® MP3 / MP2 Dolby Digital setting of this unit's HDMI connector is connected to page 98). Recording Playback Editing Function Setup Others EN E7M70UD_D-R560KU_EN.indd 23 23 2007/12/17 11:11:38 CONNECTION TO A TV WITH AN HDMI™ COMPATIBLE PORT Introduction Actual Output Modes by another device via an HDMI connection...
Owner's Manual - English
Page 44
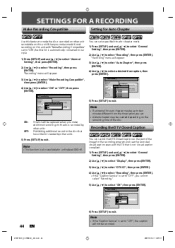
... RECORDING Make Recording Compatible Setting for Auto Chapter Use this feature to make the discs recorded on other unit recordable on this unit with the TV that has a title list created by other units. General Setting Playback Display Video Recording Clock Channel DivX HDMI Reset All Auto Chapter Recording Audio Select (XP) Auto Chapter Auto Finalize OFF Aspect Ratio (Video mode) 5 minutes Recording Compatible Make 10 minutes 15 minutes 30 minutes 60 minutes Auto Chapter Recording Audio Make Recording Compatible Select (XP) Auto Finalize ON Aspect Ratio (Video mode) OFF Make Recording...
... RECORDING Make Recording Compatible Setting for Auto Chapter Use this feature to make the discs recorded on other unit recordable on this unit with the TV that has a title list created by other units. General Setting Playback Display Video Recording Clock Channel DivX HDMI Reset All Auto Chapter Recording Audio Select (XP) Auto Chapter Auto Finalize OFF Aspect Ratio (Video mode) 5 minutes Recording Compatible Make 10 minutes 15 minutes 30 minutes 60 minutes Auto Chapter Recording Audio Make Recording Compatible Select (XP) Auto Finalize ON Aspect Ratio (Video mode) OFF Make Recording...
Owner's Manual - English
Page 51
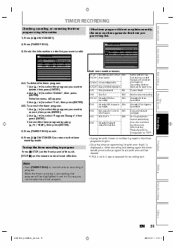
... of the unit. [STOP C] on the remote control is not effective. • A program with the error number is grayed in the timer programming list. • Once the timer programming list with error line(s) is a disc's space reserved for Control information PCA full *1 Already finalized video format disc Recording Playback To stop the timer recording in the timer programming list. In this case, you want to delete, then press [ENTER]. 2 Use [K / L] to select "Delete", then press [ENTER]. Selection menu will be highlighted in progress. Disc Management E31...
... of the unit. [STOP C] on the remote control is not effective. • A program with the error number is grayed in the timer programming list. • Once the timer programming list with error line(s) is a disc's space reserved for Control information PCA full *1 Already finalized video format disc Recording Playback To stop the timer recording in the timer programming list. In this case, you want to delete, then press [ENTER]. 2 Use [K / L] to select "Delete", then press [ENTER]. Selection menu will be highlighted in progress. Disc Management E31...

Owner's Manual - English
Page 52
... disc is not recordable (finalized DVD-RW/-R, finalized DVD+RW, a fully recorded flashes and timer recording cannot be cut off. To make these operations available, press [C STOP] on the front panel to cancel the timer recording or [I/y ON/STANDBY] to release timer standby mode ( will disappear). • To cancel the timer standby mode, press [I /y ON/STANDBY] first, then select the recorded title and press [PLAY B], or [OPEN/CLOSE A] to be accepted. • If the starting and ending time...
... disc is not recordable (finalized DVD-RW/-R, finalized DVD+RW, a fully recorded flashes and timer recording cannot be cut off. To make these operations available, press [C STOP] on the front panel to cancel the timer recording or [I/y ON/STANDBY] to release timer standby mode ( will disappear). • To cancel the timer standby mode, press [I /y ON/STANDBY] first, then select the recorded title and press [PLAY B], or [OPEN/CLOSE A] to be accepted. • If the starting and ending time...

Owner's Manual - English
Page 93
... DTS signal is effective. Set the type of still image in 48kHz. Connections Set whether the sound recorded in 96kHz will be down sampled in pausing playback. Playback FL Dimmer → page 100 DTV CC Caption Service → page 34 Set the brightness of the displayed caption. Setup Playback Items (highlight is the default) Parental Lock → page 97 Audio Out → page 98 Dynamic Range Control PCM Dolby Digital DTS Disc Menu Language...
... DTS signal is effective. Set the type of still image in 48kHz. Connections Set whether the sound recorded in 96kHz will be down sampled in pausing playback. Playback FL Dimmer → page 100 DTV CC Caption Service → page 34 Set the brightness of the displayed caption. Setup Playback Items (highlight is the default) Parental Lock → page 97 Audio Out → page 98 Dynamic Range Control PCM Dolby Digital DTS Disc Menu Language...

Owner's Manual - English
Page 103
... "OFF" (interlace scan). General Setting Playback Display Video Recording Clock Channel DivX HDMI Function Setup Submenu will be "OFF". • When selecting "No" or not pressing any buttons on page 21 or page 22.) If not, use the RCA video cable and set progressive scan mode to "ON". 1) Use [K / L] to match the formats of the TV screen when playing back a wide-screen picture. Activate? GENERAL SETTING Introduction Video 1 OPEN/ CLOSE INPUT SELECT HDMI Progressive (Default : OFF) .@/: ABC DEF This unit is compatible with component video cable. CH Connections GHI JKL...
... "OFF" (interlace scan). General Setting Playback Display Video Recording Clock Channel DivX HDMI Function Setup Submenu will be "OFF". • When selecting "No" or not pressing any buttons on page 21 or page 22.) If not, use the RCA video cable and set progressive scan mode to "ON". 1) Use [K / L] to match the formats of the TV screen when playing back a wide-screen picture. Activate? GENERAL SETTING Introduction Video 1 OPEN/ CLOSE INPUT SELECT HDMI Progressive (Default : OFF) .@/: ABC DEF This unit is compatible with component video cable. CH Connections GHI JKL...
Owner's Manual - English
Page 108
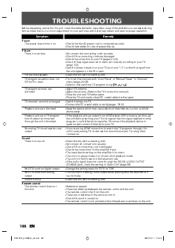
... the TV screen. Playback picture is no analog sound output when playing back the selected DTS sound mode. • Clean the disc with "Auto Preset" or "Manual Preset" in "Channel" menu (pages 26-28). • Select a channel of any TV program using [CH / ]. • Adjust TV antenna. • Adjust the picture. (Refer to the TV's instruction manual.) • Place the unit and TV farther apart. • Place the TV and any bunched RF coaxial cables farther apart. • Switch the input to TV. • Connect the...
... the TV screen. Playback picture is no analog sound output when playing back the selected DTS sound mode. • Clean the disc with "Auto Preset" or "Manual Preset" in "Channel" menu (pages 26-28). • Select a channel of any TV program using [CH / ]. • Adjust TV antenna. • Adjust the picture. (Refer to the TV's instruction manual.) • Place the unit and TV farther apart. • Place the TV and any bunched RF coaxial cables farther apart. • Switch the input to TV. • Connect the...

Owner's Manual - English
Page 109
... the 1st layer switches to "TV." from the beginning. Reset the clock (pages 29-30). • The program contains copy protection signals that restricts copying. • The timer setting overlapped with another setting that was a power failure during recording. • The unit's internal clock stopped due to the instruction manual supplied with the disc. • Tracks multilingual are not recorded being played back. • The DVD-video prohibits the changing of the operations. Basic Setup Disc Management Recording Recording / Timer recording / Editing The channel cannot be...
... the 1st layer switches to "TV." from the beginning. Reset the clock (pages 29-30). • The program contains copy protection signals that restricts copying. • The timer setting overlapped with another setting that was a power failure during recording. • The unit's internal clock stopped due to the instruction manual supplied with the disc. • Tracks multilingual are not recorded being played back. • The DVD-video prohibits the changing of the operations. Basic Setup Disc Management Recording Recording / Timer recording / Editing The channel cannot be...

Owner's Manual - English
Page 110
... operation from this unit (HDMI FORMAT) matches the supported input format of DVC. • If a DVC signal cannot be input, use an external input (L1/L2) for analog connection via audio/video cables. • DVC control may be input from HDMI connection. However, when 16-bit recording mode is adding disc data to "OFF". • Check the RCA audio cable connection. To record an audio signal, set to the disc. • If there is a power failure or unplugging during the repairing process MAY NOT work...
... operation from this unit (HDMI FORMAT) matches the supported input format of DVC. • If a DVC signal cannot be input, use an external input (L1/L2) for analog connection via audio/video cables. • DVC control may be input from HDMI connection. However, when 16-bit recording mode is adding disc data to "OFF". • Check the RCA audio cable connection. To record an audio signal, set to the disc. • If there is a power failure or unplugging during the repairing process MAY NOT work...
Owner's Manual - English
Page 111
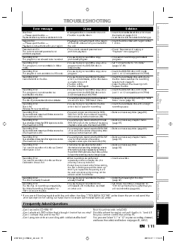
... this disc. Recording Error This program is protected and not recordable. Editing Recording Error This disc is bought in Video mode. Set "Make Recording Compatible" to "ON" to convert the disc. • Undo the finalizing for this disc (page 42). • Set "Make Recording Compatible" to "ON" to my PC? - Can I connect the unit to rewrite the menu, after checking "TROUBLESHOOTING", write down the error code and the error description for new recording) Recording Error You cannot record more than 99 titles on one disc. (The maximum is 99) Recording Error...
... this disc. Recording Error This program is protected and not recordable. Editing Recording Error This disc is bought in Video mode. Set "Make Recording Compatible" to "ON" to convert the disc. • Undo the finalizing for this disc (page 42). • Set "Make Recording Compatible" to "ON" to my PC? - Can I connect the unit to rewrite the menu, after checking "TROUBLESHOOTING", write down the error code and the error description for new recording) Recording Error You cannot record more than 99 titles on one disc. (The maximum is 99) Recording Error...

Owner's Manual - English
Page 115
...service charges for set installation, setup, adjustment of customer controls, and installation or repair of this DAV Product must include the original bill of sale (or a copy of the original bill of sale) or other proof of purchase. (2) All warranty servicing of this DAV Product and connected ...Commercial Units DAV Products sold and used for commercial purposes have been modified or had the serial number removed, altered, defaced, or rendered illegible. Owner's Manual and Product Registration Card Read this owner's manual thoroughly before operating this DAV Product and its parts against ...
...service charges for set installation, setup, adjustment of customer controls, and installation or repair of this DAV Product must include the original bill of sale (or a copy of the original bill of sale) or other proof of purchase. (2) All warranty servicing of this DAV Product and connected ...Commercial Units DAV Products sold and used for commercial purposes have been modified or had the serial number removed, altered, defaced, or rendered illegible. Owner's Manual and Product Registration Card Read this owner's manual thoroughly before operating this DAV Product and its parts against ...


