
User Manual
Page 3
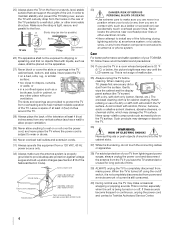
... doctor. • ALWAYS contact a service technician to come into your outlet, consult an electrician for replacement of the obsolete outlet. 10) Protect the power cord from being walked on an unstable cart, stand, or table. A grounding type plug has two blades and a third grounding prong. When a ... candles or other apparatus (including amplifiers) that it can be easily unplugged in case the product requires service. 21) NEVER route the product's power cord inside the TV contains glass and a toxic liquid. or areas subject to rain or moisture, does not operate normally, or has been ...
... doctor. • ALWAYS contact a service technician to come into your outlet, consult an electrician for replacement of the obsolete outlet. 10) Protect the power cord from being walked on an unstable cart, stand, or table. A grounding type plug has two blades and a third grounding prong. When a ... candles or other apparatus (including amplifiers) that it can be easily unplugged in case the product requires service. 21) NEVER route the product's power cord inside the TV contains glass and a toxic liquid. or areas subject to rain or moisture, does not operate normally, or has been ...
User Manual
Page 4
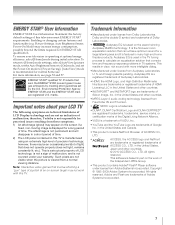
... Always unplug the TV before cleaning. The enclosed cleaning cloth is not a sign of your TOSHIBA TV, follow these sounds become frequent or continuous, unplug the power cord and contact a Toshiba Authorized Service Center. 4 Never spray volatile compounds such as insecticide on the rear of the ...objects of time. 39) ALWAYS unplug the TV to provide adequate protection against voltage surges and built-up . Never locate the antenna near overhead power lines or other electrical circuits. • Never attempt to a wall stud, pillar, or other place with a dry, soft cloth only ...
... Always unplug the TV before cleaning. The enclosed cleaning cloth is not a sign of your TOSHIBA TV, follow these sounds become frequent or continuous, unplug the power cord and contact a Toshiba Authorized Service Center. 4 Never spray volatile compounds such as insecticide on the rear of the ...objects of time. 39) ALWAYS unplug the TV to provide adequate protection against voltage surges and built-up . Never locate the antenna near overhead power lines or other electrical circuits. • Never attempt to a wall stud, pillar, or other place with a dry, soft cloth only ...
User Manual
Page 7
...• Manufactured under your warranty. Products that earn the ENERGY STAR prevent green house gas emissions by meeting strict guidelines set the Power-On mode to calculate an equalization solution that corrects time and frequency response problems in TV systems. This results in many high end...TV. Copyright © 1995-2009 Adobe Systems Incorporated. ENERGY STAR and the ENERGY STAR mark are trademarks of Adobe Systems Incorporated. 7 therefore, Toshiba is not responsible for a large listening area and it is based in part on the screen if a fixed, non-moving image is a ...
...• Manufactured under your warranty. Products that earn the ENERGY STAR prevent green house gas emissions by meeting strict guidelines set the Power-On mode to calculate an equalization solution that corrects time and frequency response problems in TV systems. This results in many high end...TV. Copyright © 1995-2009 Adobe Systems Incorporated. ENERGY STAR and the ENERGY STAR mark are trademarks of Adobe Systems Incorporated. 7 therefore, Toshiba is not responsible for a large listening area and it is based in part on the screen if a fixed, non-moving image is a ...
User Manual
Page 8
...Setting the PC Audio 50 Setting the On Timer 51 Setting the Sleep Timer 51 Automatic Power Down 52 No Signal Power Down 52 Power-On Mode 52 Blue Screen 52 TOSHIBA Illumination 52 Displaying TV status information 53 Viewing support information 53 Reset Factory Defaults 53 ...Understanding the auto power off feature 53 Understanding the last mode memory feature 53 Chapter 7: Picture and sound...
...Setting the PC Audio 50 Setting the On Timer 51 Setting the Sleep Timer 51 Automatic Power Down 52 No Signal Power Down 52 Power-On Mode 52 Blue Screen 52 TOSHIBA Illumination 52 Displaying TV status information 53 Viewing support information 53 Reset Factory Defaults 53 ...Understanding the auto power off feature 53 Understanding the last mode memory feature 53 Chapter 7: Picture and sound...
User Manual
Page 10
...•ColorMaster™ allows you to operate your LCD TV" (- pages 2-5). 2 Do not plug in any power cords until AFTER you have connected all cables and devices, plug in the power cords for controlling infrared remote-controlled devices through the TV (- pages 13-22). 5 See "Chapter 3: Using the... of your TV and other electronic device(s) to set -top box (in a proper location (- page 20). •IR OUT for your new Toshiba widescreen, integrated HD, LCD TV: •Integrated digital tuning (8VSB ATSC and QAM) eliminates the need for a separate digital converter set up your...
...•ColorMaster™ allows you to operate your LCD TV" (- pages 2-5). 2 Do not plug in any power cords until AFTER you have connected all cables and devices, plug in the power cords for controlling infrared remote-controlled devices through the TV (- pages 13-22). 5 See "Chapter 3: Using the... of your TV and other electronic device(s) to set -top box (in a proper location (- page 20). •IR OUT for your new Toshiba widescreen, integrated HD, LCD TV: •Integrated digital tuning (8VSB ATSC and QAM) eliminates the need for a separate digital converter set up your...
User Manual
Page 11
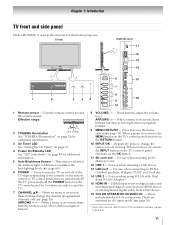
... IN - Point the remote control toward this manual for illustration purposes. Effective range: 2 TOSHIBA Illumination 16.4 ft (5m) See "TOSHIBA Illumination" on page 52 for additional information. 3 On Timer LED See "Setting the On Timer" on page 51. 4 Power On/Standby LED See "LED indications" on page 85 for 5 or more seconds to...
... IN - Point the remote control toward this manual for illustration purposes. Effective range: 2 TOSHIBA Illumination 16.4 ft (5m) See "TOSHIBA Illumination" on page 52 for additional information. 3 On Timer LED See "Setting the On Timer" on page 51. 4 Power On/Standby LED See "LED indications" on page 85 for 5 or more seconds to...

User Manual
Page 12
... of Dolby Laboratories. 12 Dolby and the double-D symbol are trademarks or registered trademarks of cable types and connections, see pages 13-20. TV back Power cord Cable Strap 1 2 3 4 5 6 1 HDMI IN -
... of Dolby Laboratories. 12 Dolby and the double-D symbol are trademarks or registered trademarks of cable types and connections, see pages 13-20. TV back Power cord Cable Strap 1 2 3 4 5 6 1 HDMI IN -
User Manual
Page 16
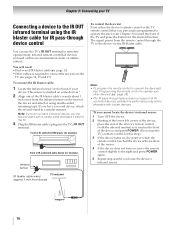
... (- Note: If you have a second device, coil the second wand with the infrared emitter) so it touches the front of the device and press POWER. (Do not use the TV's IR OUT terminal to the device via the IR blaster cable. Note: • To program the remote control to ... device) To control the device(s): Point either the device's remote control or the TV remote control (that you previously programmed to the right and press POWER again. 5 Repeat step 4 until you cannot locate the device's infrared sensor: 1 Turn OFF the device. 2 Starting at which the remote control touched the device...
... (- Note: If you have a second device, coil the second wand with the infrared emitter) so it touches the front of the device and press POWER. (Do not use the TV's IR OUT terminal to the device via the IR blaster cable. Note: • To program the remote control to ... device) To control the device(s): Point either the device's remote control or the TV remote control (that you previously programmed to the right and press POWER again. 5 Repeat step 4 until you cannot locate the device's infrared sensor: 1 Turn OFF the device. 2 Starting at which the remote control touched the device...
User Manual
Page 24
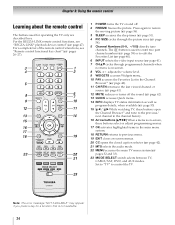
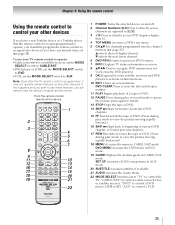
pages 26-27). 1 POWER turns the TV on -screen menus. 20 CC opens the closed caption selector (- page 51). 4 PIC SIZE cycles through programmed channels when no menu is ...
pages 26-27). 1 POWER turns the TV on -screen menus. 20 CC opens the closed caption selector (- page 51). 4 PIC SIZE cycles through programmed channels when no menu is ...
User Manual
Page 25
...wish to use the device's original remote control. "DVD" to control a VCR. 25 Point the remote control directly at the device. 16 17 18 19 1 POWER Turns the selected device on -screen menus. "CABLE/SAT" to directly access DVD chapters higher than 10. 4 TOP MENU Accesses a DVD's top menu. 5 ...operate, you must first program the remote control to recognize the device (if you will need to use those features, you have a non-Toshiba device or a Toshiba device that the remote control is programmed, it may not work on some DVD players). 9 OK Required by some satellite receivers and DVD ...
...wish to use the device's original remote control. "DVD" to control a VCR. 25 Point the remote control directly at the device. 16 17 18 19 1 POWER Turns the selected device on -screen menus. "CABLE/SAT" to directly access DVD chapters higher than 10. 4 TOP MENU Accesses a DVD's top menu. 5 ...operate, you must first program the remote control to recognize the device (if you will need to use those features, you have a non-Toshiba device or a Toshiba device that the remote control is programmed, it may not work on some DVD players). 9 OK Required by some satellite receivers and DVD ...

User Manual
Page 26
... MENU CH RTN/DVD RTN INFO OK B b C 3 c # RETURN EXIT/DVD CLEAR PAUSE/STEP PLAY STOP SKIP Z SKIP z REW FF MENU/DVD MENU Toshiba TV Sleep Picture Size FREEZE Power Digit 1 Digit 2 Digit 3 Digit 4 Digit 5 Digit 6 Digit 7 Digit 8 Digit 9 Digit 0 - (sub channel) Input Widgets Mute Quick Menu Volume... Return Exit Pause* Play* Stop* Skip REV* / DAY- Chapter 3: Using the remote control Remote control functional key chart REMOTE CONTROL KEY SLEEP PIC SIZE FREEZE POWER 1 2 3 4 5 6 7 8 9 0 - /100/ +10 INPUT WIDGETS MUTE QUICK VOL + - Top Menu DVD Return Display Enter Menu Up Menu Down Menu Left Menu...
... MENU CH RTN/DVD RTN INFO OK B b C 3 c # RETURN EXIT/DVD CLEAR PAUSE/STEP PLAY STOP SKIP Z SKIP z REW FF MENU/DVD MENU Toshiba TV Sleep Picture Size FREEZE Power Digit 1 Digit 2 Digit 3 Digit 4 Digit 5 Digit 6 Digit 7 Digit 8 Digit 9 Digit 0 - (sub channel) Input Widgets Mute Quick Menu Volume... Return Exit Pause* Play* Stop* Skip REV* / DAY- Chapter 3: Using the remote control Remote control functional key chart REMOTE CONTROL KEY SLEEP PIC SIZE FREEZE POWER 1 2 3 4 5 6 7 8 9 0 - /100/ +10 INPUT WIDGETS MUTE QUICK VOL + - Top Menu DVD Return Display Enter Menu Up Menu Down Menu Left Menu...

User Manual
Page 28
... CODE has this kind of device you will turn on the device, point the remote control at it, and press p. Note: • In addition to POWER, confirm that all listed codes, the necessary keys do not operate your device, use the remote control that came with the device. 5 Remember to set... remote control. If your device. For details on the TV remote control operate your device. To program your TV remote control to operate a non-Toshiba device (or a Toshiba device that works. 2 Set the MODE SELECT switch to the type of switch and does not respond to the codes for your VCR 28...
... CODE has this kind of device you will turn on the device, point the remote control at it, and press p. Note: • In addition to POWER, confirm that all listed codes, the necessary keys do not operate your device, use the remote control that came with the device. 5 Remember to set... remote control. If your device. For details on the TV remote control operate your device. To program your TV remote control to operate a non-Toshiba device (or a Toshiba device that works. 2 Set the MODE SELECT switch to the type of switch and does not respond to the codes for your VCR 28...

User Manual
Page 39
... menu, highlight Channel Browser Setup and press . Note: REGZA-LINK List will be automatically grayed out and set to off when Enable REGZA-LINK is powered off. 4 Press b or B to highlight ANT/CABLE List, and then press C or c to select On or Off. 5 Press b or B to highlight Inputs List, and then...
... menu, highlight Channel Browser Setup and press . Note: REGZA-LINK List will be automatically grayed out and set to off when Enable REGZA-LINK is powered off. 4 Press b or B to highlight ANT/CABLE List, and then press C or c to select On or Off. 5 Press b or B to highlight Inputs List, and then...

User Manual
Page 46
...on the TV control panel will appear when 10 minutes, 3 minutes, and 1 minute remain on the GameTimer®. • If the TV loses power with time remaining on the TV control panel are pressed. To unlock the control panel: Select Off in step 3 above. EXIT To unlock the Network... (by using the remote control. OK 2 Enter your settings from launching. "Input lock feature" on page 45.) Note: • A message will operate except POWER. 1 From the PREFERENCES menu, highlight Parental Control and Locks and press . page 45). Note: When Panel Lock is pressed, the TV will be displayed when...
...on the TV control panel will appear when 10 minutes, 3 minutes, and 1 minute remain on the GameTimer®. • If the TV loses power with time remaining on the TV control panel are pressed. To unlock the control panel: Select Off in step 3 above. EXIT To unlock the Network... (by using the remote control. OK 2 Enter your settings from launching. "Input lock feature" on page 45.) Note: • A message will operate except POWER. 1 From the PREFERENCES menu, highlight Parental Control and Locks and press . page 45). Note: When Panel Lock is pressed, the TV will be displayed when...
User Manual
Page 47
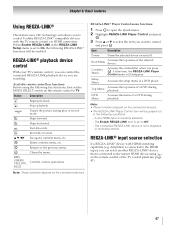
... the MODE SELECT switch on the connected devices. • The REGZA-LINK Player Control item will be enabled. OK Item Description Power Turns the selected device on the connected devices. REGZA-LINK® input source selection If a REGZA-LINK® device with the...Skips backward. H B b C c Rewinds/reverses. EXIT Closes the menu. Note: • These functions depend on the remote control to control Toshiba REGZA-LINK® compatible devices with HDMI switching capability (e.g. Available remote control key functions: Before using + on the remote control or the TV control ...
... the MODE SELECT switch on the connected devices. • The REGZA-LINK Player Control item will be enabled. OK Item Description Power Turns the selected device on the connected devices. REGZA-LINK® input source selection If a REGZA-LINK® device with the...Skips backward. H B b C c Rewinds/reverses. EXIT Closes the menu. Note: • These functions depend on the remote control to control Toshiba REGZA-LINK® compatible devices with HDMI switching capability (e.g. Available remote control key functions: Before using + on the remote control or the TV control ...
User Manual
Page 48
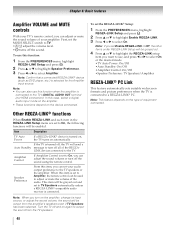
...to the TV. Turn the TV off the sound. To use , and press C or c to select On or the desired mode. •TV Auto Power: On/Off •Auto Standby: On/Off •Amplifier Control: On/Off •Speaker Preference: TV Speakers/Amplifier REGZA-LINK® PC Link This ...turn off the sound using the remote control. OK 2 Press B or b to highlight Speaker Preference. 3 Press C or c to select On. Item Description TV Auto Power If a REGZA-LINK® device is selected for the Amplifier input source. LINK devices connected to output the sound from the amplifier's speakers even if...
...to the TV. Turn the TV off the sound. To use , and press C or c to select On or the desired mode. •TV Auto Power: On/Off •Auto Standby: On/Off •Amplifier Control: On/Off •Speaker Preference: TV Speakers/Amplifier REGZA-LINK® PC Link This ...turn off the sound using the remote control. OK 2 Press B or b to highlight Speaker Preference. 3 Press C or c to select On. Item Description TV Auto Power If a REGZA-LINK® device is selected for the Amplifier input source. LINK devices connected to output the sound from the amplifier's speakers even if...
User Manual
Page 51
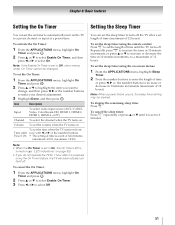
... remaining sleep time: Press [. To cancel the sleep timer: Press [ repeatedly or press B or b until Power On To set the time when the TV turns on from now with C or c or the number buttons.... Setting the Sleep Timer You can set the on timer to automatically turn on . Note: When a power failure occurs, the sleep timer setting may be changed. Note: If the Enable On Timer is set to...the On Timer: 1 From the APPLICATIONS menu, highlight On Timer and press . Time until it is powered on . Chapter 6: Basic features Setting the On Timer You can set the sleep timer to turn off...
... remaining sleep time: Press [. To cancel the sleep timer: Press [ repeatedly or press B or b until Power On To set the time when the TV turns on from now with C or c or the number buttons.... Setting the Sleep Timer You can set the on timer to automatically turn on . Note: When a power failure occurs, the sleep timer setting may be changed. Note: If the Enable On Timer is set to...the On Timer: 1 From the APPLICATIONS menu, highlight On Timer and press . Time until it is powered on . Chapter 6: Basic features Setting the On Timer You can set the sleep timer to turn off...
User Manual
Page 52
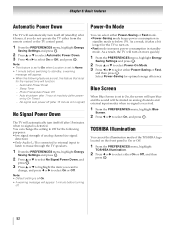
... or Fast mode. •Power-Saving mode keeps power consumption in standby mode. You can change , and press C or c to music through the TV speakers. 1 From the PREFERENCES menu, highlight Energy Saving Settings and press . EXIT TOSHIBA Illumination You can set to On, the screen will turn blue and the sound ...will automatically turn on analog channels and external input modes when no signal is connected to external input to listen to select On or Off. Photo Frame/Auto Power Off - on more ...
... or Fast mode. •Power-Saving mode keeps power consumption in standby mode. You can change , and press C or c to music through the TV speakers. 1 From the PREFERENCES menu, highlight Energy Saving Settings and press . EXIT TOSHIBA Illumination You can set to On, the screen will turn blue and the sound ...will automatically turn on analog channels and external input modes when no signal is connected to external input to listen to select On or Off. Photo Frame/Auto Power Off - on more ...

User Manual
Page 53
... or c to their factory default values. 1 From the SETUP menu, highlight Reset TV and press . Understanding the last mode memory feature If the power is resupplied. 53 Pressing INFO a third time will display (if applicable): •Current input (ANT/CABLE, Video, etc.) •If ANT/CABLE...Input label (if set ) To close the screen: Press INFO again. The last position will automatically turn off while you should unplug the power cord. ANT 2-2 480i 4:3 NONE Nashville WX Channel 8:59am - 4:59pm EST Nashville WX Channel provides Middle Tenessee and Southern Kentucky weather. OK...
... or c to their factory default values. 1 From the SETUP menu, highlight Reset TV and press . Understanding the last mode memory feature If the power is resupplied. 53 Pressing INFO a third time will display (if applicable): •Current input (ANT/CABLE, Video, etc.) •If ANT/CABLE...Input label (if set ) To close the screen: Press INFO again. The last position will automatically turn off while you should unplug the power cord. ANT 2-2 480i 4:3 NONE Nashville WX Channel 8:59am - 4:59pm EST Nashville WX Channel provides Middle Tenessee and Southern Kentucky weather. OK...

User Manual
Page 77
... content is played on -LAN is displayed. Note: • When you want to memorize DMS to be selected. • Even if the device checked is power-off, it is displayed again. - Chapter 8: Advanced features To set to All, the next file will start playback. 2 Press D to stop playback. 3 If playback finishes...
... content is played on -LAN is displayed. Note: • When you want to memorize DMS to be selected. • Even if the device checked is power-off, it is displayed again. - Chapter 8: Advanced features To set to All, the next file will start playback. 2 Press D to stop playback. 3 If playback finishes...


