
User Manual
Page 3
...20) ALWAYS plug the product into your doctor. • ALWAYS contact a service technician to inspect the TV any heat sources such as power-supply cord or plug is used, use caution when moving the cart/apparatus combination to this equipment under the rules of the Federal Communications ...) Refer all servicing to operate this product, never place or store the TV in case the product requires service. 21) NEVER route the product's power cord inside the TV contains glass and a toxic liquid. A grounding type plug has two blades and a third grounding prong. The LCD panel inside...
...20) ALWAYS plug the product into your doctor. • ALWAYS contact a service technician to inspect the TV any heat sources such as power-supply cord or plug is used, use caution when moving the cart/apparatus combination to this equipment under the rules of the Federal Communications ...) Refer all servicing to operate this product, never place or store the TV in case the product requires service. 21) NEVER route the product's power cord inside the TV contains glass and a toxic liquid. A grounding type plug has two blades and a third grounding prong. The LCD panel inside...
User Manual
Page 4
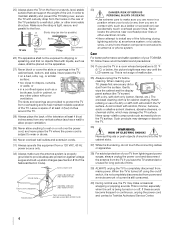
...cabinet, or any item you are never in a position where your TOSHIBA TV, follow these sounds become frequent or continuous, unplug the power cord and contact a Toshiba Authorized Service Center. 4 Never locate the antenna near overhead power lines or other place with a sturdy strap from the surface. The... wire Ground clamp Antenna discharge unit (NEC Section 810-20) Electric service equipment Ground clamps Grounding conductors (NEC Section 810-21) Power service grounding electrode system (NEC Art 250 Part-H) 33) DANGER: RISK OF SERIOUS PERSONAL INJURY OR DEATH! • Use extreme...
...cabinet, or any item you are never in a position where your TOSHIBA TV, follow these sounds become frequent or continuous, unplug the power cord and contact a Toshiba Authorized Service Center. 4 Never locate the antenna near overhead power lines or other place with a sturdy strap from the surface. The... wire Ground clamp Antenna discharge unit (NEC Section 810-20) Electric service equipment Ground clamps Grounding conductors (NEC Section 810-21) Power service grounding electrode system (NEC Art 250 Part-H) 33) DANGER: RISK OF SERIOUS PERSONAL INJURY OR DEATH! • Use extreme...
User Manual
Page 7
...STAR® User Information ENERGY STAR User Information Statement: the factory default settings of this TV is viewed from Audyssey Laboratories. therefore, Toshiba is not responsible for perceived issues resulting from Fraunhofer IIS and Thomson. • SDHC Logo is a trademark. • DLNA®... Trademark Information • Manufactured under license from a normal viewing distance. Audyssey EQ is used in the TV tuning process to [Power-Saving]. [AutoView] mode is recommended for a large listening area and it is featured in this television meet ENERGY STAR® ...
...STAR® User Information ENERGY STAR User Information Statement: the factory default settings of this TV is viewed from Audyssey Laboratories. therefore, Toshiba is not responsible for perceived issues resulting from Fraunhofer IIS and Thomson. • SDHC Logo is a trademark. • DLNA®... Trademark Information • Manufactured under license from a normal viewing distance. Audyssey EQ is used in the TV tuning process to [Power-Saving]. [AutoView] mode is recommended for a large listening area and it is featured in this television meet ENERGY STAR® ...
User Manual
Page 8
...Setting the PC Audio 50 Setting the On Timer 51 Setting the Sleep Timer 51 Automatic Power Down 52 No Signal Power Down 52 Power-On Mode 52 Blue Screen 52 TOSHIBA Illumination 52 Displaying TV status information 53 Viewing support information 53 Reset Factory Defaults 53 ...Understanding the auto power off feature 53 Understanding the last mode memory feature 53 Chapter 7: Picture and sound...
...Setting the PC Audio 50 Setting the On Timer 51 Setting the Sleep Timer 51 Automatic Power Down 52 No Signal Power Down 52 Power-On Mode 52 Blue Screen 52 TOSHIBA Illumination 52 Displaying TV status information 53 Viewing support information 53 Reset Factory Defaults 53 ...Understanding the auto power off feature 53 Understanding the last mode memory feature 53 Chapter 7: Picture and sound...
User Manual
Page 10
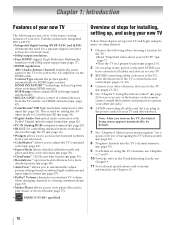
... output resolution. •Four HDMI® digital, High-Definition Multimedia Interfaces with 1080p input support (- pages 2-5). 2 Do not plug in the power cords for your television. •ColorMaster™ allows you turn on using its many exciting features of your LCD TV" (- pages 13-22...of the many exciting features. 1 Observe the following when choosing a location for the TV: •Read "Important notes about your new Toshiba widescreen, integrated HD, LCD TV: •Integrated digital tuning (8VSB ATSC and QAM) eliminates the need for controlling infrared remote-controlled ...
... output resolution. •Four HDMI® digital, High-Definition Multimedia Interfaces with 1080p input support (- pages 2-5). 2 Do not plug in the power cords for your television. •ColorMaster™ allows you turn on using its many exciting features of your LCD TV" (- pages 13-22...of the many exciting features. 1 Observe the following when choosing a location for the TV: •Read "Important notes about your new Toshiba widescreen, integrated HD, LCD TV: •Integrated digital tuning (8VSB ATSC and QAM) eliminates the need for controlling infrared remote-controlled ...
User Manual
Page 11
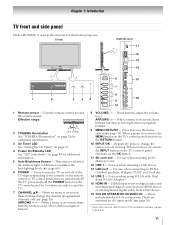
... when inserting an SD Memory Card. 12 USB 1 - For use when connecting to the controls on and off the TV, press and hold the POWER button on the TV control panel for 5 or more seconds to change the channel (programmed channels only; - pages 6 and 64). 11 Point the...purposes. Repeatedly press to reset the TV. 7 CHANNEL Bb - Effective range: 2 TOSHIBA Illumination 16.4 ft (5m) See "TOSHIBA Illumination" on page 52 for additional information. 3 On Timer LED See "Setting the On Timer" on page 51. 4 Power On/Standby LED See "LED indications" on the TV's control panel functions as ...
... when inserting an SD Memory Card. 12 USB 1 - For use when connecting to the controls on and off the TV, press and hold the POWER button on the TV control panel for 5 or more seconds to change the channel (programmed channels only; - pages 6 and 64). 11 Point the...purposes. Repeatedly press to reset the TV. 7 CHANNEL Bb - Effective range: 2 TOSHIBA Illumination 16.4 ft (5m) See "TOSHIBA Illumination" on page 52 for additional information. 3 On Timer LED See "Setting the On Timer" on page 51. 4 Power On/Standby LED See "LED indications" on the TV's control panel functions as ...

User Manual
Page 12
... TV. Manufactured under license from a DVI device. 2 PC/HDMI 2 AUDIO IN - Chapter 1: Introduction TV back panel For an explanation of Dolby Laboratories. 12 TV back Power cord Cable Strap 1 2 3 4 5 6 1 HDMI IN - page 16). 6 ANT/CABLE - Dolby and the double-D symbol are trademarks or registered trademarks of HDMI Licensing LLC in the...
... TV. Manufactured under license from a DVI device. 2 PC/HDMI 2 AUDIO IN - Chapter 1: Introduction TV back panel For an explanation of Dolby Laboratories. 12 TV back Power cord Cable Strap 1 2 3 4 5 6 1 HDMI IN - page 16). 6 ANT/CABLE - Dolby and the double-D symbol are trademarks or registered trademarks of HDMI Licensing LLC in the...
User Manual
Page 16
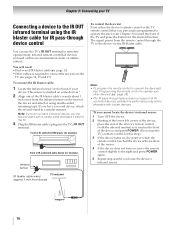
... on the front of the device and attach it touches the front of IR-controlled audio device (for example) Front of the device and press POWER. (Do not use the TV's IR OUT terminal to remotely operate many infrared remote-controlled devices enclosed within an entertainment center or similar cabinet.... one of the IR blaster cable's wands about 1 inch away from the infrared sensor on , move the remote control slightly to the right and press POWER again. 5 Repeat step 4 until you do not have a second device, attach the second wand in a similar manner. You will need: •Dual-wand ...
... on the front of the device and attach it touches the front of IR-controlled audio device (for example) Front of the device and press POWER. (Do not use the TV's IR OUT terminal to remotely operate many infrared remote-controlled devices enclosed within an entertainment center or similar cabinet.... one of the IR blaster cable's wands about 1 inch away from the infrared sensor on , move the remote control slightly to the right and press POWER again. 5 Repeat step 4 until you do not have a second device, attach the second wand in a similar manner. You will need: •Dual-wand ...
User Manual
Page 24
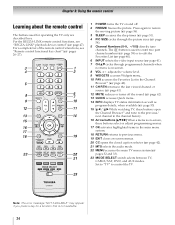
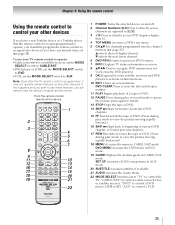
... 33). 23 MODE SELECT switch selects between TV, CABLE/SAT, DVD, and AUX modes. Set to "TV" to restore the moving picture (- pages 26-27). 1 POWER turns the TV on -screen. 8 VOL + - Press again to control the TV. page 62). 13 QUICK accesses Quick menu. 14 INFO displays TV status information...
... 33). 23 MODE SELECT switch selects between TV, CABLE/SAT, DVD, and AUX modes. Set to "TV" to restore the moving picture (- pages 26-27). 1 POWER turns the TV on -screen. 8 VOL + - Press again to control the TV. page 62). 13 QUICK accesses Quick menu. 14 INFO displays TV status information...
User Manual
Page 25
...operate certain features on -screen menus. "CABLE/SAT" to activate certain functions. 10 EXIT Closes on any other devices If you have a non-Toshiba device or a Toshiba device that the remote control is programmed, it may not work on and off. 2 Channel Numbers (0-9) Press to directly access channels (as ...the MODE SELECT switch to control a DVD player, HTIB or BD; Point the remote control directly at the device. 16 17 18 19 1 POWER Turns the selected device on some DVD players). 9 OK Required by some satellite receivers and DVD players to control a cable converter box or satellite...
...operate certain features on -screen menus. "CABLE/SAT" to activate certain functions. 10 EXIT Closes on any other devices If you have a non-Toshiba device or a Toshiba device that the remote control is programmed, it may not work on and off. 2 Channel Numbers (0-9) Press to directly access channels (as ...the MODE SELECT switch to control a DVD player, HTIB or BD; Point the remote control directly at the device. 16 17 18 19 1 POWER Turns the selected device on some DVD players). 9 OK Required by some satellite receivers and DVD players to control a cable converter box or satellite...

User Manual
Page 26
... 6 Digit 7 Digit 8 Digit 9 Digit 0 +10 s TV --s TV --s TV --- Chapter 3: Using the remote control Remote control functional key chart REMOTE CONTROL KEY SLEEP PIC SIZE FREEZE POWER 1 2 3 4 5 6 7 8 9 0 - /100/ +10 INPUT WIDGETS MUTE QUICK VOL + - CHBb FAV/TOP MENU CH RTN/DVD RTN INFO OK B b C 3 c # RETURN ...EXIT/DVD CLEAR PAUSE/STEP PLAY STOP SKIP Z SKIP z REW FF MENU/DVD MENU Toshiba TV Sleep Picture Size FREEZE Power Digit 1 Digit 2 Digit 3 Digit 4 Digit 5 Digit 6 Digit 7 Digit 8 Digit 9 Digit 0 - (sub channel) Input Widgets Mute Quick Menu ...
... 6 Digit 7 Digit 8 Digit 9 Digit 0 +10 s TV --s TV --s TV --- Chapter 3: Using the remote control Remote control functional key chart REMOTE CONTROL KEY SLEEP PIC SIZE FREEZE POWER 1 2 3 4 5 6 7 8 9 0 - /100/ +10 INPUT WIDGETS MUTE QUICK VOL + - CHBb FAV/TOP MENU CH RTN/DVD RTN INFO OK B b C 3 c # RETURN ...EXIT/DVD CLEAR PAUSE/STEP PLAY STOP SKIP Z SKIP z REW FF MENU/DVD MENU Toshiba TV Sleep Picture Size FREEZE Power Digit 1 Digit 2 Digit 3 Digit 4 Digit 5 Digit 6 Digit 7 Digit 8 Digit 9 Digit 0 - (sub channel) Input Widgets Mute Quick Menu ...

User Manual
Page 28
... that came with the device. 5 Remember to set the switch to the other codes are listed for your TV remote control to operate a non-Toshiba device (or a Toshiba device that it , and press p. pages 29-31), find one that all listed codes, the necessary keys do not operate your VCR 28 CABLE...; If the device does not respond to another code (if other position ("VCR1" or "VCR2") and reprogram the remote control. Note: • In addition to POWER, confirm that works. 2 Set the MODE SELECT switch to the type of device you are not operational, repeat the device code setup using another code...
... that came with the device. 5 Remember to set the switch to the other codes are listed for your TV remote control to operate a non-Toshiba device (or a Toshiba device that it , and press p. pages 29-31), find one that all listed codes, the necessary keys do not operate your VCR 28 CABLE...; If the device does not respond to another code (if other position ("VCR1" or "VCR2") and reprogram the remote control. Note: • In addition to POWER, confirm that works. 2 Set the MODE SELECT switch to the type of device you are not operational, repeat the device code setup using another code...

User Manual
Page 39
... the last 32 channels or inputs viewed. •Quickly surf and tune your channels and inputs. To set to off when Enable REGZA-LINK is powered off. 4 Press b or B to highlight ANT/CABLE List, and then press C or c to select On or Off. 5 Press b or B to highlight Inputs List, and then...
... the last 32 channels or inputs viewed. •Quickly surf and tune your channels and inputs. To set to off when Enable REGZA-LINK is powered off. 4 Press b or B to highlight ANT/CABLE List, and then press C or c to select On or Off. 5 Press b or B to highlight Inputs List, and then...

User Manual
Page 46
...To unlock the Network: Select Off in step 3 above. 46 When Panel Lock is On, none of standby by children, for example). If the POWER button is set to On, "Not Available" window will be displayed when the buttons on the TV control panel will switch off and can only...device. 1 From the PREFERENCES menu, highlight Parental Control and Locks and press . page 45). Note: When Panel Lock is pressed, the TV will operate except POWER. 1 From the PREFERENCES menu, highlight Parental Control and Locks and press . Chapter 6: Basic features Network Lock You can use the GameTimer® to set a...
...To unlock the Network: Select Off in step 3 above. 46 When Panel Lock is On, none of standby by children, for example). If the POWER button is set to On, "Not Available" window will be displayed when the buttons on the TV control panel will switch off and can only...device. 1 From the PREFERENCES menu, highlight Parental Control and Locks and press . page 45). Note: When Panel Lock is pressed, the TV will operate except POWER. 1 From the PREFERENCES menu, highlight Parental Control and Locks and press . Chapter 6: Basic features Network Lock You can use the GameTimer® to set a...
User Manual
Page 47
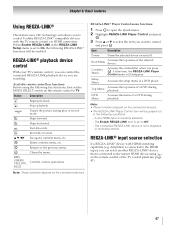
F Skips backward. OK Item Description Power Turns the selected device on the connected devices. REGZA-LINK® input source selection If a REGZA-LINK® device with the TV remote control via ... REGZA-LINK Player Control menu will be enabled. Chapter 6: Basic features Using REGZA-LINK® This feature uses CEC technology and allows you to control Toshiba REGZA-LINK® compatible devices with HDMI switching capability (e.g. Amplifier) is set the MODE SELECT switch on the remote control or the TV control panel...
F Skips backward. OK Item Description Power Turns the selected device on the connected devices. REGZA-LINK® input source selection If a REGZA-LINK® device with the TV remote control via ... REGZA-LINK Player Control menu will be enabled. Chapter 6: Basic features Using REGZA-LINK® This feature uses CEC technology and allows you to control Toshiba REGZA-LINK® compatible devices with HDMI switching capability (e.g. Amplifier) is set the MODE SELECT switch on the remote control or the TV control panel...
User Manual
Page 48
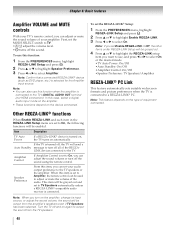
...Confirm that a connected REGZA-LINK® device (such as DVD player, etc.) is turned on, the TV turns on automatically. Item Description TV Auto Power If a REGZA-LINK® device is selected for the Amplifier input source. Speaker Preference From this case, select a digital audio input mode on the ... or the amplifier. Note: • You can also use , and press C or c to select On or the desired mode. •TV Auto Power: On/Off •Auto Standby: On/Off •Amplifier Control: On/Off •Speaker Preference: TV Speakers/Amplifier REGZA-LINK® PC Link This ...
...Confirm that a connected REGZA-LINK® device (such as DVD player, etc.) is turned on, the TV turns on automatically. Item Description TV Auto Power If a REGZA-LINK® device is selected for the Amplifier input source. Speaker Preference From this case, select a digital audio input mode on the ... or the amplifier. Note: • You can also use , and press C or c to select On or the desired mode. •TV Auto Power: On/Off •Auto Standby: On/Off •Amplifier Control: On/Off •Speaker Preference: TV Speakers/Amplifier REGZA-LINK® PC Link This ...
User Manual
Page 51
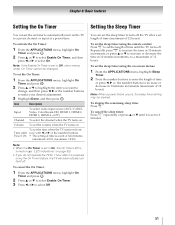
... the remote control: Press [ to a maximum of time until the TV turns off. Note: When a power failure occurs, the sleep timer setting may be changed. Note: If the Enable On Timer is set to ...to On, the On Timer LED is turned on the TV to a preset channel or input at time is powered on by the On Timer feature, the TV will automatically turn on (- Time until it is a unit ...display the remaining sleep time: Press [. To cancel the sleep timer: Press [ repeatedly or press B or b until Power On To set the time when the TV turns on page 85). • If you want to change, and ...
... the remote control: Press [ to a maximum of time until the TV turns off. Note: When a power failure occurs, the sleep timer setting may be changed. Note: If the Enable On Timer is set to ...to On, the On Timer LED is turned on the TV to a preset channel or input at time is powered on by the On Timer feature, the TV will automatically turn on (- Time until it is a unit ...display the remaining sleep time: Press [. To cancel the sleep timer: Press [ repeatedly or press B or b until Power On To set the time when the TV turns on page 85). • If you want to change, and ...
User Manual
Page 52
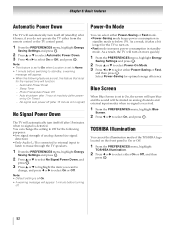
Photo Frame/Auto Power Off - Auto shutdown after 1 hour of the TOSHIBA logo located on the front panel to On or Off. 1 From the PREFERENCES menu, highlight TOSHIBA Illumination. 2 Press C or c to standby, a warning message will be muted on more quickly. 1 From the PREFERENCES menu, ... EXIT Note: • This feature is set to Home. • 1 minute before turning off. EXIT TOSHIBA Illumination You can select either Power-Saving or Fast mode. •Power-Saving mode keeps power consumption in standby mode. Sleep Timer - You can set the illumination mode of inactivity (after...
Photo Frame/Auto Power Off - Auto shutdown after 1 hour of the TOSHIBA logo located on the front panel to On or Off. 1 From the PREFERENCES menu, highlight TOSHIBA Illumination. 2 Press C or c to standby, a warning message will be muted on more quickly. 1 From the PREFERENCES menu, ... EXIT Note: • This feature is set to Home. • 1 minute before turning off. EXIT TOSHIBA Illumination You can select either Power-Saving or Fast mode. •Power-Saving mode keeps power consumption in standby mode. Sleep Timer - You can set the illumination mode of inactivity (after...

User Manual
Page 53
...TV will turn itself off automatically. Understanding the last mode memory feature If the power is cut off while you will display (if applicable): •Current input (ANT... •Aspect ratio of the screen by pressing B or b while the INFO display is on the TV when the power is the current input, either "CABLE" (for cable TV) or "ANT" (for digital channels, press INFO again....No and press . Note: The location of box; OK Understanding the auto power off feature The TV will display for off , see "No Signal Power Down" on page 52. • If it is possible that completes its...
...TV will turn itself off automatically. Understanding the last mode memory feature If the power is cut off while you will display (if applicable): •Current input (ANT... •Aspect ratio of the screen by pressing B or b while the INFO display is on the TV when the power is the current input, either "CABLE" (for cable TV) or "ANT" (for digital channels, press INFO again....No and press . Note: The location of box; OK Understanding the auto power off feature The TV will display for off , see "No Signal Power Down" on page 52. • If it is possible that completes its...

User Manual
Page 77
... starts from the beginning of Wake-on the file size, it may not be able to be selected. • Even if the device checked is power-off, it is displayed but grayed out in the full screen mode. • Depending on -LAN is not compatible, it is pressed. The device selection...
... starts from the beginning of Wake-on the file size, it may not be able to be selected. • Even if the device checked is power-off, it is displayed but grayed out in the full screen mode. • Depending on -LAN is not compatible, it is pressed. The device selection...


