User Manual
Page 1
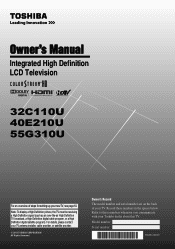
...55G310U Foran overview of your TV. For details, please contact your Toshiba dealer about this TV. Record these numbers whenever you communicate with your TV antenna installer, cable provider, or satellite provider. © 2011 TOSHIBA... CORPORATION All Rights Reserved Owner's Record The model number and serial number are on the back of steps for setting up yournewTV, see page10.... Refer to these numbers in the spaces below. Model number: Serial number: HDA51J3200I Note: To display a High Definition picture, the...
...55G310U Foran overview of your TV. For details, please contact your Toshiba dealer about this TV. Record these numbers whenever you communicate with your TV antenna installer, cable provider, or satellite provider. © 2011 TOSHIBA... CORPORATION All Rights Reserved Owner's Record The model number and serial number are on the back of steps for setting up yournewTV, see page10.... Refer to these numbers in the spaces below. Model number: Serial number: HDA51J3200I Note: To display a High Definition picture, the...
User Manual
Page 8
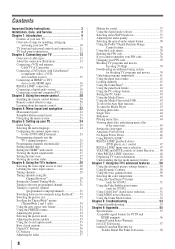
...® functions 48 Displaying TV status information 48 Understanding the last mode memory feature 49 Chapter 7: Using the TV's advanced features......... 50 Using the advanced picture settings features 50 Using Dynamic Contrast 50 Using the static gamma feature 50 Selecting the color temperature 50 Using the ClearFrame™ feature (only for G310U... 55 Specifications 55 Acceptable signal formats for PC IN and HDMI terminals 56 Limited United States Warranty for LCD Televisions 57 Limited Canadian Warranty for Toshiba Brand Flat Panel Televisions 58
...® functions 48 Displaying TV status information 48 Understanding the last mode memory feature 49 Chapter 7: Using the TV's advanced features......... 50 Using the advanced picture settings features 50 Using Dynamic Contrast 50 Using the static gamma feature 50 Selecting the color temperature 50 Using the ClearFrame™ feature (only for G310U... 55 Specifications 55 Acceptable signal formats for PC IN and HDMI terminals 56 Limited United States Warranty for LCD Televisions 57 Limited Canadian Warranty for Toshiba Brand Flat Panel Televisions 58
User Manual
Page 9
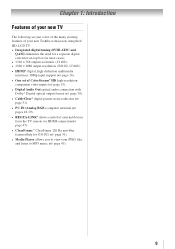
...TV The following are just a few of the many exciting features of your new Toshiba widescreen, integrated HD, LCD TV: • Integrated digital tuning (8VSB ATSC and QAM) eliminates the need for a separate digital converter set-top box (in most cases). • 1366 x 768 output resolution. (C110U)... 15). • Digital Audio Out optical audio connection with Dolby® Digital optical output format ( page 38). • CableClear® digital picture noise reduction ( page 51). • PC IN (Analog RGB) computer terminal ( pages 18-19). • REGZA-LINK® allows...
...TV The following are just a few of the many exciting features of your new Toshiba widescreen, integrated HD, LCD TV: • Integrated digital tuning (8VSB ATSC and QAM) eliminates the need for a separate digital converter set-top box (in most cases). • 1366 x 768 output resolution. (C110U)... 15). • Digital Audio Out optical audio connection with Dolby® Digital optical output format ( page 38). • CableClear® digital picture noise reduction ( page 51). • PC IN (Analog RGB) computer terminal ( pages 18-19). • REGZA-LINK® allows...
User Manual
Page 13
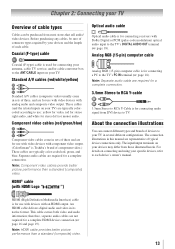
... is for connecting receivers with HDMI Logo " ") Optical audio cable Optical audio cable is Toshiba's brand of component video.) These cables are typically colorcoded according to use with video devices ... from those illustrated herein. Component video cables (red/green/blue) Component video cables come in sets of three, and are for use : yellow for video, red for stereo right audio,... use with video devices with an HDMI output. Note: Component video cables provide better picture performance than a standard (composite) video. 13 therefore, separate audio cables are representative ...
... is for connecting receivers with HDMI Logo " ") Optical audio cable Optical audio cable is Toshiba's brand of component video.) These cables are typically colorcoded according to use with video devices ... from those illustrated herein. Component video cables (red/green/blue) Component video cables come in sets of three, and are for use : yellow for video, red for stereo right audio,... use with video devices with an HDMI output. Note: Component video cables provide better picture performance than a standard (composite) video. 13 therefore, separate audio cables are representative ...
User Manual
Page 18
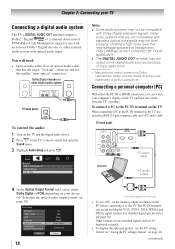
... monitor output resolution on the PC before connecting it to the PC IN terminal on the TV, use the PC setting feature ( "Using the PC settings feature" on your TV Connecting a digital audio system The TV's DIGITAL AUDIO OUT terminal outputs a Dolby® * Digital or 2-channel ... signals will need: • Optical audio cable (Use an optical audio cable that may not be displayed correctly. • To display the optimum picture, use an analog RGB (15-pin) computer cable and a PC audio cable. For detailed signal specifications ( page 56). Older audio systems ...
... monitor output resolution on the PC before connecting it to the PC IN terminal on the TV, use the PC setting feature ( "Using the PC settings feature" on your TV Connecting a digital audio system The TV's DIGITAL AUDIO OUT terminal outputs a Dolby® * Digital or 2-channel ... signals will need: • Optical audio cable (Use an optical audio cable that may not be displayed correctly. • To display the optimum picture, use an analog RGB (15-pin) computer cable and a PC audio cable. For detailed signal specifications ( page 56). Older audio systems ...
User Manual
Page 22
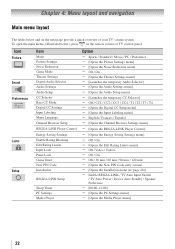
...of your TV's menu system. Icon Picture Sound Preferences Locks Setup Item Mode Picture Settings Noise Reduction Game Mode Theater Settings Digital Audio Selector Audio Settings Audio Setup CC Selector Base CC Mode Digital CC Settings Input Labeling Menu Language Channel Browser Setup... / Movie / PC / Preference [Opens the Picture Settings menu] [Opens the Noise Reduction menu] Off / On [Opens the Theater Settings menu] [Launches the temporary Audio Selector] [Opens the Audio Settings menu] [Opens the Audio Setup menu] ...
...of your TV's menu system. Icon Picture Sound Preferences Locks Setup Item Mode Picture Settings Noise Reduction Game Mode Theater Settings Digital Audio Selector Audio Settings Audio Setup CC Selector Base CC Mode Digital CC Settings Input Labeling Menu Language Channel Browser Setup... / Movie / PC / Preference [Opens the Picture Settings menu] [Opens the Noise Reduction menu] Off / On [Opens the Theater Settings menu] [Launches the temporary Audio Selector] [Opens the Audio Settings menu] [Opens the Audio Setup menu] ...
User Manual
Page 32
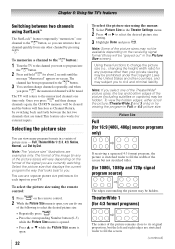
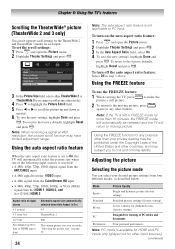
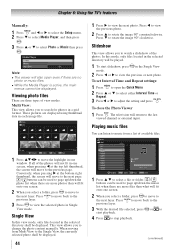
... be hidden. The format of the image (in any of the picture sizes may be "grayed out" in the Theater Settings menu. 2無 Press or to select the desired picture size setting. 3無 Highlight Done and press . Note: Some of the picture sizes) will be hidden. Full, TheaterWide 1/ 2/ 3, 4:3, Native,...to fill the width of the screen but the left and right edges are stretched wider to fill the screen. (continued) Select the picture size that displays the current program the way that looks best to you want to civil and criminal liability. Note: If you to...
... be hidden. The format of the image (in any of the picture sizes may be "grayed out" in the Theater Settings menu. 2無 Press or to select the desired picture size setting. 3無 Highlight Done and press . Note: Some of the picture sizes) will be hidden. Full, TheaterWide 1/ 2/ 3, 4:3, Native,...to fill the width of the screen but the left and right edges are stretched wider to fill the screen. (continued) Select the picture size that displays the current program the way that looks best to you want to civil and criminal liability. Note: If you to...
User Manual
Page 34
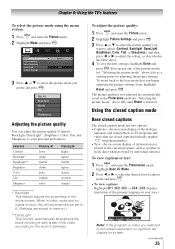
... PC inputs only (grayed out for other countries, and may have limited adjustment range. Adjusting the picture Selecting the picture mode You can set separate scroll settings for the TheaterWide 2 and TheaterWide 3 modes for more than your desired picture settings from the HDMI 1, HDMI 2, and (for G310U)HDMI 3 Aspect ratio of PC tables and PC documents...
... PC inputs only (grayed out for other countries, and may have limited adjustment range. Adjusting the picture Selecting the picture mode You can set separate scroll settings for the TheaterWide 2 and TheaterWide 3 modes for more than your desired picture settings from the HDMI 1, HDMI 2, and (for G310U)HDMI 3 Aspect ratio of PC tables and PC documents...
User Manual
Page 35
... sound effects of TV programs and videos that you began adjusting the picture settings from, highlight Reset and press . To adjust the picture quality: 1無 Press and open the Picture menu. 2無 Highlight Picture Settings and press . 3無 Press or to select the picture quality you want to adjust (Contrast, Backlight, DynaLight, Brightness, Color, Tint...
... sound effects of TV programs and videos that you began adjusting the picture settings from, highlight Reset and press . To adjust the picture quality: 1無 Press and open the Picture menu. 2無 Highlight Picture Settings and press . 3無 Press or to select the picture quality you want to adjust (Contrast, Backlight, DynaLight, Brightness, Color, Tint...
User Manual
Page 41
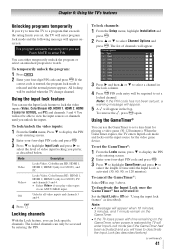
...below. Locking channels With the Lock feature, you unlock the inputs. The locked channels can only be required to set a locked channel. When the GameTimer expires, the TV enters Input Lock mode and locks out the input source ...to select a channel in step 3 above. Off Unlocks all video inputs and channels 3 and 4. 4無 Press . To set a time limit for playing a video game (30-120 minutes). Using the input lock feature You can lock specific channels. Mode...or channels until the Input Lock is released and the normal picture appears. You will be able to enter PIN.
...below. Locking channels With the Lock feature, you unlock the inputs. The locked channels can only be required to set a locked channel. When the GameTimer expires, the TV enters Input Lock mode and locks out the input source ...to select a channel in step 3 above. Off Unlocks all video inputs and channels 3 and 4. 4無 Press . To set a time limit for playing a video game (30-120 minutes). Using the input lock feature You can lock specific channels. Mode...or channels until the Input Lock is released and the normal picture appears. You will be able to enter PIN.
User Manual
Page 42
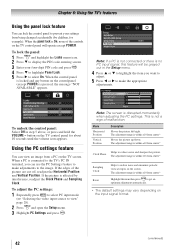
...to highlight Panel Lock. 5無 Press to select On. If the edges of malfunction. If the picture is disrupted momentarily when adjusting the PC settings. When the panel lock is within ±10 from center.* Highlight this feature will operate except POWER. button on... to view" page 28). 2無 Press and open the Setup menu. 3無 Highlight PC Settings and press . Mode Horizontal Position Vertical Position Description Moves the picture left/right. When a PC is not a sign of the picture are cut off, readjust the Horizontal Position and Vertical Position.
...to highlight Panel Lock. 5無 Press to select On. If the edges of malfunction. If the picture is disrupted momentarily when adjusting the PC settings. When the panel lock is within ±10 from center.* Highlight this feature will operate except POWER. button on... to view" page 28). 2無 Press and open the Setup menu. 3無 Highlight PC Settings and press . Mode Horizontal Position Vertical Position Description Moves the picture left/right. When a PC is not a sign of the picture are cut off, readjust the Horizontal Position and Vertical Position.
User Manual
Page 44
..., press to move to move the highlight in each image file. 1無 Press to adjust the setting and press . These pictures are displayed using thumbnail data in one window. To set Interval Time and Repeat settings: 1無 Press to open even if there are more photos than what will fit onto one screen...
..., press to move to move the highlight in each image file. 1無 Press to adjust the setting and press . These pictures are displayed using thumbnail data in one window. To set Interval Time and Repeat settings: 1無 Press to open even if there are more photos than what will fit onto one screen...
User Manual
Page 45
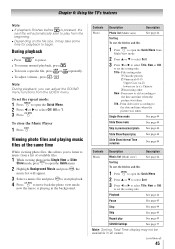
... priority 2 Numerical (0-9) Upper Case (A-Z) lowercase (a-z), Chinese 3 Increasing order New--From new to old according to the date and time when the picture was taken. Playback See page 44 Pause See page 45 Stop See page 44 Skip See page 45 Repeat play from Multi View mode. 2無.... 2無 Press or to select Sort. 3無 Press or to select Title, New or Old to set the sorting rule. Contents Photo Description Photo list (Multi view) Sorting To sort the folders and files Description See page 44. 1無 Press to open...
... priority 2 Numerical (0-9) Upper Case (A-Z) lowercase (a-z), Chinese 3 Increasing order New--From new to old according to the date and time when the picture was taken. Playback See page 44 Pause See page 45 Stop See page 44 Skip See page 45 Repeat play from Multi View mode. 2無.... 2無 Press or to select Sort. 3無 Press or to select Title, New or Old to set the sorting rule. Contents Photo Description Photo list (Multi view) Sorting To sort the folders and files Description See page 44. 1無 Press to open...
User Manual
Page 47
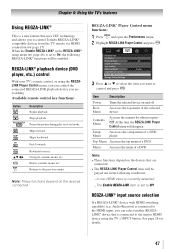
...or using the TV's INPUT button. Stops playback. Pauses the picture during play or record mode. Rewinds/reverses. Returns to control Toshiba REGZA-LINK® compatible devices from the TV remote via HDMI connection ( page 17). Energy Saving Settings 3無 Press p or q to the master HDMI device ...be grayed out in the following conditions: −−A non-HDMI input is currently selected. −−The Enable REGZA-LINK item is set to Off. Fast-forwards. At this time, the REGZA-LINK Player Control menu will be enabled. REGZA-LINK® input source selection If...
...or using the TV's INPUT button. Stops playback. Pauses the picture during play or record mode. Rewinds/reverses. Returns to control Toshiba REGZA-LINK® compatible devices from the TV remote via HDMI connection ( page 17). Energy Saving Settings 3無 Press p or q to the master HDMI device ...be grayed out in the following conditions: −−A non-HDMI input is currently selected. −−The Enable REGZA-LINK item is set to Off. Fast-forwards. At this time, the REGZA-LINK Player Control menu will be enabled. REGZA-LINK® input source selection If...
User Manual
Page 50
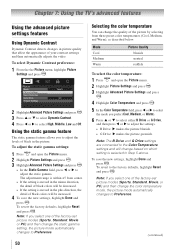
...; to select Dynamic Contrast. 4無 Press or to adjust the static gamma. To adjust the static gamma settings: 1無 Press and open the Picture menu. 2無 Highlight Picture Settings and press . 3無 Highlight Advanced Picture Settings and press . 4無 Highlight Color Temperature and press . 5無 In the Color Temperature field, press or ...
...; to select Dynamic Contrast. 4無 Press or to adjust the static gamma. To adjust the static gamma settings: 1無 Press and open the Picture menu. 2無 Highlight Picture Settings and press . 3無 Highlight Advanced Picture Settings and press . 4無 Highlight Color Temperature and press . 5無 In the Color Temperature field, press or ...

User Manual
Page 51
... lowest to highest, respectively. (continued) 51 This may cause a slight jitter of the scrolling text. To change the CableClear settings: 1無 Press and open the Picture menu 2無 Highlight Picture Settings and press . 3無 Highlight Advance Picture Settings and press . 4無 In the Cinema Mode field, select Film. Note: •• If the current input is...
... lowest to highest, respectively. (continued) 51 This may cause a slight jitter of the scrolling text. To change the CableClear settings: 1無 Press and open the Picture menu 2無 Highlight Picture Settings and press . 3無 Highlight Advance Picture Settings and press . 4無 In the Cinema Mode field, select Film. Note: •• If the current input is...
User Manual
Page 52
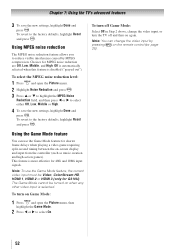
... is more effective for shorter frame delays when playing a video game requiring split-second timing between the on Game Mode: 1無 Press and open the Picture menu. 2無 Highlight Noise Reduction and press . 3無 Press or to highlight the MPEG Noise Reduction field, and then press &#...: To use the Game Mode feature for 480i and 1080i input signals. Chapter 7: Using the TV's advanced features 3無 To save the new settings, highlight Done and press . To turn the TV off and then on again. Note: You can use the Game Mode feature, the current video...
... is more effective for shorter frame delays when playing a video game requiring split-second timing between the on Game Mode: 1無 Press and open the Picture menu. 2無 Highlight Noise Reduction and press . 3無 Press or to highlight the MPEG Noise Reduction field, and then press &#...: To use the Game Mode feature for 480i and 1080i input signals. Chapter 7: Using the TV's advanced features 3無 To save the new settings, highlight Done and press . To turn the TV off and then on again. Note: You can use the Game Mode feature, the current video...
User Manual
Page 53
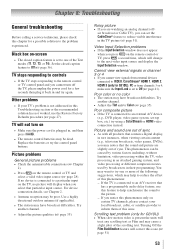
...external signals or channel 3 or 4 •• If you notice this phenomenon only on the TV, no picture will change to inform them of this issue. If the TV is set the CableClear® feature to Off ( page 36). Black box on-screen •• The closed ... this Troubleshooting section or the recommended solution has not worked, use this feature to help to the problem experienced. This phenomenon can set to the picture. -- Set the closed caption feature is connected to one or more of the scrolling text. TV stops responding to controls •• If...
...external signals or channel 3 or 4 •• If you notice this phenomenon only on the TV, no picture will change to inform them of this issue. If the TV is set the CableClear® feature to Off ( page 36). Black box on-screen •• The closed ... this Troubleshooting section or the recommended solution has not worked, use this feature to help to the problem experienced. This phenomenon can set to the picture. -- Set the closed caption feature is connected to one or more of the scrolling text. TV stops responding to controls •• If...
Setup Guide
Page 1
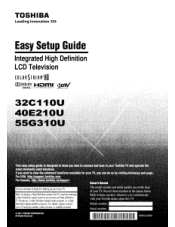
... number and serial number are on the back of steps for setting up your Toshiba V do mosf commonly used functions. For details, please contact your TV. Model number: Serial number: © 2011 TOSHIBA CORPORATION All Rights Reserved II II II II II HDA51J3200I If ...antenna installer, cable provider, or satellite provider. Note: To display a High Definition picture, the TV must be receiving a High Definition signal (such as an over-the-air High Definition TV broadcast. TOSHIBA Leading Innovation >>> Easy Setup Guide Integrated High Definition LCD Television coLonSTREorn CO DOLBY ...
... number and serial number are on the back of steps for setting up your Toshiba V do mosf commonly used functions. For details, please contact your TV. Model number: Serial number: © 2011 TOSHIBA CORPORATION All Rights Reserved II II II II II HDA51J3200I If ...antenna installer, cable provider, or satellite provider. Note: To display a High Definition picture, the TV must be receiving a High Definition signal (such as an over-the-air High Definition TV broadcast. TOSHIBA Leading Innovation >>> Easy Setup Guide Integrated High Definition LCD Television coLonSTREorn CO DOLBY ...
Setup Guide
Page 6
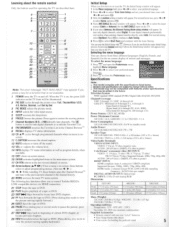
.... 16 ENTER activates highlighted items in the future. and press el. 3 Next, the Location setting window will appear. To tune only digital channels, select Digital. Press @ to continue to Auto...7mm) Depth 9-5/8 inches (245mm) 40E210U 3'2-3/4 inches (984.9mm) 2'-2 inches (661.5mm) 11'-5/8 inches (295mm) 55G310U 4'4-1/4 inches (1328mm) 3'-I ) Super band CI through W) Hyper band (AA through ZZ, AAA, BBB) Ultra band...restart. 27 SKIP 1414 Skips back to view the picture moving rapidly backward.) Initial Setup When you to control Toshiba REGZALINK compatible devices via HDMI connection. 21 STOP ...
.... 16 ENTER activates highlighted items in the future. and press el. 3 Next, the Location setting window will appear. To tune only digital channels, select Digital. Press @ to continue to Auto...7mm) Depth 9-5/8 inches (245mm) 40E210U 3'2-3/4 inches (984.9mm) 2'-2 inches (661.5mm) 11'-5/8 inches (295mm) 55G310U 4'4-1/4 inches (1328mm) 3'-I ) Super band CI through W) Hyper band (AA through ZZ, AAA, BBB) Ultra band...restart. 27 SKIP 1414 Skips back to view the picture moving rapidly backward.) Initial Setup When you to control Toshiba REGZALINK compatible devices via HDMI connection. 21 STOP ...


