
Owner's Manual - English
Page 3
... the power cord is dropped and the cabinet or enclosure surface has been damaged or the TV does not operate normally, take the following precautions: • ALWAYS turn off the TV and unplug the power cord to avoid possible electric shock or fire. • To prevent ...personal injury, never handle the damaged television. • ALWAYS contact a service technician to inspect the TV any other apparatus (including amplifiers) that produce...
... the power cord is dropped and the cabinet or enclosure surface has been damaged or the TV does not operate normally, take the following precautions: • ALWAYS turn off the TV and unplug the power cord to avoid possible electric shock or fire. • To prevent ...personal injury, never handle the damaged television. • ALWAYS contact a service technician to inspect the TV any other apparatus (including amplifiers) that produce...
Owner's Manual - English
Page 4
...cont. from previous page) 26) Always make sure the antenna system is being turned on the Plasma display for extended periods of the panel. If these recommendations and precautions: 28) If you use the TV in wire Antenna discharge unit (NEC Section 810-20) Grounding conductors (NEC ...useful life, ask a qualified service technician to service the TV yourself. Never leave the Plasma TV on for long periods of time. 33) During normal use, the TV may make sure you are never in a position where your TOSHIBA TV, follow these sounds become permanently ingrained in safe operating condition...
...cont. from previous page) 26) Always make sure the antenna system is being turned on the Plasma display for extended periods of the panel. If these recommendations and precautions: 28) If you use the TV in wire Antenna discharge unit (NEC Section 810-20) Grounding conductors (NEC ...useful life, ask a qualified service technician to service the TV yourself. Never leave the Plasma TV on for long periods of time. 33) During normal use, the TV may make sure you are never in a position where your TOSHIBA TV, follow these sounds become permanently ingrained in safe operating condition...
Owner's Manual - English
Page 5
... minimal contrast between the equipment and the receiver. - Introduction Connecting your TV Setting up your TV FCC Declaration of Conformity Compliance Statement (Part 15): The Toshiba 42HP66/50HP66 Plasma Color Televisions comply with Part 15 of the FCC rules. Connect the ...Plasma TV is connected. - The party responsible for shooting at www.tacp.Toshiba.com Note: This equipment has been tested and found to comply with this Plasma TV radiates infrared rays. however, black bars on a 4:3 aspect ratio used in accordance with the instructions, may not • Always turn...
... minimal contrast between the equipment and the receiver. - Introduction Connecting your TV Setting up your TV FCC Declaration of Conformity Compliance Statement (Part 15): The Toshiba 42HP66/50HP66 Plasma Color Televisions comply with Part 15 of the FCC rules. Connect the ...Plasma TV is connected. - The party responsible for shooting at www.tacp.Toshiba.com Note: This equipment has been tested and found to comply with this Plasma TV radiates infrared rays. however, black bars on a 4:3 aspect ratio used in accordance with the instructions, may not • Always turn...
Owner's Manual - English
Page 6
...15 5 Important notes about your Plasma TV 5 Features of your new TV 7 Exploring your new TV 7 Selecting a location for the TV 8 Connecting your TV 8 Connecting a VCR 9 ...computer 17 Power connection 17 Setting up your TV 18 Using the remote control 18 Preparing the...TV's memory ........ 24 Programming channels automatically ........ 24 Adding and erasing channels manually ..... 24 Changing channels 24 Using the TV... 41 Resetting your audio adjustments 42 Turning off the built-in speakers 42...Checking the digital signal strength 44 Displaying TV status information on-screen ..... 44 ...
...15 5 Important notes about your Plasma TV 5 Features of your new TV 7 Exploring your new TV 7 Selecting a location for the TV 8 Connecting your TV 8 Connecting a VCR 9 ...computer 17 Power connection 17 Setting up your TV 18 Using the remote control 18 Preparing the...TV's memory ........ 24 Programming channels automatically ........ 24 Adding and erasing channels manually ..... 24 Changing channels 24 Using the TV... 41 Resetting your audio adjustments 42 Turning off the built-in speakers 42...Checking the digital signal strength 44 Displaying TV status information on-screen ..... 44 ...
Owner's Manual - English
Page 7
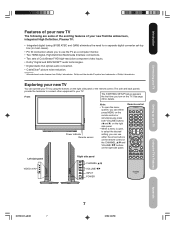
...either the arrow buttons on the remote control or the CHANNEL / and VOLUME / buttons on the TV. Power indicator Remote sensor Note: • To open the menu system, you turn on the right side panel. Remote control INPUT DISPLAY Left side panel Right side panel CHANNEL / VIDEO... buttons on the right side panel. • When a menu is open, to your TV. Dolby and the double-D symbol are some of the exciting features of your new Toshiba widescreen, integrated High Definition, Plasma TV: • Integrated digital tuning (8VSB ATSC and QAM) eliminates the need for details. ...
...either the arrow buttons on the remote control or the CHANNEL / and VOLUME / buttons on the TV. Power indicator Remote sensor Note: • To open the menu system, you turn on the right side panel. Remote control INPUT DISPLAY Left side panel Right side panel CHANNEL / VIDEO... buttons on the right side panel. • When a menu is open, to your TV. Dolby and the double-D symbol are some of the exciting features of your new Toshiba widescreen, integrated High Definition, Plasma TV: • Integrated digital tuning (8VSB ATSC and QAM) eliminates the need for details. ...

Owner's Manual - English
Page 14
...audio input setting to hear digital audio you follow these procedures: • When turning on the TV first, and then the HDMI or DVI device. • When turning off the HDMI or DVI device first, and then the TV. They will need : • one HDMI-to-DVI adapter cable (HDMI type... standard analog audio cables An HDMI-to AUDIO L/R, not AUDIO. Connecting your TV Connecting an HDMI™ or DVI device The HDMI inputs on your electronic components, turn on your electronic components, turn off your TV receive digital audio and uncompressed digital video from an HDMI source device, or ...
...audio input setting to hear digital audio you follow these procedures: • When turning on the TV first, and then the HDMI or DVI device. • When turning off the HDMI or DVI device first, and then the TV. They will need : • one HDMI-to-DVI adapter cable (HDMI type... standard analog audio cables An HDMI-to AUDIO L/R, not AUDIO. Connecting your TV Connecting an HDMI™ or DVI device The HDMI inputs on your electronic components, turn on your electronic components, turn off your TV receive digital audio and uncompressed digital video from an HDMI source device, or ...

Owner's Manual - English
Page 15
... Appendix Introduction Connecting an analog audio system This connection allows you also must be set to a reasonable listening level. Turn off the TV's built-in speakers (see "Turning off the built-in digital surround The TV's two digital audio outputs output a Dolby* Digital or 2- To hear analog broadcast audio, you to use with an...
... Appendix Introduction Connecting an analog audio system This connection allows you also must be set to a reasonable listening level. Turn off the TV's built-in speakers (see "Turning off the built-in digital surround The TV's two digital audio outputs output a Dolby* Digital or 2- To hear analog broadcast audio, you to use with an...

Owner's Manual - English
Page 16
... control (programmed to the device via the IR blaster cable. The signal passes from the remote control through the TV to operate the device; If the device turns on some devices* (see note at which the remote control touched the device is marked on , the point at right.) 2. Front ... plug) • other audio/video cables as a Toshiba infrared remote-controlled VCR or DVD player) enclosed within an entertainment center or similar cabinet. Connecting a device to the IR OUT terminal for IR pass-through device control You can use the TV's IR OUT terminal (infrared passthrough) to operate it...
... control (programmed to the device via the IR blaster cable. The signal passes from the remote control through the TV to operate the device; If the device turns on some devices* (see note at which the remote control touched the device is marked on , the point at right.) 2. Front ... plug) • other audio/video cables as a Toshiba infrared remote-controlled VCR or DVD player) enclosed within an entertainment center or similar cabinet. Connecting a device to the IR OUT terminal for IR pass-through device control You can use the TV's IR OUT terminal (infrared passthrough) to operate it...
Owner's Manual - English
Page 22
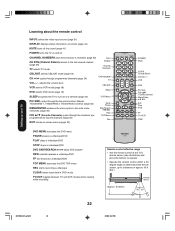
...18) DVD selects DVD mode (page 19) Channel / TV CBL/SAT Sleep SLEEP programs the TV to turn off CHANNEL NUMBERS allow direct access to channels (page 25) CH RTN (Channel Return) returns to the last viewed channel (page 25) TV selects TV mode Input Display Channel Numbers CBL/SAT selects CBL/SAT... about the remote control INPUT selects the video input source (page 31) DISPLAY displays status information on-screen (page 44) MUTE turns off the sound (page 41) POWER turns the TV on either side of the remote sensor, up to a distance of approx. 16 ft. (5m.) Approx. 5 meters Remote Sensor...
...18) DVD selects DVD mode (page 19) Channel / TV CBL/SAT Sleep SLEEP programs the TV to turn off CHANNEL NUMBERS allow direct access to channels (page 25) CH RTN (Channel Return) returns to the last viewed channel (page 25) TV selects TV mode Input Display Channel Numbers CBL/SAT selects CBL/SAT... about the remote control INPUT selects the video input source (page 31) DISPLAY displays status information on-screen (page 44) MUTE turns off the sound (page 41) POWER turns the TV on either side of the remote sensor, up to a distance of approx. 16 ft. (5m.) Approx. 5 meters Remote Sensor...
Owner's Manual - English
Page 23
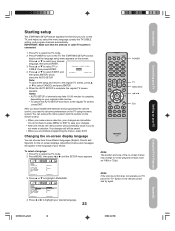
... FRAN‚AIS / ESPA„OL CLOCK SET TV / CABLE CABLE CH PROGRAM ADD / ERASE SELECT ADJUST 4. Introduction Connecting your TV Setting up your TV Starting setup The STARTING SETUP feature appears the first time you turn on the TV. Adjustment menus and messages will still be saved.... • When you need to turn on the TV, and helps you make a selection. ...
... FRAN‚AIS / ESPA„OL CLOCK SET TV / CABLE CABLE CH PROGRAM ADD / ERASE SELECT ADJUST 4. Introduction Connecting your TV Setting up your TV Starting setup The STARTING SETUP feature appears the first time you turn on the TV. Adjustment menus and messages will still be saved.... • When you need to turn on the TV, and helps you make a selection. ...

Owner's Manual - English
Page 28
...To unlock the video inputs: Select OFF in step 6, above. 28 INPUT DISPLAY Channel Numbers TV Menu/Enter Exit Note: After programming CH LOCK, change channels or press INPUT before turning off the television. If you try again. Locking channels With the CH LOCK feature, you ... the video inputs With the VIDEO LOCK feature, you clear the setting. INPUT DISPLAY Input Channel Numbers TV Menu/Enter Exit Note: After programming VIDEO LOCK, change channels before turning off the television. Press MENU, then press or to normal viewing. When you clear the setting. Press...
...To unlock the video inputs: Select OFF in step 6, above. 28 INPUT DISPLAY Channel Numbers TV Menu/Enter Exit Note: After programming CH LOCK, change channels or press INPUT before turning off the television. If you try again. Locking channels With the CH LOCK feature, you ... the video inputs With the VIDEO LOCK feature, you clear the setting. INPUT DISPLAY Input Channel Numbers TV Menu/Enter Exit Note: After programming VIDEO LOCK, change channels before turning off the television. Press MENU, then press or to normal viewing. When you clear the setting. Press...
Owner's Manual - English
Page 30
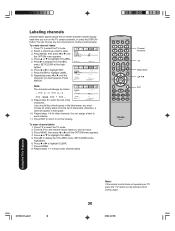
... can assign a label to each time you want to the channel whose label you turn on the remote control and try again. 30 3/7/06, 6:24 PM Press TV to display the CH LABEL menu. Press to select the TV mode. 2. Press or to highlight LABEL. 8. Press ENTER to highlight SET. 7. Repeatedly ... can choose any four characters to display the CH LABEL menu. Press EXIT to return to highlight CH LABEL. 5. To erase channel labels: 1. Tune the TV to label. 3. Press MENU, then press or until the OPTION menu appears. 4. Press ▲ or ▼ to normal viewing. SET/CLEAR will change ...
... can assign a label to each time you want to the channel whose label you turn on the remote control and try again. 30 3/7/06, 6:24 PM Press TV to display the CH LABEL menu. Press to select the TV mode. 2. Press or to highlight LABEL. 8. Press ENTER to highlight SET. 7. Repeatedly ... can choose any four characters to display the CH LABEL menu. Press EXIT to return to highlight CH LABEL. 5. To erase channel labels: 1. Tune the TV to label. 3. Press MENU, then press or until the OPTION menu appears. 4. Press ▲ or ▼ to normal viewing. SET/CLEAR will change ...

Owner's Manual - English
Page 32
... SET, then press ENTER. Note: After a power failure or disconnection of time until the TV turns off the TV at the same time to the same channel until the display turns to remind you clear the ON TIMER. INPUT DISPLAY TV Menu/ Enter ON TIMER ON TIMER 6:30AM RETURN CH 2 O N C E / D A I LY / C L E A R SELECT ...ON TIMER to set time. If you have not already done so (see page 31.) 3. To set the ON timer: (Example: Turning on the TV to automatically turn on the remote control and try again. 32 3/7/06, 6:25 PM Exit Setting the sleep timer You can use the sleep timer ...
... SET, then press ENTER. Note: After a power failure or disconnection of time until the TV turns off the TV at the same time to the same channel until the display turns to remind you clear the ON TIMER. INPUT DISPLAY TV Menu/ Enter ON TIMER ON TIMER 6:30AM RETURN CH 2 O N C E / D A I LY / C L E A R SELECT ...ON TIMER to set time. If you have not already done so (see page 31.) 3. To set the ON timer: (Example: Turning on the TV to automatically turn on the remote control and try again. 32 3/7/06, 6:25 PM Exit Setting the sleep timer You can use the sleep timer ...

Owner's Manual - English
Page 36
... 480i signal, the picture size is automatically selected (as described in step 4, above. To set the CINEMA MODE to FILM. To turn on the TV, smoother and more natural motion can be obtained by setting the CINEMA MODE to FILM: 1. SETUP CINEMA MODE ASPECT SIGNAL METER REVERSE WHITE... PICTURE SHIFT SIDE PANEL COLOR SELECT FILM ON / OFF ON G R AY ADJUST 4. Press or to select the TV mode. 2. Press TV to highlight FILM. 5. Selecting the cinema mode When you selected on the remote control and try again. 36 3/7/06, 6:25 PM Press &#...
... 480i signal, the picture size is automatically selected (as described in step 4, above. To set the CINEMA MODE to FILM. To turn on the TV, smoother and more natural motion can be obtained by setting the CINEMA MODE to FILM: 1. SETUP CINEMA MODE ASPECT SIGNAL METER REVERSE WHITE... PICTURE SHIFT SIDE PANEL COLOR SELECT FILM ON / OFF ON G R AY ADJUST 4. Press or to select the TV mode. 2. Press TV to highlight FILM. 5. Selecting the cinema mode When you selected on the remote control and try again. 36 3/7/06, 6:25 PM Press &#...
Owner's Manual - English
Page 37
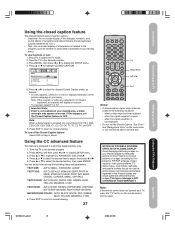
... the desired program. 3. To turn off the Closed Caption feature: Select OFF in the Plasma display and cause subtle but not limited to highlight CLOSED CAPTION. when a video tape has been dubbed - Introduction Connecting your TV Setting up your TV Using the closed caption feature The... remote control and try again. NOTICE OF POSSIBLE ADVERSE EFFECTS ON PLASMA DISPLAY Avoid displaying stationary images on -screen. Press ▲ or ▼ to PIP/POP windows, closed captions, video game patterns, TV station logos, stock tickers, websites, and special formats that are ...
... the desired program. 3. To turn off the Closed Caption feature: Select OFF in the Plasma display and cause subtle but not limited to highlight CLOSED CAPTION. when a video tape has been dubbed - Introduction Connecting your TV Setting up your TV Using the closed caption feature The... remote control and try again. NOTICE OF POSSIBLE ADVERSE EFFECTS ON PLASMA DISPLAY Avoid displaying stationary images on -screen. Press ▲ or ▼ to PIP/POP windows, closed captions, video game patterns, TV station logos, stock tickers, websites, and special formats that are ...
Owner's Manual - English
Page 40
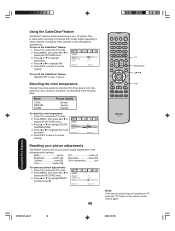
... ▲ or ▼ to highlight CableClear. Press TV to display the PICTURE menu. 3. PICTURE CableClear COLOR T E M P E R AT U R E RESET SPORTS ON / OFF COOL 4. Press MENU, then press or to select the TV mode. 2. To turn on the remote control and try again. Press EXIT to...to normal viewing. To turn off the CableClear® feature: Highlight OFF in the following factory settings: Mode sports Tint center (0) Brightness center (25) Sharpness center (25) Contrast max (50) Color temperature cool Color center (25) To reset your TV, press the "TV" button on the CableClear...
... ▲ or ▼ to highlight CableClear. Press TV to display the PICTURE menu. 3. PICTURE CableClear COLOR T E M P E R AT U R E RESET SPORTS ON / OFF COOL 4. Press MENU, then press or to select the TV mode. 2. To turn on the remote control and try again. Press EXIT to...to normal viewing. To turn off the CableClear® feature: Highlight OFF in the following factory settings: Mode sports Tint center (0) Brightness center (25) Sharpness center (25) Contrast max (50) Color temperature cool Color center (25) To reset your TV, press the "TV" button on the CableClear...
Owner's Manual - English
Page 41
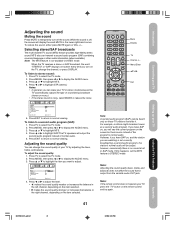
...AUDIO menu. 3. To listen to select the TV mode. 2. Note: If the remote control does not operate your TV Adjusting the sound Muting the sound Press MUTE to temporarily turn on the TV, change the sound quality of your TV in the lower right-hand corner. Press TV to a second audio program (SAP): 1.... the item selected. • makes the sound quality stronger or increases the balance in VIDEO mode. Press TV to highlight MTS. 4. If you have SAP on, and the station you turn off , the screen will see the current program on the screen but hear music instead of sound being ...
...AUDIO menu. 3. To listen to select the TV mode. 2. Note: If the remote control does not operate your TV Adjusting the sound Muting the sound Press MUTE to temporarily turn on the TV, change the sound quality of your TV in the lower right-hand corner. Press TV to a second audio program (SAP): 1.... the item selected. • makes the sound quality stronger or increases the balance in VIDEO mode. Press TV to highlight MTS. 4. If you have SAP on, and the station you turn off , the screen will see the current program on the screen but hear music instead of sound being ...

Owner's Manual - English
Page 42
... settings: Bass center (25) Treble center (25) Balance center (0) To reset your TV, press the "TV" button on the remote control and try again. To turn on page 15.) To turn off the TV speakers when you connect an audio system (see "Connecting an analog audio system" on ... above . Press MENU, then press or to normal viewing. To turn off the built-in volume when the signal source is changed. Using the TV's Features 3X70701A_En_p42-45 42 3/7/06, 6:25 PM Press TV to select the TV mode. 2. AUDIO MTS BASS TREBLE BALANCE STABLE SOUND SPEAKERS STEREO 25 ...
... settings: Bass center (25) Treble center (25) Balance center (0) To reset your TV, press the "TV" button on the remote control and try again. To turn on page 15.) To turn off the TV speakers when you connect an audio system (see "Connecting an analog audio system" on ... above . Press MENU, then press or to normal viewing. To turn off the built-in volume when the signal source is changed. Using the TV's Features 3X70701A_En_p42-45 42 3/7/06, 6:25 PM Press TV to select the TV mode. 2. AUDIO MTS BASS TREBLE BALANCE STABLE SOUND SPEAKERS STEREO 25 ...
Owner's Manual - English
Page 43
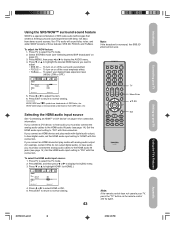
Select STEREO mode (see page 14.) Set the HDMI audio input setting to "DVI" with this connection. To turn on the remote control and try again. 43 Using the TV's Features Appendix 3X70701A_En_p42-45 43 3/7/06, 6:25 PM If you connect a DVI device, to hear audio you must also connect the analog... up your TV Using the SRS WOW™ surround sound feature WOW is monaural, the SRS 3D effect will sound fuller, richer, and wider. To turn on page 14 for example, certain CDVs do not output digital audio), to hear audio you connect an HDMI device and play media with ...
Select STEREO mode (see page 14.) Set the HDMI audio input setting to "DVI" with this connection. To turn on the remote control and try again. 43 Using the TV's Features Appendix 3X70701A_En_p42-45 43 3/7/06, 6:25 PM If you connect a DVI device, to hear audio you must also connect the analog... up your TV Using the SRS WOW™ surround sound feature WOW is monaural, the SRS 3D effect will sound fuller, richer, and wider. To turn on page 14 for example, certain CDVs do not output digital audio), to hear audio you connect an HDMI device and play media with ...

Owner's Manual - English
Page 45
...PHASE: This must be adjusted after the frequency has been set to select the TV mode. 2. WOW SRS 3D: To turn on the remote control and try again. Press TV to optimize picture quality. Using the TV's Features Appendix 3X70701A_En_p42-45 45 3/7/06, 6:25 PM quire a different value ...settings you can adjust to optimize the performance of the TV in PC mode The RESET function returns your picture quality adjustments to the following factory settings: PICTURE menu AUDIO menu Brightness center (25) Bass center (25) Contrast center (50) Treble center (25) Red center (25) Balance ...
...PHASE: This must be adjusted after the frequency has been set to select the TV mode. 2. WOW SRS 3D: To turn on the remote control and try again. Press TV to optimize picture quality. Using the TV's Features Appendix 3X70701A_En_p42-45 45 3/7/06, 6:25 PM quire a different value ...settings you can adjust to optimize the performance of the TV in PC mode The RESET function returns your picture quality adjustments to the following factory settings: PICTURE menu AUDIO menu Brightness center (25) Bass center (25) Contrast center (50) Treble center (25) Red center (25) Balance ...


