
Owner's Manual - English
Page 1
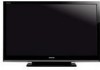
...;nition LCD Television HIGH-DEFINITION TELEVISION 40XV648U 46XV648U 52XV648U For an overview of your new TV, see page 9. For details, please contact your TV antenna installer, cable provider, or satellite provider. © 2009 TOSHIBA CORPORATION All Rights Reserved Owner's Record The model number and serial number are on the back and side of steps for setting...
...;nition LCD Television HIGH-DEFINITION TELEVISION 40XV648U 46XV648U 52XV648U For an overview of your new TV, see page 9. For details, please contact your TV antenna installer, cable provider, or satellite provider. © 2009 TOSHIBA CORPORATION All Rights Reserved Owner's Record The model number and serial number are on the back and side of steps for setting...
Owner's Manual - English
Page 2
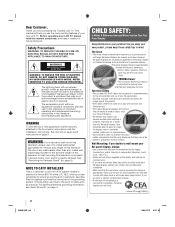
...injury. WARNING: TO REDUCE THE RISK OF ELECTRIC SHOCK, DO NOT REMOVE COVER (OR BACK). The lightning flash with furniture and television sets. • Don't place flat panel display. • Carefully read this manual completely, and keep these safety tips in particular,...you for the size and weight of this television. The use a UL Listed wall bracket appropriate for purchasing this Toshiba LCD TV. page 5). Before operating your new LCD TV. WARNING RISK OF ELECTRIC SHOCK DO NOT OPEN. Follow the manufacturer's recommendations for the safe installation and use the...
...injury. WARNING: TO REDUCE THE RISK OF ELECTRIC SHOCK, DO NOT REMOVE COVER (OR BACK). The lightning flash with furniture and television sets. • Don't place flat panel display. • Carefully read this manual completely, and keep these safety tips in particular,...you for the size and weight of this television. The use a UL Listed wall bracket appropriate for purchasing this Toshiba LCD TV. page 5). Before operating your new LCD TV. WARNING RISK OF ELECTRIC SHOCK DO NOT OPEN. Follow the manufacturer's recommendations for the safe installation and use the...
Owner's Manual - English
Page 6
...earn the ENERGY STAR prevent green house gas emissions by meeting strict guidelines set the Power-On mode to [Power-Saving]. [AutoView] mode is subject ... technology; FCC Declaration of Conformity Compliance Statement (Part 15): The Toshiba 40XV648U, 46XV648U and 52XV648U Televisions comply with Part 15 of this television meet ENERGY...TV. These limits are not an indication of time. therefore, Toshiba is not responsible for a long period of malfunction; Environmental Protection Agency. however, there may not work with this TV. This is a structural property of LCD...
...earn the ENERGY STAR prevent green house gas emissions by meeting strict guidelines set the Power-On mode to [Power-Saving]. [AutoView] mode is subject ... technology; FCC Declaration of Conformity Compliance Statement (Part 15): The Toshiba 40XV648U, 46XV648U and 52XV648U Televisions comply with Part 15 of this television meet ENERGY...TV. These limits are not an indication of time. therefore, Toshiba is not responsible for a long period of malfunction; Environmental Protection Agency. however, there may not work with this TV. This is a structural property of LCD...
Owner's Manual - English
Page 7
... 3 Choosing a location for your LCD TV 5 Chapter 1: Introduction 9 Features of your new TV 9 Overview of steps for installing, setting up, and using your new TV 9 TV front and side panel controls and connections . . . . 10 TV back panel connections 11 Chapter 2: Connecting your TV 12 Overview of cable types 12 ... blocking TV programs and movies 44 Unlocking programs 45 Locking channels 46 Using the input lock feature 46 Using the GameTimer® feature 46 Using the panel lock feature 46 Using the PC settings feature 47 Setting the PC Audio 47 Setting the On Timer 48 Setting the...
... 3 Choosing a location for your LCD TV 5 Chapter 1: Introduction 9 Features of your new TV 9 Overview of steps for installing, setting up, and using your new TV 9 TV front and side panel controls and connections . . . . 10 TV back panel connections 11 Chapter 2: Connecting your TV 12 Overview of cable types 12 ... blocking TV programs and movies 44 Unlocking programs 45 Locking channels 46 Using the input lock feature 46 Using the GameTimer® feature 46 Using the panel lock feature 46 Using the PC settings feature 47 Setting the PC Audio 47 Setting the On Timer 48 Setting the...
Owner's Manual - English
Page 8
...MUTE controls 50 Other REGZA-LINK® functions 50 REGZA-LINK® PC Link 50 Using the HDMI™ settings feature 51 Setting the HDMI™ audio mode 51 Displaying TV status information 52 Understanding the auto power off feature 52 Understanding the last mode memory feature 52 Chapter 7: Using the... formats for PC IN and HDMI terminals 63 PC IN signal formats 63 HDMI signal formats 64 Limited United States Warranty for LCD Televisions 26" and Larger 65 Limited Canadian Warranty for Toshiba Brand Flat Panel Televisions 66 Index 69 8 XV648U_03TOC.pdf 2 2009/07/10 10:58:25
...MUTE controls 50 Other REGZA-LINK® functions 50 REGZA-LINK® PC Link 50 Using the HDMI™ settings feature 51 Setting the HDMI™ audio mode 51 Displaying TV status information 52 Understanding the auto power off feature 52 Understanding the last mode memory feature 52 Chapter 7: Using the... formats for PC IN and HDMI terminals 63 PC IN signal formats 63 HDMI signal formats 64 Limited United States Warranty for LCD Televisions 26" and Larger 65 Limited Canadian Warranty for Toshiba Brand Flat Panel Televisions 66 Index 69 8 XV648U_03TOC.pdf 2 2009/07/10 10:58:25
Owner's Manual - English
Page 9
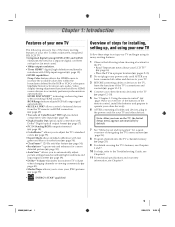
... light conditions and input signal content (- page 15). •HDMI capabilities Deep Color feature allows the HDMI source to automatically adjust picture settings based on using its many exciting features of your new Toshiba widescreen, integrated HD, LCD TV: •Integrated digital tuning (8VSB ATSC and QAM) eliminates the need for a separate digital converter...
... light conditions and input signal content (- page 15). •HDMI capabilities Deep Color feature allows the HDMI source to automatically adjust picture settings based on using its many exciting features of your new Toshiba widescreen, integrated HD, LCD TV: •Integrated digital tuning (8VSB ATSC and QAM) eliminates the need for a separate digital converter...
Owner's Manual - English
Page 10
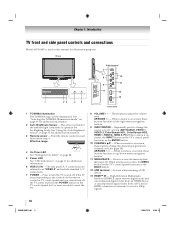
Effective range: 4 On Timer LED 16.4 ft (5m) See "Setting the On Timer" on page 48. 5 Power LED See "LED indications" on the TV control panel for additional information. 6 VIDEO 2 IN - Press to turn off . page 28). HDMI connection is on -...See "Selecting the TOSHIBA Illumination mode" on page 55 for additional information. 3 Remote sensor - Point the remote control toward this manual for additional information. 2 Auto Brightness Sensor -This sensor will be illuminated. Chapter 1: Introduction TV front and side panel controls and connections Model 46XV648U is used in ...
Effective range: 4 On Timer LED 16.4 ft (5m) See "Setting the On Timer" on page 48. 5 Power LED See "LED indications" on the TV control panel for additional information. 6 VIDEO 2 IN - Press to turn off . page 28). HDMI connection is on -...See "Selecting the TOSHIBA Illumination mode" on page 55 for additional information. 3 Remote sensor - Point the remote control toward this manual for additional information. 2 Auto Brightness Sensor -This sensor will be illuminated. Chapter 1: Introduction TV front and side panel controls and connections Model 46XV648U is used in ...
Owner's Manual - English
Page 11
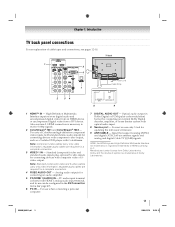
...or uncompressed digital video from Dolby Laboratories. page 47). 6 PC IN - Two sets of ColorStream high-definition component video inputs (with standard stereo audio inputs) for connecting... decoder, amplifier, or home theater system with ColorStream. Note: Component video cables carry only video information; TV back 1 5 6 Power cord Cable Strap 7 2 34 8 9 1 HDMI™ IN - ... PCM (pulse-code modulation) format for connecting devices with component video output, such as a Toshiba DVD player with optical audio input. 8 Service port - For service use when connecting a...
...or uncompressed digital video from Dolby Laboratories. page 47). 6 PC IN - Two sets of ColorStream high-definition component video inputs (with standard stereo audio inputs) for connecting... decoder, amplifier, or home theater system with ColorStream. Note: Component video cables carry only video information; TV back 1 5 6 Power cord Cable Strap 7 2 34 8 9 1 HDMI™ IN - ... PCM (pulse-code modulation) format for connecting devices with component video output, such as a Toshiba DVD player with optical audio input. 8 Service port - For service use when connecting a...

Owner's Manual - English
Page 12
... devices and the length of cable types Cables can connect different types and brands of three and are typically colorcoded according to your TV in sets of devices to use: yellow for video, red for stereo right audio, and white for connecting your antenna, cable... Note: An HDMI cable provides the best audio and picture performance. Analog RGB (15-pin) computer cable Analog RGB (15-pin) computer cable is Toshiba's brand of typical device connections only. If you connect an S-video cable, be unacceptable. The connection illustrations in its native format. Separate audio cables are...
... devices and the length of cable types Cables can connect different types and brands of three and are typically colorcoded according to your TV in sets of devices to use: yellow for video, red for stereo right audio, and white for connecting your antenna, cable... Note: An HDMI cable provides the best audio and picture performance. Analog RGB (15-pin) computer cable Analog RGB (15-pin) computer cable is Toshiba's brand of typical device connections only. If you connect an S-video cable, be unacceptable. The connection illustrations in its native format. Separate audio cables are...

Owner's Manual - English
Page 13
.... Use the Cable box controls to VIDEO 1 on the TV.* To view basic and premium Cable channels: Turn OFF the VCR. To program the TV remote control to operate other materials is set to). Select the VIDEO 1 video input source on the TV.* To view the camcorder video: Select the VIDEO 2 video... input source on the TV.* * To select the video input source, press INPUT on...
.... Use the Cable box controls to VIDEO 1 on the TV.* To view basic and premium Cable channels: Turn OFF the VCR. To program the TV remote control to operate other materials is set to). Select the VIDEO 1 video input source on the TV.* To view the camcorder video: Select the VIDEO 2 video... input source on the TV.* * To select the video input source, press INPUT on...
Owner's Manual - English
Page 14
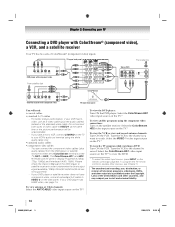
Do not connect both types of video cable to either set of ColorStream terminals on the TV (HD1 or HD2). You can be unacceptable. - If your VCR ... 2: Connecting your DVD player or satellite receiver does not have a mono VCR, connect L/MONO on the TV to record. TV upper back panel From antenna Y PB PR COMPONENT VIDEO S-VIDEO VIDEO OUT OUT DVD player with ColorStream®...; (component video), a VCR, and a satellite receiver Your TV has two sets of the DVD player or satellite receiver in order to view the DVD. * To select the video...
Do not connect both types of video cable to either set of ColorStream terminals on the TV (HD1 or HD2). You can be unacceptable. - If your VCR ... 2: Connecting your DVD player or satellite receiver does not have a mono VCR, connect L/MONO on the TV to record. TV upper back panel From antenna Y PB PR COMPONENT VIDEO S-VIDEO VIDEO OUT OUT DVD player with ColorStream®...; (component video), a VCR, and a satellite receiver Your TV has two sets of the DVD player or satellite receiver in order to view the DVD. * To select the video...

Owner's Manual - English
Page 15
...32/44.1/48 kHz Note: • To connect a PC to the HDMI input, see illustration). - See "Setting the HDMI audio mode" (- Because this cable to the HDMI 1 input on the TV. page 51). TV upper back panel DVI device VIDEO AUDIO L R IN DVI /HDCP OUT OUT L R Note: To ensure ...adapter cable should operate properly with the TV. To display an 1080p/60 Hz signal format, you will need : •one HDMI cable per HDMI device - To connect an HDMI device, you will need a High Speed HDMI™ cable. Please try setting the following four options (Deep Color,...
...32/44.1/48 kHz Note: • To connect a PC to the HDMI input, see illustration). - See "Setting the HDMI audio mode" (- Because this cable to the HDMI 1 input on the TV. page 51). TV upper back panel DVI device VIDEO AUDIO L R IN DVI /HDCP OUT OUT L R Note: To ensure ...adapter cable should operate properly with the TV. To display an 1080p/60 Hz signal format, you will need : •one HDMI cable per HDMI device - To connect an HDMI device, you will need a High Speed HDMI™ cable. Please try setting the following four options (Deep Color,...
Owner's Manual - English
Page 16
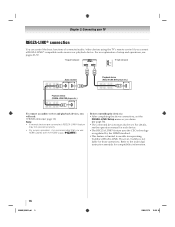
For details, see pages 49-50. However, Toshiba is limited to the individual instruction manuals for those operations. page 12) Note: • If several devices are connected, REGZA-LINK® feature may not .... • For proper operation, it is recommended that you will need: •HDMI cables (- Before controlling the device(s): •After completing the above connections, set . TV upper back panel TV right side panel VIDEO AUDIO L R IN OUT L R Audio receiver HDMI IN HDMI OUT Playback device (REGZA-LINK DVD player,etc.) VIDEO AUDIO L R HDMI...
For details, see pages 49-50. However, Toshiba is limited to the individual instruction manuals for those operations. page 12) Note: • If several devices are connected, REGZA-LINK® feature may not .... • For proper operation, it is recommended that you will need: •HDMI cables (- Before controlling the device(s): •After completing the above connections, set . TV upper back panel TV right side panel VIDEO AUDIO L R IN OUT L R Audio receiver HDMI IN HDMI OUT Playback device (REGZA-LINK DVD player,etc.) VIDEO AUDIO L R HDMI...

Owner's Manual - English
Page 17
... system LINE IN LR Optical Audio IN TV upper back panel damage speakers or headphones. LINE IN LR TV upper back panel SETUP Menu Language English ANT/CABLE In Antenna Auto Tuning Manual Tuning TV Settings Manual Setting AV Connection PC Settings 4 Press B or b to select Digital... Audio Output, and then press C or c to a digital RF channel. * Manufactured under license from the TV's built-in speakers and control the volume level ...
... system LINE IN LR Optical Audio IN TV upper back panel damage speakers or headphones. LINE IN LR TV upper back panel SETUP Menu Language English ANT/CABLE In Antenna Auto Tuning Manual Tuning TV Settings Manual Setting AV Connection PC Settings 4 Press B or b to select Digital... Audio Output, and then press C or c to a digital RF channel. * Manufactured under license from the TV's built-in speakers and control the volume level ...
Owner's Manual - English
Page 18
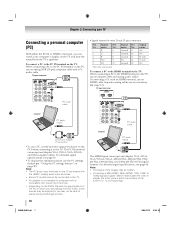
... IN or HDMI connection, you may not be able to the HDMI terminal on the TV: When connecting a PC to pause during multi-angle scenes. Separate analog cables are shared with an HDMI terminal, use the PC settings feature (- name No. name 1 R 6 Ground 11 NC 2 G 7 Ground 12 NC 3 B ... Conversion adapter (if necessary) •To use a PC, set the monitor output resolution on the TV, use an adapter cable and analog audio cables. "Using the PC settings feature" on the TV and hear the sound from the TV's speakers. Computer PC audio output The HDMI input can accept ...
... IN or HDMI connection, you may not be able to the HDMI terminal on the TV: When connecting a PC to pause during multi-angle scenes. Separate analog cables are shared with an HDMI terminal, use the PC settings feature (- name No. name 1 R 6 Ground 11 NC 2 G 7 Ground 12 NC 3 B ... Conversion adapter (if necessary) •To use a PC, set the monitor output resolution on the TV, use an adapter cable and analog audio cables. "Using the PC settings feature" on the TV and hear the sound from the TV's speakers. Computer PC audio output The HDMI input can accept ...

Owner's Manual - English
Page 20
... buttons select or adjust programming menus. 16 ENTER activates highlighted items in the main menu system. 17 MENU accesses the main TV menu system (- When the TV is on-screen, these buttons open the Channel Browser™ and tune to the previous/ next channel in the Channel Browser...™ (- page 36). 5 Channel Numbers (0-9, -/100) directly tune channels. Set to "TV" to edit the Favorites List (- Chapter 3: Using the remote control Learning about the remote control The buttons used to enter two part channel numbers...
... buttons select or adjust programming menus. 16 ENTER activates highlighted items in the main menu system. 17 MENU accesses the main TV menu system (- When the TV is on-screen, these buttons open the Channel Browser™ and tune to the previous/ next channel in the Channel Browser...™ (- page 36). 5 Channel Numbers (0-9, -/100) directly tune channels. Set to "TV" to edit the Favorites List (- Chapter 3: Using the remote control Learning about the remote control The buttons used to enter two part channel numbers...
Owner's Manual - English
Page 21
...DVD chapter, title or time. 19 REC Starts tape recording. 20 MODE SELECT Switches Set to "TV" to select TV mode. b selects the next lower channel. 6 GUIDE Displays the channel guide in the AUX mode. 7 INFO Displays TV status information on-screen. 8 BbC c Press to navigate DVD menus (may not operate.... "CABLE/SAT" to control a DVD player or HTIB. If this happens and you wish to use those features, you have a non-Toshiba device or a Toshiba device that the remote control is programmed, it may not work on and off. 2 Channel Numbers (0-9) Press to directly access channels (as ...
...DVD chapter, title or time. 19 REC Starts tape recording. 20 MODE SELECT Switches Set to "TV" to select TV mode. b selects the next lower channel. 6 GUIDE Displays the channel guide in the AUX mode. 7 INFO Displays TV status information on-screen. 8 BbC c Press to navigate DVD menus (may not operate.... "CABLE/SAT" to control a DVD player or HTIB. If this happens and you wish to use those features, you have a non-Toshiba device or a Toshiba device that the remote control is programmed, it may not work on and off. 2 Channel Numbers (0-9) Press to directly access channels (as ...
Owner's Manual - English
Page 22
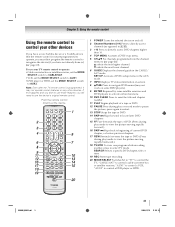
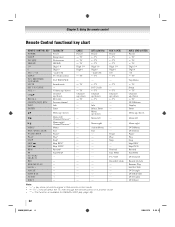
...functional key chart REMOTE CONTROL KEY POWER SLEEP PIC SIZE FREEZE 1-9 0 100/-/+10 INPUT FAV BROWSER/ TOP MENU MUTE SET UP/GUIDE VOL + - SAT (satellite) Power s TV s TV s TV Digit 1-9 Digit 0 - (sub CH) s TV --- CHBb RECALL CH RTN/DVD RTN INFO ENTER Bb C 3 c # MENU EXIT/DVD CLEAR PAUSE/STEP PLAY... STOP SKIP Z SKIP z REW FF TV/VCR/ SEARCH REC RESUME PLAY SLOW + ANGLE SUB TITLE AUDIO EJECT Toshiba TV Power Sleep timer Picture size FREEZE Digit 1-9 Digit 0 - (sub CH) TV/Video select FAV BROWSER Sound mute --Volume up/down Channel up/down RECALL Previous...
...functional key chart REMOTE CONTROL KEY POWER SLEEP PIC SIZE FREEZE 1-9 0 100/-/+10 INPUT FAV BROWSER/ TOP MENU MUTE SET UP/GUIDE VOL + - SAT (satellite) Power s TV s TV s TV Digit 1-9 Digit 0 - (sub CH) s TV --- CHBb RECALL CH RTN/DVD RTN INFO ENTER Bb C 3 c # MENU EXIT/DVD CLEAR PAUSE/STEP PLAY... STOP SKIP Z SKIP z REW FF TV/VCR/ SEARCH REC RESUME PLAY SLOW + ANGLE SUB TITLE AUDIO EJECT Toshiba TV Power Sleep timer Picture size FREEZE Digit 1-9 Digit 0 - (sub CH) TV/Video select FAV BROWSER Sound mute --Volume up/down Channel up/down RECALL Previous...
Owner's Manual - English
Page 23
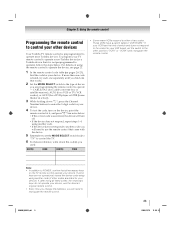
...page 21. 1 In the remote control code table (- Chapter 3: Using the remote control Programming the remote control to control your other devices Your Toshiba TV remote control is listed, try each one separately until you find the code for your device). Note: • In addition to enter the 3-digit... 1-4 using the remote control to either of switch and does not respond to the codes for your VCR brand, set the MODE SELECT switch back to "TV" to control the TV. 6 For future reference, write down E, press the Channel Number buttons to POWER, confirm that it is not preprogrammed...
...page 21. 1 In the remote control code table (- Chapter 3: Using the remote control Programming the remote control to control your other devices Your Toshiba TV remote control is listed, try each one separately until you find the code for your device). Note: • In addition to enter the 3-digit... 1-4 using the remote control to either of switch and does not respond to the codes for your VCR brand, set the MODE SELECT switch back to "TV" to control the TV. 6 For future reference, write down E, press the Channel Number buttons to POWER, confirm that it is not preprogrammed...
Owner's Manual - English
Page 26
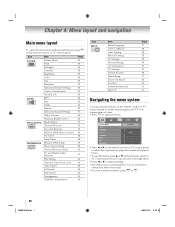
... Selectors 41 PIN Setting 43 Parental Control and Locks 44 Auto Aspect 38 4:3 Stretch 38 Blue Screen 30 Transparency 30 TOSHIBA Illumination 30 Icon SETUP Item Menu Language ANT/CABLE In Auto Tuning Manual Tuning TV Settings Manual Setting AV Connection PC Settings Picture Position Quick ...Setup Power-On Mode Location System Information Reset TV Page 27 28 28 28 29 ...
... Selectors 41 PIN Setting 43 Parental Control and Locks 44 Auto Aspect 38 4:3 Stretch 38 Blue Screen 30 Transparency 30 TOSHIBA Illumination 30 Icon SETUP Item Menu Language ANT/CABLE In Auto Tuning Manual Tuning TV Settings Manual Setting AV Connection PC Settings Picture Position Quick ...Setup Power-On Mode Location System Information Reset TV Page 27 28 28 28 29 ...


