Owner's Manual - English
Page 3
... do not use caution when moving the cart/apparatus combination to avoid injury from the hooks on or pinched, particularly at all times. The LCD panel inside a wall or similar enclosed area. 20) Never modify this apparatus during lightning storms or when unused for replacement of plug to excessive...as power-supply cord or plug is dropped and the cabinet or enclosure surface has been damaged or the TV does not operate normally, take the following precautions: • ALWAYS turn off the TV and unplug the power cord to avoid possible electric shock or fire. • NEVER allow your body...
... do not use caution when moving the cart/apparatus combination to avoid injury from the hooks on or pinched, particularly at all times. The LCD panel inside a wall or similar enclosed area. 20) Never modify this apparatus during lightning storms or when unused for replacement of plug to excessive...as power-supply cord or plug is dropped and the cabinet or enclosure surface has been damaged or the TV does not operate normally, take the following precautions: • ALWAYS turn off the TV and unplug the power cord to avoid possible electric shock or fire. • NEVER allow your body...
Owner's Manual - English
Page 4
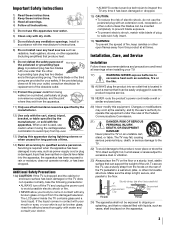
... thundering, do not touch the connecting cables or apparatus. 36) For added protection of your TOSHIBA TV, follow the instructions in a position where your TV, please first remove any item you need to clean the LCD screen, follow these sounds become frequent or continuous, unplug the power cord and contact...snapping or popping sounds. Harsh rubbing or use of current is still consumed. 38) During normal use the TV in the TV cabinet back, bottom, and sides. When the TV is turned off . This is not completely disconnected from the surface. When cleaning your body (or any dirt or ...
... thundering, do not touch the connecting cables or apparatus. 36) For added protection of your TOSHIBA TV, follow the instructions in a position where your TV, please first remove any item you need to clean the LCD screen, follow these sounds become frequent or continuous, unplug the power cord and contact...snapping or popping sounds. Harsh rubbing or use of current is still consumed. 38) During normal use the TV in the TV cabinet back, bottom, and sides. When the TV is turned off . This is not completely disconnected from the surface. When cleaning your body (or any dirt or ...

Owner's Manual - English
Page 9
.... RGB Range feature adjusts RGB full range signal automatically. •REGZA-LINK® allows control of your new Toshiba widescreen, integrated HD, LCD TV: •Integrated digital tuning (8VSB ATSC and QAM) eliminates the need for controlling infrared remote-controlled devices through the... TV (- page 64). •ClearScan 240™ provides picture clarity for a more detailed picture (- page 14). •Digital Audio Out optical audio connection with red, green and blue color selections (- page 63). •AutoView™ allows you turn on ambient light ...
.... RGB Range feature adjusts RGB full range signal automatically. •REGZA-LINK® allows control of your new Toshiba widescreen, integrated HD, LCD TV: •Integrated digital tuning (8VSB ATSC and QAM) eliminates the need for controlling infrared remote-controlled devices through the... TV (- page 64). •ClearScan 240™ provides picture clarity for a more detailed picture (- page 14). •Digital Audio Out optical audio connection with red, green and blue color selections (- page 63). •AutoView™ allows you turn on ambient light ...
Owner's Manual - English
Page 10
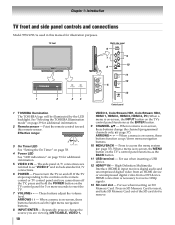
...MENU/BACK - When no menu is on-screen, these buttons change the source you cannot turn the TV on and off the TV, press and hold the POWER button on the TV control panel for illustration purposes. High-Definition Multimedia Interface (HDMI 4) input receives digital audio ...13 SD card slot - These buttons adjust the volume level. TV front 1 2 34 Right side panel 6 7 9 10 8 11 12 5 13 Control panel 1 TOSHIBA Illumination The TOSHIBA logo will be illuminated by the LED backlight. See "Selecting the TOSHIBA Illumination mode" on -screen, these buttons function as the ENTER...
...MENU/BACK - When no menu is on-screen, these buttons change the source you cannot turn the TV on and off the TV, press and hold the POWER button on the TV control panel for illustration purposes. High-Definition Multimedia Interface (HDMI 4) input receives digital audio ...13 SD card slot - These buttons adjust the volume level. TV front 1 2 34 Right side panel 6 7 9 10 8 11 12 5 13 Control panel 1 TOSHIBA Illumination The TOSHIBA logo will be illuminated by the LED backlight. See "Selecting the TOSHIBA Illumination mode" on -screen, these buttons function as the ENTER...
Owner's Manual - English
Page 13
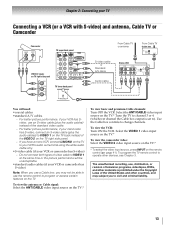
...;S-video cable (if your VCR or camcorder has S-video) - Do not connect both types of the VIDEO 2 on the TV.* To view basic and premium Cable channels: Turn OFF the VCR. For better picture performance, if your camcorder has S-video, connect an S-video cable (plus the audio cables...) instead of the United States and other devices, see Chapter 3. Select the ANT/CABLE video input source on the TV.* Tune the TV to channel 3 ...
...;S-video cable (if your VCR or camcorder has S-video) - Do not connect both types of the VIDEO 2 on the TV.* To view basic and premium Cable channels: Turn OFF the VCR. For better picture performance, if your camcorder has S-video, connect an S-video cable (plus the audio cables...) instead of the United States and other devices, see Chapter 3. Select the ANT/CABLE video input source on the TV.* Tune the TV to channel 3 ...
Owner's Manual - English
Page 14
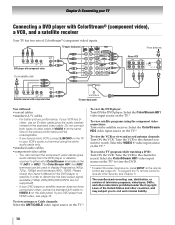
...channels: Select the ANT/CABLE video input source on the TV.* To record a TV program while watching a DVD: Turn ON the VCR. Select the ColorStream HD1 video input source on the TV* to your TV Connecting a DVD player with component video TV lower back panel You will be used to VIDEO 2 ...50Hz/25Hz are not supported). - Chapter 2: Connecting your VCR's audio out terminal using the component video connections: Turn on the TV.* To view the VCR or view and record antenna channels: Turn ON the VCR. You can be unacceptable. - Tune the VCR to the channel you have component video, ...
...channels: Select the ANT/CABLE video input source on the TV.* To record a TV program while watching a DVD: Turn ON the VCR. Select the ColorStream HD1 video input source on the TV* to your TV Connecting a DVD player with component video TV lower back panel You will be used to VIDEO 2 ...50Hz/25Hz are not supported). - Chapter 2: Connecting your VCR's audio out terminal using the component video connections: Turn on the TV.* To view the VCR or view and record antenna channels: Turn ON the VCR. You can be unacceptable. - Tune the VCR to the channel you have component video, ...
Owner's Manual - English
Page 15
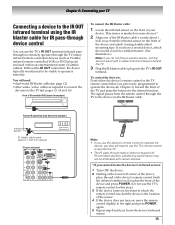
... of the device and attach it remotely. This sensor is the location of IR-controlled audio device (for this step.) 3 If the device turns on the front of the device's remote control (with a rubber band and leave it touches the front of the device and press POWER. ...panel Note: • If you use the device's remote control to operate the device, you previously programmed to the TV (- page 12) •other audio/video cables as Toshiba infrared remote-controlled VCRs or DVD players) enclosed within an entertainment center or similar cabinet. To control the device(s): ...
... of the device and attach it remotely. This sensor is the location of IR-controlled audio device (for this step.) 3 If the device turns on the front of the device's remote control (with a rubber band and leave it touches the front of the device and press POWER. ...panel Note: • If you use the device's remote control to operate the device, you previously programmed to the TV (- page 12) •other audio/video cables as Toshiba infrared remote-controlled VCRs or DVD players) enclosed within an entertainment center or similar cabinet. To control the device(s): ...
Owner's Manual - English
Page 16
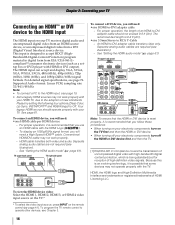
...operation, the length of an HDMI-to-DVI adapter cable should operate properly with your electronic components, turn on the TV first and then the HDMI or DVI device. • When turning off your TV. Because this is an evolving technology, it is 6.6 ft (2m). •one HDMI-to...To ensure that you follow these procedures: • When turning on your electronic components, turn off the HDMI or DVI device first and then the TV. [1] EIA/CEA-861-D compliance covers the transmission of uncompressed digital video with your TV receives digital audio and uncompressed digital video from an HDMI...
...operation, the length of an HDMI-to-DVI adapter cable should operate properly with your electronic components, turn on the TV first and then the HDMI or DVI device. • When turning off your TV. Because this is an evolving technology, it is 6.6 ft (2m). •one HDMI-to...To ensure that you follow these procedures: • When turning on your electronic components, turn off the HDMI or DVI device first and then the TV. [1] EIA/CEA-861-D compliance covers the transmission of uncompressed digital video with your TV receives digital audio and uncompressed digital video from an HDMI...
Owner's Manual - English
Page 18
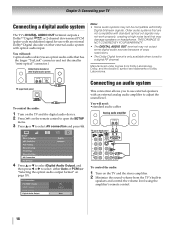
...audio system with optical audio input. You will need : •standard audio cables Analog audio amplifier LINE IN LR TV upper back panel To control the audio: 1 Turn on the TV and the stereo amplifier. 2 Minimize the sound volume from Dolby Laboratories. You will need : •optical audio cable (... you to use with an external Dolby® Digital decoder or other digital audio system LINE IN LR Optical Audio IN TV upper back panel To control the audio: 1 Turn on the TV and the digital audio device. 2 Press Y on the remote control to open the SETUP menu. 3 Press B or b to...
...audio system with optical audio input. You will need : •standard audio cables Analog audio amplifier LINE IN LR TV upper back panel To control the audio: 1 Turn on the TV and the stereo amplifier. 2 Minimize the sound volume from Dolby Laboratories. You will need : •optical audio cable (... you to use with an external Dolby® Digital decoder or other digital audio system LINE IN LR Optical Audio IN TV upper back panel To control the audio: 1 Turn on the TV and the digital audio device. 2 Press Y on the remote control to open the SETUP menu. 3 Press B or b to...
Owner's Manual - English
Page 21
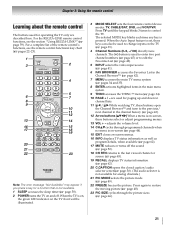
... Arrow buttons (BbC c) When a menu is on -screen, these buttons open the Channel Browser™ and tune to enter two part channel numbers (- page 46). 21 page 39). 4 Channel Numbers (0-9, -/100) directly tune channels. page 34). 10 PAGE + / - adjusts the volume level. 14 CH Bb cycles...BROWSER accesses the Favorites List in the main menu system. 9 THINC accesses the THINC™ menu (- page 58). 2 POWER turns the TV on -screen menus. 16 INFO displays TV status information as well as program details, when available (- page 44). 15 EXIT closes on and off the sound (- pages ...
... Arrow buttons (BbC c) When a menu is on -screen, these buttons open the Channel Browser™ and tune to enter two part channel numbers (- page 46). 21 page 39). 4 Channel Numbers (0-9, -/100) directly tune channels. page 34). 10 PAGE + / - adjusts the volume level. 14 CH Bb cycles...BROWSER accesses the Favorites List in the main menu system. 9 THINC accesses the THINC™ menu (- page 58). 2 POWER turns the TV on -screen menus. 16 INFO displays TV status information as well as program details, when available (- page 44). 15 EXIT closes on and off the sound (- pages ...

Owner's Manual - English
Page 36
... Setting up your TV Initial Setup When you first turn on the TV. To tune digital channels preferentially over analog when entering channel number directly, select Auto. Note: The on or reset the TV, the Initial Setup window will appear. You can conveniently change various basic TV settings from three ...Y to open the SETUP menu. 2 Press B or b to select Quick Setup and press T. 3 A confirmation message will appear on the TV. 6 If you turn on -screen demonstration will appear. Quick Setup from the SETUP menu You can stop the Initial Setup with the Auto Tuning. To enable the...
... Setting up your TV Initial Setup When you first turn on the TV. To tune digital channels preferentially over analog when entering channel number directly, select Auto. Note: The on or reset the TV, the Initial Setup window will appear. You can conveniently change various basic TV settings from three ...Y to open the SETUP menu. 2 Press B or b to select Quick Setup and press T. 3 A confirmation message will appear on the TV. 6 If you turn on -screen demonstration will appear. Quick Setup from the SETUP menu You can stop the Initial Setup with the Auto Tuning. To enable the...
Owner's Manual - English
Page 38
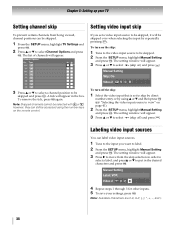
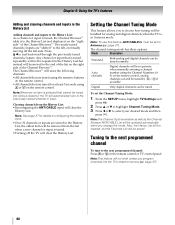
...to veiw" on ) and press O. Note: Available characters are 0-9, A-Z and /. 38 Manual Setting Skip: On Video 2 V C R To turn on the remote control. Labeling video input sources You can still be skipped. 2 From the SETUP menu, highlight Manual Setting and press T. Channel ...Options Ch. "Selecting the video input source to be skipped. 1 From the SETUP menu, highlight TV Settings and press T. 2 Press B or b to put in the box. Chapter 5: Setting up your settings, press T. Type 5-1 DTV 6 ATV ...
...to veiw" on ) and press O. Note: Available characters are 0-9, A-Z and /. 38 Manual Setting Skip: On Video 2 V C R To turn on the remote control. Labeling video input sources You can still be skipped. 2 From the SETUP menu, highlight Manual Setting and press T. Channel ...Options Ch. "Selecting the video input source to be skipped. 1 From the SETUP menu, highlight TV Settings and press T. 2 Press B or b to put in the box. Chapter 5: Setting up your settings, press T. Type 5-1 DTV 6 ATV ...
Owner's Manual - English
Page 39
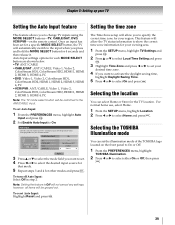
... for other modes and press O. Chapter 5: Setting up your desired time zone. 4 If you want to set the illumination mode of the TOSHIBA logo located on the remote control. Once an input has been set for your remote control. SLEEP POWER MODE SELECT CABLE/SAT DVD... ANT/CABLE, Video 1, Video 2, ColorStream HD1, ColorStream HD2, HDMI 1, HDMI 2, HDMI 3, HDMI 4, PC Note: The TV mode select button will not cancel any settings; Auto Input settings options for the TV location. To turn off Auto Input: Select Off in step 2. however, all items will allow you to specify the correct...
... for other modes and press O. Chapter 5: Setting up your desired time zone. 4 If you want to set the illumination mode of the TOSHIBA logo located on the remote control. Once an input has been set for your remote control. SLEEP POWER MODE SELECT CABLE/SAT DVD... ANT/CABLE, Video 1, Video 2, ColorStream HD1, ColorStream HD2, HDMI 1, HDMI 2, HDMI 3, HDMI 4, PC Note: The TV mode select button will not cancel any settings; Auto Input settings options for the TV location. To turn off Auto Input: Select Off in step 2. however, all items will allow you to specify the correct...
Owner's Manual - English
Page 40
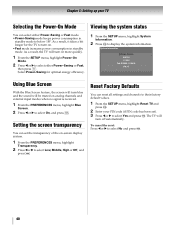
...channels to their factory default values. 1 From the SETUP menu, highlight Reset TV and press T. 2 Enter your TV Selecting the Power-On Mode You can set ). 3 Press C or c to below 1W. Select Power-Saving for the TV to turn on more quickly. 1 From the SETUP menu, highlight Power-On Mode....Information. 2 Press T to select No and press T. 40 As a result, it takes a bit longer for optimal energy efficiency. As a result, the TV will turn on analog channels and external input modes when no signal is received. 1 From the PREFERENCES menu, highlight Blue Screen. 2 Press C or c to select...
...channels to their factory default values. 1 From the SETUP menu, highlight Reset TV and press T. 2 Enter your TV Selecting the Power-On Mode You can set ). 3 Press C or c to below 1W. Select Power-Saving for the TV to turn on more quickly. 1 From the SETUP menu, highlight Power-On Mode....Information. 2 Press T to select No and press T. 40 As a result, it takes a bit longer for optimal energy efficiency. As a result, the TV will turn on analog channels and external input modes when no signal is received. 1 From the PREFERENCES menu, highlight Blue Screen. 2 Press C or c to select...
Owner's Manual - English
Page 43
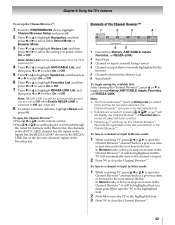
... list, the REGZA-LINK® devices in the REGZALINK list, or the favorite channels/inputs in the last selected list. • If all lists are turned off . 4 Press b or B to highlight ANT/CABLE List, and then press C or c to select On or Off. 5 Press b or B to highlight Inputs List, ...input currently being viewed 4 Channel or input that is currently highlighted in the browser 5 Channels stored in the Channel Browser™. Chapter 6: Using the TV's features To set to Off when Enable REGZA-LINK is switched to Off. (- In Browse mode, when you prefer: either Select Mode or Browser ...
... list, the REGZA-LINK® devices in the REGZALINK list, or the favorite channels/inputs in the last selected list. • If all lists are turned off . 4 Press b or B to highlight ANT/CABLE List, and then press C or c to select On or Off. 5 Press b or B to highlight Inputs List, ...input currently being viewed 4 Channel or input that is currently highlighted in the browser 5 Channels stored in the Channel Browser™. Chapter 6: Using the TV's features To set to Off when Enable REGZA-LINK is switched to Off. (- In Browse mode, when you prefer: either Select Mode or Browser ...
Owner's Manual - English
Page 44
...:The Channel Options window as well as the Channel Browser ANT/CABLE List will be set the Channel Tuning Mode: 1 From the SETUP menu, highlight TV Settings and press T. 2 Press B or b to highlight Channel Tuning Mode. 3 Press C or c to the next programmed channel: Press < or , on ... a new channel or input is tuned repeatedly will clear the History List. Note:Whenever an item is selected that is tuned. •Turning off the left side. Mode Description Standard Both analog and digital channels can be tuned normally Auto (default) Digital Digital channels will automatically...
...:The Channel Options window as well as the Channel Browser ANT/CABLE List will be set the Channel Tuning Mode: 1 From the SETUP menu, highlight TV Settings and press T. 2 Press B or b to highlight Channel Tuning Mode. 3 Press C or c to the next programmed channel: Press < or , on ... a new channel or input is tuned repeatedly will clear the History List. Note:Whenever an item is selected that is tuned. •Turning off the left side. Mode Description Standard Both analog and digital channels can be tuned normally Auto (default) Digital Digital channels will automatically...
Owner's Manual - English
Page 49
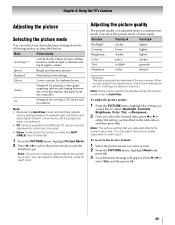
... be set to the picture mode of the entire screen. Note: The picture mode you adjusted affects the current input only. Chapter 6: Using the TV's features Adjusting the picture Selecting the picture mode You can adjust the picture quality separately for each input. Press C or c to adjust the setting...). • Game mode cannot be adjusted when the picture mode is set to 0. (Settings are stored in memory.) Note: Some menus cannot be turned on -screen display and input from the following modes, as described in video mode and no signal is saved to AutoView. When in the table...
... be set to the picture mode of the entire screen. Note: The picture mode you adjusted affects the current input only. Chapter 6: Using the TV's features Adjusting the picture Selecting the picture mode You can adjust the picture quality separately for each input. Press C or c to adjust the setting...). • Game mode cannot be adjusted when the picture mode is set to 0. (Settings are stored in memory.) Note: Some menus cannot be turned on -screen display and input from the following modes, as described in video mode and no signal is saved to AutoView. When in the table...
Owner's Manual - English
Page 50
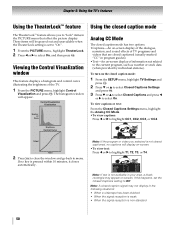
... Press R to close the window and go back to the current program, such as weather or stock data (when provided by individual stations). To turn on screen. Note: A closed captioned (usually marked "CC" in the PICTURE menu that are closed caption signal may appear on the closed captioned, ... Captions setting to "lock" items in program guides). •Text-An on -screen display of the dialogue, narration, and sound effects of TV programs and videos that affect the picture display. Note: If the program or video you to Off. Viewing the Control Visualization window This feature ...
... Press R to close the window and go back to the current program, such as weather or stock data (when provided by individual stations). To turn on screen. Note: A closed captioned (usually marked "CC" in the PICTURE menu that are closed caption signal may appear on the closed captioned, ... Captions setting to "lock" items in program guides). •Text-An on -screen display of the dialogue, narration, and sound effects of TV programs and videos that affect the picture display. Note: If the program or video you to Off. Viewing the Control Visualization window This feature ...
Owner's Manual - English
Page 52
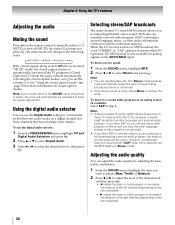
... another language as a second audio program. However, occasionally there is noisy, select Mono to Off when you to partially reduce (1/2 MUTE) or turn off (MUTE) the sound. To use Z to set the MTS feature to 0. The MTS feature is set to reduce the noise. To listen...highlight MTS. 2 Press C or c to select the desired service, then press O. If you have multiple audio tracks). Chapter 6: Using the TV's features Adjusting the audio Muting the sound Press W on the remote control to output high-fidelity stereo sound. Selecting stereo/SAP broadcasts The multi-channel...
... another language as a second audio program. However, occasionally there is noisy, select Mono to Off when you to partially reduce (1/2 MUTE) or turn off (MUTE) the sound. To use Z to set the MTS feature to 0. The MTS feature is set to reduce the noise. To listen...highlight MTS. 2 Press C or c to select the desired service, then press O. If you have multiple audio tracks). Chapter 6: Using the TV's features Adjusting the audio Muting the sound Press W on the remote control to output high-fidelity stereo sound. Selecting stereo/SAP broadcasts The multi-channel...
Owner's Manual - English
Page 58
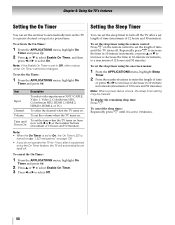
... Timer You can set the sleep timer using the remote control: Press [ on the remote control to set the length of time until the TV turns off the TV after it is set length of time (maximum of 12 hours and 50 minutes). To display the remaining sleep time: Press [. To activate the... menu, highlight On Timer and press T. 2 Press B or b to select Enable On Timer. 3 Press C or c to select On. To set the sleep timer to turn on the TV to Off, other menus under On Timer cannot be cleared. To cancel the sleep timer: Repeatedly press [ until Power On Description To select video...
... Timer You can set the sleep timer using the remote control: Press [ on the remote control to set the length of time until the TV turns off the TV after it is set length of time (maximum of 12 hours and 50 minutes). To display the remaining sleep time: Press [. To activate the... menu, highlight On Timer and press T. 2 Press B or b to select Enable On Timer. 3 Press C or c to select On. To set the sleep timer to turn on the TV to Off, other menus under On Timer cannot be cleared. To cancel the sleep timer: Repeatedly press [ until Power On Description To select video...


