Owner's Manual - English
Page 3
...thoroughly with your mouth or eyes, or your skin is dropped and the cabinet or enclosure surface has been damaged or the TV does not operate normally, take the following precautions: • ALWAYS turn off the TV and unplug the power cord to avoid possible electric shock or fire. • NEVER allow your... to the floor. or areas subject to operate this equipment. The wide blade or the third prong are provided to inspect the TV any time it has been damaged or dropped. 15) CAUTION: • To reduce the risk of the unit. The LCD panel inside the TV contains glass and a toxic liquid.
...thoroughly with your mouth or eyes, or your skin is dropped and the cabinet or enclosure surface has been damaged or the TV does not operate normally, take the following precautions: • ALWAYS turn off the TV and unplug the power cord to avoid possible electric shock or fire. • NEVER allow your... to the floor. or areas subject to operate this equipment. The wide blade or the third prong are provided to inspect the TV any time it has been damaged or dropped. 15) CAUTION: • To reduce the risk of the unit. The LCD panel inside the TV contains glass and a toxic liquid.

Owner's Manual - English
Page 4
... screwdriver) can be exposed to direct sunlight, such as a wall) to allow proper ventilation. 24) Never allow anything on the LCD screen. Never spill liquids or push objects of any home theater component connected to an antenna or phone system. Never attempt to dangerous...For disposal or recycling information, contact your TOSHIBA TV, follow these sounds become frequent or continuous, unplug the power cord and contact a Toshiba Authorized Service Center. 35) WARNING: RISK OF SERIOUS PERSONAL INJURY OR EQUIPMENT DAMAGE! This is being turned on or off. Such products may damage...
... screwdriver) can be exposed to direct sunlight, such as a wall) to allow proper ventilation. 24) Never allow anything on the LCD screen. Never spill liquids or push objects of any home theater component connected to an antenna or phone system. Never attempt to dangerous...For disposal or recycling information, contact your TOSHIBA TV, follow these sounds become frequent or continuous, unplug the power cord and contact a Toshiba Authorized Service Center. 35) WARNING: RISK OF SERIOUS PERSONAL INJURY OR EQUIPMENT DAMAGE! This is being turned on or off. Such products may damage...

Owner's Manual - English
Page 10
... sensor. These buttons adjust the volume level. 10 INPUT - Point the remote control toward this manual for illustration purposes. Press to turn off . Chapter 1: Introduction TV front and side panel controls and connections Model 42RV530U is on-screen, these buttons change the source you cannot... turn the TV on and off the TV, press and hold the POWER button on the TV control panel for 5 or more seconds to reset the TV. 12 Control panel 5 ARROWS BbC c - Effective range: 16.4 ft (5m) 2 ...
... sensor. These buttons adjust the volume level. 10 INPUT - Point the remote control toward this manual for illustration purposes. Press to turn off . Chapter 1: Introduction TV front and side panel controls and connections Model 42RV530U is on-screen, these buttons change the source you cannot... turn the TV on and off the TV, press and hold the POWER button on the TV control panel for 5 or more seconds to reset the TV. 12 Control panel 5 ARROWS BbC c - Effective range: 16.4 ft (5m) 2 ...
Owner's Manual - English
Page 13
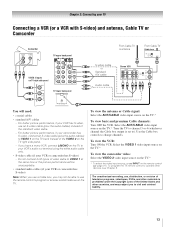
... view the camcorder video: Select the VIDEO 2 video input source on the TV.* * To select the video input source, press INPUT on the TV.* To view basic and premium Cable channels: Turn OFF the VCR. To program the TV remote control to change channels. The unauthorized recording, use a Cable box, you ...may subject you have a mono VCR, connect L/MONO on the TV to ). Do not connect both types...
... view the camcorder video: Select the VIDEO 2 video input source on the TV.* * To select the video input source, press INPUT on the TV.* To view basic and premium Cable channels: Turn OFF the VCR. To program the TV remote control to change channels. The unauthorized recording, use a Cable box, you ...may subject you have a mono VCR, connect L/MONO on the TV to ). Do not connect both types...
Owner's Manual - English
Page 14
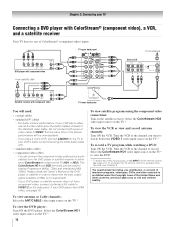
... - To view antenna or Cable channels: Select the ANT/CABLE video input source on the TV.* To view the VCR or view and record antenna channels: Turn ON the VCR. page 21). To program the TV remote control to operate other countries, and may subject you have component video, connect a standard...does not have a mono VCR, connect L/MONO on the TV to your VCR's audio out terminal using the component video connections: Turn on the satellite receiver. Select the ColorStream HD2 video input source on the TV.* To view the DVD player: Turn ON the DVD player. If your VCR has S-video, ...
... - To view antenna or Cable channels: Select the ANT/CABLE video input source on the TV.* To view the VCR or view and record antenna channels: Turn ON the VCR. page 21). To program the TV remote control to operate other countries, and may subject you have component video, connect a standard...does not have a mono VCR, connect L/MONO on the TV to your VCR's audio out terminal using the component video connections: Turn on the satellite receiver. Select the ColorStream HD2 video input source on the TV.* To view the DVD player: Turn ON the DVD player. If your VCR has S-video, ...
Owner's Manual - English
Page 15
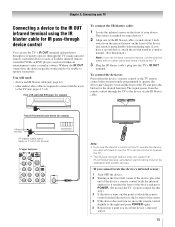
...tape. page 12) • other audio/video cables as Toshiba infrared remotecontrolled VCRs or DVD players) enclosed within an entertainment center or similar cabinet. pages 13-16) Front of IR-controlled DVD player (for this step.) 3 If the device turns on, the point at which the remote control touched the ...of the IR blaster cable's wands about 1 inch away from the infrared sensor on the front of your TV Connecting a device to operate the device, you cannot locate the device's infrared sensor: 1 Turn OFF the device. 2 Starting at the lower left corner of the device, place the end of the ...
...tape. page 12) • other audio/video cables as Toshiba infrared remotecontrolled VCRs or DVD players) enclosed within an entertainment center or similar cabinet. pages 13-16) Front of IR-controlled DVD player (for this step.) 3 If the device turns on, the point at which the remote control touched the ...of the IR blaster cable's wands about 1 inch away from the infrared sensor on the front of your TV Connecting a device to operate the device, you cannot locate the device's infrared sensor: 1 Turn OFF the device. 2 Starting at the lower left corner of the device, place the end of the ...

Owner's Manual - English
Page 16
... per DVI device - TV upper back panel TV right side panel To connect a DVI device, you follow these procedures: • When turning on your electronic components, turn on the TV first, and then the HDMI or DVI device. • When turning off your electronic components, turn off the HDMI or ...DVI device first, and then the TV. TV upper back panel DVI device VIDEO AUDIO L ...
... per DVI device - TV upper back panel TV right side panel To connect a DVI device, you follow these procedures: • When turning on your electronic components, turn on the TV first, and then the HDMI or DVI device. • When turning off your electronic components, turn off the HDMI or ...DVI device first, and then the TV. TV upper back panel DVI device VIDEO AUDIO L ...

Owner's Manual - English
Page 18
... No Auto Stereo English Dolby Digital Compressed Done To control the audio: 1 Turn on page 46). Older audio systems that are registered trademarks of copy restrictions. * Manufactured under license from the TV's built-in speakers and control the volume level using the amplifier's remote control...You will need : • standard audio cables Analog audio amplifier To control the audio: 1 Turn on the TV and the digital audio device. 2 Press Y on your TV Connecting a digital audio system The TV's DIGITAL AUDIO OUT terminal outputs a Dolby®* Digital g or 2-channel down-mixed PCM (...
... No Auto Stereo English Dolby Digital Compressed Done To control the audio: 1 Turn on page 46). Older audio systems that are registered trademarks of copy restrictions. * Manufactured under license from the TV's built-in speakers and control the volume level using the amplifier's remote control...You will need : • standard audio cables Analog audio amplifier To control the audio: 1 Turn on the TV and the digital audio device. 2 Press Y on your TV Connecting a digital audio system The TV's DIGITAL AUDIO OUT terminal outputs a Dolby®* Digital g or 2-channel down-mixed PCM (...

Owner's Manual - English
Page 21
... the picture sizes: Natural, TheaterWide 1/2/3, Full, 4:3 HD, Native, and Dot by Dot (- page 39). 12 MUTE reduces or turns off . page 23). 1 POWER turns the TV on -screen (- Press again to tune digital channels (- The = button is used for a function that is on and off the... sound (- page 54). 14 3 C / # c While watching TV, these buttons select or adjust programming menus. (Also see the remote control functional...
... the picture sizes: Natural, TheaterWide 1/2/3, Full, 4:3 HD, Native, and Dot by Dot (- page 39). 12 MUTE reduces or turns off . page 23). 1 POWER turns the TV on -screen (- Press again to tune digital channels (- The = button is used for a function that is on and off the... sound (- page 54). 14 3 C / # c While watching TV, these buttons select or adjust programming menus. (Also see the remote control functional...
Owner's Manual - English
Page 22
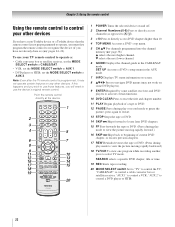
...To use your other devices If you have not already done so) (- Point the remote control directly at the device. 16 17 18 19 1 POWER Turns the selected device on and off. 2 Channel Numbers (0-9) Press to directly access channels (as opposed to < ,). 3 +10 Press to recognize the device... or a Toshiba device that the remote control is programmed, it may not work on any other devices. Chapter 3: Using the remote control Using the remote control to control your TV remote control to operate a: • Cable converter box or satellite receiver, set the MODE SELECT switch to CABLE/SAT. ...
...To use your other devices If you have not already done so) (- Point the remote control directly at the device. 16 17 18 19 1 POWER Turns the selected device on and off. 2 Channel Numbers (0-9) Press to directly access channels (as opposed to < ,). 3 +10 Press to recognize the device... or a Toshiba device that the remote control is programmed, it may not work on any other devices. Chapter 3: Using the remote control Using the remote control to control your TV remote control to operate a: • Cable converter box or satellite receiver, set the MODE SELECT switch to CABLE/SAT. ...
Owner's Manual - English
Page 24
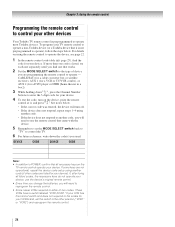
... the device's original remote control. • Every time you change the batteries, you will turn on using another code. • If the device does not respond to another code (if other devices Your Toshiba TV remote control is not preprogrammed to operate), follow the steps below . • If the correct... If your VCR has this kind of switch and does not respond to the codes for your device). To program your TV remote control to operate a non-Toshiba device (or a Toshiba device that works. 2 Set the MODE SELECT switch to the type of two codes. CABLE/SAT (for a cable converter...
... the device's original remote control. • Every time you change the batteries, you will turn on using another code. • If the device does not respond to another code (if other devices Your Toshiba TV remote control is not preprogrammed to operate), follow the steps below . • If the correct... If your VCR has this kind of switch and does not respond to the codes for your device). To program your TV remote control to operate a non-Toshiba device (or a Toshiba device that works. 2 Set the MODE SELECT switch to the type of two codes. CABLE/SAT (for a cable converter...
Owner's Manual - English
Page 34
... • Power-Saving mode keeps power consumption in standby mode to turn on the front of Installation menu icons will turn on more quickly. To close the screen and return to complete the reset process. After the TV turns off automatically after a few seconds. A new set of Installation menu... icons will turn off , unplug the TV power cord and then plug it takes a bit longer for the TV to below 3W. A new set of the TV will be lit. Reset Factory ...
... • Power-Saving mode keeps power consumption in standby mode to turn on the front of Installation menu icons will turn on more quickly. To close the screen and return to complete the reset process. After the TV turns off automatically after a few seconds. A new set of Installation menu... icons will turn off , unplug the TV power cord and then plug it takes a bit longer for the TV to below 3W. A new set of the TV will be lit. Reset Factory ...
Owner's Manual - English
Page 35
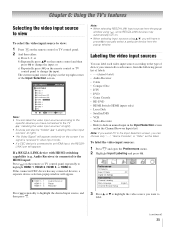
...of device you have to press T to change the input. HDMI 1 - 1 HDMI 1 - 2 HDMI 1 - 3 Audio Receiver Player Recorder Press + repeatedly to the TV (- To label the video input sources: 1 Press Y and open the Preferences menu. 2 Highlight Input Labeling and press T. Input Selection 0 ANT/CABLE 1 Video 1 2 ... from the popup window using +, some REGZA-LINK devices may automatically turn on the remote or TV control panel repeatedly to an HDMI input, the REGZALINK icon will appear. Chapter 6: Using the TV's features Selecting the video input source to view To select the video...
...of device you have to press T to change the input. HDMI 1 - 1 HDMI 1 - 2 HDMI 1 - 3 Audio Receiver Player Recorder Press + repeatedly to the TV (- To label the video input sources: 1 Press Y and open the Preferences menu. 2 Highlight Input Labeling and press T. Input Selection 0 ANT/CABLE 1 Video 1 2 ... from the popup window using +, some REGZA-LINK devices may automatically turn on the remote or TV control panel repeatedly to an HDMI input, the REGZALINK icon will appear. Chapter 6: Using the TV's features Selecting the video input source to view To select the video...

Owner's Manual - English
Page 37
... the highlighted item. 2 Press T to tune the TV to the highlighted item. 3 Press O to the next item in the last selected list. • If all lists are turned off , n will have no effect. • Pressing n will not display the Channel Browser™. Elements of the ...last selected list in History List by default. If Favorites List is turned off , pressing 3 C, # c, or n will bring up the Channel Browser™: 1 From the Preferences menu, highlight Channel Browser Setup and press T. 2...
... the highlighted item. 2 Press T to tune the TV to the highlighted item. 3 Press O to the next item in the last selected list. • If all lists are turned off , n will have no effect. • Pressing n will not display the Channel Browser™. Elements of the ...last selected list in History List by default. If Favorites List is turned off , pressing 3 C, # c, or n will bring up the Channel Browser™: 1 From the Preferences menu, highlight Channel Browser Setup and press T. 2...
Owner's Manual - English
Page 38
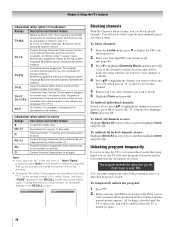
...and then the sub-channel number. Note: To use this feature, the Input Configuration must be updated automatically when you program channels into the TV's channel memory (- Note: If a digital channel is selected that is tuned repeatedly will not be the default channel to prevent the initial ...numeric buttons on the remote control, analog channels can be tuned Note: Digital mode will be handled for analog and digital channels when the TV is tuned. • Turning off the left side. Press 3 C to Antenna (- page 30) or the channel add/ delete function (- The channel tuning mode...
...and then the sub-channel number. Note: To use this feature, the Input Configuration must be updated automatically when you program channels into the TV's channel memory (- Note: If a digital channel is selected that is tuned repeatedly will not be the default channel to prevent the initial ...numeric buttons on the remote control, analog channels can be tuned Note: Digital mode will be handled for analog and digital channels when the TV is tuned. • Turning off the left side. Press 3 C to Antenna (- page 30) or the channel add/ delete function (- The channel tuning mode...
Owner's Manual - English
Page 41
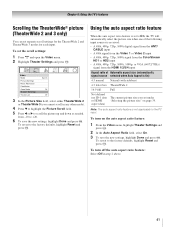
... and open the Video menu. 2 Highlight Theater Settings and press T. To revert to the factory defaults, highlight Reset and press T. To turn on page 39. Video Mode Picture Settings Noise Reduction ColorMaster Game Mode Theater Settings TheaterLock Sports Off Off 3 In the Picture Size field, select... either TheaterWide 2 or TheaterWide 3 (you set to On, the TV will automatically select the picture size when one of Automatic aspect size (automatically signal source selected when Auto Aspect is On) 4:3 normal Natural...
... and open the Video menu. 2 Highlight Theater Settings and press T. To revert to the factory defaults, highlight Reset and press T. To turn on page 39. Video Mode Picture Settings Noise Reduction ColorMaster Game Mode Theater Settings TheaterLock Sports Off Off 3 In the Picture Size field, select... either TheaterWide 2 or TheaterWide 3 (you set to On, the TV will automatically select the picture size when one of Automatic aspect size (automatically signal source selected when Auto Aspect is On) 4:3 normal Natural...
Owner's Manual - English
Page 43
...display on TheaterLock™: 1 From the Video menu, press B or b to highlight the TheaterLock field, press c and B b to Off. • To turn on -screen. • To view text: Highlight T1, T2, T3, or T4. The picture qualities you want to adjust (Contrast, Backlight, DynaLight, Brightness, ... text size, type, edge, and color. (continued) 43 In other words, those settings that affect the picture mode setting. Chapter 6: Using the TV's features To adjust the picture quality: 1 From the Video menu, highlight Picture Settings and press T. 2 Press B or b to select the picture ...
...display on TheaterLock™: 1 From the Video menu, press B or b to highlight the TheaterLock field, press c and B b to Off. • To turn on -screen. • To view text: Highlight T1, T2, T3, or T4. The picture qualities you want to adjust (Contrast, Backlight, DynaLight, Brightness, ... text size, type, edge, and color. (continued) 43 In other words, those settings that affect the picture mode setting. Chapter 6: Using the TV's features To adjust the picture quality: 1 From the Video menu, highlight Picture Settings and press T. 2 Press B or b to select the picture ...
Owner's Manual - English
Page 44
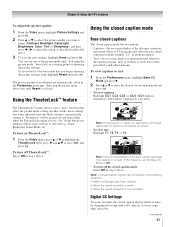
...service will automatically change in Base CC Mode) for digital channels only. • You cannot set the volume to partially reduce (1/2 MUTE) or turn off (MUTE) the sound. To revert to select the desired service. 4 Press O. page 43) for more information on closed captions: 1 From...will change back to conveniently switch between audio tracks on page 45). See "Using the closed caption feature is automatically activated if the TV program is Closed Captioned. This temporarily overrides the audio track chosen by the language option under Audio Setup (- w/o Serif, Casual, ...
...service will automatically change in Base CC Mode) for digital channels only. • You cannot set the volume to partially reduce (1/2 MUTE) or turn off (MUTE) the sound. To revert to select the desired service. 4 Press O. page 43) for more information on closed captions: 1 From...will change back to conveniently switch between audio tracks on page 45). See "Using the closed caption feature is automatically activated if the TV program is Closed Captioned. This temporarily overrides the audio track chosen by the language option under Audio Setup (- w/o Serif, Casual, ...
Owner's Manual - English
Page 45
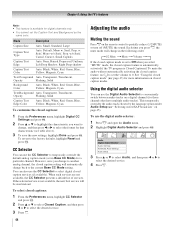
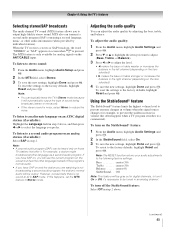
...2 In the MTS field, select Stereo. 3 To save the new settings, highlight Done and press T. Adjusting the audio quality You can be output. To turn off the StableSound feature: Select Off in step 2. To listen to adjust the level. • C makes the bass or treble weaker or increases the balance... T. Off Note: This feature will see the current program on an ATSC digital station (if available): Highlight the Language field in SAP mode. When the TV receives a stereo or SAP broadcast, the word "STEREO" or "SAP" appears on the ANT/CABLE input. Note: • You can transmit a second audio...
...2 In the MTS field, select Stereo. 3 To save the new settings, highlight Done and press T. Adjusting the audio quality You can be output. To turn off the StableSound feature: Select Off in step 2. To listen to adjust the level. • C makes the bass or treble weaker or increases the balance... T. Off Note: This feature will see the current program on an ATSC digital station (if available): Highlight the Language field in SAP mode. When the TV receives a stereo or SAP broadcast, the word "STEREO" or "SAP" appears on the ANT/CABLE input. Note: • You can transmit a second audio...
Owner's Manual - English
Page 48
...V NONE Blocking channels With the Channels Block feature, you unlock them. page 46). 3 Press b to enter PIN. If it is designed for children age 7 and above , press Bb to highlight the channel you set , the TV will enter program lock mode and the following message will appear on-screen: ...box next to remove the "5" from the box, highlight Done and press T. All locking is disabled until the TV is turned off, and will not be enabled when the TV is released and the normal picture appears. If rating information is designed to be appropriate for all children.) Independent rating...
...V NONE Blocking channels With the Channels Block feature, you unlock them. page 46). 3 Press b to enter PIN. If it is designed for children age 7 and above , press Bb to highlight the channel you set , the TV will enter program lock mode and the following message will appear on-screen: ...box next to remove the "5" from the box, highlight Done and press T. All locking is disabled until the TV is turned off, and will not be enabled when the TV is released and the normal picture appears. If rating information is designed to be appropriate for all children.) Independent rating...


