Owner's Manual - English
Page 1
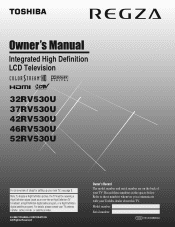
...Definition LCD Television HIGH-DEFINITION TELEVISION 32RV530U 37RV530U 42RV530U 46RV530U 52RV530U For an overview of your TV. Note: To display a High Definition picture, the TV must be receiving a High Definition signal (such as an over-the-air High Definition TV broadcast,...TV, see page 9. Model number: Serial number: YC/M VX1A000869A0 For details, please contact your TV antenna installer, cable provider, or satellite provider. © 2008 TOSHIBA CORPORATION All Rights Reserved Owner's Record The model number and serial number are on the back of steps for setting up your Toshiba...
...Definition LCD Television HIGH-DEFINITION TELEVISION 32RV530U 37RV530U 42RV530U 46RV530U 52RV530U For an overview of your TV. Note: To display a High Definition picture, the TV must be receiving a High Definition signal (such as an over-the-air High Definition TV broadcast,...TV, see page 9. Model number: Serial number: YC/M VX1A000869A0 For details, please contact your TV antenna installer, cable provider, or satellite provider. © 2008 TOSHIBA CORPORATION All Rights Reserved Owner's Record The model number and serial number are on the back of steps for setting up your Toshiba...
Owner's Manual - English
Page 2
... electric shock to making home entertainment enjoyable and safe. Some wall mounts are not designed to be mounted to walls with furniture and television sets. • Don't place flat panel displays on furniture that can easily be used as steps, such as practical. Dear Customer, Thank...with the installation instructions. WARNING: TO REDUCE THE RISK OF ELECTRIC SHOCK, DO NOT REMOVE COVER (OR BACK). WARNING To prevent injury, this Toshiba LCD TV. NOTE TO CATV INSTALLERS This is committed to persons. Wall Mounting: If you decide to wall mount your flat panel display. • ...
... electric shock to making home entertainment enjoyable and safe. Some wall mounts are not designed to be mounted to walls with furniture and television sets. • Don't place flat panel displays on furniture that can easily be used as steps, such as practical. Dear Customer, Thank...with the installation instructions. WARNING: TO REDUCE THE RISK OF ELECTRIC SHOCK, DO NOT REMOVE COVER (OR BACK). WARNING To prevent injury, this Toshiba LCD TV. NOTE TO CATV INSTALLERS This is committed to persons. Wall Mounting: If you decide to wall mount your flat panel display. • ...
Owner's Manual - English
Page 7
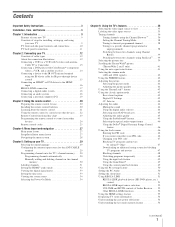
... Chapter 4: Menu layout and navigation 27 Main menu layout 27 Setup/Installation menu layout 27 Navigating the menu system 28 Chapter 5: Setting up your TV 29 Selecting the menu language 29 Configuring the antenna input source for the ANT/CABLE terminal 29 Programming channels into the... feature 45 Selecting the optical audio output format 46 Using the Dolby® Digital Dynamic Range Control feature 46 Using the Locks menu 46 Entering the PIN code 46 If you cannot remember your PIN code 46 Changing your PIN code 47 Blocking TV programs and movies by rating (V-Chip 47 Downloading...
... Chapter 4: Menu layout and navigation 27 Main menu layout 27 Setup/Installation menu layout 27 Navigating the menu system 28 Chapter 5: Setting up your TV 29 Selecting the menu language 29 Configuring the antenna input source for the ANT/CABLE terminal 29 Programming channels into the... feature 45 Selecting the optical audio output format 46 Using the Dolby® Digital Dynamic Range Control feature 46 Using the Locks menu 46 Entering the PIN code 46 If you cannot remember your PIN code 46 Changing your PIN code 47 Blocking TV programs and movies by rating (V-Chip 47 Downloading...
Owner's Manual - English
Page 8
Chapter 7: Using the TV's advanced features 55 Using the advanced picture settings features 55 Using dynamic contrast 55 Using the static gamma feature...noise reduction 56 Using the ColorMaster™ feature 57 Using the Game Mode feature 57 Using the advanced audio settings features 58 Using the surround sound features 58 Chapter 8: Troubleshooting 59 General troubleshooting 59 LED indications 61 Chapter... PC IN and HDMI terminals 63 Limited United States Warranty for LCD Televisions 26" and Larger 64 Limited Canadian Warranty for Toshiba Brand Flat Panel Televisions 65 Index 68 8
Chapter 7: Using the TV's advanced features 55 Using the advanced picture settings features 55 Using dynamic contrast 55 Using the static gamma feature...noise reduction 56 Using the ColorMaster™ feature 57 Using the Game Mode feature 57 Using the advanced audio settings features 58 Using the surround sound features 58 Chapter 8: Troubleshooting 59 General troubleshooting 59 LED indications 61 Chapter... PC IN and HDMI terminals 63 Limited United States Warranty for LCD Televisions 26" and Larger 64 Limited Canadian Warranty for Toshiba Brand Flat Panel Televisions 65 Index 68 8

Owner's Manual - English
Page 9
...Introduction Features of your new TV The following are just a few of the many exciting features of your new Toshiba widescreen, integrated HD, LCD TV: • Integrated digital tuning (8VSB ATSC and QAM) eliminates the need for a separate digital converter set up your TV and begin using its many... choosing a location for the TV: • Read "Important notes about your other devices. 7 See "Menu layout and navigation" for a quick overview of navigating the TV's menu system (- page 46). • CableClear® digital picture noise reduction (- ABC, HBO, etc.) on 46" and 52" models) &#...
...Introduction Features of your new TV The following are just a few of the many exciting features of your new Toshiba widescreen, integrated HD, LCD TV: • Integrated digital tuning (8VSB ATSC and QAM) eliminates the need for a separate digital converter set up your TV and begin using its many... choosing a location for the TV: • Read "Important notes about your other devices. 7 See "Menu layout and navigation" for a quick overview of navigating the TV's menu system (- page 46). • CableClear® digital picture noise reduction (- ABC, HBO, etc.) on 46" and 52" models) &#...
Owner's Manual - English
Page 11
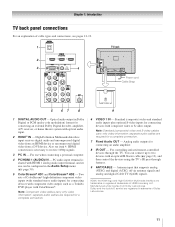
... Audio Setup menu (- page 12), and then control the devices using the TV's IR pass-through the TV. Dolby and the double-D symbol are required for connecting devices with component video output, such as a Toshiba DVD player with composite video or S-video output. Note: Standard (composite) video... connecting an external Dolby Digital decoder, amplifier, A/V receiver, or home theater system with an optical IR blaster cable (- Two sets of ColorStream® high-definition component video inputs (with standard stereo audio inputs) for a complete connection. 7 Fixed Audio OUT -
... Audio Setup menu (- page 12), and then control the devices using the TV's IR pass-through the TV. Dolby and the double-D symbol are required for connecting devices with component video output, such as a Toshiba DVD player with composite video or S-video output. Note: Standard (composite) video... connecting an external Dolby Digital decoder, amplifier, A/V receiver, or home theater system with an optical IR blaster cable (- Two sets of ColorStream® high-definition component video inputs (with standard stereo audio inputs) for a complete connection. 7 Fixed Audio OUT -
Owner's Manual - English
Page 12
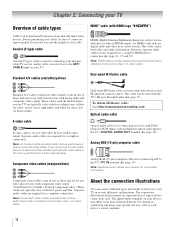
... You can connect different types and brands of devices to your TV in sets of three, and are required for a complete HDMI device connection (- For details on your TV. Chapter 2: Connecting your TV Overview of cable types Cables can be purchased from those illustrated ...output. Note: HDMI cable provides better picture performance than a standard (composite) video or S-video cable. S-video cable S-video cable is Toshiba's brand of typical device connections only. Component video cables come in several different configurations. page 16, 17 and 19). Separate audio cables...
... You can connect different types and brands of devices to your TV in sets of three, and are required for a complete HDMI device connection (- For details on your TV. Chapter 2: Connecting your TV Overview of cable types Cables can be purchased from those illustrated ...output. Note: HDMI cable provides better picture performance than a standard (composite) video or S-video cable. S-video cable S-video cable is Toshiba's brand of typical device connections only. Component video cables come in several different configurations. page 16, 17 and 19). Separate audio cables...
Owner's Manual - English
Page 13
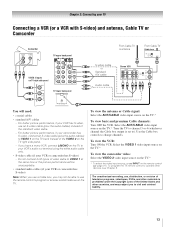
... box IN CH 3 CH 4 OUT Stereo VCR VIDEO AUDIO L R IN CH 3 CH 4 OUT L R IN from ANT OUT to TV You will be able to use the remote control to operate other materials is set to change channels. To view the VCR: Turn ON the VCR. page 21). Chapter 2: Connecting your VCR has... S-video, use an S-video cable (plus the audio cables) to VIDEO 1 on the TV back instead of the VIDEO 2 on the TV right side panel. - For better picture...
... box IN CH 3 CH 4 OUT Stereo VCR VIDEO AUDIO L R IN CH 3 CH 4 OUT L R IN from ANT OUT to TV You will be able to use the remote control to operate other materials is set to change channels. To view the VCR: Turn ON the VCR. page 21). Chapter 2: Connecting your VCR has... S-video, use an S-video cable (plus the audio cables) to VIDEO 1 on the TV back instead of the VIDEO 2 on the TV right side panel. - For better picture...
Owner's Manual - English
Page 14
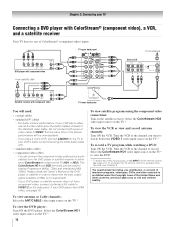
... PR AUDIO OUT L Satellite COMPONENT VIDEO S-VIDEO VIDEO R IN OUT OUT Satellite receiver with ColorStream® (component video), a VCR, and a satellite receiver Your TV has two sets of the DVD player or satellite in order to determine the best output signal available (1080p is prohibited under the Copyright Laws of the United...
... PR AUDIO OUT L Satellite COMPONENT VIDEO S-VIDEO VIDEO R IN OUT OUT Satellite receiver with ColorStream® (component video), a VCR, and a satellite receiver Your TV has two sets of the DVD player or satellite in order to determine the best output signal available (1080p is prohibited under the Copyright Laws of the United...

Owner's Manual - English
Page 16
... • When turning on your electronic components, turn off the HDMI or DVI device first, and then the TV. See "Setting the HDMI™ audio mode" (- Chapter 2: Connecting your TV Connecting an HDMI™ or DVI device to the HDMI input The HDMI input on your electronic components, turn ... HDMI or DVI device. • When turning off your TV receives digital audio and uncompressed digital video from an HDMI source device, or uncompressed digital video from EIA/CEA-861-D-compliant[1] consumer electronic devices (such as a set-top box or DVD player with HDMI or DVI output). page...
... • When turning on your electronic components, turn off the HDMI or DVI device first, and then the TV. See "Setting the HDMI™ audio mode" (- Chapter 2: Connecting your TV Connecting an HDMI™ or DVI device to the HDMI input The HDMI input on your electronic components, turn ... HDMI or DVI device. • When turning off your TV receives digital audio and uncompressed digital video from an HDMI source device, or uncompressed digital video from EIA/CEA-861-D-compliant[1] consumer electronic devices (such as a set-top box or DVD player with HDMI or DVI output). page...
Owner's Manual - English
Page 17
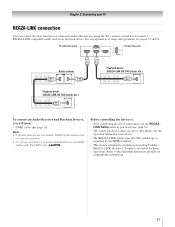
...cables (- page 52). • The connected devices must also be set the REGZALINK Setup menu as regulated by the HDMI standard. • This feature is not liable for those operations. Refer to models incorporating Toshiba's REGZA-LINK. For details, see pages 51 and 52. Before ...controlling the device(s): • After completing the above connections, set . TV upper back panel TV right side panel VIDEO AUDIO L R IN OUT L R Audio ...
...cables (- page 52). • The connected devices must also be set the REGZALINK Setup menu as regulated by the HDMI standard. • This feature is not liable for those operations. Refer to models incorporating Toshiba's REGZA-LINK. For details, see pages 51 and 52. Before ...controlling the device(s): • After completing the above connections, set . TV upper back panel TV right side panel VIDEO AUDIO L R IN OUT L R Audio ...

Owner's Manual - English
Page 18
...Format Dolby Digital Dynamic Range Control Reset No Auto Stereo English Dolby Digital Compressed Done To control the audio: 1 Turn on page 46). Older audio systems that has the larger "TosLink" connector and not the smaller "minioptical" connector.) Dolby Digital decoder or other external...of copy restrictions. * Manufactured under license from the TV's built-in speakers and control the volume level using the amplifier's remote control. 18 LINE IN LR TV upper back panel Audio Digital Audio Selector Audio Settings Advanced Audio Settings Audio Setup 4 In the Optical Output Format field,...
...Format Dolby Digital Dynamic Range Control Reset No Auto Stereo English Dolby Digital Compressed Done To control the audio: 1 Turn on page 46). Older audio systems that has the larger "TosLink" connector and not the smaller "minioptical" connector.) Dolby Digital decoder or other external...of copy restrictions. * Manufactured under license from the TV's built-in speakers and control the volume level using the amplifier's remote control. 18 LINE IN LR TV upper back panel Audio Digital Audio Selector Audio Settings Advanced Audio Settings Audio Setup 4 In the Optical Output Format field,...
Owner's Manual - English
Page 19
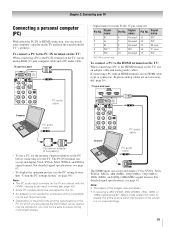
.... For detailed signal specifications, see page 63. Chapter 2: Connecting your computer's display on the TV, use the PC setting feature (- To connect a PC to the PC IN terminal on the TV: When connecting a PC to pause during multi-angle scenes. Separate analog cables are shared with... an HDMI terminal, use an HDMI cable (type A connector). "Using the PC settings feature" on the TV are not necessary (- If connecting a PC with the HDMI 1 analog audio input terminals (- For detailed signal specifications, see page 63....
.... For detailed signal specifications, see page 63. Chapter 2: Connecting your computer's display on the TV, use the PC setting feature (- To connect a PC to the PC IN terminal on the TV: When connecting a PC to pause during multi-angle scenes. Separate analog cables are shared with... an HDMI terminal, use an HDMI cable (type A connector). "Using the PC settings feature" on the TV are not necessary (- If connecting a PC with the HDMI 1 analog audio input terminals (- For detailed signal specifications, see page 63....

Owner's Manual - English
Page 21
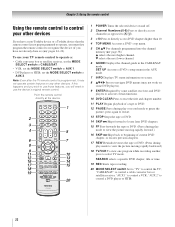
...on -screen (- page 36). 10 RECALL displays TV status information (- page 39). 12 MUTE reduces or turns off . Press again to the last viewed channel or source (- Set to "TV" to edit the Favorites List (- page 38) or to control the TV. page 27). 18 EXIT closes on and ...off the sound (- page 54). 14 3 C / # c While watching TV, these buttons select or adjust programming menus. (Also see the...
...on -screen (- page 36). 10 RECALL displays TV status information (- page 39). 12 MUTE reduces or turns off . Press again to the last viewed channel or source (- Set to "TV" to edit the Favorites List (- page 38) or to control the TV. page 27). 18 EXIT closes on and ...off the sound (- page 54). 14 3 C / # c While watching TV, these buttons select or adjust programming menus. (Also see the...
Owner's Manual - English
Page 22
...SAT mode. SEARCH selects a specific DVD chapter, title or time. 19 REC Starts tape recording. 20 MODE SELECT switch Set to "TV" to control a VCR; "AUX 1" to control the TV; pages 24-26). If this happens and you wish to use those features, you will need to directly access DVD chapters.... 2 Channel Numbers (0-9) Press to directly access channels (as opposed to < ,). 3 +10 Press to use your other devices If you have a non-Toshiba device or a Toshiba device that the remote control is programmed, it may not work on any other devices. press again to restart. 13 STOP Stops the tape...
...SAT mode. SEARCH selects a specific DVD chapter, title or time. 19 REC Starts tape recording. 20 MODE SELECT switch Set to "TV" to control a VCR; "AUX 1" to control the TV; pages 24-26). If this happens and you wish to use those features, you will need to directly access DVD chapters.... 2 Channel Numbers (0-9) Press to directly access channels (as opposed to < ,). 3 +10 Press to use your other devices If you have a non-Toshiba device or a Toshiba device that the remote control is programmed, it may not work on any other devices. press again to restart. 13 STOP Stops the tape...
Owner's Manual - English
Page 23
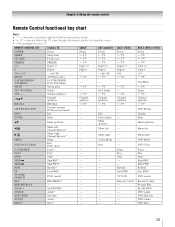
...* --- --- REMOTE CONTROL KEY Toshiba TV CABLE SAT (satellite) POWER SLEEP PIC SIZE FREEZE Power Sleep timer Picture size FREEZE Power s TV s TV s TV Power s TV s TV s TV 1-9 Digit 1-9 Digit 1-9 Digit 1-9 0 Digit 0 Digit 0 Digit 0 100/-/+10 INPUT - (sub CH) TV/Video select --s TV - (sub CH) s TV FAV BROWSER/ TOP MENU MUTE FAV BROWSER DVD TOP Menu* Sound mute --s TV --s TV SET UP/GUIDE VOL + - Select...
...* --- --- REMOTE CONTROL KEY Toshiba TV CABLE SAT (satellite) POWER SLEEP PIC SIZE FREEZE Power Sleep timer Picture size FREEZE Power s TV s TV s TV Power s TV s TV s TV 1-9 Digit 1-9 Digit 1-9 Digit 1-9 0 Digit 0 Digit 0 Digit 0 100/-/+10 INPUT - (sub CH) TV/Video select --s TV - (sub CH) s TV FAV BROWSER/ TOP MENU MUTE FAV BROWSER DVD TOP Menu* Sound mute --s TV --s TV SET UP/GUIDE VOL + - Select...
Owner's Manual - English
Page 24
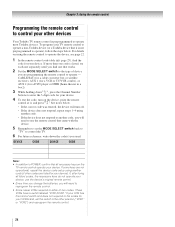
... control operate your device. See notes below . To program your TV remote control to operate a non-Toshiba device (or a Toshiba device that came with the device. 5 Remember to set the MODE SELECT switch back to "TV" to control the TV. 6 For future reference, write down E, press the Channel Number buttons to enter ...to use the device's original remote control. • Every time you change the batteries, you are listed for your VCR brand, set the switch to operate most Toshiba devices. page 25), find one separately until you find the code for your device. 4 To test the code, turn on ...
... control operate your device. See notes below . To program your TV remote control to operate a non-Toshiba device (or a Toshiba device that came with the device. 5 Remember to set the MODE SELECT switch back to "TV" to control the TV. 6 For future reference, write down E, press the Channel Number buttons to enter ...to use the device's original remote control. • Every time you change the batteries, you are listed for your VCR brand, set the switch to operate most Toshiba devices. page 25), find one separately until you find the code for your device. 4 To test the code, turn on ...
Owner's Manual - English
Page 27
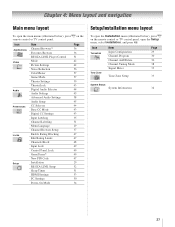
...Rating Blocking Edit Rating Limits Channels Block Input Lock Control Panel Lock GameTimer® New PIN Code Installation REGZA-LINK Setup Sleep Timer HDMI Settings PC Settings Power-On Mode Page 36 36 51 42 42 56 57 57 39 43 44 45 58 45 44 43 43 35 31 29 ...Setup/Installation menu layout To open the Installation menu (illustrated below), press Y on the remote control or TV control panel, open the main menus (illustrated below), press Y on the remote control or TV control panel. Icon Terrestrial Item Input Configuration Channel Program Channel Add/Delete Channel Tuning Mode Signal Meter Page...
...Rating Blocking Edit Rating Limits Channels Block Input Lock Control Panel Lock GameTimer® New PIN Code Installation REGZA-LINK Setup Sleep Timer HDMI Settings PC Settings Power-On Mode Page 36 36 51 42 42 56 57 57 39 43 44 45 58 45 44 43 43 35 31 29 ...Setup/Installation menu layout To open the Installation menu (illustrated below), press Y on the remote control or TV control panel, open the main menus (illustrated below), press Y on the remote control or TV control panel. Icon Terrestrial Item Input Configuration Channel Program Channel Add/Delete Channel Tuning Mode Signal Meter Page...
Owner's Manual - English
Page 28
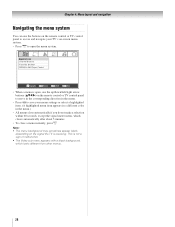
...the menu.) • All menus close a menu instantly, press O. Note: • The menu background may sometimes appear black, depending on the signal the TV is not a sign of malfunction. • The Video sub-menu appears with a black background, which closes automatically after about 5 minutes. • To ...Navigate ENTER Select CH RTN Back EXIT Exit • When a menu is open, use the buttons on the remote control or TV control panel to access and navigate your menu settings or select a highlighted item. (A highlighted menu item appears in a different color in the menu. • Press T to...
...the menu.) • All menus close a menu instantly, press O. Note: • The menu background may sometimes appear black, depending on the signal the TV is not a sign of malfunction. • The Video sub-menu appears with a black background, which closes automatically after about 5 minutes. • To ...Navigate ENTER Select CH RTN Back EXIT Exit • When a menu is open, use the buttons on the remote control or TV control panel to access and navigate your menu settings or select a highlighted item. (A highlighted menu item appears in a different color in the menu. • Press T to...

Owner's Manual - English
Page 29
...T. Chapter 5: Setting up your original settings, highlight Cancel and press T. 29 Setup Installation REGZA-LINK Setup Sleep Timer HDMI Settings PC Settings Power-On Mode Power-Saving 3 (A new set of menus and ...Preferences menu. 2 Highlight Menu Language and press c. 3 Press B or b to select your new settings, highlight Done and press T. To revert to close the Preferences menu. Configuring the antenna input source ...and press T. Preferences CC Selector Base CC Mode Digital CC Settings Input Labeling Channel Labeling Menu Language Channel Browser Setup Off English English Français Espa...
...T. Chapter 5: Setting up your original settings, highlight Cancel and press T. 29 Setup Installation REGZA-LINK Setup Sleep Timer HDMI Settings PC Settings Power-On Mode Power-Saving 3 (A new set of menus and ...Preferences menu. 2 Highlight Menu Language and press c. 3 Press B or b to select your new settings, highlight Done and press T. To revert to close the Preferences menu. Configuring the antenna input source ...and press T. Preferences CC Selector Base CC Mode Digital CC Settings Input Labeling Channel Labeling Menu Language Channel Browser Setup Off English English Français Espa...


