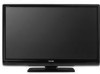

Owner's Manual - English
Page 4
... place the TV where the power cord is subject to wear or abuse. 25) Never overload wall outlets and extension cords. 26) Always operate this product can accidentally touch overhead power lines. If you need to clean the LCD screen, follow this manual to a Toshiba Authorized Service Center.... 38) If you are in the LCD panel contains a small amount of service, ask the service technician to perform routine safety ...
... place the TV where the power cord is subject to wear or abuse. 25) Never overload wall outlets and extension cords. 26) Always operate this product can accidentally touch overhead power lines. If you need to clean the LCD screen, follow this manual to a Toshiba Authorized Service Center.... 38) If you are in the LCD panel contains a small amount of service, ask the service technician to perform routine safety ...
Owner's Manual - English
Page 6
...that may cause undesired operation. Trademark Information • Manufactured under your LCD TV The following two conditions: (1) this device may not cause harmful interference...LCD Display technology and are not visible when the picture is no guarantee that does not operate properly (does not light, remains constantly lit, etc.). FCC Declaration of Conformity Compliance Statement (Part 15): The Toshiba 32RV530U, 37RV530U, 42RV530U, 46RV530U... (ghost) may appear on -screen target may not work with the limits for help. therefore, Toshiba is displayed for 46" and 52" models) 6 ...
...that may cause undesired operation. Trademark Information • Manufactured under your LCD TV The following two conditions: (1) this device may not cause harmful interference...LCD Display technology and are not visible when the picture is no guarantee that does not operate properly (does not light, remains constantly lit, etc.). FCC Declaration of Conformity Compliance Statement (Part 15): The Toshiba 32RV530U, 37RV530U, 42RV530U, 46RV530U... (ghost) may appear on -screen target may not work with the limits for help. therefore, Toshiba is displayed for 46" and 52" models) 6 ...

Owner's Manual - English
Page 9
...infrared terminal using the IR blaster cable for the TV: • Read "Important notes about your LCD TV" (- Overview of steps for installing, setting up your TV and begin using its many exciting features of your new Toshiba widescreen, integrated HD, LCD TV: • Integrated digital tuning (8VSB ATSC and... of the buttons on the screen along with Dolby® Digital optical output format (- page 30). 9 For details on 46" and 52" models) • REGZA-LINK allows control of external devices from the TV remote via HDMI connection (- page 6). • Place the TV in a proper location (-...
...infrared terminal using the IR blaster cable for the TV: • Read "Important notes about your LCD TV" (- Overview of steps for installing, setting up your TV and begin using its many exciting features of your new Toshiba widescreen, integrated HD, LCD TV: • Integrated digital tuning (8VSB ATSC and... of the buttons on the screen along with Dolby® Digital optical output format (- page 30). 9 For details on 46" and 52" models) • REGZA-LINK allows control of external devices from the TV remote via HDMI connection (- page 6). • Place the TV in a proper location (-...

Owner's Manual - English
Page 10
... and side panel controls and connections Model 42RV530U is on-screen, these buttons change the source you cannot turn the TV on and off the TV, press and hold the POWER button on the remote control or TV control panel and you are referred to access the menu system (- Press to instantly close an... digital video from an HDMI device or uncompressed digital video from a DVI device. "Selecting the Power-On Mode" on page 34) See "LED indications" on -screen menu. 8 CHANNEL Bb - TV front Right side panel 4 8 5 9 6 7 10 3 11 1 2 1 Remote sensor -
... and side panel controls and connections Model 42RV530U is on-screen, these buttons change the source you cannot turn the TV on and off the TV, press and hold the POWER button on the remote control or TV control panel and you are referred to access the menu system (- Press to instantly close an... digital video from an HDMI device or uncompressed digital video from a DVI device. "Selecting the Power-On Mode" on page 34) See "LED indications" on -screen menu. 8 CHANNEL Bb - TV front Right side panel 4 8 5 9 6 7 10 3 11 1 2 1 Remote sensor -
Owner's Manual - English
Page 19
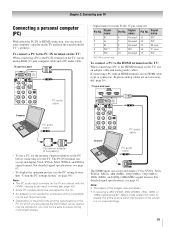
... display on the TV and hear the sound from the TV's speakers. Signal ...TV: When connecting a PC to the HDMI terminal on the TV, use a PC, set the monitor output resolution on the TV, use the PC setting feature (- TV...before connecting it to the TV. For detailed signal specifications, ...IN terminal can watch your TV Connecting a personal computer (PC...VGA, SVGA, XGA, WXGA, and SXGA signal formats. TV upper back panel • Signal names for computers with ...the PC on the TV: When connecting a PC to this TV. • An ...PC settings feature" on the TV are not necessary (- For...
... display on the TV and hear the sound from the TV's speakers. Signal ...TV: When connecting a PC to the HDMI terminal on the TV, use a PC, set the monitor output resolution on the TV, use the PC setting feature (- TV...before connecting it to the TV. For detailed signal specifications, ...IN terminal can watch your TV Connecting a personal computer (PC...VGA, SVGA, XGA, WXGA, and SXGA signal formats. TV upper back panel • Signal names for computers with ...the PC on the TV: When connecting a PC to this TV. • An ...PC settings feature" on the TV are not necessary (- For...

Owner's Manual - English
Page 21
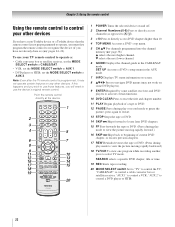
... BROWSER accesses the Favorites List in the main menu system. 17 MENU accesses the main TV menu system (- page 37). (Also see "Arrow buttons.") 15 Arrow buttons (BbC c) When a menu is on-screen (- Set to "TV" to the last viewed channel or source (- Note: The error message "Not Available"... may appear if you press a key for operating the TV only are described here. page 51). 4 PIC SIZE cycles through programmed channels...
... BROWSER accesses the Favorites List in the main menu system. 17 MENU accesses the main TV menu system (- page 37). (Also see "Arrow buttons.") 15 Arrow buttons (BbC c) When a menu is on-screen (- Set to "TV" to the last viewed channel or source (- Note: The error message "Not Available"... may appear if you press a key for operating the TV only are described here. page 51). 4 PIC SIZE cycles through programmed channels...
Owner's Manual - English
Page 22
... chapter, title or time. 19 REC Starts tape recording. 20 MODE SELECT switch Set to "TV" to use your other devices. "AUX 2" to recognize the device (if you have a non-Toshiba device or a Toshiba device that the remote control is programmed, it may not work on some DVD players). 9...control a DVD player or HTIB. 22 b selects the next lower channel. 6 GUIDE Displays the channel guide in the AUX mode. 7 INFO Displays TV status information on-screen. 8 BbC c Press to navigate DVD menus (may not operate certain features on and off. 2 Channel Numbers (0-9) Press to directly access channels ...
... chapter, title or time. 19 REC Starts tape recording. 20 MODE SELECT switch Set to "TV" to use your other devices. "AUX 2" to recognize the device (if you have a non-Toshiba device or a Toshiba device that the remote control is programmed, it may not work on some DVD players). 9...control a DVD player or HTIB. 22 b selects the next lower channel. 6 GUIDE Displays the channel guide in the AUX mode. 7 INFO Displays TV status information on-screen. 8 BbC c Press to navigate DVD menus (may not operate certain features on and off. 2 Channel Numbers (0-9) Press to directly access channels ...
Owner's Manual - English
Page 28
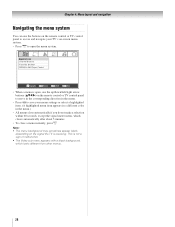
... Exit • When a menu is open, use the buttons on the remote control or TV control panel to open the menu system. Note: • The menu background may sometimes appear black, depending on -screen menu system. • Press Y to access and navigate your menu settings or select a ...highlighted item. (A highlighted menu item appears in a different color in the menu. • Press T to save your TV's on the signal the TV is not a sign of malfunction. ...
... Exit • When a menu is open, use the buttons on the remote control or TV control panel to open the menu system. Note: • The menu background may sometimes appear black, depending on -screen menu system. • Press Y to access and navigate your menu settings or select a ...highlighted item. (A highlighted menu item appears in a different color in the menu. • Press T to save your TV's on the signal the TV is not a sign of malfunction. ...

Owner's Manual - English
Page 29
Configuring the antenna input source for the ANT/CABLE input on -screen display of Installation menu icons will appear, as shown below.) Open the Terrestrial menu, highlight Input Configuration, and press T. To select the menu language: 1 Press Y ... Mode Digital CC Settings Input Labeling Channel Labeling Menu Language Channel Browser Setup Off English English Français Español 4 Press O to your TV Selecting the menu language You can choose from three different languages (English, French and Spanish) for the on the...
Configuring the antenna input source for the ANT/CABLE input on -screen display of Installation menu icons will appear, as shown below.) Open the Terrestrial menu, highlight Input Configuration, and press T. To select the menu language: 1 Press Y ... Mode Digital CC Settings Input Labeling Channel Labeling Menu Language Channel Browser Setup Off English English Français Español 4 Press O to your TV Selecting the menu language You can choose from three different languages (English, French and Spanish) for the on the...

Owner's Manual - English
Page 30
... memory, you have to a channel not programmed in the channel memory. Note: • You must use the Channel Number buttons on -screen display and press T). To program channels automatically: 1 Configure the antenna input source, if you can automatically detect all active channels in the ...configure the ANT/CABLE input source before programming channels (- A new set of Channels Found - 52 Scanning Analog Channels Found Channel - 55 Cancel The TV will appear. 2 Open the Terrestrial menu, highlight Channel Add/ Delete, and then press T. To add a channel to the channel memory: Highlight...
... memory, you have to a channel not programmed in the channel memory. Note: • You must use the Channel Number buttons on -screen display and press T). To program channels automatically: 1 Configure the antenna input source, if you can automatically detect all active channels in the ...configure the ANT/CABLE input source before programming channels (- A new set of Channels Found - 52 Scanning Analog Channels Found Channel - 55 Cancel The TV will appear. 2 Open the Terrestrial menu, highlight Channel Add/ Delete, and then press T. To add a channel to the channel memory: Highlight...
Owner's Manual - English
Page 31
...to the channel list by programming channels, you can remove the unwanted encrypted (non-viewable) channel while you will appear. Chapter 5: Setting up your TV To revert to your settings, highlight Done and press T. Press 1 on remote to remove channel Press 1 while the message is 128. The ...(logos) for other channels. 5 To save your original settings: Highlight Cancel and press T before saving. You will be stored is on the screen to select the channel for which you can be programmed into an encrypted channel, the following message will be able to view and assign these...
...to the channel list by programming channels, you can remove the unwanted encrypted (non-viewable) channel while you will appear. Chapter 5: Setting up your TV To revert to your settings, highlight Done and press T. Press 1 on remote to remove channel Press 1 while the message is 128. The ...(logos) for other channels. 5 To save your original settings: Highlight Cancel and press T before saving. You will be stored is on the screen to select the channel for which you can be programmed into an encrypted channel, the following message will be able to view and assign these...
Owner's Manual - English
Page 32
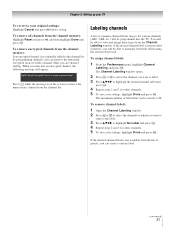
... to highlight Custom and press T. No Yes 4 Highlight Done and press T to save your TV To create and assign a custom label: 1 Open the Channel Labeling window. 2 Press < or , to "Auto." If not, the TV will be deleted and press =. 3 Highlight Yes from the HDMI input is available, it will ... 2 Highlight the label to be added to the list in alphabetical order and marked with an icon to highlight the desired character on the on-screen software keyboard. 5 The highlighted character is grayed out in the banner, Channel Add/Delete, Channels Block, and Channel Browser. Note: Because the ...
... to highlight Custom and press T. No Yes 4 Highlight Done and press T to save your TV To create and assign a custom label: 1 Open the Channel Labeling window. 2 Press < or , to "Auto." If not, the TV will be deleted and press =. 3 Highlight Yes from the HDMI input is available, it will ... 2 Highlight the label to be added to the list in alphabetical order and marked with an icon to highlight the desired character on the on-screen software keyboard. 5 The highlighted character is grayed out in the banner, Channel Add/Delete, Channels Block, and Channel Browser. Note: Because the ...
Owner's Manual - English
Page 33
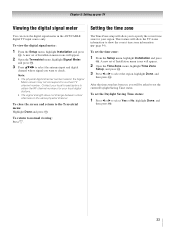
... Time Zone menu, highlight Time Zone Setup, and press T. 3 Press C or c to select the region, highlight Done, and then press T. To close the screen and return to normal viewing: Press O. To return to the Terrestrial menu: Highlight Done and press T. This feature will allow the... channel number listed in the ANT/CABLE digital TV input source only. Chapter 5: Setting up your local broadcasters to a virtual TV channel number. Contact your TV Viewing the digital signal meter You can view the digital signal meter in the Signal Meter screen may not correspond to obtain the RF channel...
... Time Zone menu, highlight Time Zone Setup, and press T. 3 Press C or c to select the region, highlight Done, and then press T. To close the screen and return to normal viewing: Press O. To return to the Terrestrial menu: Highlight Done and press T. This feature will allow the... channel number listed in the ANT/CABLE digital TV input source only. Chapter 5: Setting up your local broadcasters to a virtual TV channel number. Contact your TV Viewing the digital signal meter You can view the digital signal meter in the Signal Meter screen may not correspond to obtain the RF channel...
Owner's Manual - English
Page 34
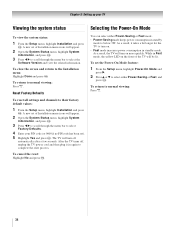
... mode increases power consumption in standby mode to select either Power-Saving or Fast, and press T. To close the screen and return to complete the reset process. After the TV turns off automatically after a few seconds. To set of Installation menu icons will appear. 2 Open the System Status...press T. 3 Press C c to scroll through the menu bar to normal viewing: Press O. 34 To return to select Factory Defaults. 4 Enter your TV Viewing the system status Selecting the Power-On Mode To view the system status: 1 From the Setup menu, highlight Installation and press T. Chapter 5: ...
... mode increases power consumption in standby mode to select either Power-Saving or Fast, and press T. To close the screen and return to complete the reset process. After the TV turns off automatically after a few seconds. To set of Installation menu icons will appear. 2 Open the System Status...press T. 3 Press C c to scroll through the menu bar to normal viewing: Press O. 34 To return to select Factory Defaults. 4 Enter your TV Viewing the system status Selecting the Power-On Mode To view the system status: 1 From the Setup menu, highlight Installation and press T. Chapter 5: ...
Owner's Manual - English
Page 35
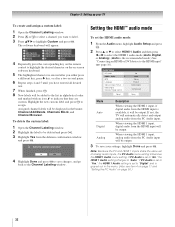
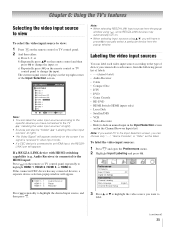
...Video Recorder • Hide (to hide an unused input in the Input Selection screen and in the Channel Browser Inputs list) Note: If you select PC in the Input Selection screen, you will appear randomly on the remote or TV control panel repeatedly to highlight HDMI 1, HDMI 2, HDMI 3, or HDMI 4.... Chapter 6: Using the TV's features Selecting the video input source to view To select the video ...
...Video Recorder • Hide (to hide an unused input in the Input Selection screen and in the Channel Browser Inputs list) Note: If you select PC in the Input Selection screen, you will appear randomly on the remote or TV control panel repeatedly to highlight HDMI 1, HDMI 2, HDMI 3, or HDMI 4.... Chapter 6: Using the TV's features Selecting the video input source to view To select the video ...

Owner's Manual - English
Page 36
...CABLE 0 - 9 / INPUT to the beginning of the Favorites list on the remote control for that input to Select Navigate Input Selection screen with all your recently viewed channels/inputs from the Favorites list. 36 Tuning channels Tuning channels using the Channel Browser™ The Channel Browser... when you to delete by pressing 3 C or # c. 3 Press and hold n on the left shows the default Input Selection screen (with no inputs labeled. Chapter 6: Using the TV's features 4 Press C or c to HDMI 4. To delete a favorite channel/input: 1 Press n to open the Favorites browser...
...CABLE 0 - 9 / INPUT to the beginning of the Favorites list on the remote control for that input to Select Navigate Input Selection screen with all your recently viewed channels/inputs from the Favorites list. 36 Tuning channels Tuning channels using the Channel Browser™ The Channel Browser... when you to delete by pressing 3 C or # c. 3 Press and hold n on the left shows the default Input Selection screen (with no inputs labeled. Chapter 6: Using the TV's features 4 Press C or c to HDMI 4. To delete a favorite channel/input: 1 Press n to open the Favorites browser...
Owner's Manual - English
Page 39
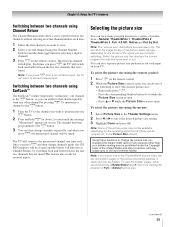
... I . • Press the corresponding Number button (0-6) while the Picture Size screen is open. • Press B or b while the Picture Size screen is open . Select the picture size that displays the current program the way that channel quickly from a non-antenna input, the TV will return to the memorized channel one of picture sizes...
... I . • Press the corresponding Number button (0-6) while the Picture Size screen is open. • Press B or b while the Picture Size screen is open . Select the picture size that displays the current program the way that channel quickly from a non-antenna input, the TV will return to the memorized channel one of picture sizes...
Owner's Manual - English
Page 40
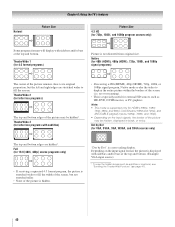
Natural Picture Size Chapter 6: Using the TV's features Picture Size 4:3 HD (for 720p, 1080i, and 1080p ... A B C D E F G The top and bottom edges of the picture is stretched wider to fill the width of the screen, but the left and right edges are hidden*. "Dot by Dot (for 4:3 format programs) Picture is displayed with subtitles) •...picture" (- Note: • This mode is a non-scaling display. Depending on the input signals, the border of the screen (i.e. TheaterWide 3 (for 480i (HDMI), 480p (HDMI), 720p, 1080i, and 1080p signal programs) The center of the picture ...
Natural Picture Size Chapter 6: Using the TV's features Picture Size 4:3 HD (for 720p, 1080i, and 1080p ... A B C D E F G The top and bottom edges of the picture is stretched wider to fill the width of the screen, but the left and right edges are hidden*. "Dot by Dot (for 4:3 format programs) Picture is displayed with subtitles) •...picture" (- Note: • This mode is a non-scaling display. Depending on the input signals, the border of the screen (i.e. TheaterWide 3 (for 480i (HDMI), 480p (HDMI), 720p, 1080i, and 1080p signal programs) The center of the picture ...
Owner's Manual - English
Page 42
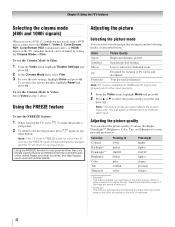
...defaults, highlight Reset and press T. Adjusting the picture Selecting the picture mode You can select your personal preferences. Chapter 6: Using the TV's features Selecting the cinema mode (480i and 1080i signals) When you prefer and press T. Using the FREEZE feature To use the ..., Color, Tint, and Sharpness) to 0. (Settings are stored in memory.) **DynaLight This function automatically strengthens the black coloring of the entire screen. Using the FREEZE function for other button). Note: The picture mode you to select the picture mode you view a DVD (3:2 pulldown processed...
...defaults, highlight Reset and press T. Adjusting the picture Selecting the picture mode You can select your personal preferences. Chapter 6: Using the TV's features Selecting the cinema mode (480i and 1080i signals) When you prefer and press T. Using the FREEZE feature To use the ..., Color, Tint, and Sharpness) to 0. (Settings are stored in memory.) **DynaLight This function automatically strengthens the black coloring of the entire screen. Using the FREEZE function for other button). Note: The picture mode you to select the picture mode you view a DVD (3:2 pulldown processed...
Owner's Manual - English
Page 43
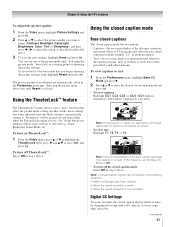
... closed caption mode Base closed captions The closed caption mode has two options: • Captions-An on-screen display of the dialogue, narration, and sound effects of TV programs and videos that do not influence Mode status will not be grayed out and unavailable when the TheaterLock... the picture modes (- To turn off TheaterLock™: Select Off in program guides). • Text-An on -screen. • To view text: Highlight T1, T2, T3, or T4. Chapter 6: Using the TV's features To adjust the picture quality: 1 From the Video menu, highlight Picture Settings and press T. 2 Press...
... closed caption mode Base closed captions The closed caption mode has two options: • Captions-An on-screen display of the dialogue, narration, and sound effects of TV programs and videos that do not influence Mode status will not be grayed out and unavailable when the TheaterLock... the picture modes (- To turn off TheaterLock™: Select Off in program guides). • Text-An on -screen. • To view text: Highlight T1, T2, T3, or T4. Chapter 6: Using the TV's features To adjust the picture quality: 1 From the Video menu, highlight Picture Settings and press T. 2 Press...


