Owner's Manual - English
Page 2
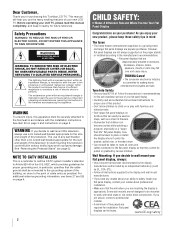
...you enjoy your retailer about professional installation. • Make sure that they cannot be heavy. Before operating your flat panel display. • Carefully read this Toshiba LCD TV. For additional antenna grounding information, see items 27 and 28 on page 4. 2 CHILD SAFETY: It Makes A... Difference How and Where You Use Your Flat Panel Display Congratulations on page 5. Flat panel displays can easily be used as steps, such as ...
...you enjoy your retailer about professional installation. • Make sure that they cannot be heavy. Before operating your flat panel display. • Carefully read this Toshiba LCD TV. For additional antenna grounding information, see items 27 and 28 on page 4. 2 CHILD SAFETY: It Makes A... Difference How and Where You Use Your Flat Panel Display Congratulations on page 5. Flat panel displays can easily be used as steps, such as ...
Owner's Manual - English
Page 3
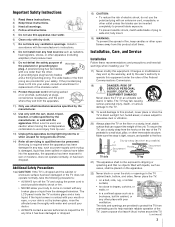
.... 6) Clean only with dry cloth. 7) Do not block any ventilation openings. Hooks Securement Securement Clip Clip TV side TV top 21) The apparatus shall not be exposed to dripping or splashing and that can be placed on an ...caution when moving the cart/apparatus combination to avoid injury from overheating and to help maintain reliable operation of the TV. Leave a space of time. 14) Refer all servicing to qualified service personnel. Installation, Care, and Service...does not operate normally, or has been dropped. The LCD panel inside the TV contains glass and a toxic liquid.
.... 6) Clean only with dry cloth. 7) Do not block any ventilation openings. Hooks Securement Securement Clip Clip TV side TV top 21) The apparatus shall not be exposed to dripping or splashing and that can be placed on an ...caution when moving the cart/apparatus combination to avoid injury from overheating and to help maintain reliable operation of the TV. Leave a space of time. 14) Refer all servicing to qualified service personnel. Installation, Care, and Service...does not operate normally, or has been dropped. The LCD panel inside the TV contains glass and a toxic liquid.

Owner's Manual - English
Page 4
...cleaners, or chemical cloths, which may damage the surface of the panel. Never attempt to clean the LCD screen, follow these sounds become frequent or continuous, unplug the power cord and contact a Toshiba Authorized Service Center. 35) WARNING: RISK OF SERIOUS PERSONAL INJURY OR...operation of your local authorities or the Electronics Industries Alliance (www.eiae.org). 4 For disposal or recycling information, contact your TOSHIBA TV, follow the instructions in wire Ground clamp Antenna discharge unit (NEC Section 810-20) Electric service equipment Grounding conductors (NEC...
...cleaners, or chemical cloths, which may damage the surface of the panel. Never attempt to clean the LCD screen, follow these sounds become frequent or continuous, unplug the power cord and contact a Toshiba Authorized Service Center. 35) WARNING: RISK OF SERIOUS PERSONAL INJURY OR...operation of your local authorities or the Electronics Industries Alliance (www.eiae.org). 4 For disposal or recycling information, contact your TOSHIBA TV, follow the instructions in wire Ground clamp Antenna discharge unit (NEC Section 810-20) Electric service equipment Grounding conductors (NEC...
Owner's Manual - English
Page 5
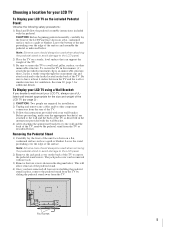
... 20, page 3 for additional details. Choosing a location for your LCD TV To Display your LCD TV on the back of the TV to wall mount your wall bracket. CAUTION: Before beginning pedestal assembly, carefully lay the front of the LCD Panel face down on the back of the TV. Leave the stand protruding over the edge of the...
... 20, page 3 for additional details. Choosing a location for your LCD TV To Display your LCD TV on the back of the TV to wall mount your wall bracket. CAUTION: Before beginning pedestal assembly, carefully lay the front of the LCD Panel face down on the back of the TV. Leave the stand protruding over the edge of the...
Owner's Manual - English
Page 6
... The LCD panel contained in a particular installation. This is a structural property of LCD technology, is not a sign of malfunction, and is trademark of HDMI Licensing LLC. (Only available for 46" and ...limitations of LCD Display technology and are designed to radio communications. therefore, Toshiba is connected. • Consult the dealer or an experienced radio/TV technician for ..., NJ 07470. FCC Declaration of Conformity Compliance Statement (Part 15): The Toshiba 32RV530U, 37RV530U, 42RV530U, 46RV530U, and 52RV530U Televisions comply with the limits for a Class B digital device...
... The LCD panel contained in a particular installation. This is a structural property of LCD technology, is not a sign of malfunction, and is trademark of HDMI Licensing LLC. (Only available for 46" and ...limitations of LCD Display technology and are designed to radio communications. therefore, Toshiba is connected. • Consult the dealer or an experienced radio/TV technician for ..., NJ 07470. FCC Declaration of Conformity Compliance Statement (Part 15): The Toshiba 32RV530U, 37RV530U, 42RV530U, 46RV530U, and 52RV530U Televisions comply with the limits for a Class B digital device...
Owner's Manual - English
Page 7
... 3 Chapter 1: Introduction 9 Features of your new TV 9 Overview of steps for installing, setting up, and using your new TV 9 TV front and side panel controls and connections 10 TV back panel connections 11 Chapter 2: Connecting your TV 12 Overview of cable types 12 About the connection ...46 Changing your PIN code 47 Blocking TV programs and movies by rating (V-Chip 47 Downloading an additional rating system for blocking TV programs and movies 47 Blocking channels 48 Unlocking programs temporarily 48 Using the input lock feature 49 Using the GameTimer 49 Using the control panel...
... 3 Chapter 1: Introduction 9 Features of your new TV 9 Overview of steps for installing, setting up, and using your new TV 9 TV front and side panel controls and connections 10 TV back panel connections 11 Chapter 2: Connecting your TV 12 Overview of cable types 12 About the connection ...46 Changing your PIN code 47 Blocking TV programs and movies by rating (V-Chip 47 Downloading an additional rating system for blocking TV programs and movies 47 Blocking channels 48 Unlocking programs temporarily 48 Using the input lock feature 49 Using the GameTimer 49 Using the control panel...
Owner's Manual - English
Page 8
Chapter 7: Using the TV's advanced features 55 Using the advanced picture settings features 55 Using dynamic contrast 55 Using the static gamma feature 55 Selecting the color temperature 56 ... troubleshooting 59 LED indications 61 Chapter 9: Appendix 62 Specifications 62 Acceptable signal formats for PC IN and HDMI terminals 63 Limited United States Warranty for LCD Televisions 26" and Larger 64 Limited Canadian Warranty for Toshiba Brand Flat Panel Televisions 65 Index 68 8
Chapter 7: Using the TV's advanced features 55 Using the advanced picture settings features 55 Using dynamic contrast 55 Using the static gamma feature 55 Selecting the color temperature 56 ... troubleshooting 59 LED indications 61 Chapter 9: Appendix 62 Specifications 62 Acceptable signal formats for PC IN and HDMI terminals 63 Limited United States Warranty for LCD Televisions 26" and Larger 64 Limited Canadian Warranty for Toshiba Brand Flat Panel Televisions 65 Index 68 8

Owner's Manual - English
Page 10
...off . These buttons adjust the volume level. 10 INPUT - Repeatedly press to the controls on the remote control or TV control panel and you are referred to reset the TV. 12 Control panel 5 ARROWS BbC c - When a menu is on-screen, these buttons function as up/down/left/right menu ...navigation buttons. 6 MENU (ENTER) - Press to receive 1080p signals. 12 Service port - When no menu is on the TV control panel for updating the television's firmware. 10 High-Definition Multimedia Interface (HDMI 4) input receives digital audio and uncompressed digital video from an HDMI ...
...off . These buttons adjust the volume level. 10 INPUT - Repeatedly press to the controls on the remote control or TV control panel and you are referred to reset the TV. 12 Control panel 5 ARROWS BbC c - When a menu is on-screen, these buttons function as up/down/left/right menu ...navigation buttons. 6 MENU (ENTER) - Press to receive 1080p signals. 12 Service port - When no menu is on the TV control panel for updating the television's firmware. 10 High-Definition Multimedia Interface (HDMI 4) input receives digital audio and uncompressed digital video from an HDMI ...
Owner's Manual - English
Page 11
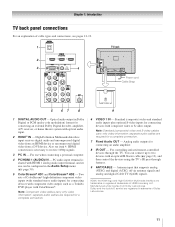
Chapter 1: Introduction TV back panel connections For an explanation of ColorStream® high-definition component video inputs (with standard stereo audio inputs) for connecting devices with component video output, such as a Toshiba DVD player with ColorStream®. HDMI connection is shared with HDMI 1...external Dolby Digital decoder, amplifier, A/V receiver, or home theater system with an optical IR blaster cable (- Also see pages 12-19. 1 TV back 2 3 4 Power cord Cable Strap 5 67 8 9 1 DIGITAL AUDIO OUT - Manufactured under license from a DVI device. High-...
Chapter 1: Introduction TV back panel connections For an explanation of ColorStream® high-definition component video inputs (with standard stereo audio inputs) for connecting devices with component video output, such as a Toshiba DVD player with ColorStream®. HDMI connection is shared with HDMI 1...external Dolby Digital decoder, amplifier, A/V receiver, or home theater system with an optical IR blaster cable (- Also see pages 12-19. 1 TV back 2 3 4 Power cord Cable Strap 5 67 8 9 1 DIGITAL AUDIO OUT - Manufactured under license from a DVI device. High-...
Owner's Manual - English
Page 13
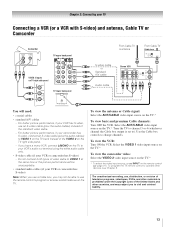
... instead of video cable to change channels. Select the ANT/CABLE video input source on TV right side panel TV lower back panel S-video cable or Standard A/V cable Audio cable From Cable TV or antenna From Cable TV Cable box IN CH 3 CH 4 OUT Stereo VCR VIDEO AUDIO L R IN CH 3 CH 4 ...OUT L R IN from ANT OUT to program or access certain features on the TV right side panel. - To program the TV remote control to operate other countries, and may not be unacceptable. • standard audio cables (if your camcorder has S-video, connect an...
... instead of video cable to change channels. Select the ANT/CABLE video input source on TV right side panel TV lower back panel S-video cable or Standard A/V cable Audio cable From Cable TV or antenna From Cable TV Cable box IN CH 3 CH 4 OUT Stereo VCR VIDEO AUDIO L R IN CH 3 CH 4 ...OUT L R IN from ANT OUT to program or access certain features on the TV right side panel. - To program the TV remote control to operate other countries, and may not be unacceptable. • standard audio cables (if your camcorder has S-video, connect an...
Owner's Manual - English
Page 14
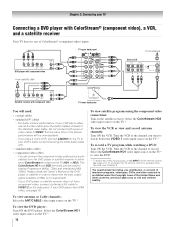
...HDMI video, see Chapter 3. You can be unacceptable. - Select the ColorStream HD1 video input source on the TV* to display Progressive (480p, 720p) and Interlaced (480i, 1080i). TV upper back panel From antenna Y PB PR COMPONENT VIDEO S-VIDEO VIDEO OUT OUT DVD player with component video AUDIO OUT L.... Tune the VCR to the channel to your VCR's audio out terminal using the component video connections: Turn on the side panel. To program the TV remote control to operate other countries, and may subject you want to VIDEO 2 on the satellite receiver. Select the ColorStream HD2...
...HDMI video, see Chapter 3. You can be unacceptable. - Select the ColorStream HD1 video input source on the TV* to display Progressive (480p, 720p) and Interlaced (480i, 1080i). TV upper back panel From antenna Y PB PR COMPONENT VIDEO S-VIDEO VIDEO OUT OUT DVD player with component video AUDIO OUT L.... Tune the VCR to the channel to your VCR's audio out terminal using the component video connections: Turn on the side panel. To program the TV remote control to operate other countries, and may subject you want to VIDEO 2 on the satellite receiver. Select the ColorStream HD2...
Owner's Manual - English
Page 15
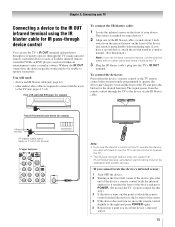
...touched the device is marked on some devices.* 2 Align one of your TV Connecting a device to operate the device, you locate the device's infrared sensor. 15 page 12) • other audio/video cables as Toshiba infrared remotecontrolled VCRs or DVD players) enclosed within an entertainment center or similar...for the desired function. Front of the device and press POWER. (Do not use the TV's remote control for example) Infrared sensor IR blaster cable wand (approx.1 inch from device) TV upper back panel Note: • If you use the device's remote control to the IR OUT infrared ...
...touched the device is marked on some devices.* 2 Align one of your TV Connecting a device to operate the device, you locate the device's infrared sensor. 15 page 12) • other audio/video cables as Toshiba infrared remotecontrolled VCRs or DVD players) enclosed within an entertainment center or similar...for the desired function. Front of the device and press POWER. (Do not use the TV's remote control for example) Infrared sensor IR blaster cable wand (approx.1 inch from device) TV upper back panel Note: • If you use the device's remote control to the IR OUT infrared ...

Owner's Manual - English
Page 16
For detailed signal specifications, see illustration). - HDMI cable transfers both video and audio. TV upper back panel TV right side panel To connect a DVI device, you will need: • one pair of highdefinition video signals. An HDMI-to operate other devices, see Chapter 3. [1] EIA...DVI device. • When turning off your electronic components, turn off the HDMI or DVI device first, and then the TV. Separate analog audio cables are required (see page 63. TV upper back panel DVI device VIDEO AUDIO L R IN IN DVI / HDCP OUT OUT L R Note: To ensure that the HDMI ...
For detailed signal specifications, see illustration). - HDMI cable transfers both video and audio. TV upper back panel TV right side panel To connect a DVI device, you will need: • one pair of highdefinition video signals. An HDMI-to operate other devices, see Chapter 3. [1] EIA...DVI device. • When turning off your electronic components, turn off the HDMI or DVI device first, and then the TV. Separate analog audio cables are required (see page 63. TV upper back panel DVI device VIDEO AUDIO L R IN IN DVI / HDCP OUT OUT L R Note: To ensure that the HDMI ...
Owner's Manual - English
Page 17
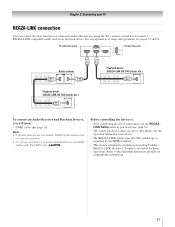
...you use HDMI cables with the HDMI Logo ( ). Before controlling the device(s): • After completing the above connections, set . TV upper back panel TV right side panel VIDEO AUDIO L R IN OUT L R Audio receiver HDMI IN HDMI OUT Playback device (REGZA-LINK HD DVD player,etc.) ...IN OUT L R To connect an Audio Receiver and Playback Devices, you connect a REGZA-LINK compatible audio receiver or playback device. However, Toshiba is recommended that you desire (- page 16) Note: • If several devices are connected, REGZA-LINK feature may not operate properly. ...
...you use HDMI cables with the HDMI Logo ( ). Before controlling the device(s): • After completing the above connections, set . TV upper back panel TV right side panel VIDEO AUDIO L R IN OUT L R Audio receiver HDMI IN HDMI OUT Playback device (REGZA-LINK HD DVD player,etc.) ...IN OUT L R To connect an Audio Receiver and Playback Devices, you connect a REGZA-LINK compatible audio receiver or playback device. However, Toshiba is recommended that you desire (- page 16) Note: • If several devices are connected, REGZA-LINK feature may not operate properly. ...

Owner's Manual - English
Page 18
...with optical audio input. You will need : • standard audio cables Analog audio amplifier To control the audio: 1 Turn on the TV and the digital audio device. 2 Press Y on page 46). Chapter 2: Connecting your device (- THIS DAMAGE IS NOT COVERED BY YOUR WARRANTY. • The DIGITAL AUDIO OUT terminal may damage speakers... This connection allows you to use with an external Dolby® Digital decoder or other digital audio system LINE IN LR Optical Audio IN TV upper back panel Note: • Some audio systems may not be compatible with Dolby Digital bitstream signals.
...with optical audio input. You will need : • standard audio cables Analog audio amplifier To control the audio: 1 Turn on the TV and the digital audio device. 2 Press Y on page 46). Chapter 2: Connecting your device (- THIS DAMAGE IS NOT COVERED BY YOUR WARRANTY. • The DIGITAL AUDIO OUT terminal may damage speakers... This connection allows you to use with an external Dolby® Digital decoder or other digital audio system LINE IN LR Optical Audio IN TV upper back panel Note: • Some audio systems may not be compatible with Dolby Digital bitstream signals.
Owner's Manual - English
Page 19
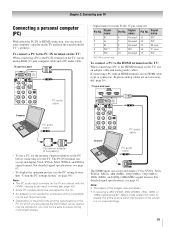
... see page 63. page 50). • Some PC models cannot be connected to this TV. • An adapter is not needed for mini D-sub 15-pin connector Pin No. no overscanning). 19 TV upper back panel • Signal names for computers with an HDMI terminal, use an HDMI cable (type ..." on the PC before connecting it to pause during multi-angle scenes. Signal name 1 R 2 G 3 B 4 NC * 5 NC Pin No. page 16). TV upper back panel PC audio cable Computer PC audio output PC audio cable Conversion adapter (if necessary) • To use an analog RGB (15-pin) computer cable...
... see page 63. page 50). • Some PC models cannot be connected to this TV. • An adapter is not needed for mini D-sub 15-pin connector Pin No. no overscanning). 19 TV upper back panel • Signal names for computers with an HDMI terminal, use an HDMI cable (type ..." on the PC before connecting it to pause during multi-angle scenes. Signal name 1 R 2 G 3 B 4 NC * 5 NC Pin No. page 16). TV upper back panel PC audio cable Computer PC audio output PC audio cable Conversion adapter (if necessary) • To use an analog RGB (15-pin) computer cable...
Owner's Manual - English
Page 27
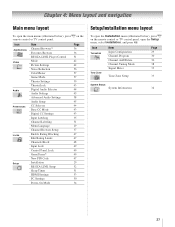
...CC Settings Input Labeling Channel Labeling Menu Language Channel Browser Setup Enable Rating Blocking Edit Rating Limits Channels Block Input Lock Control Panel Lock GameTimer® New PIN Code Installation REGZA-LINK Setup Sleep Timer HDMI Settings PC Settings Power-On Mode Page 36... To open the Installation menu (illustrated below ), press Y on the remote control or TV control panel, open the main menus (illustrated below ), press Y on the remote control or TV control panel. Icon Terrestrial Item Input Configuration Channel Program Channel Add/Delete Channel Tuning Mode Signal Meter ...
...CC Settings Input Labeling Channel Labeling Menu Language Channel Browser Setup Enable Rating Blocking Edit Rating Limits Channels Block Input Lock Control Panel Lock GameTimer® New PIN Code Installation REGZA-LINK Setup Sleep Timer HDMI Settings PC Settings Power-On Mode Page 36... To open the Installation menu (illustrated below ), press Y on the remote control or TV control panel, open the main menus (illustrated below ), press Y on the remote control or TV control panel. Icon Terrestrial Item Input Configuration Channel Program Channel Add/Delete Channel Tuning Mode Signal Meter ...
Owner's Manual - English
Page 28
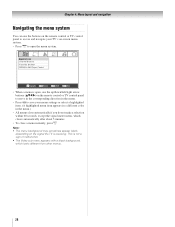
... closes automatically after about 5 minutes. • To close a menu instantly, press O. Note: • The menu background may sometimes appear black, depending on the signal the TV is open, use the buttons on -screen menu system. • Press Y to access and navigate your menu settings or select a highlighted item. (A highlighted menu item.... Chapter 4: Menu layout and navigation Navigating the menu system You can use the up/down/left/right arrow buttons (BbC c) on the remote control or TV control panel to move in the corresponding direction in the menu. • Press T to save your...
... closes automatically after about 5 minutes. • To close a menu instantly, press O. Note: • The menu background may sometimes appear black, depending on the signal the TV is open, use the buttons on -screen menu system. • Press Y to access and navigate your menu settings or select a highlighted item. (A highlighted menu item.... Chapter 4: Menu layout and navigation Navigating the menu system You can use the up/down/left/right arrow buttons (BbC c) on the remote control or TV control panel to move in the corresponding direction in the menu. • Press T to save your...

Owner's Manual - English
Page 30
... the box will appear. If the channel is found , a message will be added to bring up your TV Programming channels into the TV's channel memory When you press < or , on the remote control or TV control panel, your TV will appear. 2 Open the Terrestrial menu, highlight Channel Add/ Delete, and then press T. If the channel...
... the box will appear. If the channel is found , a message will be added to bring up your TV Programming channels into the TV's channel memory When you press < or , on the remote control or TV control panel, your TV will appear. 2 Open the Terrestrial menu, highlight Channel Add/ Delete, and then press T. If the channel...
Owner's Manual - English
Page 35
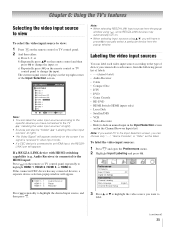
..., and then press O. If the connected CEC device has any connected devices, a separate device selection popup window will appear randomly on the remote control or TV control panel. 2 And then either: a) Press 0-9; HDMI 1 - 1 HDMI 1 - 2 HDMI 1 - 3 Audio Receiver Player Recorder Press + repeatedly to view: ...a particular device from the popup window using +, some REGZA-LINK devices may automatically turn on the remote control or TV control panel to change the input. Preferences CC Selector Base CC Mode Digital CC Settings Input Labeling Channel Labeling Menu Language Channel Browser...
..., and then press O. If the connected CEC device has any connected devices, a separate device selection popup window will appear randomly on the remote control or TV control panel. 2 And then either: a) Press 0-9; HDMI 1 - 1 HDMI 1 - 2 HDMI 1 - 3 Audio Receiver Player Recorder Press + repeatedly to view: ...a particular device from the popup window using +, some REGZA-LINK devices may automatically turn on the remote control or TV control panel to change the input. Preferences CC Selector Base CC Mode Digital CC Settings Input Labeling Channel Labeling Menu Language Channel Browser...


