
Owner's Manual - English
Page 7
...your other devices 25 Remote control codes 26 Chapter 4: Menu layout and navigation 28 Main menu layout 28 Setup/Installation menu layout 29 Navigating the menu system 29 Chapter 5: Setting up your TV 30 Selecting the menu language 30 TOSHIBA Logo LED 30 Configuring the antenna input source for ... Control feature 45 Using the Locks menu 46 Entering the PIN code 46 If you cannot remember your PIN code 46 Changing your PIN code 46 Blocking TV programs and movies by rating (V-Chip 46 Downloading an additional rating system for blocking TV programs and movies 47 Blocking channels 48...
...your other devices 25 Remote control codes 26 Chapter 4: Menu layout and navigation 28 Main menu layout 28 Setup/Installation menu layout 29 Navigating the menu system 29 Chapter 5: Setting up your TV 30 Selecting the menu language 30 TOSHIBA Logo LED 30 Configuring the antenna input source for ... Control feature 45 Using the Locks menu 46 Entering the PIN code 46 If you cannot remember your PIN code 46 Changing your PIN code 46 Blocking TV programs and movies by rating (V-Chip 46 Downloading an additional rating system for blocking TV programs and movies 47 Blocking channels 48...
Owner's Manual - English
Page 9
...; Place the TV in the power cords for your TV and begin using its many exciting features. 1 Carefully read the important safety, installation, care, and service information. THIS TYPE OF DAMAGE IS NOT COVERED UNDER THE TOSHIBA WARRANTY. 3 Do...TV's menu system ( page 28). 11 Program channels into the TV's channel memory ( page 31). 12 For details on using the TV's features, see Chapters 6 and 7. 13 For help, refer to the Troubleshooting Guide, Chapter 8. 14 For technical specifications and warranty information, see Chapter 9. 15 Enjoy your LCD TV" ( page 6). • Place the TV on the TV...
...; Place the TV in the power cords for your TV and begin using its many exciting features. 1 Carefully read the important safety, installation, care, and service information. THIS TYPE OF DAMAGE IS NOT COVERED UNDER THE TOSHIBA WARRANTY. 3 Do...TV's menu system ( page 28). 11 Program channels into the TV's channel memory ( page 31). 12 For details on using the TV's features, see Chapters 6 and 7. 13 For help, refer to the Troubleshooting Guide, Chapter 8. 14 For technical specifications and warranty information, see Chapter 9. 15 Enjoy your LCD TV" ( page 6). • Place the TV on the TV...
Owner's Manual - English
Page 11
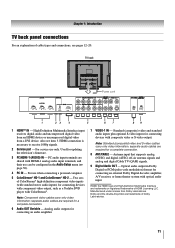
... connection is necessary to receive 1080p signals. 2 Service port - Two sets of ColorStream® high-definition component video inputs (with standard stereo audio inputs) for connecting devices with component video output, such as a Toshiba DVD player with HDMI-1 analog audio input terminals,...Standard (composite) video and S-video cables carry only video information; Optical audio output in the Audio Setup menu ( page 50). 4 PC IN - Chapter 1: Introduction TV back panel connections For an explanation of cable types and connections, see item 3. High-Definition Multimedia Interface input...
... connection is necessary to receive 1080p signals. 2 Service port - Two sets of ColorStream® high-definition component video inputs (with standard stereo audio inputs) for connecting devices with component video output, such as a Toshiba DVD player with HDMI-1 analog audio input terminals,...Standard (composite) video and S-video cables carry only video information; Optical audio output in the Audio Setup menu ( page 50). 4 PC IN - Chapter 1: Introduction TV back panel connections For an explanation of cable types and connections, see item 3. High-Definition Multimedia Interface input...
Owner's Manual - English
Page 31
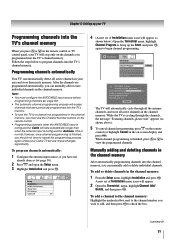
... Installation and press . Setup Installation HDMI Control Setup Sleep Timer PC Settings Logo LED Off 4 (A new set of Installation menu icons will appear, as shown above). 5 To cancel channel programming, press on the remote control (or highlight Cancel in the on-screen display and press ). ... a channel to the channel memory: Highlight the unchecked box next to the channel number you have to repeat the programming process again unless your Cable TV service lineup changes significantly. Chapter 5: Setting up the Start, and press again to begin channel programming.
... Installation and press . Setup Installation HDMI Control Setup Sleep Timer PC Settings Logo LED Off 4 (A new set of Installation menu icons will appear, as shown above). 5 To cancel channel programming, press on the remote control (or highlight Cancel in the on-screen display and press ). ... a channel to the channel memory: Highlight the unchecked box next to the channel number you have to repeat the programming process again unless your Cable TV service lineup changes significantly. Chapter 5: Setting up the Start, and press again to begin channel programming.
Owner's Manual - English
Page 43
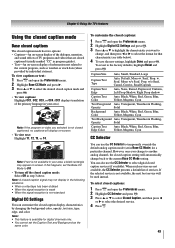
...Large Caption Text Type Auto, Default, Mono w. To view captions or text: 1 Press and open the Preferences menu. 2 Highlight Base CC Mode and press X. 3 Press S or T to select digital closed caption services (if available). If this happens, set in your area.) Giant pandas eat leaves. Serif, Mono w/o Serif,... . 43 If the selected service is not available, the next best service will display on-screen. • To view text: Highlight T1, T2, T3, or T4. Chapter 6: Using the TV's features Using the closed caption mode Base closed captions The closed caption mode has two options: •...
...Large Caption Text Type Auto, Default, Mono w. To view captions or text: 1 Press and open the Preferences menu. 2 Highlight Base CC Mode and press X. 3 Press S or T to select digital closed caption services (if available). If this happens, set in your area.) Giant pandas eat leaves. Serif, Mono w/o Serif,... . 43 If the selected service is not available, the next best service will display on-screen. • To view text: Highlight T1, T2, T3, or T4. Chapter 6: Using the TV's features Using the closed caption mode Base closed captions The closed caption mode has two options: •...
Owner's Manual - English
Page 44
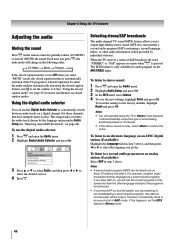
... the audio track chosen by individual stations). To reset the settings to select the desired service. 4 Press . See "Using the closed caption feature is automatically activated if the TV program is set the volume to an alternate language on closed caption mode is Closed Captioned...the factory defaults, highlight Reset and press . However, occasionally there is noisy, select Mono to stereo sound: 1 Press and open the Audio menu. 2 Highlight Digital Audio Selector and press . The MTS feature is only available for analog signals on and the station you have multiple audio...
... the audio track chosen by individual stations). To reset the settings to select the desired service. 4 Press . See "Using the closed caption feature is automatically activated if the TV program is set the volume to an alternate language on closed caption mode is Closed Captioned...the factory defaults, highlight Reset and press . However, occasionally there is noisy, select Mono to stereo sound: 1 Press and open the Audio menu. 2 Highlight Digital Audio Selector and press . The MTS feature is only available for analog signals on and the station you have multiple audio...


