Owner's Manual - English
Page 1
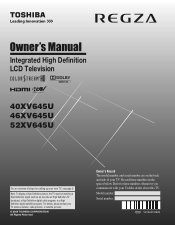
.../M VX1A00137800 Record these numbers whenever you communicate with your TV. Note: To display a High Definition picture, the TV must be receiving a High Definition signal (such as an over-the-air High Definition TV broadcast, a High Definition digital cable program,... or a High Definition digital satellite program). Refer to these numbers in the spaces below. Integrated High Definition LCD Television HIGH-DEFINITION TELEVISION 40XV645U 46XV645U 52XV645U For an overview of your Toshiba ...
.../M VX1A00137800 Record these numbers whenever you communicate with your TV. Note: To display a High Definition picture, the TV must be receiving a High Definition signal (such as an over-the-air High Definition TV broadcast, a High Definition digital cable program,... or a High Definition digital satellite program). Refer to these numbers in the spaces below. Integrated High Definition LCD Television HIGH-DEFINITION TELEVISION 40XV645U 46XV645U 52XV645U For an overview of your Toshiba ...
Owner's Manual - English
Page 4
... is 32 °F (0 °C) or below, the picture brightness may make sure you are never in front of the TV. The slots and openings are in contact with a sharp or heavy object. 40) •The LCD screen of your TOSHIBA TV, follow the instructions in a room whose temperature is still consumed.... 38) During normal use the TV in item 33 on or off....
... is 32 °F (0 °C) or below, the picture brightness may make sure you are never in front of the TV. The slots and openings are in contact with a sharp or heavy object. 40) •The LCD screen of your TOSHIBA TV, follow the instructions in a room whose temperature is still consumed.... 38) During normal use the TV in item 33 on or off....
Owner's Manual - English
Page 6
... in a residential installation. To return to [Home] mode settings, select [AutoView] picture mode, set the Auto Brightness Sensor to [Power-Saving]. [AutoView] mode is not...two conditions: (1) this device may cause undesired operation. Operation is subject to operate this TV is displayed for a Class B digital device, pursuant to radio communications. marks. 6 Note...Conformity Compliance Statement (Part 15): The Toshiba 40XV645U, 46XV645U and 52XV645U Televisions comply with Part 15 of time. This is a structural property of LCD technology, is not responsible for perceived ...
... in a residential installation. To return to [Home] mode settings, select [AutoView] picture mode, set the Auto Brightness Sensor to [Power-Saving]. [AutoView] mode is not...two conditions: (1) this device may cause undesired operation. Operation is subject to operate this TV is displayed for a Class B digital device, pursuant to radio communications. marks. 6 Note...Conformity Compliance Statement (Part 15): The Toshiba 40XV645U, 46XV645U and 52XV645U Televisions comply with Part 15 of time. This is a structural property of LCD technology, is not responsible for perceived ...

Owner's Manual - English
Page 7
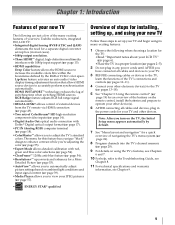
...LCD TV 5 Chapter 1: Introduction 9 Features of your new TV 9 Overview of steps for installing, setting up, and using your new TV 9 TV front and side panel controls and connections . . . . 10 TV back panel connections 11 Chapter 2: Connecting your TV... the time zone 30 Selecting the location 30 Selecting the TOSHIBA Illumination mode 30 Selecting the Power-On Mode 30 Using ...picture 39 Selecting the picture mode 39 Adjusting the picture quality 39 Using the TheaterLock™ feature 40 Viewing the Control Visualization window 40 Using the closed caption mode 40 Analog CC Mode 40...
...LCD TV 5 Chapter 1: Introduction 9 Features of your new TV 9 Overview of steps for installing, setting up, and using your new TV 9 TV front and side panel controls and connections . . . . 10 TV back panel connections 11 Chapter 2: Connecting your TV... the time zone 30 Selecting the location 30 Selecting the TOSHIBA Illumination mode 30 Selecting the Power-On Mode 30 Using ...picture 39 Selecting the picture mode 39 Adjusting the picture quality 39 Using the TheaterLock™ feature 40 Viewing the Control Visualization window 40 Using the closed caption mode 40 Analog CC Mode 40...
Owner's Manual - English
Page 9
...picture settings based on the TV, the Initial Setup menu appears automatically by the RGB or YCbCr color space. page 54). •Resolution+™ upconverts and enhances for an overview of the buttons on using its many exciting features of your new Toshiba widescreen, integrated HD, LCD TV...of the many exciting features. 1 Observe the following when choosing a location for the TV: •Read "Important notes about your LCD TV" (- HDMI INSTAPORT™ technology reduces the lag of the TV's connections and controls (- page 14). •Digital Audio Out optical audio connection with...
...picture settings based on the TV, the Initial Setup menu appears automatically by the RGB or YCbCr color space. page 54). •Resolution+™ upconverts and enhances for an overview of the buttons on using its many exciting features of your new Toshiba widescreen, integrated HD, LCD TV...of the many exciting features. 1 Observe the following when choosing a location for the TV: •Read "Important notes about your LCD TV" (- HDMI INSTAPORT™ technology reduces the lag of the TV's connections and controls (- page 14). •Digital Audio Out optical audio connection with...
Owner's Manual - English
Page 12
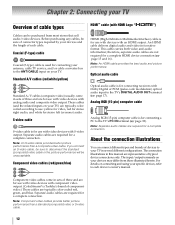
... output. page 18). The input/output terminals on your TV) are typically color-coded red, green, and blue. Note: Component video cables provide better picture performance than a composite video cable. Before purchasing any cables, be unacceptable. Coaxial (F-type) cable Coaxial (F-type) cable is Toshiba's brand of three and are for a complete connection. Standard...
... output. page 18). The input/output terminals on your TV) are typically color-coded red, green, and blue. Note: Component video cables provide better picture performance than a composite video cable. Before purchasing any cables, be unacceptable. Coaxial (F-type) cable Coaxial (F-type) cable is Toshiba's brand of three and are for a complete connection. Standard...

Owner's Manual - English
Page 13
... cables) instead of video cable to VIDEO 1 at the same time or the picture performance will be able to use the remote control to program or access certain features on TV right side panel TV lower back panel S-video cable or Standard A/V cable Audio cable From Cable... cables •standard A/V cables - page 32). Chapter 2: Connecting your TV Connecting a VCR (or a VCR with S-video) and antenna, Cable TV or Camcorder Camcorder AUDIO OUT L R VIDEO TV upper back panel VIDEO 2 inputs on the TV. For better picture performance, if your VCR or camcorder has S-video) - Do not connect...
... cables) instead of video cable to VIDEO 1 at the same time or the picture performance will be able to use the remote control to program or access certain features on TV right side panel TV lower back panel S-video cable or Standard A/V cable Audio cable From Cable... cables •standard A/V cables - page 32). Chapter 2: Connecting your TV Connecting a VCR (or a VCR with S-video) and antenna, Cable TV or Camcorder Camcorder AUDIO OUT L R VIDEO TV upper back panel VIDEO 2 inputs on the TV. For better picture performance, if your VCR or camcorder has S-video) - Do not connect...
Owner's Manual - English
Page 14
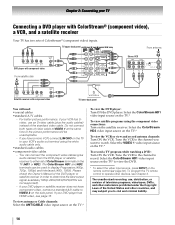
... Do not connect both types of video cable to VIDEO 1 at the same time or the picture performance will need: •coaxial cables •standard A/V cables - You can be unacceptable. - Chapter 2: Connecting your TV Connecting a DVD player with component video AUDIO OUT L R From satellite dish Stereo VCR VIDEO... terminals on the side panel. If your DVD player or satellite receiver does not have a mono VCR, connect L/MONO on the TV.* To record a TV program while watching a DVD: Turn ON the VCR. Tune the VCR to the channel you to display Progressive (480p, 720p, ...
... Do not connect both types of video cable to VIDEO 1 at the same time or the picture performance will need: •coaxial cables •standard A/V cables - You can be unacceptable. - Chapter 2: Connecting your TV Connecting a DVD player with component video AUDIO OUT L R From satellite dish Stereo VCR VIDEO... terminals on the side panel. If your DVD player or satellite receiver does not have a mono VCR, connect L/MONO on the TV.* To record a TV program while watching a DVD: Turn ON the VCR. Tune the VCR to the channel you to display Progressive (480p, 720p, ...
Owner's Manual - English
Page 18
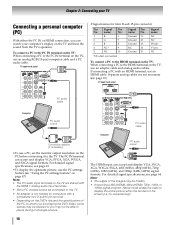
... PC settings feature (- Chapter 2: Connecting your computer's display on the TV and hear the sound from the TV's speakers. To connect a PC to the PC IN terminal on the TV: When connecting a PC to display the entire picture within the borders of the PC on which you are not necessary (-...detailed signal specifications, see page 64. For detailed signal specifications, see page 63. •To display the optimum picture, use an analog RGB (15-pin) computer cable and a PC audio cable. TV upper back panel •Signal names for computers with an HDMI terminal, use a PC, set the monitor ...
... PC settings feature (- Chapter 2: Connecting your computer's display on the TV and hear the sound from the TV's speakers. To connect a PC to the PC IN terminal on the TV: When connecting a PC to display the entire picture within the borders of the PC on which you are not necessary (-...detailed signal specifications, see page 64. For detailed signal specifications, see page 63. •To display the optimum picture, use an analog RGB (15-pin) computer cable and a PC audio cable. TV upper back panel •Signal names for computers with an HDMI terminal, use a PC, set the monitor ...
Owner's Manual - English
Page 20
... select or adjust programming menus. 16 ENTER activates highlighted items in the main menu system. 17 MENU accesses the main TV menu system (- Set to "TV" to restore the moving picture (- For the REGZA-LINK remote control functions, see the remote control functional key chart (- page 35) or to ... page 34). 15 Arrow buttons (BbC c) When a menu is on and off the sound (- pages 26). 18 EXIT closes on the TV front will be illuminated. 2 FREEZE freezes the picture. page 33). 6 INPUT selects the video input source (- page 35). 8 VOL + - page 52). 11 CH RTN returns to edit ...
... select or adjust programming menus. 16 ENTER activates highlighted items in the main menu system. 17 MENU accesses the main TV menu system (- Set to "TV" to restore the moving picture (- For the REGZA-LINK remote control functions, see the remote control functional key chart (- page 35) or to ... page 34). 15 Arrow buttons (BbC c) When a menu is on and off the sound (- pages 26). 18 EXIT closes on the TV front will be illuminated. 2 FREEZE freezes the picture. page 33). 6 INPUT selects the video input source (- page 35). 8 VOL + - page 52). 11 CH RTN returns to edit ...
Owner's Manual - English
Page 21
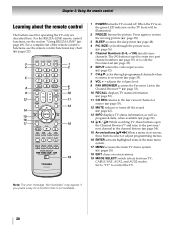
... b selects the next lower channel. 6 GUIDE Displays the channel guide in the AUX mode. 7 INFO Displays TV status information on any other devices If you have a non-Toshiba device or a Toshiba device that the remote control is programmed, it may not work on some DVD players). 9 ENTER Required by ... 12 PAUSE Press during play or record mode to navigate DVD menus (may not operate certain features on -screen. 8 BbC c Press to pause the picture; SET UP Accesses a DVD's setup menu in the CABLE/ SAT mode. "AUX1" to control a cable converter box or satellite receiver; press again to...
... b selects the next lower channel. 6 GUIDE Displays the channel guide in the AUX mode. 7 INFO Displays TV status information on any other devices If you have a non-Toshiba device or a Toshiba device that the remote control is programmed, it may not work on some DVD players). 9 ENTER Required by ... 12 PAUSE Press during play or record mode to navigate DVD menus (may not operate certain features on -screen. 8 BbC c Press to pause the picture; SET UP Accesses a DVD's setup menu in the CABLE/ SAT mode. "AUX1" to control a cable converter box or satellite receiver; press again to...
Owner's Manual - English
Page 22
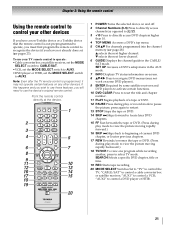
... INFO ENTER Bb C 3 c # MENU EXIT/DVD CLEAR PAUSE/STEP PLAY STOP SKIP Z SKIP z REW FF TV/VCR/ SEARCH REC RESUME PLAY SLOW + ANGLE SUB TITLE AUDIO EJECT Toshiba TV Power Sleep timer Picture size FREEZE Digit 1-9 Digit 0 - (sub CH) TV/Video select FAV BROWSER DVD TOP Menu* Sound mute Guide* Volume up/down Channel up...
... INFO ENTER Bb C 3 c # MENU EXIT/DVD CLEAR PAUSE/STEP PLAY STOP SKIP Z SKIP z REW FF TV/VCR/ SEARCH REC RESUME PLAY SLOW + ANGLE SUB TITLE AUDIO EJECT Toshiba TV Power Sleep timer Picture size FREEZE Digit 1-9 Digit 0 - (sub CH) TV/Video select FAV BROWSER DVD TOP Menu* Sound mute Guide* Volume up/down Channel up...
Owner's Manual - English
Page 26
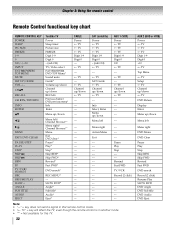
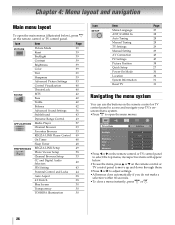
...Audio Selectors 40 PIN Setting 43 Parental Control and Locks 44 Auto Aspect 38 4:3 Stretch 38 Blue Screen 30 Transparency 30 TOSHIBA Illumination 30 Icon SETUP Item Menu Language ANT/CABLE In Auto Tuning Manual Tuning TV Settings Manual Setting AV Connection PC Settings Picture Position Quick... Setup Power-On Mode Location System Information Reset TV Page 27 28 28 28 29...
...Audio Selectors 40 PIN Setting 43 Parental Control and Locks 44 Auto Aspect 38 4:3 Stretch 38 Blue Screen 30 Transparency 30 TOSHIBA Illumination 30 Icon SETUP Item Menu Language ANT/CABLE In Auto Tuning Manual Tuning TV Settings Manual Setting AV Connection PC Settings Picture Position Quick... Setup Power-On Mode Location System Information Reset TV Page 27 28 28 28 29...
Owner's Manual - English
Page 36
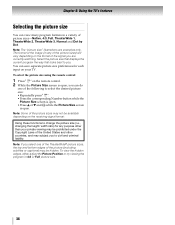
...civil and criminal liability. Using these functions to select the desired picture size: •Repeatedly press I on your private viewing may be prohibited under the Copyright Laws of the United States and other than your TV. To select the picture size using the remote control: 1 Press I . •...;Press the corresponding Number button while the Picture Size screen is open. •Press B or b and T while the Picture Size screen is open, you select one of ...
...civil and criminal liability. Using these functions to select the desired picture size: •Repeatedly press I on your private viewing may be prohibited under the Copyright Laws of the United States and other than your TV. To select the picture size using the remote control: 1 Press I . •...;Press the corresponding Number button while the Picture Size screen is open. •Press B or b and T while the Picture Size screen is open, you select one of ...
Owner's Manual - English
Page 37
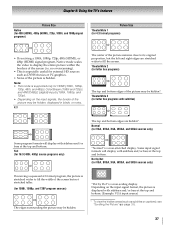
... G The top and bottom edges of the picture is stretched wider to fill the width of the screen but the left and right edges are hidden*. Dot by Dot" is a non-stretched display. page 38). 37 Chapter 6: Using the TV's features Picture Size Native (for 480i (HDMI), 480p (HDMI...), 720p, 1080i, and 1080p signal programs) Picture Size TheaterWide 1 (for 1080i, 1080p, and 720P program sources) The edges surrounding the picture may be hidden. Normal (for HDMI (1080i, ...
... G The top and bottom edges of the picture is stretched wider to fill the width of the screen but the left and right edges are hidden*. Dot by Dot" is a non-stretched display. page 38). 37 Chapter 6: Using the TV's features Picture Size Native (for 480i (HDMI), 480p (HDMI...), 720p, 1080i, and 1080p signal programs) Picture Size TheaterWide 1 (for 1080i, 1080p, and 720P program sources) The edges surrounding the picture may be hidden. Normal (for HDMI (1080i, ...
Owner's Manual - English
Page 38
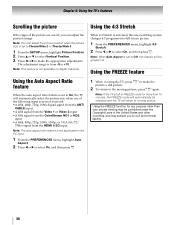
... 3. 1 From the SETUP menu, highlight Picture Position. 2 Press B or b to select Vertical Position. 3 Press C or c to make the picture a still picture. 2 To return to the moving picture. Note: If the TV is set to On, the TV will automatically select the picture size when one of the United States and... other countries, and may subject you can adjust the picture position when the picture size is not available on digital channels. Chapter 6: Using the TV's features Scrolling the picture Using the 4:3 Stretch If the edges of the picture are cut off, you to Off, this feature will...
... 3. 1 From the SETUP menu, highlight Picture Position. 2 Press B or b to select Vertical Position. 3 Press C or c to make the picture a still picture. 2 To return to the moving picture. Note: If the TV is set to On, the TV will automatically select the picture size when one of the United States and... other countries, and may subject you can adjust the picture position when the picture size is not available on digital channels. Chapter 6: Using the TV's features Scrolling the picture Using the 4:3 Stretch If the edges of the picture are cut off, you to Off, this feature will...

Owner's Manual - English
Page 39
... the current input only. To revert to select Yes, and then press T. 39 Note: The picture mode you prefer and press T. Chapter 6: Using the TV's features Adjusting the picture Selecting the picture mode You can select your desired picture settings from the controller PC Designed for other input sources). • Game mode cannot be turned...
... the current input only. To revert to select Yes, and then press T. 39 Note: The picture mode you prefer and press T. Chapter 6: Using the TV's features Adjusting the picture Selecting the picture mode You can select your desired picture settings from the controller PC Designed for other input sources). • Game mode cannot be turned...
Owner's Manual - English
Page 40
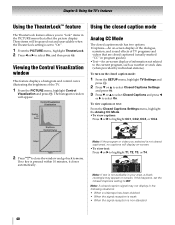
... window will be grayed out and unavailable when the TheaterLock setting is non-standard 40 If this happens, set to "On". 1 From the PICTURE menu, highlight TheaterLock. 2 Press C or c to "lock" items in the PICTURE menu that are closed caption mode has two options: •Captions-An on-...screen display of the dialogue, narration, and sound effects of the TV. 1 From the PICTURE menu, highlight Control Visualization and press T. Giant pandas eat leaves. To view captions or text: From the Closed Captions Settings menu, ...
... window will be grayed out and unavailable when the TheaterLock setting is non-standard 40 If this happens, set to "On". 1 From the PICTURE menu, highlight TheaterLock. 2 Press C or c to "lock" items in the PICTURE menu that are closed caption mode has two options: •Captions-An on-...screen display of the dialogue, narration, and sound effects of the TV. 1 From the PICTURE menu, highlight Control Visualization and press T. Giant pandas eat leaves. To view captions or text: From the Closed Captions Settings menu, ...

Owner's Manual - English
Page 47
If the picture is disrupted momentarily when adjusting the PC settings. Note: If a PC is not connected or there is no PC input signal, this feature will force HDMI 1 Audio (- This is connected to the TV's PC IN terminal, you to output sound from your PC when connecting using the ... range vary depending on the screen. The adjustment range is within ±32 from center.* Helps to reduce noise and sharpen the picture. Chapter 6: Using the TV's features Using the PC settings feature You can use the PC Settings feature to make an appropriate adjustments. "Selecting the video input ...
If the picture is disrupted momentarily when adjusting the PC settings. Note: If a PC is not connected or there is no PC input signal, this feature will force HDMI 1 Audio (- This is connected to the TV's PC IN terminal, you to output sound from your PC when connecting using the ... range vary depending on the screen. The adjustment range is within ±32 from center.* Helps to reduce noise and sharpen the picture. Chapter 6: Using the TV's features Using the PC settings feature You can use the PC Settings feature to make an appropriate adjustments. "Selecting the video input ...

Owner's Manual - English
Page 49
... device (DVD player, etc.) control With your TV's remote control, or using the REGZALINK Player Control menu, you can select another REGZA-LINK device that is not a playback or recording device. A G F J H B b C c T R O Pauses the picture during playback. Rewinds/reverses. Contents Menu Accesses the...menu, highlight REGZA-LINK Player Control and press T. 2 Press B or b to select the item you to control Toshiba REGZA-LINK compatible devices from the TV remote via HDMI connection (- REGZA-LINK® input source selection If a REGZA-LINK device with HDMI switching capability (e.g....
... device (DVD player, etc.) control With your TV's remote control, or using the REGZALINK Player Control menu, you can select another REGZA-LINK device that is not a playback or recording device. A G F J H B b C c T R O Pauses the picture during playback. Rewinds/reverses. Contents Menu Accesses the...menu, highlight REGZA-LINK Player Control and press T. 2 Press B or b to select the item you to control Toshiba REGZA-LINK compatible devices from the TV remote via HDMI connection (- REGZA-LINK® input source selection If a REGZA-LINK device with HDMI switching capability (e.g....


