
Owner's Manual - English
Page 7
...LCD TV 5 Chapter 1: Introduction 9 Features of your new TV 9 Overview of steps for installing, setting up, and using your new TV 9 TV front and side panel controls and connections . . . . 10 TV back panel connections 11 Chapter 2: Connecting your TV... sources 29 Setting the time zone 30 Selecting the location 30 Selecting the TOSHIBA Illumination mode 30 Selecting the Power-On Mode 30 Using Blue Screen 30... 39 Using the TheaterLock™ feature 40 Viewing the Control Visualization window 40 Using the closed caption mode 40 Analog CC Mode 40 Digital CC Settings 41 CC Selector 41...
...LCD TV 5 Chapter 1: Introduction 9 Features of your new TV 9 Overview of steps for installing, setting up, and using your new TV 9 TV front and side panel controls and connections . . . . 10 TV back panel connections 11 Chapter 2: Connecting your TV... sources 29 Setting the time zone 30 Selecting the location 30 Selecting the TOSHIBA Illumination mode 30 Selecting the Power-On Mode 30 Using Blue Screen 30... 39 Using the TheaterLock™ feature 40 Viewing the Control Visualization window 40 Using the closed caption mode 40 Analog CC Mode 40 Digital CC Settings 41 CC Selector 41...
Owner's Manual - English
Page 9
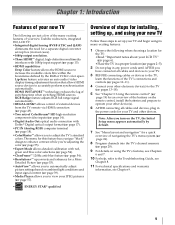
... with red, green and blue color selections (- pages 13-18). 5 See "Chapter 3: Using the remote control" (page 19) for an overview of the buttons on the TV, the Initial Setup menu appears automatically by the RGB or YCbCr color space. Chapter 1: Introduction Features of... any power cords until AFTER you 're adjusting the color (- page 6). •Place the TV in the power cords for the TV: •Read "Important notes about your new Toshiba widescreen, integrated HD, LCD TV: •Integrated digital tuning (8VSB ATSC and QAM) eliminates the need for a More Detailed Picture...
... with red, green and blue color selections (- pages 13-18). 5 See "Chapter 3: Using the remote control" (page 19) for an overview of the buttons on the TV, the Initial Setup menu appears automatically by the RGB or YCbCr color space. Chapter 1: Introduction Features of... any power cords until AFTER you 're adjusting the color (- page 6). •Place the TV in the power cords for the TV: •Read "Important notes about your new Toshiba widescreen, integrated HD, LCD TV: •Integrated digital tuning (8VSB ATSC and QAM) eliminates the need for a More Detailed Picture...
Owner's Manual - English
Page 10
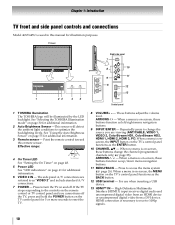
...When no menu is on page 30 for additional information. 3 Remote sensor - Press to reset the TV. 8 VOLUME+ - - See "Selecting the TOSHIBA Illumination mode" on -screen, these buttons change the source you cannot turn the TV on -screen, these buttons function as left/right menu navigation...the LED backlight. Chapter 1: Introduction TV front and side panel controls and connections Model 46XV645U is used in this remote sensor. TV front 1 23 45 Right side panel 7 8 10 11 9 6 12 13 Control panel 1 TOSHIBA Illumination The TOSHIBA logo will detect the ambient light...
...When no menu is on page 30 for additional information. 3 Remote sensor - Press to reset the TV. 8 VOLUME+ - - See "Selecting the TOSHIBA Illumination mode" on -screen, these buttons change the source you cannot turn the TV on -screen, these buttons function as left/right menu navigation...the LED backlight. Chapter 1: Introduction TV front and side panel controls and connections Model 46XV645U is used in this remote sensor. TV front 1 23 45 Right side panel 7 8 10 11 9 6 12 13 Control panel 1 TOSHIBA Illumination The TOSHIBA logo will detect the ambient light...

Owner's Manual - English
Page 13
... may not be able to use the remote control to program or access certain features on the TV. Chapter 2: Connecting your TV Connecting a VCR (or a VCR with S-video) and antenna, Cable TV or Camcorder Camcorder AUDIO OUT L R VIDEO TV upper back panel VIDEO 2 inputs on TV right side panel TV lower back panel S-video cable or Standard...
... may not be able to use the remote control to program or access certain features on the TV. Chapter 2: Connecting your TV Connecting a VCR (or a VCR with S-video) and antenna, Cable TV or Camcorder Camcorder AUDIO OUT L R VIDEO TV upper back panel VIDEO 2 inputs on TV right side panel TV lower back panel S-video cable or Standard...
Owner's Manual - English
Page 14
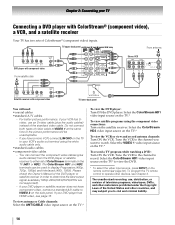
...8226;standard A/V cables - To view antenna or Cable channels: Select the ANT/CABLE video input source on the remote control (- Select the ColorStream HD1 video input source on the TV.* To view satellite programs using the white audio cable only. •standard audio cables •component video cables ...) inputs. Select the ColorStream HD2 video input source on the satellite receiver. Tune the VCR to the channel to watch. To program the TV remote control to operate other countries, and may subject you want to record. You can be unacceptable. - Please check the Owner's Manual of ...
...8226;standard A/V cables - To view antenna or Cable channels: Select the ANT/CABLE video input source on the remote control (- Select the ColorStream HD1 video input source on the TV.* To view satellite programs using the white audio cable only. •standard audio cables •component video cables ...) inputs. Select the ColorStream HD2 video input source on the satellite receiver. Tune the VCR to the channel to watch. To program the TV remote control to operate other countries, and may subject you want to record. You can be unacceptable. - Please check the Owner's Manual of ...
Owner's Manual - English
Page 15
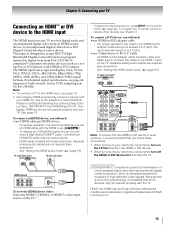
... a DVI device, you follow these procedures: • When turning on your electronic components, turn off your electronic components, turn on the remote control (- An HDMI-to Off. Separate analog audio cables are trademarks or registered trademarks of new standards. See "Setting the HDMI audio mode..." (- To program the TV remote control to the HDMI 1 input on the TV. For proper operation, it is 6.6 ft (2m). •one HDMI-to the adoption of HDMI Licensing LLC. ...
... a DVI device, you follow these procedures: • When turning on your electronic components, turn off your electronic components, turn on the remote control (- An HDMI-to Off. Separate analog audio cables are trademarks or registered trademarks of new standards. See "Setting the HDMI audio mode..." (- To program the TV remote control to the HDMI 1 input on the TV. For proper operation, it is 6.6 ft (2m). •one HDMI-to the adoption of HDMI Licensing LLC. ...
Owner's Manual - English
Page 16
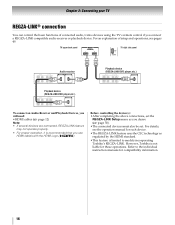
...menu as regulated by the HDMI standard. •This feature is limited to models incorporating Toshiba's REGZA-LINK. For details, see pages 49. For an explanation of connected audio/video devices using the TV's remote control if you use HDMI cables with the HDMI Logo ( ). Chapter 2: Connecting your... TV REGZA-LINK® connection You can control the basic functions of setup and operations, see the...
...menu as regulated by the HDMI standard. •This feature is limited to models incorporating Toshiba's REGZA-LINK. For details, see pages 49. For an explanation of connected audio/video devices using the TV's remote control if you use HDMI cables with the HDMI Logo ( ). Chapter 2: Connecting your... TV REGZA-LINK® connection You can control the basic functions of setup and operations, see the...
Owner's Manual - English
Page 17
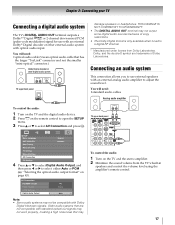
... audio input. "Selecting the optical audio output format" on the remote control to open the SETUP menu. 3 Press B or b to select AV Connection and press T. Chapter 2: Connecting your TV Connecting a digital audio system The TV's DIGITAL AUDIO OUT terminal outputs a Dolby®* Digital or 2-...Audio Output, and then press C or c to a digital RF channel. * Manufactured under license from the TV's built-in speakers and control the volume level using the amplifier's remote control. 17 Dolby, and the double-D symbol are not compatible with standard optical out signals may To control...
... audio input. "Selecting the optical audio output format" on the remote control to open the SETUP menu. 3 Press B or b to select AV Connection and press T. Chapter 2: Connecting your TV Connecting a digital audio system The TV's DIGITAL AUDIO OUT terminal outputs a Dolby®* Digital or 2-...Audio Output, and then press C or c to a digital RF channel. * Manufactured under license from the TV's built-in speakers and control the volume level using the amplifier's remote control. 17 Dolby, and the double-D symbol are not compatible with standard optical out signals may To control...
Owner's Manual - English
Page 19
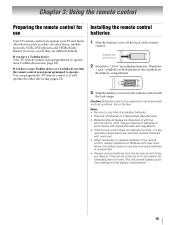
..., always replace both batteries with the environment in combination. • Always remove batteries from leaking into the battery compartment. 19 If you have a Toshiba device: Your TV remote control is not preprogrammed to excessive heat such as cable converter boxes, satellite receivers, VCRs, DVD players, and HTIBs (home theater in accordance with applicable...
..., always replace both batteries with the environment in combination. • Always remove batteries from leaking into the battery compartment. 19 If you have a Toshiba device: Your TV remote control is not preprogrammed to excessive heat such as cable converter boxes, satellite receivers, VCRs, DVD players, and HTIBs (home theater in accordance with applicable...
Owner's Manual - English
Page 20
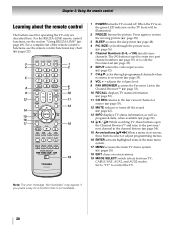
...Available" may appear if you press a key for operating the TV only are described here. For the REGZA-LINK remote control functions, see the remote control functional key chart (- page 52). 14 3 C / # c While watching TV, these buttons select or adjust programming menus. 16 ENTER activates ...36). 5 Channel Numbers (0-9, -/100) directly tune channels. page 35) or to control the TV. page 38). 3 SLEEP accesses the sleep timer (- Chapter 3: Using the remote control Learning about the remote control The buttons used to enter two part channel numbers (- page 52). 11 CH RTN returns...
...Available" may appear if you press a key for operating the TV only are described here. For the REGZA-LINK remote control functions, see the remote control functional key chart (- page 52). 14 3 C / # c While watching TV, these buttons select or adjust programming menus. 16 ENTER activates ...36). 5 Channel Numbers (0-9, -/100) directly tune channels. page 35) or to control the TV. page 38). 3 SLEEP accesses the sleep timer (- Chapter 3: Using the remote control Learning about the remote control The buttons used to enter two part channel numbers (- page 52). 11 CH RTN returns...
Owner's Manual - English
Page 21
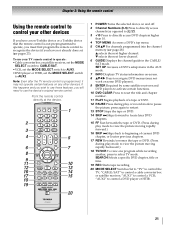
...AUX1" to control the TV; To use the device's original remote control. Note: Even after the TV remote control is not preprogrammed to operate, you must first program the remote control to recognize the device (if you have a non-Toshiba device or a Toshiba device that the remote control is programmed, ...not already done so) (- "AUX2" to control a cable converter box or satellite receiver; Chapter 3: Using the remote control Using the remote control to control your TV remote control to operate: •Cable converter box or satellite receiver, set the MODE SELECT switch to CABLE/SAT. •...
...AUX1" to control the TV; To use the device's original remote control. Note: Even after the TV remote control is not preprogrammed to operate, you must first program the remote control to recognize the device (if you have a non-Toshiba device or a Toshiba device that the remote control is programmed, ...not already done so) (- "AUX2" to control a cable converter box or satellite receiver; Chapter 3: Using the remote control Using the remote control to control your TV remote control to operate: •Cable converter box or satellite receiver, set the MODE SELECT switch to CABLE/SAT. •...
Owner's Manual - English
Page 22
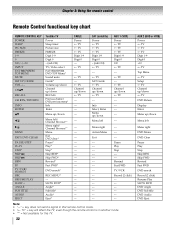
...* REC MENU* --SLOW FWD* Angle* Sub title* Audio* Eject* CABLE Power s TV s TV s TV Digit 1-9 Digit 0 --s TV --- s TV --s TV Channel up /down s TV --- ----- --- --- --- --- --- Chapter 3: Using the remote control Remote Control functional key chart REMOTE CONTROL KEY POWER SLEEP PIC SIZE FREEZE 1-9 0 100/-/+10 INPUT FAV BROWSER/ TOP MENU... CLEAR PAUSE/STEP PLAY STOP SKIP Z SKIP z REW FF TV/VCR/ SEARCH REC RESUME PLAY SLOW + ANGLE SUB TITLE AUDIO EJECT Toshiba TV Power Sleep timer Picture size FREEZE Digit 1-9 Digit 0 - (sub CH) TV/Video select FAV BROWSER DVD TOP Menu* Sound mute Guide*...
...* REC MENU* --SLOW FWD* Angle* Sub title* Audio* Eject* CABLE Power s TV s TV s TV Digit 1-9 Digit 0 --s TV --- s TV --s TV Channel up /down s TV --- ----- --- --- --- --- --- Chapter 3: Using the remote control Remote Control functional key chart REMOTE CONTROL KEY POWER SLEEP PIC SIZE FREEZE 1-9 0 100/-/+10 INPUT FAV BROWSER/ TOP MENU... CLEAR PAUSE/STEP PLAY STOP SKIP Z SKIP z REW FF TV/VCR/ SEARCH REC RESUME PLAY SLOW + ANGLE SUB TITLE AUDIO EJECT Toshiba TV Power Sleep timer Picture size FREEZE Digit 1-9 Digit 0 - (sub CH) TV/Video select FAV BROWSER DVD TOP Menu* Sound mute Guide*...
Owner's Manual - English
Page 23
... • If the correct code was entered, the device will need to reprogram the remote control. 23 For details on the TV remote control operate your TV remote control to operate a non-Toshiba device (or a Toshiba device that came with the device. 5 Remember to set the switch to the other position... does not respond to another code (if other devices Your Toshiba TV remote control is not preprogrammed to operate), follow the steps below. CABLE/SAT (for a cable converter box or satellite receiver), AUX1 (for a VCR or TV/VCR combo), or AUX2 (for your device). page 24-...
... • If the correct code was entered, the device will need to reprogram the remote control. 23 For details on the TV remote control operate your TV remote control to operate a non-Toshiba device (or a Toshiba device that came with the device. 5 Remember to set the switch to the other position... does not respond to another code (if other devices Your Toshiba TV remote control is not preprogrammed to operate), follow the steps below. CABLE/SAT (for a cable converter box or satellite receiver), AUX1 (for a VCR or TV/VCR combo), or AUX2 (for your device). page 24-...

Owner's Manual - English
Page 24
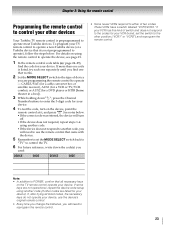
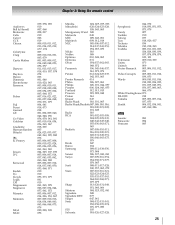
..., 005, 006, 007, 020, 031, 056 Uniden 021, 028, 030, 032, 035, 039, 043, 045, 047, 058 Zenith 027 TV/VCR Combo Action GE Goldstar Panasonic Precision Quasar Realistic Sony Toshiba Zenith Totevision 078 059, 062 065 065 078 065 079 074 057 065 009, 010, 065 DVD/VCR Combo Go... Aiko Aiwa Akai 049 019 018 003, 004, 037, 038, Chapter 3: Using the remote control Remote control codes In some cases, you may use the device's remote control. S. If this happens, use a code that is not recognized by the TV remote control. Cable converter box ABC 061, 062, 063, 082, 084, 087, 092, ...
..., 005, 006, 007, 020, 031, 056 Uniden 021, 028, 030, 032, 035, 039, 043, 045, 047, 058 Zenith 027 TV/VCR Combo Action GE Goldstar Panasonic Precision Quasar Realistic Sony Toshiba Zenith Totevision 078 059, 062 065 065 078 065 079 074 057 065 009, 010, 065 DVD/VCR Combo Go... Aiko Aiwa Akai 049 019 018 003, 004, 037, 038, Chapter 3: Using the remote control Remote control codes In some cases, you may use the device's remote control. S. If this happens, use a code that is not recognized by the TV remote control. Cable converter box ABC 061, 062, 063, 082, 084, 087, 092, ...
Owner's Manual - English
Page 25
Chapter 3: Using the remote control Audiovox Bell & Howell Broksonic Calix Carver CCE Citizen Colortyme Craig Curtis Mathes Daewoo Daytron Denon Dimensia Electrohome Emerson Fisher Fuji Funai Garrard GE Go ..., 044, 072 Symphonic 018, 050, 051, 053, 073, 079 Tandy 007 Tashiko 010 Tatung 037 Teac 018, 029, 037 Technics 036 Teknika 010, 018, 065 Toshiba 000, 011, 021, 023, 024, 028, 030, 039, 057, 074, 078, 079, 100, 101 Totevision 009, 010, 065 Unitec 073 Unitech 009 Vector Research 005...
Chapter 3: Using the remote control Audiovox Bell & Howell Broksonic Calix Carver CCE Citizen Colortyme Craig Curtis Mathes Daewoo Daytron Denon Dimensia Electrohome Emerson Fisher Fuji Funai Garrard GE Go ..., 044, 072 Symphonic 018, 050, 051, 053, 073, 079 Tandy 007 Tashiko 010 Tatung 037 Teac 018, 029, 037 Technics 036 Teknika 010, 018, 065 Toshiba 000, 011, 021, 023, 024, 028, 030, 039, 057, 074, 078, 079, 100, 101 Totevision 009, 010, 065 Unitec 073 Unitech 009 Vector Research 005...
Owner's Manual - English
Page 26
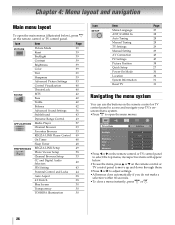
... REGZA-LINK Setup 49 Photo Viewer Setup 58 Channel Browser Setup 33 CC and Digital Audio Selectors 40 PIN Setting 43 Parental Control and Locks 44 Auto Aspect 38 4:3 Stretch 38 Blue Screen 30 Transparency 30 TOSHIBA Illumination 30 Icon SETUP Item Menu Language ANT/CABLE In Auto Tuning Manual Tuning... 29 29 43 47 38 27 30 30 31 31 Navigating the menu system You can use the buttons on the remote control or TV control panel to access and navigate your TV's onscreen menu system. •Press Y to open the main menus (illustrated below . •To use the items, press B or b...
... REGZA-LINK Setup 49 Photo Viewer Setup 58 Channel Browser Setup 33 CC and Digital Audio Selectors 40 PIN Setting 43 Parental Control and Locks 44 Auto Aspect 38 4:3 Stretch 38 Blue Screen 30 Transparency 30 TOSHIBA Illumination 30 Icon SETUP Item Menu Language ANT/CABLE In Auto Tuning Manual Tuning... 29 29 43 47 38 27 30 30 31 31 Navigating the menu system You can use the buttons on the remote control or TV control panel to access and navigate your TV's onscreen menu system. •Press Y to open the main menus (illustrated below . •To use the items, press B or b...
Owner's Manual - English
Page 28
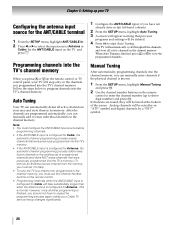
... existing set it to Skip. • To tune the TV to threedigit number) and press T. Analog channels will stop only on the TV and press O. If channels are programmed automatically, you press < or , on the remote control or TV control panel, your area and store them in the channel ...is known. 1 From the SETUP menu, highlight Manual Tuning and press T. 2 Use the channel number buttons on the remote control to enter the channel number (up your Cable TV service lineup changes significantly. 1 Configure the ANT/CABLE input, if you have to view the programmed channels. Manual Tuning...
... existing set it to Skip. • To tune the TV to threedigit number) and press T. Analog channels will stop only on the TV and press O. If channels are programmed automatically, you press < or , on the remote control or TV control panel, your area and store them in the channel ...is known. 1 From the SETUP menu, highlight Manual Tuning and press T. 2 Use the channel number buttons on the remote control to enter the channel number (up your Cable TV service lineup changes significantly. 1 Configure the ANT/CABLE input, if you have to view the programmed channels. Manual Tuning...
Owner's Manual - English
Page 29
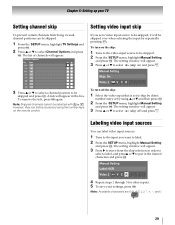
... input sources. 1 Tune to the input you set to select Channel Options and press T. Manual Setting Skip: On Video 2 V C R To turn on the remote control. A tick will appear. To turn off ) and press O. If you want to put in the box. Manual Setting Label: VCR Video 2 V C...the SETUP menu, highlight Manual Setting and press T. The setting window will appear. 3 Press B or b to be skipped. 1 From the SETUP menu, highlight TV Settings and press T. 2 Press B or b to skip by direct number entry or by repeatedly pressing +. Channel Options Ch. Note: Available characters are 0-9, ...
... input sources. 1 Tune to the input you set to select Channel Options and press T. Manual Setting Skip: On Video 2 V C R To turn on the remote control. A tick will appear. To turn off ) and press O. If you want to put in the box. Manual Setting Label: VCR Video 2 V C...the SETUP menu, highlight Manual Setting and press T. The setting window will appear. 3 Press B or b to be skipped. 1 From the SETUP menu, highlight TV Settings and press T. 2 Press B or b to skip by direct number entry or by repeatedly pressing +. Channel Options Ch. Note: Available characters are 0-9, ...
Owner's Manual - English
Page 32
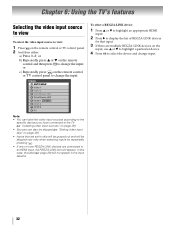
... REGZA-LINK devices are multiple REGZA-LINK devices on the remote control and then press T to change input. 32 or c) Repeatedly press + on the remote control or TV control panel. 2 And then either: a) Press 0-8; page 29) will appear. Chapter 6: Using the TV's features Selecting the video input source to view To select... the video input source to view: 1 Press + on the remote control or TV control panel to change the input. "Setting video input skip" on page 29). • Inputs that input. 3 If there are connected to an HDMI...
... REGZA-LINK devices are multiple REGZA-LINK devices on the remote control and then press T to change input. 32 or c) Repeatedly press + on the remote control or TV control panel. 2 And then either: a) Press 0-8; page 29) will appear. Chapter 6: Using the TV's features Selecting the video input source to view To select... the video input source to view: 1 Press + on the remote control or TV control panel to change the input. "Setting video input skip" on page 29). • Inputs that input. 3 If there are connected to an HDMI...
Owner's Manual - English
Page 33
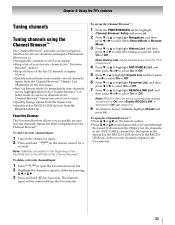
... the left side of the Channel Browser™. Note: History List will be cleared every time the TV is switched to Off. (- page 50) 8 To return to the beginning of the Favorites list on the remote control. •Press 3 C or # c to surf backward or forward through the tuned 32 ...feature allows you to: •Navigate the contents of all your recently viewed channels/ inputs from the Channel Browser™ History List (illustrated on the remote control for 3 seconds. The channel/ input will be removed from the REGZA-LINK List. To set up the Channel Browser™: 1 From the...
... the left side of the Channel Browser™. Note: History List will be cleared every time the TV is switched to Off. (- page 50) 8 To return to the beginning of the Favorites list on the remote control. •Press 3 C or # c to surf backward or forward through the tuned 32 ...feature allows you to: •Navigate the contents of all your recently viewed channels/ inputs from the Channel Browser™ History List (illustrated on the remote control for 3 seconds. The channel/ input will be removed from the REGZA-LINK List. To set up the Channel Browser™: 1 From the...


