Owners Manual
Page 3
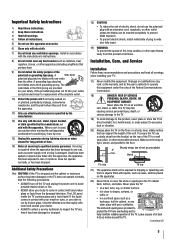
...the floor or a sturdy, level, stable surface that can be exposed to this product, never place or store the TV in contact with the apparatus. The LCD panel inside the TV contains glass and a toxic liquid. Sturdy strap (as short as vases, shall be placed on or pinched, particularly at... grounding prong. When a cart is dropped and the cabinet or enclosure surface has been damaged or the TV does not operate normally, take the following precautions: • ALWAYS turn off the TV and unplug the power cord to avoid possible electric shock or fire. • NEVER allow your body ...
...the floor or a sturdy, level, stable surface that can be exposed to this product, never place or store the TV in contact with the apparatus. The LCD panel inside the TV contains glass and a toxic liquid. Sturdy strap (as short as vases, shall be placed on or pinched, particularly at... grounding prong. When a cart is dropped and the cabinet or enclosure surface has been damaged or the TV does not operate normally, take the following precautions: • ALWAYS turn off the TV and unplug the power cord to avoid possible electric shock or fire. • NEVER allow your body ...
Owners Manual
Page 4
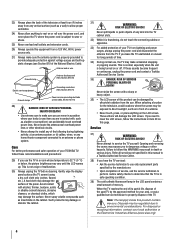
...damage the LCD screen. When the TV reaches the end of its useful life, dispose of the used TV by the approved method for long periods of time. 34) During normal use the TV in death or serious injury. Disposal may result in a room whose temperature is being turned on the... 36) • The LCD screen of this product contain mercury. Gently wipe the display panel surface (the TV screen) using a dry, soft cloth only (cotton, flannel, etc.). If you need to follow these sounds become frequent or continuous, unplug the power cord and contact a Toshiba Authorized Service Center. 35)...
...damage the LCD screen. When the TV reaches the end of its useful life, dispose of the used TV by the approved method for long periods of time. 34) During normal use the TV in death or serious injury. Disposal may result in a room whose temperature is being turned on the... 36) • The LCD screen of this product contain mercury. Gently wipe the display panel surface (the TV screen) using a dry, soft cloth only (cotton, flannel, etc.). If you need to follow these sounds become frequent or continuous, unplug the power cord and contact a Toshiba Authorized Service Center. 35)...
Owners Manual
Page 9
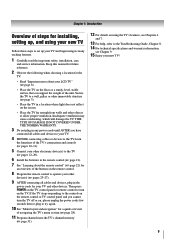
... safety, installation, care, and service information. THIS TYPE OF DAMAGE IS NOT COVERED UNDER THE TOSHIBA WARRANTY. 3 Do not plug in any power cords until AFTER you cannot turn the TV off or on, please unplug the power cords few seconds then re-plug to try again. 10...7. 13 For help, refer to the Troubleshooting Guide, Chapter 8. 14 For technical specifications and warranty information, see Chapter 9. 15 Enjoy your LCD TV" ( page 6). • Place the TV on the remote control. 8 Program the remote control to operate your other device(s) ( pages 23-27). 9 AFTER connecting all cables and ...
... safety, installation, care, and service information. THIS TYPE OF DAMAGE IS NOT COVERED UNDER THE TOSHIBA WARRANTY. 3 Do not plug in any power cords until AFTER you cannot turn the TV off or on, please unplug the power cords few seconds then re-plug to try again. 10...7. 13 For help, refer to the Troubleshooting Guide, Chapter 8. 14 For technical specifications and warranty information, see Chapter 9. 15 Enjoy your LCD TV" ( page 6). • Place the TV on the remote control. 8 Program the remote control to operate your other device(s) ( pages 23-27). 9 AFTER connecting all cables and ...
Owners Manual
Page 10
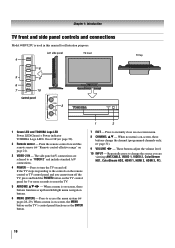
... control or TV control panel and you are referred to turn off . When no menu is on -screen, these buttons change the source you cannot turn the TV on and off the TV, press and hold the POWER button on the TV control panel for illustration purposes. 1 Green LED and TOSHIBA Logo LED... Power LED(Green) = Power indicator TOSHIBA Logo LED= On or Off ( page 30). 2 Remote ...
... control or TV control panel and you are referred to turn off . When no menu is on -screen, these buttons change the source you cannot turn the TV on and off the TV, press and hold the POWER button on the TV control panel for illustration purposes. 1 Green LED and TOSHIBA Logo LED... Power LED(Green) = Power indicator TOSHIBA Logo LED= On or Off ( page 30). 2 Remote ...
Owners Manual
Page 13
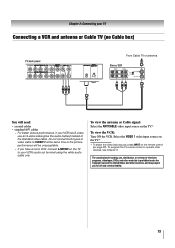
...both types of the standard video cable. Select the VIDEO 1 video input source on the TV.* * To select the video input source, press INPUT on the TV.* To view the VCR: Turn ON the VCR. To program the TV remote control to civil and criminal liability. 13 The unauthorized recording, use an S-video ... the picture performance will be unacceptable. − If you to operate other countries, and may subject you have a mono VCR, connect L/MONO on the TV to your VCR's audio out terminal using the white audio cable only. To view the antenna or Cable signal: Select the ANT/CABLE video input...
...both types of the standard video cable. Select the VIDEO 1 video input source on the TV.* * To select the video input source, press INPUT on the TV.* To view the VCR: Turn ON the VCR. To program the TV remote control to civil and criminal liability. 13 The unauthorized recording, use an S-video ... the picture performance will be unacceptable. − If you to operate other countries, and may subject you have a mono VCR, connect L/MONO on the TV to your VCR's audio out terminal using the white audio cable only. To view the antenna or Cable signal: Select the ANT/CABLE video input...

Owners Manual
Page 14
To program the TV remote control to operate other countries, and may not be unacceptable. • standard audio cables − If you to ). To view the VCR: Turn ON the VCR. The unauthorized recording, use, distribution, or revision of television programs, videotapes, DVDs, and other materials ...is set to civil and criminal liability. 14 To view basic and premium Cable channels: Turn OFF the VCR. Use the Cable box controls to VIDEO 1 at the same time or the picture performance will provide better picture performance ...
To program the TV remote control to operate other countries, and may not be unacceptable. • standard audio cables − If you to ). To view the VCR: Turn ON the VCR. The unauthorized recording, use, distribution, or revision of television programs, videotapes, DVDs, and other materials ...is set to civil and criminal liability. 14 To view basic and premium Cable channels: Turn OFF the VCR. Use the Cable box controls to VIDEO 1 at the same time or the picture performance will provide better picture performance ...
Owners Manual
Page 15
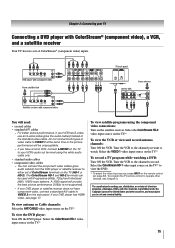
...the video input source, press INPUT on the remote control ( page 22). Select the VIDEO 1 video input source on the TV.* To view the VCR or view and record antenna channels: Turn ON the VCR. Do not connect both types of video cable to VIDEO 1 at the same time or the picture... States and other devices, see page 17. Select the ColorStream HD-2 video input source on the TV.* To record a TV program while watching a DVD: Turn ON the VCR. Select the ColorStream HD-1 video input source on the TV* to record. The ColorStream HD-1 and HD-2 terminals can connect the component video cables (plus the...
...the video input source, press INPUT on the remote control ( page 22). Select the VIDEO 1 video input source on the TV.* To view the VCR or view and record antenna channels: Turn ON the VCR. Do not connect both types of video cable to VIDEO 1 at the same time or the picture... States and other devices, see page 17. Select the ColorStream HD-2 video input source on the TV.* To record a TV program while watching a DVD: Turn ON the VCR. Select the ColorStream HD-1 video input source on the TV* to record. The ColorStream HD-1 and HD-2 terminals can connect the component video cables (plus the...

Owners Manual
Page 17
...connector) per HDMI device − For proper operation, it is recommended that you follow these procedures: • When turning on your electronic components, turn off your TV receives digital audio and uncompressed digital video from an HDMI source device, or uncompressed digital video from EIA/CEA-861-D-compliant[1]... to the HDMI input The HDMI input on your electronic components, turn on the TV first, and then the HDMI or DVI device. • When turning off the HDMI or DVI device first, and then the TV. [1] EIA/CEA-861-D compliance covers the transmission of uncompressed digital...
...connector) per HDMI device − For proper operation, it is recommended that you follow these procedures: • When turning on your electronic components, turn off your TV receives digital audio and uncompressed digital video from an HDMI source device, or uncompressed digital video from EIA/CEA-861-D-compliant[1]... to the HDMI input The HDMI input on your electronic components, turn on the TV first, and then the HDMI or DVI device. • When turning off the HDMI or DVI device first, and then the TV. [1] EIA/CEA-861-D compliance covers the transmission of uncompressed digital...
Owners Manual
Page 19
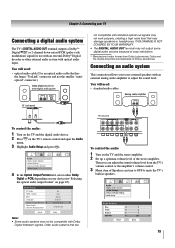
...optical audio cable that are trademarks of the stereo amplifier. You will need : • standard audio cables To control the audio: 1 Turn on the TV and the digital audio device. 2 Press on page 45). Older audio systems that has the larger "TosLink" connector and not the smaller ..."minioptical" connector.) not compatible with Dolby Digital bitstream signals. Dolby and the double-D symbol are To control the audio: 1 Turn on the TV and the stereo amplifier. 2 Set up a optimum volume level of Dolby Laboratories. THIS DAMAGE IS NOT COVERED BY YOUR WARRANTY. •...
...optical audio cable that are trademarks of the stereo amplifier. You will need : • standard audio cables To control the audio: 1 Turn on the TV and the digital audio device. 2 Press on page 45). Older audio systems that has the larger "TosLink" connector and not the smaller ..."minioptical" connector.) not compatible with Dolby Digital bitstream signals. Dolby and the double-D symbol are To control the audio: 1 Turn on the TV and the stereo amplifier. 2 Set up a optimum volume level of Dolby Laboratories. THIS DAMAGE IS NOT COVERED BY YOUR WARRANTY. •...

Owners Manual
Page 22
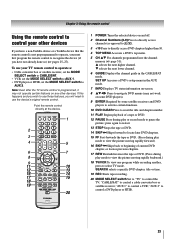
...functions, see the remote control functional key chart ( page 24). 1 POWER turns the TV on and off the sound ( page 44). 13 INFO displays TV status information as well as program details, when available ( page 51). 14 / While watching TV, these buttons select or adjust programming menus. (Also see / .) 16 ENTER...previous/next channel in the Channel Brower™ ( page 36). 10 RECALL displays TV status information ( page 51). 11 CH RTN returns to the last viewed channel or source ( page 39). 12 MUTE reduces or turns off . adjusts the volume level. 9 FAV BROWSER accesses the Favorites List in...
...functions, see the remote control functional key chart ( page 24). 1 POWER turns the TV on and off the sound ( page 44). 13 INFO displays TV status information as well as program details, when available ( page 51). 14 / While watching TV, these buttons select or adjust programming menus. (Also see / .) 16 ENTER...previous/next channel in the Channel Brower™ ( page 36). 10 RECALL displays TV status information ( page 51). 11 CH RTN returns to the last viewed channel or source ( page 39). 12 MUTE reduces or turns off . adjusts the volume level. 9 FAV BROWSER accesses the Favorites List in...
Owners Manual
Page 23
... To use the device's original remote control. Note: Even after the TV remote control is not preprogrammed to operate, you must first program the remote control to recognize the device (if you have a non-Toshiba device or a Toshiba device that the remote control is programmed, it may not work on some...into the channel memory ( page 31): S selects the next higher channel. Point the remote control directly at the device. 16 17 18 19 1 POWER Turns the selected device on any other devices If you have not already done so) ( pages 25-27). T selects the next lower channel. 6 GUIDE ...
... To use the device's original remote control. Note: Even after the TV remote control is not preprogrammed to operate, you must first program the remote control to recognize the device (if you have a non-Toshiba device or a Toshiba device that the remote control is programmed, it may not work on some...into the channel memory ( page 31): S selects the next higher channel. Point the remote control directly at the device. 16 17 18 19 1 POWER Turns the selected device on any other devices If you have not already done so) ( pages 25-27). T selects the next lower channel. 6 GUIDE ...
Owners Manual
Page 25
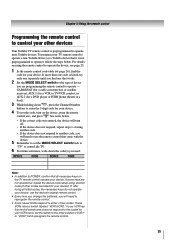
... point the remote control at it is not preprogrammed to operate), follow the steps below . • If the correct code was entered, the device will turn off. • If the device does not respond, repeat steps 1-4 using the remote control to operate - These VCRs have a switch labeled "VCR1/VCR2."... do not operate your device, use the remote control that came with the device. 5 Remember to set the switch to the other devices Your Toshiba TV remote control is listed, try each one separately until you will need to reprogram the remote control. • Some newer VCRs respond to either...
... point the remote control at it is not preprogrammed to operate), follow the steps below . • If the correct code was entered, the device will turn off. • If the device does not respond, repeat steps 1-4 using the remote control to operate - These VCRs have a switch labeled "VCR1/VCR2."... do not operate your device, use the remote control that came with the device. 5 Remember to set the switch to the other devices Your Toshiba TV remote control is listed, try each one separately until you will need to reprogram the remote control. • Some newer VCRs respond to either...

Owners Manual
Page 34
... and open the Setup menu. 2 Highlight Installation and press . Note: • The physical digital channel number listed in again to a virtual TV channel number. Open the Terrestrial menu, highlight Signal Meter, and press . 4 Press STWX to select the antenna input and digital channel whose signal... you will turn off , unplug the TV power cord and then plug it in the Signal Meter screen may not correspond to complete the reset process. After the TV turns off automatically after a few seconds. Contact your local broadcasters...
... and open the Setup menu. 2 Highlight Installation and press . Note: • The physical digital channel number listed in again to a virtual TV channel number. Open the Terrestrial menu, highlight Signal Meter, and press . 4 Press STWX to select the antenna input and digital channel whose signal... you will turn off , unplug the TV power cord and then plug it in the Signal Meter screen may not correspond to complete the reset process. After the TV turns off automatically after a few seconds. Contact your local broadcasters...
Owners Manual
Page 35
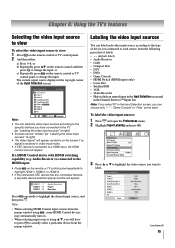
... Player Recorder Press repeatedly to view: 1 Press on . • When selecting input sources using , some HDMI Control devices may automatically turn on the remote control or TV control panel. 2 And then either: a) Press 0-8; Note: • When selecting HDMI Control input sources from the popup window using ... ColorStream HD 2 HDMI 1 HDMI 2 HDMI 3 PC Reset VCR Cable Video Recorder Hide DTV Satellite/DSS DV D -- Chapter 6: Using the TV's features Selecting the video input source to view To select the video input source to highlight the desired input source, and then press . or ...
... Player Recorder Press repeatedly to view: 1 Press on . • When selecting input sources using , some HDMI Control devices may automatically turn on the remote control or TV control panel. 2 And then either: a) Press 0-8; Note: • When selecting HDMI Control input sources from the popup window using ... ColorStream HD 2 HDMI 1 HDMI 2 HDMI 3 PC Reset VCR Cable Video Recorder Hide DTV Satellite/DSS DV D -- Chapter 6: Using the TV's features Selecting the video input source to view To select the video input source to highlight the desired input source, and then press . or ...
Owners Manual
Page 37
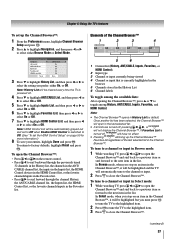
... next item in the list. Note: • The Channel Browser™ opens in the Channel Browser™, it will be highlighted and the TV will bring up the Channel Browser™: 1 From the Preferences menu, highlight Channel Browser Setup and press . 2 Press S to highlight Navigation,... list (History, ANT/CABLE, Inputs, Favorites, or HDMI Control) 2 Input type 3 Channel or input currently being viewed 4 Channel or input that is turned off , pressing W, X, or will be highlighted but you prefer: either Browse Mode or Select Mode. To open in the Channel Browser™. Chapter ...
... next item in the list. Note: • The Channel Browser™ opens in the Channel Browser™, it will be highlighted and the TV will bring up the Channel Browser™: 1 From the Preferences menu, highlight Channel Browser Setup and press . 2 Press S to highlight Navigation,... list (History, ANT/CABLE, Inputs, Favorites, or HDMI Control) 2 Input type 3 Channel or input currently being viewed 4 Channel or input that is turned off , pressing W, X, or will be highlighted but you prefer: either Browse Mode or Select Mode. To open in the Channel Browser™. Chapter ...
Owners Manual
Page 38
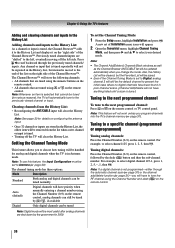
...channel 125, press 1, 2, 5, then . Clearing channels from the list when a new channel or input is tuned. • Turning off the left , eventually moving off the TV will clear the History List. Setting the Channel Tuning Mode This feature allows you will clear the History List. Note: If a ... select your desired mode. A new set the Channel Tuning Mode: 1 From the Setup menu, highlight Installation and press . Chapter 6: Using the TV's features Adding and clearing channels and inputs in the History List Adding channels and inputs to the History List: As a channel or input is tuned...
...channel 125, press 1, 2, 5, then . Clearing channels from the list when a new channel or input is tuned. • Turning off the left , eventually moving off the TV will clear the History List. Setting the Channel Tuning Mode This feature allows you will clear the History List. Note: If a ... select your desired mode. A new set the Channel Tuning Mode: 1 From the Setup menu, highlight Installation and press . Chapter 6: Using the TV's features Adding and clearing channels and inputs in the History List Adding channels and inputs to the History List: As a channel or input is tuned...
Owners Manual
Page 41
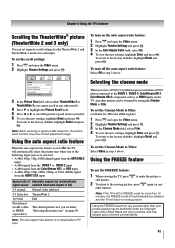
...for any other countries, and may have limited adjustment range. To revert to the factory defaults, highlight Reset and press . Chapter 6: Using the TV's features Scrolling the TheaterWide® picture (TheaterWide 2 and 3 only) You can be obtained by setting the Cinema Mode to Film. To set... mode When you to scroll the picture up and down as needed. 6 To save the new settings, highlight Done and press . To turn on page 40. Video Mode Picture Settings Noise Reduction Game Mode Theater Settings Sports Off 3 In the Picture Size field, select either TheaterWide 2 or TheaterWide ...
...for any other countries, and may have limited adjustment range. To revert to the factory defaults, highlight Reset and press . Chapter 6: Using the TV's features Scrolling the TheaterWide® picture (TheaterWide 2 and 3 only) You can be obtained by setting the Cinema Mode to Film. To set... mode When you to scroll the picture up and down as needed. 6 To save the new settings, highlight Done and press . To turn on page 40. Video Mode Picture Settings Noise Reduction Game Mode Theater Settings Sports Off 3 In the Picture Size field, select either TheaterWide 2 or TheaterWide ...
Owners Manual
Page 43
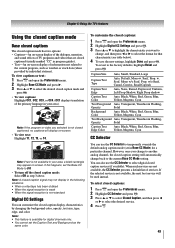
...characteristic you change , and then press W or X to select the desired closed caption display characteristics by individual stations). Chapter 6: Using the TV's features Using the closed caption mode Base closed captions The closed caption mode has two options: • Captions-An on-screen display of the...press X. 3 Press S or T to select the format for a particular channel. If this happens, set the Base CC Mode to Off. • To turn off the closed captions: 1 Press and open the Preferences menu. 2 Highlight CC Selector and press . 3 Press S or T to select Closed Caption, and...
...characteristic you change , and then press W or X to select the desired closed caption display characteristics by individual stations). Chapter 6: Using the TV's features Using the closed caption mode Base closed captions The closed caption mode has two options: • Captions-An on-screen display of the...press X. 3 Press S or T to select the format for a particular channel. If this happens, set the Base CC Mode to Off. • To turn off the closed captions: 1 Press and open the Preferences menu. 2 Highlight CC Selector and press . 3 Press S or T to select Closed Caption, and...
Owners Manual
Page 44
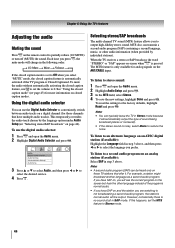
...select Mono to stereo sound: 1 Press and open the Audio menu. 2 Highlight Digital Audio Selector and press . Selecting stereo/SAP broadcasts The multi-channel TV sound (MTS) feature allows you prefer. MTS also can be output. Note: • A second audio program (SAP) can transmit a second audio program... set the volume to output high-fidelity stereo sound. To reset the settings to partially reduce (1/2 MUTE) or turn off (MUTE) the sound. Chapter 6: Using the TV's features Adjusting the audio Muting the sound Press on the remote control to the factory defaults, highlight Reset and...
...select Mono to stereo sound: 1 Press and open the Audio menu. 2 Highlight Digital Audio Selector and press . Selecting stereo/SAP broadcasts The multi-channel TV sound (MTS) feature allows you prefer. MTS also can be output. Note: • A second audio program (SAP) can transmit a second audio program... set the volume to output high-fidelity stereo sound. To reset the settings to partially reduce (1/2 MUTE) or turn off (MUTE) the sound. Chapter 6: Using the TV's features Adjusting the audio Muting the sound Press on the remote control to the factory defaults, highlight Reset and...

Owners Manual
Page 48
...channels: 1 Press and highlight the Locks menu icon. 2 Press T to view the input sources or channels until the TV is turned off, and will be enabled when the TV is released and the normal picture appears. Push 'MUTE' to watch. Using the input lock feature You can either temporarily... unlock the program or select an unlocked program to enter PIN. Chapter 6: Using the TV's features Blocking channels With...
...channels: 1 Press and highlight the Locks menu icon. 2 Press T to view the input sources or channels until the TV is turned off, and will be enabled when the TV is released and the normal picture appears. Push 'MUTE' to watch. Using the input lock feature You can either temporarily... unlock the program or select an unlocked program to enter PIN. Chapter 6: Using the TV's features Blocking channels With...


