
User Guide
Page 10
... a computer to the TV's PC IN terminal 36 Connection to the TV's HDMI® terminal............38 Chapter 3: Using the Remote Control 41 Installing batteries 41 Remote control effective range 43 Learning about the remote control 44 Chapter 4: Menu Layout and Navigation 47 Main menu layout 47 Setup/Installation menu layout 49 Navigating the...
... a computer to the TV's PC IN terminal 36 Connection to the TV's HDMI® terminal............38 Chapter 3: Using the Remote Control 41 Installing batteries 41 Remote control effective range 43 Learning about the remote control 44 Chapter 4: Menu Layout and Navigation 47 Main menu layout 47 Setup/Installation menu layout 49 Navigating the...
User Guide
Page 13
... CableClear® digital Noise Reduction 118 MPEG Noise Reduction 119 Game Mode 119 Chapter 8: Troubleshooting 121 General troubleshooting 121 Picture problems 122 Sound problems 123 Remote control problems 124 Channel tuning problems 124 Closed caption problems 125 Rating blocking (V-Chip) problems 125 No HDMI® CEC operation 125 HDMI® problems...
... CableClear® digital Noise Reduction 118 MPEG Noise Reduction 119 Game Mode 119 Chapter 8: Troubleshooting 121 General troubleshooting 121 Picture problems 122 Sound problems 123 Remote control problems 124 Channel tuning problems 124 Closed caption problems 125 Rating blocking (V-Chip) problems 125 No HDMI® CEC operation 125 HDMI® problems...
User Guide
Page 16
...The following are just a few of the many exciting features of external devices from the TV remote via HDMI® connection. See "Connecting a digital audio system" on page 102. ❖...most cases). ❖ 1366 x 768 output resolution(32L2200U) ❖ 1920 x 1080 output resolution(40L2200U/50L2200U) ❖ Two HDMI®-Digital, High-Definition Multimedia Interfaces with Dolby® Digital optical output...), or a VCR" on page 36. ❖ HDMI® CEC-Allows control of your new Toshiba wide screen, integrated HD, LED TV: ❖ Integrated digital tuning (8VSB ATSC and QAM)- See...
...The following are just a few of the many exciting features of external devices from the TV remote via HDMI® connection. See "Connecting a digital audio system" on page 102. ❖...most cases). ❖ 1366 x 768 output resolution(32L2200U) ❖ 1920 x 1080 output resolution(40L2200U/50L2200U) ❖ Two HDMI®-Digital, High-Definition Multimedia Interfaces with Dolby® Digital optical output...), or a VCR" on page 36. ❖ HDMI® CEC-Allows control of your new Toshiba wide screen, integrated HD, LED TV: ❖ Integrated digital tuning (8VSB ATSC and QAM)- See...
User Guide
Page 17
... future reference. 2 To choose a location for the TV: ❖ Read "Important notes about the remote control" on page 44 for an overview of the buttons on the TV. THIS TYPE OF DAMAGE IS NOT COVERED UNDER THE TOSHIBA WARRANTY. 3 Do not plug in any power cords until after you cannot turn on... the remote control. 8 After connecting all cables and devices to your TV and begin using its many exciting features...
... future reference. 2 To choose a location for the TV: ❖ Read "Important notes about the remote control" on page 44 for an overview of the buttons on the TV. THIS TYPE OF DAMAGE IS NOT COVERED UNDER THE TOSHIBA WARRANTY. 3 Do not plug in any power cords until after you cannot turn on... the remote control. 8 After connecting all cables and devices to your TV and begin using its many exciting features...
User Guide
Page 18
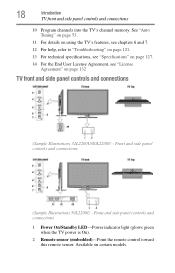
.../Standby LED-Power indicator light (glows green when the TV power is On). 2 Remote sensor (embedded)-Point the remote control toward this remote sensor. Available on page 132 TV front and side panel controls and connections (Sample Illustration) 32L2200U/40L2200U - 18 Introduction TV front and side panel controls and connections 10 Program channels into...
.../Standby LED-Power indicator light (glows green when the TV power is On). 2 Remote sensor (embedded)-Point the remote control toward this remote sensor. Available on page 132 TV front and side panel controls and connections (Sample Illustration) 32L2200U/40L2200U - 18 Introduction TV front and side panel controls and connections 10 Program channels into...
User Guide
Page 19
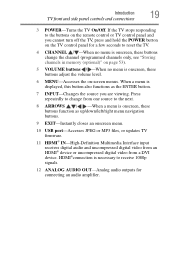
... menus. HDMI®connection is necessary to receive 1080p signals. 12 ANALOG AUDIO OUT-Analog audio outputs for a few seconds to the buttons on the remote control or TV control panel and you are viewing. When a menu is displayed, this button also functions as up/down/left/right menu navigation buttons...
... menus. HDMI®connection is necessary to receive 1080p signals. 12 ANALOG AUDIO OUT-Analog audio outputs for a few seconds to the buttons on the remote control or TV control panel and you are viewing. When a menu is displayed, this button also functions as up/down/left/right menu navigation buttons...

User Guide
Page 26
... of the United States and other materials is set to). To view the antenna or cable signal: Select ANT/CABLE video input source on the remote control. When you to civil and criminal liability. Select VIDEO input source on the TV.* *To select the video input source, press the INPUT button... input mode. 26 Connecting Your TV Connecting a VCR, antenna, cable TV, or camcorder NOTE When you use a cable box, you may subject you use the remote control to program or access certain features on the TV.
... of the United States and other materials is set to). To view the antenna or cable signal: Select ANT/CABLE video input source on the remote control. When you to civil and criminal liability. Select VIDEO input source on the TV.* *To select the video input source, press the INPUT button... input mode. 26 Connecting Your TV Connecting a VCR, antenna, cable TV, or camcorder NOTE When you use a cable box, you may subject you use the remote control to program or access certain features on the TV.
User Guide
Page 28
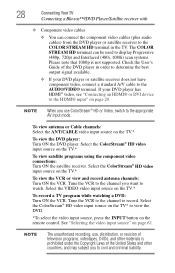
... component video, connect a standard A/V cable to civil and criminal liability. To view antenna or Cable channels: Select the ANT/CABLE video input source on the remote control. NOTE When you want to the appropriate AV input mode. Tune the VCR to the channel you use , distribution, or revision of the DVD...
... component video, connect a standard A/V cable to civil and criminal liability. To view antenna or Cable channels: Select the ANT/CABLE video input source on the remote control. NOTE When you want to the appropriate AV input mode. Tune the VCR to the channel you use , distribution, or revision of the DVD...
User Guide
Page 30
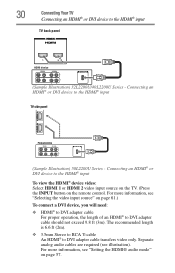
... DVI adapter cable should not exceed 9.8 ft (3m). Separate analog audio cables are required (see "Setting the HDMI® audio mode" on the remote control. Connecting an HDMI® or DVI device to DVI adapter cable transfers video only. The recommended length is 6.6 ft (2m). ❖ 3....Series - 30 Connecting Your TV Connecting an HDMI® or DVI device to the HDMI® input TV back panel HDMI device (Sample Illustration) 32L2200U/40L2200U Series - For more information, see "Selecting the video input source" on page 61.) To connect a DVI device, you will need: ❖ HDMI...
... DVI adapter cable should not exceed 9.8 ft (3m). Separate analog audio cables are required (see "Setting the HDMI® audio mode" on the remote control. Connecting an HDMI® or DVI device to DVI adapter cable transfers video only. The recommended length is 6.6 ft (2m). ❖ 3....Series - 30 Connecting Your TV Connecting an HDMI® or DVI device to the HDMI® input TV back panel HDMI device (Sample Illustration) 32L2200U/40L2200U Series - For more information, see "Selecting the video input source" on page 61.) To connect a DVI device, you will need: ❖ HDMI...
User Guide
Page 32
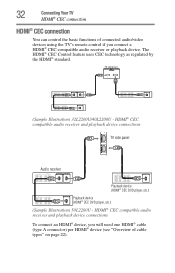
...device. The HDMI® CEC Control feature uses CEC technology as regulated by the HDMI® standard. TV side panel 1 2 (Sample Illustration) 32L2200U/40L2200U - HDMI® CEC compatible audio receiver and playback device connections p TV side panel Audio receiver Playback device (HDMI® CEC DVD player, etc.) ...HDMI® CEC connection HDMI® CEC connection You can control the basic functions of connected audio/video devices using the TV's remote control if you will need one HDMI® cable (type A connector) per HDMI® device (see "Overview of cable types" on page ...
...device. The HDMI® CEC Control feature uses CEC technology as regulated by the HDMI® standard. TV side panel 1 2 (Sample Illustration) 32L2200U/40L2200U - HDMI® CEC compatible audio receiver and playback device connections p TV side panel Audio receiver Playback device (HDMI® CEC DVD player, etc.) ...HDMI® CEC connection HDMI® CEC connection You can control the basic functions of connected audio/video devices using the TV's remote control if you will need one HDMI® cable (type A connector) per HDMI® device (see "Overview of cable types" on page ...

User Guide
Page 34
34 Connecting Your TV Connecting a digital audio system (Sample Illustration) L2200U series - Connecting a digital audio system To control the audio: 1 Turn on the TV and the digital audio device. 2 Press the MENU button on the remote control and open the Sound menu. 3 Press the ( / arrow) buttons to select Digital Output Format. Audio Setup selection 4 Press the ( / arrow) buttons to highlight Audio Setup, and then press the ENTER button. (Sample Illustration) Sound menu -
34 Connecting Your TV Connecting a digital audio system (Sample Illustration) L2200U series - Connecting a digital audio system To control the audio: 1 Turn on the TV and the digital audio device. 2 Press the MENU button on the remote control and open the Sound menu. 3 Press the ( / arrow) buttons to select Digital Output Format. Audio Setup selection 4 Press the ( / arrow) buttons to highlight Audio Setup, and then press the ENTER button. (Sample Illustration) Sound menu -
User Guide
Page 41
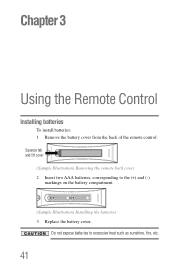
Squeeze tab and lift cover (Sample Illustration) Removing the remote back cover 2 Insert two AAA batteries, corresponding to excessive heat such as sunshine, fire, etc. 41 Chapter 3 Using the Remote Control Installing batteries To install batteries: 1 Remove the battery cover from the back of the remote control. Do not expose batteries to the (+) and (-) markings on the battery compartment. (Sample Illustration) Installing the batteries 3 Replace the battery cover.
Squeeze tab and lift cover (Sample Illustration) Removing the remote back cover 2 Insert two AAA batteries, corresponding to excessive heat such as sunshine, fire, etc. 41 Chapter 3 Using the Remote Control Installing batteries To install batteries: 1 Remove the battery cover from the back of the remote control. Do not expose batteries to the (+) and (-) markings on the battery compartment. (Sample Illustration) Installing the batteries 3 Replace the battery cover.
User Guide
Page 42
...batteries. ❖ Dispose of batteries in a designated disposal area. ❖ Always consider the environment when disposing of time. 42 Using the Remote Control Installing batteries NOTE ❖ Be sure to be used batteries together. ❖ Always remove batteries from leaking into the battery compartment. ...Always follow applicable laws and regulations. ❖ If the remote does not operate correctly, or if the operating range is not to use new and used for an extended period of batteries.
...batteries. ❖ Dispose of batteries in a designated disposal area. ❖ Always consider the environment when disposing of time. 42 Using the Remote Control Installing batteries NOTE ❖ Be sure to be used batteries together. ❖ Always remove batteries from leaking into the battery compartment. ...Always follow applicable laws and regulations. ❖ If the remote does not operate correctly, or if the operating range is not to use new and used for an extended period of batteries.
User Guide
Page 43
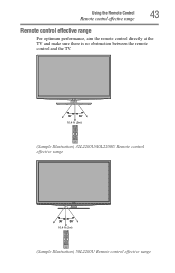
Using the Remote Control 43 Remote control effective range Remote control effective range For optimum performance, aim the remote control directly at the TV and make sure there is no obstruction between the remote control and the TV. 16.4 ft (5m) (Sample Illustration) 32L2200U/40L2200U Remote control effective range 16.4 ft (5m) (Sample Illustration) 50L2200U Remote control effective range
Using the Remote Control 43 Remote control effective range Remote control effective range For optimum performance, aim the remote control directly at the TV and make sure there is no obstruction between the remote control and the TV. 16.4 ft (5m) (Sample Illustration) 32L2200U/40L2200U Remote control effective range 16.4 ft (5m) (Sample Illustration) 50L2200U Remote control effective range
User Guide
Page 44
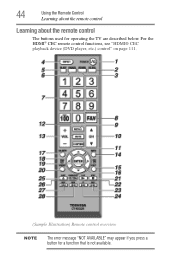
For the HDMI® CEC remote control functions, see "HDMI® CEC playback device (DVD player, etc.) control" on page 111. (Sample Illustration) Remote control overview NOTE The error message "NOT AVAILABLE" may appear if you press a button for operating the TV are described below. 44 Using the Remote Control Learning about the remote control Learning about the remote control The buttons used for a function that is not available.
For the HDMI® CEC remote control functions, see "HDMI® CEC playback device (DVD player, etc.) control" on page 111. (Sample Illustration) Remote control overview NOTE The error message "NOT AVAILABLE" may appear if you press a button for operating the TV are described below. 44 Using the Remote Control Learning about the remote control Learning about the remote control The buttons used for a function that is not available.
User Guide
Page 45
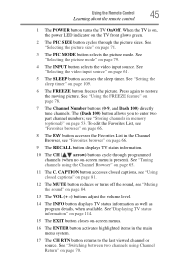
..." on page 81. 12 The MUTE button reduces or turns off the sound, see "Favorites browser" on -screen menu is present). Using the Remote Control 45 Learning about the remote control 1 The POWER button turns the TV On/Off. See "Using the FREEZE feature" on page 84. 13 The VOL (+ -) buttons adjust...
..." on page 81. 12 The MUTE button reduces or turns off the sound, see "Favorites browser" on -screen menu is present). Using the Remote Control 45 Learning about the remote control 1 The POWER button turns the TV On/Off. See "Using the FREEZE feature" on page 84. 13 The VOL (+ -) buttons adjust...
User Guide
Page 46
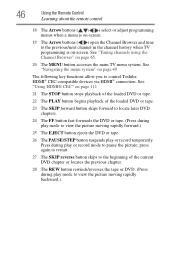
... The EJECT button ejects the DVD or tape. 26 The PAUSE/STEP button suspends play mode to pause the picture; 46 Using the Remote Control Learning about the remote control 18 The Arrow buttons ( / / / ) select or adjust programming menus when a menu is on-screen. 19 The Arrow ...buttons ( / ) open the Channel Browser and tune to control Toshiba HDMI® CEC-compatible devices via HDMI® connection. See "Tuning channels using the Channel...
... The EJECT button ejects the DVD or tape. 26 The PAUSE/STEP button suspends play mode to pause the picture; 46 Using the Remote Control Learning about the remote control 18 The Arrow buttons ( / / / ) select or adjust programming menus when a menu is on-screen. 19 The Arrow ...buttons ( / ) open the Channel Browser and tune to control Toshiba HDMI® CEC-compatible devices via HDMI® connection. See "Tuning channels using the Channel...
User Guide
Page 47
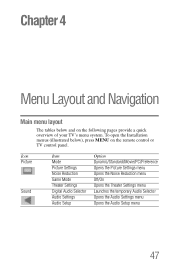
... the temporary Audio Selector Opens the Audio Settings menu Opens the Audio Setup menu 47 To open the Installation menus (illustrated below and on the remote control or TV control panel. Chapter 4 Menu Layout and Navigation Main menu layout The tables below ), press MENU on the following pages provide a quick overview...
... the temporary Audio Selector Opens the Audio Settings menu Opens the Audio Setup menu 47 To open the Installation menus (illustrated below and on the remote control or TV control panel. Chapter 4 Menu Layout and Navigation Main menu layout The tables below ), press MENU on the following pages provide a quick overview...
User Guide
Page 49
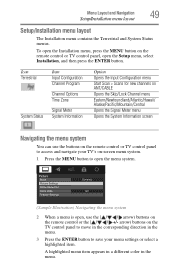
...Meter menu Opens the System Information screen Navigating the menu system You can use the ( / / / arrow) buttons on the remote control or the arrow) buttons on the remote control or TV control panel, open the Setup menu, select Installation, and then press the ENTER button. A highlighted menu item ... menu layout Setup/Installation menu layout The Installation menu contains the Terrestrial and System Status menus. To open , use the buttons on the remote control or TV control panel to access and navigate your TV's on-screen menu system. 1 Press the MENU button to save your menu...
...Meter menu Opens the System Information screen Navigating the menu system You can use the ( / / / arrow) buttons on the remote control or the arrow) buttons on the remote control or TV control panel, open the Setup menu, select Installation, and then press the ENTER button. A highlighted menu item ... menu layout Setup/Installation menu layout The Installation menu contains the Terrestrial and System Status menus. To open , use the buttons on the remote control or TV control panel to access and navigate your TV's on-screen menu system. 1 Press the MENU button to save your menu...

User Guide
Page 53
... set up your area and store them in the TV's memory. Storing channels in memory (optional) To make sure your TV stops only on the remote control or the control panel, store those channels in its memory. Auto Tuning You can manually add or erase individual channels from memory. Setting up...
... set up your area and store them in the TV's memory. Storing channels in memory (optional) To make sure your TV stops only on the remote control or the control panel, store those channels in its memory. Auto Tuning You can manually add or erase individual channels from memory. Setting up...


