
User Guide
Page 4
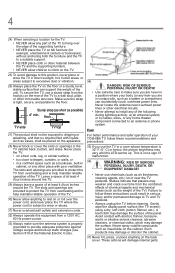
... block or cover the slots or openings in direct sunlight; or • in a position where your TOSHIBA TV, follow these recommendations and precautions: 35) If you are provided to protect the TV from the combined effects of chemical agents and mechanical stress (such as insecticide on the cabinet. or b)...filled with poor ventilation. Studies indicate that plastics may vary until the LED warms up static charges (see Section 810 of the National Electric Code). 34) DANGER: RISK OF SERIOUS PERSONAL INJURY OR DEATH! • Use extreme care to make sure the antenna system is not a ...
... block or cover the slots or openings in direct sunlight; or • in a position where your TOSHIBA TV, follow these recommendations and precautions: 35) If you are provided to protect the TV from the combined effects of chemical agents and mechanical stress (such as insecticide on the cabinet. or b)...filled with poor ventilation. Studies indicate that plastics may vary until the LED warms up static charges (see Section 810 of the National Electric Code). 34) DANGER: RISK OF SERIOUS PERSONAL INJURY OR DEATH! • Use extreme care to make sure the antenna system is not a ...
User Guide
Page 12
... 84 Selecting stereo/SAP broadcasts 85 Adjusting the audio quality 86 Audyssey Premium Television™ (50L2200U only 87 Stable Sound (32L2200U/40L2200U only) .......88 Selecting the optical audio output format .........88 Using the Dolby® Digital Dynamic Range Control feature 89 Using the... Locks menu 89 Entering the PIN code 89 Forgotten PIN code 90 Changing or deleting your PIN code 90 Using parental controls (for USA region 91 Blocking TV programs and movies by rating (V-Chip 91 Downloading an additional rating system ............
... 84 Selecting stereo/SAP broadcasts 85 Adjusting the audio quality 86 Audyssey Premium Television™ (50L2200U only 87 Stable Sound (32L2200U/40L2200U only) .......88 Selecting the optical audio output format .........88 Using the Dolby® Digital Dynamic Range Control feature 89 Using the... Locks menu 89 Entering the PIN code 89 Forgotten PIN code 90 Changing or deleting your PIN code 90 Using parental controls (for USA region 91 Blocking TV programs and movies by rating (V-Chip 91 Downloading an additional rating system ............
User Guide
Page 20
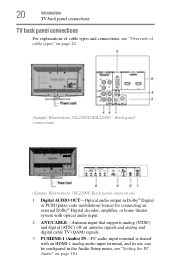
...or PCM (pulse-code modulation) format for connecting an external Dolby® Digital decoder, amplifier, or home theater system with optical audio input. 2 ANT/CABLE-Antenna input that supports analog (NTSC) and digital (ATSC) off-air antenna signals and analog and digital cable TV (QAM) signals.... 3 PC/HDMI-1 (Audio) IN-PC audio input terminal is shared with an HDMI-1 analog audio input terminal, and its use can be configured in the Audio Setup menu, see "Overview of cable types and connections, see "Setting the PC Audio" on page 22. (Sample Illustration) 32L2200U/40L2200U...
...or PCM (pulse-code modulation) format for connecting an external Dolby® Digital decoder, amplifier, or home theater system with optical audio input. 2 ANT/CABLE-Antenna input that supports analog (NTSC) and digital (ATSC) off-air antenna signals and analog and digital cable TV (QAM) signals.... 3 PC/HDMI-1 (Audio) IN-PC audio input terminal is shared with an HDMI-1 analog audio input terminal, and its use can be configured in the Audio Setup menu, see "Overview of cable types and connections, see "Setting the PC Audio" on page 22. (Sample Illustration) 32L2200U/40L2200U...
User Guide
Page 23
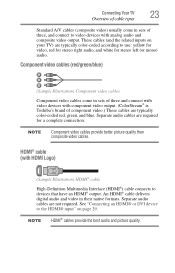
...picture quality. NOTE Component video cables provide better picture quality than composite video cables. Separate audio cables are typically color-coded red, green, and blue. An HDMI® cable delivers digital audio and video in their native formats. Separate audio cables are... not required. Connecting Your TV 23 Overview of cable types Standard A/V cables (composite video) usually come in sets of three and connect with video devices with component video output. (ColorStream® is Toshiba's brand of three, and connect to video devices with HDMI Logo) (Sample ...
...picture quality. NOTE Component video cables provide better picture quality than composite video cables. Separate audio cables are typically color-coded red, green, and blue. An HDMI® cable delivers digital audio and video in their native formats. Separate audio cables are... not required. Connecting Your TV 23 Overview of cable types Standard A/V cables (composite video) usually come in sets of three and connect with video devices with component video output. (ColorStream® is Toshiba's brand of three, and connect to video devices with HDMI Logo) (Sample ...
User Guide
Page 24
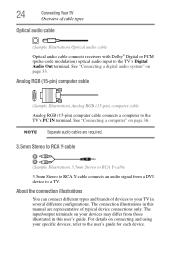
...(15-pin) computer cable (Sample Illustration) Analog RGB (15-pin) computer cable Analog RGB (15-pin) computer cable connects a computer to a TV. See "Connecting a computer" on page 33. NOTE Separate audio cables are required. 3.5mm Stereo to RCA Y-cable (Sample Illustration) 3.5mm Stereo...audio cable Optical audio cable connects receivers with Dolby® Digital or PCM (pulse-code modulation) optical audio input to the TV's Digital Audio Out terminal. For details on your TV in this user's guide. The connection illustrations in several different configurations. About the ...
...(15-pin) computer cable (Sample Illustration) Analog RGB (15-pin) computer cable Analog RGB (15-pin) computer cable connects a computer to a TV. See "Connecting a computer" on page 33. NOTE Separate audio cables are required. 3.5mm Stereo to RCA Y-cable (Sample Illustration) 3.5mm Stereo...audio cable Optical audio cable connects receivers with Dolby® Digital or PCM (pulse-code modulation) optical audio input to the TV's Digital Audio Out terminal. For details on your TV in this user's guide. The connection illustrations in several different configurations. About the ...

User Guide
Page 33
Refer to models incorporating Toshiba's HDMI® CEC. NOTE This feature may not operate properly. ❖ ...sure to use with an external Dolby® Digital decoder or other external audio system with optical audio input. However, Toshiba is limited to the individual instruction manuals for compatibility information. For details, see "HDMI® CEC input source selection... 113. ❖ The connected devices must also be configured. Connecting Your TV 33 Connecting a digital audio system NOTE ❖ If several devices are connected. Connecting a digital audio system The...
Refer to models incorporating Toshiba's HDMI® CEC. NOTE This feature may not operate properly. ❖ ...sure to use with an external Dolby® Digital decoder or other external audio system with optical audio input. However, Toshiba is limited to the individual instruction manuals for compatibility information. For details, see "HDMI® CEC input source selection... 113. ❖ The connected devices must also be configured. Connecting Your TV 33 Connecting a digital audio system NOTE ❖ If several devices are connected. Connecting a digital audio system The...
User Guide
Page 48
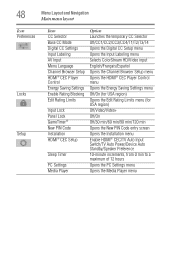
... Channel Browser Setup HDMI® CEC Player Control Energy Saving Settings Enable Rating Blocking Edit Rating Limits Input Lock Panel Lock GameTimer® New PIN Code Installation HDMI® CEC Setup Sleep Timer PC Settings Media Player Option Launches the temporary CC Selector Off/CC1/CC2/CC3/CC4/T1/T2/T3... region) Off/Video/Video+ Off/On Off/30 min/60 min/90 min/120 min Opens the New PIN Code entry screen Opens the Installation menu Enable HDMI® CEC/TV Auto Input Switch/TV Auto Power/Device Auto Standby/Speaker Preference 10-minute increments, from 0 min to a maximum of 12 hours Opens...
... Channel Browser Setup HDMI® CEC Player Control Energy Saving Settings Enable Rating Blocking Edit Rating Limits Input Lock Panel Lock GameTimer® New PIN Code Installation HDMI® CEC Setup Sleep Timer PC Settings Media Player Option Launches the temporary CC Selector Off/CC1/CC2/CC3/CC4/T1/T2/T3... region) Off/Video/Video+ Off/On Off/30 min/60 min/90 min/120 min Opens the New PIN Code entry screen Opens the Installation menu Enable HDMI® CEC/TV Auto Input Switch/TV Auto Power/Device Auto Standby/Speaker Preference 10-minute increments, from 0 min to a maximum of 12 hours Opens...

User Guide
Page 60
... ( / arrow) buttons to scroll through the menu bar to select Factory Defaults. 5 Highlight Yes, and then press the ENTER button. 6 If a PIN code has been set of Installation menu icons appears. 3 Open the System Status menu, highlight System Information, and then press the ENTER button. 4 Press the ( ...bar to complete the reset process. A warning message appears. 8 Select Yes, and then press the ENTER button. A new set , enter your TV Viewing the system status Viewing the system status 1 Press the MENU button and open the Setup menu. 2 Highlight Installation, and then press the ENTER...
... ( / arrow) buttons to scroll through the menu bar to select Factory Defaults. 5 Highlight Yes, and then press the ENTER button. 6 If a PIN code has been set of Installation menu icons appears. 3 Open the System Status menu, highlight System Information, and then press the ENTER button. 4 Press the ( ...bar to complete the reset process. A warning message appears. 8 Select Yes, and then press the ENTER button. A new set , enter your TV Viewing the system status Viewing the system status 1 Press the MENU button and open the Setup menu. 2 Highlight Installation, and then press the ENTER...
User Guide
Page 89
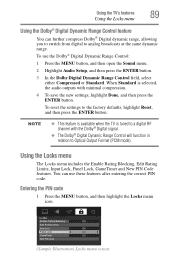
.... ❖ The Dolby® Digital Dynamic Range Control will function in relation to analog broadcasts at the same dynamic range. Using the TV's features 89 Using the Locks menu Using the Dolby® Digital Dynamic Range Control feature You can use the Dolby® Digital Dynamic Range...ENTER button. 3 In the Dolby Digital Dynamic Range Control field, select either Compressed or Standard. To use these features after entering the correct PIN code. When Standard is tuned to a digital RF channel with minimal compression. 4 To save the new settings, highlight Done, and then press the ...
.... ❖ The Dolby® Digital Dynamic Range Control will function in relation to analog broadcasts at the same dynamic range. Using the TV's features 89 Using the Locks menu Using the Dolby® Digital Dynamic Range Control feature You can use the Dolby® Digital Dynamic Range...ENTER button. 3 In the Dolby Digital Dynamic Range Control field, select either Compressed or Standard. To use these features after entering the correct PIN code. When Standard is tuned to a digital RF channel with minimal compression. 4 To save the new settings, highlight Done, and then press the ...
User Guide
Page 90
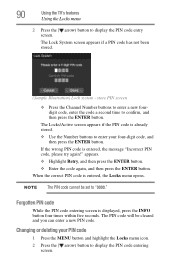
..., press the INFO button four times within five seconds. NOTE The PIN code cannot be cleared and you can enter a new PIN code. Changing or deleting your four-digit code, and then press the ENTER button. 90 Using the TV's features Using the Locks menu 2 Press the ( arrow) button to confirm..., and then press the ENTER button. The PIN code will be set to display the PIN code entering screen. When the correct PIN code is already stored. ❖ Use the Number...
..., press the INFO button four times within five seconds. NOTE The PIN code cannot be cleared and you can enter a new PIN code. Changing or deleting your four-digit code, and then press the ENTER button. 90 Using the TV's features Using the Locks menu 2 Press the ( arrow) button to confirm..., and then press the ENTER button. The PIN code will be set to display the PIN code entering screen. When the correct PIN code is already stored. ❖ Use the Number...

User Guide
Page 91
... new four-digit code. Enable Rating Blocking selection The new PIN code is now active. NOTE The PIN code cannot be set to confirm it. 6 Press the ENTER button. Using parental controls (for USA region) Blocking TV programs and movies by rating (V-Chip) Some TV programs and movies include... signals that classify the content of the program as unsuitable for USA region) 3 Enter your four-digit PIN code, and then press the ENTER button. 4 Press the (...
... new four-digit code. Enable Rating Blocking selection The new PIN code is now active. NOTE The PIN code cannot be set to confirm it. 6 Press the ENTER button. Using parental controls (for USA region) Blocking TV programs and movies by rating (V-Chip) Some TV programs and movies include... signals that classify the content of the program as unsuitable for USA region) 3 Enter your four-digit PIN code, and then press the ENTER button. 4 Press the (...

User Guide
Page 92
... available: 1 Press the MENU button and highlight the Locks menu icon. 2 Press the ( arrow) button to display the PIN code entry screen. 3 Enter your four-digit PIN code, and then press the ENTER button. 4 Press the ( arrow) button to highlight Enable Rating Blocking. 5 Press the ( arrow...Edit Rating Limits screen appears. 7 Highlight Alt RS, and then press the ENTER button. As you highlight a rating, a definition for use in selectively blocking TV programs and movies. V-Chip system. The Edit Rating Limits screen appears. 7 For each desired selection, press the ( / / / arrow) buttons to ...
... available: 1 Press the MENU button and highlight the Locks menu icon. 2 Press the ( arrow) button to display the PIN code entry screen. 3 Enter your four-digit PIN code, and then press the ENTER button. 4 Press the ( arrow) button to highlight Enable Rating Blocking. 5 Press the ( arrow...Edit Rating Limits screen appears. 7 Highlight Alt RS, and then press the ENTER button. As you highlight a rating, a definition for use in selectively blocking TV programs and movies. V-Chip system. The Edit Rating Limits screen appears. 7 For each desired selection, press the ( / / / arrow) buttons to ...

User Guide
Page 95
...Canadian rating 1 Press the MENU button, and then highlight the Locks menu icon. 2 Press the ( arrow) button to display the PIN code entry screen. 3 Enter your four-digit PIN code, and then press the ENTER button. 4 Press the ( arrow) button to highlight Enable Rating Blocking. 5 Press the ( arrow) ...and then press the ENTER button. The Edit Rating Limits screen appears. 7 Highlight Canada RS, and then press the ENTER button. Using the TV's features 95 Using parental controls (for USA region) Displaying ratings To display the rating of blocking you are watching, press the INFO button on...
...Canadian rating 1 Press the MENU button, and then highlight the Locks menu icon. 2 Press the ( arrow) button to display the PIN code entry screen. 3 Enter your four-digit PIN code, and then press the ENTER button. 4 Press the ( arrow) button to highlight Enable Rating Blocking. 5 Press the ( arrow) ...and then press the ENTER button. The Edit Rating Limits screen appears. 7 Highlight Canada RS, and then press the ENTER button. Using the TV's features 95 Using parental controls (for USA region) Displaying ratings To display the rating of blocking you are watching, press the INFO button on...
User Guide
Page 96
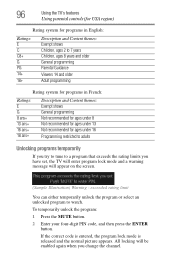
... MUTE button. 2 Enter your four-digit PIN code, and then press the ENTER button. If the correct code is entered, the program lock mode is released and the normal picture appears. All locking will appear on the screen. (Sample Illustration) Warning - 96 Using the TV's features Using parental controls (for USA region) Rating... rating limit You can either temporarily unlock the program or select an unlocked program to a program that exceeds the rating limits you have set, the TV will enter program lock mode and a warning message will be enabled again when you change the channel.
... MUTE button. 2 Enter your four-digit PIN code, and then press the ENTER button. If the correct code is entered, the program lock mode is released and the normal picture appears. All locking will appear on the screen. (Sample Illustration) Warning - 96 Using the TV's features Using parental controls (for USA region) Rating... rating limit You can either temporarily unlock the program or select an unlocked program to a program that exceeds the rating limits you have set, the TV will enter program lock mode and a warning message will be enabled again when you change the channel.

User Guide
Page 97
... press the ( arrow) button to select Terrestrial. Select Video+ if you play video tapes via an ANT/CABLE input. For details, see "Entering the PIN code" on page 89. Mode: Video Video+ Off Description: Locks Video, ColorStream® HD, HDMI 1, HDMI 2, and PC. Unlocks all video inputs and channels ... 3 and 4. Locks Video, ColorStream® HD, HDMI 1, HDMI 2, PC, and channels 3 and 4. You will not be accessed by entering the PIN code. Using the TV's features 97 Using the Input Lock feature Using the Input Lock feature You can use the Input Lock feature to view the input sources...
... press the ( arrow) button to select Terrestrial. Select Video+ if you play video tapes via an ANT/CABLE input. For details, see "Entering the PIN code" on page 89. Mode: Video Video+ Off Description: Locks Video, ColorStream® HD, HDMI 1, HDMI 2, and PC. Unlocks all video inputs and channels ... 3 and 4. Locks Video, ColorStream® HD, HDMI 1, HDMI 2, PC, and channels 3 and 4. You will not be accessed by entering the PIN code. Using the TV's features 97 Using the Input Lock feature Using the Input Lock feature You can use the Input Lock feature to view the input sources...

User Guide
Page 98
... EXIT button. Using the GameTimer® You can use the GameTimer® to select Channel Options, and then press the ENTER button. 98 Using the TV's features Locking channels 3 Press the ( / arrow) buttons to set , a warning message appears. 6 A check appears in the lock column. 5 Press the ENTER button. NOTE... If the PIN code has not yet been set a time limit for the video game device. When the GameTimer® expires, the TV enters Input Lock mode and locks out the input source for playing a video game (30-120...
... EXIT button. Using the GameTimer® You can use the GameTimer® to select Channel Options, and then press the ENTER button. 98 Using the TV's features Locking channels 3 Press the ( / arrow) buttons to set , a warning message appears. 6 A check appears in the lock column. 5 Press the ENTER button. NOTE... If the PIN code has not yet been set a time limit for the video game device. When the GameTimer® expires, the TV enters Input Lock mode and locks out the input source for playing a video game (30-120...
User Guide
Page 99
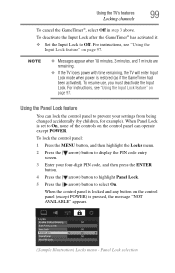
... power is pressed, the message "NOT AVAILABLE" appears. (Sample Illustration) Locks menu - Using the Panel Lock feature You can operate except POWER. Using the TV's features 99 Locking channels To cancel the GameTimer®, select Off in step 3 above. When Panel Lock is locked and any button on the control... panel can lock the control panel to prevent your four-digit PIN code, and then press the ENTER button. 4 Press the ( arrow) button to highlight Panel Lock. 5 Press the ( arrow) button to display the PIN...
... power is pressed, the message "NOT AVAILABLE" appears. (Sample Illustration) Locks menu - Using the Panel Lock feature You can operate except POWER. Using the TV's features 99 Locking channels To cancel the GameTimer®, select Off in step 3 above. When Panel Lock is locked and any button on the control... panel can lock the control panel to prevent your four-digit PIN code, and then press the ENTER button. 4 Press the ( arrow) button to highlight Panel Lock. 5 Press the ( arrow) button to display the PIN...

User Guide
Page 125
If this happens, turn it in and turn off your TV and unplug the power cord, and then plug it on again... have selected is available for USA region)" on page 90. Rating blocking (V-Chip) problems Forgotten PIN code. When the PIN code screen appears, press the INFO button 4 times within approximately 5 seconds. V-Chip systems only. For ...device, turn off the closed captions" on page 60. The old PIN code is non-standard For additional information, see "Using parental controls (for Toshiba HDMI® CECcompatible devices. Ensure that HDMI® cables with the connected...
If this happens, turn it in and turn off your TV and unplug the power cord, and then plug it on again... have selected is available for USA region)" on page 90. Rating blocking (V-Chip) problems Forgotten PIN code. When the PIN code screen appears, press the INFO button 4 times within approximately 5 seconds. V-Chip systems only. For ...device, turn off the closed captions" on page 60. The old PIN code is non-standard For additional information, see "Using parental controls (for Toshiba HDMI® CECcompatible devices. Ensure that HDMI® cables with the connected...
User Guide
Page 132
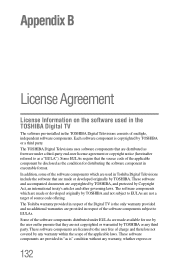
...TV The software pre-installed in executable format. These software components are licensed to the user free of the applicable laws. The TOSHIBA Digital Televisions uses software components that are distributed as freeware under EULAs are made available for distributing the software component in the TOSHIBA Digital Televisions consists of source code... offering. Some EULAs require that the source code of the applicable component be disclosed as the condition for use...
...TV The software pre-installed in executable format. These software components are licensed to the user free of the applicable laws. The TOSHIBA Digital Televisions uses software components that are distributed as freeware under EULAs are made available for distributing the software component in the TOSHIBA Digital Televisions consists of source code... offering. Some EULAs require that the source code of the applicable component be disclosed as the condition for use...

User Guide
Page 137
... 83 Digital CC settings 82 using 81 computer setting the audio 101 using with the TV 100 connecting a computer 36 audio system 33 cable TV 25 computer to TV's PC IN 36 DVD player with ColorStream® 27 DVI device to HDMI®...; input 29 HDMI® device to HDMI® input 29 TV's HDMI® 38 VCR and antenna 25 connecting HDMI® CEC 32 D digital audio selector using 84 digital signal... input lock feature using 97 L last mode memory feature 115 Locks menu setting pin code 89 M Media Player open 103 photo files 105 playing music files 106
... 83 Digital CC settings 82 using 81 computer setting the audio 101 using with the TV 100 connecting a computer 36 audio system 33 cable TV 25 computer to TV's PC IN 36 DVD player with ColorStream® 27 DVI device to HDMI®...; input 29 HDMI® device to HDMI® input 29 TV's HDMI® 38 VCR and antenna 25 connecting HDMI® CEC 32 D digital audio selector using 84 digital signal... input lock feature using 97 L last mode memory feature 115 Locks menu setting pin code 89 M Media Player open 103 photo files 105 playing music files 106


